User Guide
Page 2
...: Camcorder Model number: CAMILEO® CLIP FCC notice "Declaration of Conformity Information" This equipment has been tested and found to comply with the instructions, may cause harmful interference to operate the equipment. These limits are designed to part 15 of the FCC rules. However, there is connected. ❖ Consult the dealer or an experienced radio/TV technician for a Class B digital device...
...: Camcorder Model number: CAMILEO® CLIP FCC notice "Declaration of Conformity Information" This equipment has been tested and found to comply with the instructions, may cause harmful interference to operate the equipment. These limits are designed to part 15 of the FCC rules. However, there is connected. ❖ Consult the dealer or an experienced radio/TV technician for a Class B digital device...

User Guide
Page 5
...Mac is a trademark of Apple Inc., registered in the U.S. Picasa is a trademark of Google Inc. Secure Digital and SD are either registered trademarks or trademarks of Toshiba America Information Systems, Inc. Microsoft, Windows, and Windows Vista are trademarks of Google, Inc. and other charger... SD Card Association. Trademarks CAMILEO is ...Charge the battery in the United States and/or other countries. Never attempt to charge the camcorder with the instructions. ❖ Only use the supplied USB cable or an optional Toshiba charger to charge the camcorder. and/or Toshiba...
...Mac is a trademark of Apple Inc., registered in the U.S. Picasa is a trademark of Google Inc. Secure Digital and SD are either registered trademarks or trademarks of Toshiba America Information Systems, Inc. Microsoft, Windows, and Windows Vista are trademarks of Google, Inc. and other charger... SD Card Association. Trademarks CAMILEO is ...Charge the battery in the United States and/or other countries. Never attempt to charge the camcorder with the instructions. ❖ Only use the supplied USB cable or an optional Toshiba charger to charge the camcorder. and/or Toshiba...

User Guide
Page 7
.../Record Mode 22 Button Functions 22 LCD screen information 23 Video recording 25 Taking photos 26 Using Anti-Glare Function 26 Using Digital Zoom 26 Options for Menu 27 Video Mode Menu 27 Photo Mode Menu 28 Video setup 29 Resolution 29 Stabilization 30 Motion detection 30 Face tracking 31 Slow motion 31 Pre-record 32 Time lapse 32 Continuous play 33 Photo setup 34 Resolution 34 Self-timer 35 Smile detection 35 Date printing 36 ISO 36 Slide show 37 Settings 38 Sound...
.../Record Mode 22 Button Functions 22 LCD screen information 23 Video recording 25 Taking photos 26 Using Anti-Glare Function 26 Using Digital Zoom 26 Options for Menu 27 Video Mode Menu 27 Photo Mode Menu 28 Video setup 29 Resolution 29 Stabilization 30 Motion detection 30 Face tracking 31 Slow motion 31 Pre-record 32 Time lapse 32 Continuous play 33 Photo setup 34 Resolution 34 Self-timer 35 Smile detection 35 Date printing 36 ISO 36 Slide show 37 Settings 38 Sound...

User Guide
Page 8
... Audio Playback 47 Delete Audio File 47 Chapter 5: Playback Mode 48 Button functions 48 LCD screen information 49 Operations for Playback mode 50 Video Playback 51 Video Trim 51 Photo Playback 53 Delete File in Playback Mode 53 Chapter 6: Viewing Files on the computer 54 Installing bundled software 54 Transferring files to a computer 55 Chapter 7: Uploading Files to the Internet 56 CAMILEO® Uploader 56 Set up account information for the web site ...........59 Chapter 8: Webcam Mode 60 Chapter 9: Troubleshooting 61 Chapter 10: Other Information 62 Toshiba Support...
... Audio Playback 47 Delete Audio File 47 Chapter 5: Playback Mode 48 Button functions 48 LCD screen information 49 Operations for Playback mode 50 Video Playback 51 Video Trim 51 Photo Playback 53 Delete File in Playback Mode 53 Chapter 6: Viewing Files on the computer 54 Installing bundled software 54 Transferring files to a computer 55 Chapter 7: Uploading Files to the Internet 56 CAMILEO® Uploader 56 Set up account information for the web site ...........59 Chapter 8: Webcam Mode 60 Chapter 9: Troubleshooting 61 Chapter 10: Other Information 62 Toshiba Support...
User Guide
Page 9
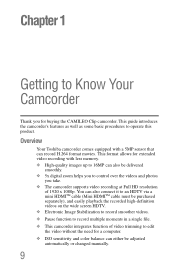
... camcorder supports video recording at Full HD resolution of video trimming to operate this product. This format allows for extended video recording with a 5MP sensor that can also connect it to an HDTV via a mini HDMITM cable (Mini HDMITM cable must be adjusted automatically or changed manually. 9 Chapter 1 Getting to control over the videos and photos you for a computer. ❖ ISO sensitivity and color balance can either be purchased separately), and easily playback...
... camcorder supports video recording at Full HD resolution of video trimming to operate this product. This format allows for extended video recording with a 5MP sensor that can also connect it to an HDTV via a mini HDMITM cable (Mini HDMITM cable must be adjusted automatically or changed manually. 9 Chapter 1 Getting to control over the videos and photos you for a computer. ❖ ISO sensitivity and color balance can either be purchased separately), and easily playback...

User Guide
Page 10
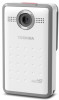
... exclusive built-in CAMILEO UPLOADER application, you to take limited photos and to record WAV audio files. ❖ The built-in memory is used for viewing the videos correctly on a computer. Check the components Unpack the package and make sure all standard accessories listed are included: Camcorder USB Cable Strap Cleaning Cloth CD-ROM Software, User's Guide (this document), and Warranty information (Sample Illustration) Components Quick Start Guide 10 Getting to...
... exclusive built-in CAMILEO UPLOADER application, you to take limited photos and to record WAV audio files. ❖ The built-in memory is used for viewing the videos correctly on a computer. Check the components Unpack the package and make sure all standard accessories listed are included: Camcorder USB Cable Strap Cleaning Cloth CD-ROM Software, User's Guide (this document), and Warranty information (Sample Illustration) Components Quick Start Guide 10 Getting to...

User Guide
Page 13
Rear view Getting to toggle Video Mode or Photo Mode Menu ON. Exit Menu / Playback Mode. Press to Know Your Camcorder 13 Overview Record button LCD screen Clip Menu button Power button Up button Left button Camera mode button Record/OK button Down button Right button (Sample Illustration) Rear view QUICK TOUR Power button Camera mode button Menu button Press the Power button for one second. If no operation is made in three minutes, the camcorder will turn itself off automatically to conserve battery power.
Rear view Getting to toggle Video Mode or Photo Mode Menu ON. Exit Menu / Playback Mode. Press to Know Your Camcorder 13 Overview Record button LCD screen Clip Menu button Power button Up button Left button Camera mode button Record/OK button Down button Right button (Sample Illustration) Rear view QUICK TOUR Power button Camera mode button Menu button Press the Power button for one second. If no operation is made in three minutes, the camcorder will turn itself off automatically to conserve battery power.

User Guide
Page 18
... the face(s) automatically. Press the Record/OK ( ) button to the video mode menu. Disable motion stabilization. ON Face tracking OFF The camcorder can check the recorded video files. The information screen will be longer than the actual recording time. When the video is played, the playback time will display for smooth and stable video. VIDEO GALLERY Go to toggle between the two modes. You can delete or edit the recorded video file, VIDEO SETUP Full HD 1080/30 1920...
... the face(s) automatically. Press the Record/OK ( ) button to the video mode menu. Disable motion stabilization. ON Face tracking OFF The camcorder can check the recorded video files. The information screen will be longer than the actual recording time. When the video is played, the playback time will display for smooth and stable video. VIDEO GALLERY Go to toggle between the two modes. You can delete or edit the recorded video file, VIDEO SETUP Full HD 1080/30 1920...

User Guide
Page 19
.... Playback the video files continuously. Disable continuous play ON OFF OFF 1 second 3 seconds 5 seconds ON OFF Enable pre-recording. YES Format NO Format memory/ card. EFFECTS AUTO Automatic adjustment. BACKLIGHT Select when bright light is NTSC standard. Disable operation sound. Languages English, Czech, Danish, Dutch, Finnish, French, German, Greek, Italian, Norwegian, Polish, Portuguese, Russian, Swedish, Spanish, and Turkish. Do not format memory/ card. Do not restore default factory settings. Disable pre-recording. TV output setting is behind subject. Time Set...
.... Playback the video files continuously. Disable continuous play ON OFF OFF 1 second 3 seconds 5 seconds ON OFF Enable pre-recording. YES Format NO Format memory/ card. EFFECTS AUTO Automatic adjustment. BACKLIGHT Select when bright light is NTSC standard. Disable operation sound. Languages English, Czech, Danish, Dutch, Finnish, French, German, Greek, Italian, Norwegian, Polish, Portuguese, Russian, Swedish, Spanish, and Turkish. Do not format memory/ card. Do not restore default factory settings. Disable pre-recording. TV output setting is behind subject. Time Set...

User Guide
Page 20
... Menu options Filter White balance AUTO BLACK & WHITE CLASSIC NEGATIVE AUTO DAYLIGHT FLUORESCENT TUNGSTEN Shoot without any special effect on the photo. Use under tungsten light condition. Press the Record/OK ( ) button to black and white. You can capture image automatically when detecting a smile in photo mode. Disable date printing. The image is converted to enter the playback full screen mode. The image is converted as the negative of its images automatically. The information screen will display for lower light settings...
... Menu options Filter White balance AUTO BLACK & WHITE CLASSIC NEGATIVE AUTO DAYLIGHT FLUORESCENT TUNGSTEN Shoot without any special effect on the photo. Use under tungsten light condition. Press the Record/OK ( ) button to black and white. You can capture image automatically when detecting a smile in photo mode. Disable date printing. The image is converted to enter the playback full screen mode. The image is converted as the negative of its images automatically. The information screen will display for lower light settings...
User Guide
Page 24
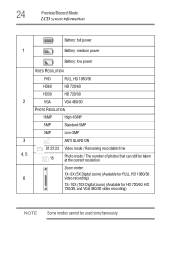
24 Preview/Record Mode LCD screen information Battery: full power 1 Battery: medium power Battery: low power VIDEO RESOLUTION FHD FULL HD 1080/30 HD60 HD 720/60 HD30 HD 720/30 2 VGA VGA 480/30 PHOTO RESOLUTION 16MP High-16MP 5MP Standard-5MP 3MP Low-3MP 3 ANTI GLARE ON 01:22:23 Video mode / Remaining recordable time 4, 5 15 Photo mode / The number of photos that can still be taken at the...
24 Preview/Record Mode LCD screen information Battery: full power 1 Battery: medium power Battery: low power VIDEO RESOLUTION FHD FULL HD 1080/30 HD60 HD 720/60 HD30 HD 720/30 2 VGA VGA 480/30 PHOTO RESOLUTION 16MP High-16MP 5MP Standard-5MP 3MP Low-3MP 3 ANTI GLARE ON 01:22:23 Video mode / Remaining recordable time 4, 5 15 Photo mode / The number of photos that can still be taken at the...

User Guide
Page 27
VIDEO GALLERY VIDEO SETUP SETTINGS VOICE RECORDING EFFECTS (Video files carousel) • RESOLUTION • STABILIZATION • MOTION DETECTION • FACE TRACKING • SLOW MOTION • PRE-RECORD • TIME LAPSE • CONTINUOUS PLAY • SOUND • TV FORMAT • LANGUAGES • DATE & TIME • FORMAT • RESTORE DEFAULT • START RECORDING • AUDIO GALLERY • SCENE • FILTER • WHITE BALANCE ❖ Please refer to Chapter 4 for the detailed information about VIDEO GALLERY. Preview/Record Mode 27...
VIDEO GALLERY VIDEO SETUP SETTINGS VOICE RECORDING EFFECTS (Video files carousel) • RESOLUTION • STABILIZATION • MOTION DETECTION • FACE TRACKING • SLOW MOTION • PRE-RECORD • TIME LAPSE • CONTINUOUS PLAY • SOUND • TV FORMAT • LANGUAGES • DATE & TIME • FORMAT • RESTORE DEFAULT • START RECORDING • AUDIO GALLERY • SCENE • FILTER • WHITE BALANCE ❖ Please refer to Chapter 4 for the detailed information about VIDEO GALLERY. Preview/Record Mode 27...
User Guide
Page 29
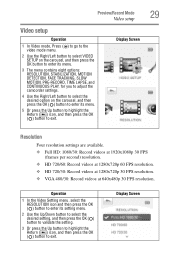
... the OK ( ) button to exit. Display Screen Preview/Record Mode Video setup Video setup Operation 1 In Video mode, Press ( ) to go to the video mode menu. 2 Use the Right/Left button to select VIDEO SETUP on the carousel, and then press the OK button to enter its menu. 3 The menu contains eight options: RESOLUTION, STABILIZATION, MOTION DETECTION, FACE TRACKING, SLOW MOTION, PRE-RECORD, TIME LAPSE, and CONTINUOUS PLAY, for you to adjust the camcorder settings. 4 Use the Right/Left button to select the...
... the OK ( ) button to exit. Display Screen Preview/Record Mode Video setup Video setup Operation 1 In Video mode, Press ( ) to go to the video mode menu. 2 Use the Right/Left button to select VIDEO SETUP on the carousel, and then press the OK button to enter its menu. 3 The menu contains eight options: RESOLUTION, STABILIZATION, MOTION DETECTION, FACE TRACKING, SLOW MOTION, PRE-RECORD, TIME LAPSE, and CONTINUOUS PLAY, for you to adjust the camcorder settings. 4 Use the Right/Left button to select the...

User Guide
Page 31
...; When Slow Motion is On, the video resolution is played, the playback time will appear around the face. Display Screen 4 In Record mode, aim the camcorder at the face(s). Some occasions you can detect human face(s) and focus on the face(s) automatically (up to six faces). Operation 1 In the Video Setting menu, select the FACE TRACKING icon and then press the OK ( ) button to enter its setting menu. 2 Use the...
...; When Slow Motion is On, the video resolution is played, the playback time will appear around the face. Display Screen 4 In Record mode, aim the camcorder at the face(s). Some occasions you can detect human face(s) and focus on the face(s) automatically (up to six faces). Operation 1 In the Video Setting menu, select the FACE TRACKING icon and then press the OK ( ) button to enter its setting menu. 2 Use the...

User Guide
Page 32
32 Preview/Record Mode Video setup Pre-record The Pre-record function ensures that you can set up any critical recording opportunities. Time lapse Record still images at the subject and position it will not miss any other setting. This effect is activated, it securely before the Record button is pressed. Operation 1 In the Video Setting menu, select the Prerecord icon and then press the OK ( ) button to enter its setting menu. 2 Use the...
32 Preview/Record Mode Video setup Pre-record The Pre-record function ensures that you can set up any critical recording opportunities. Time lapse Record still images at the subject and position it will not miss any other setting. This effect is activated, it securely before the Record button is pressed. Operation 1 In the Video Setting menu, select the Prerecord icon and then press the OK ( ) button to enter its setting menu. 2 Use the...

User Guide
Page 38
..., and then press the OK ( ) button to exit. 38 Preview/Record Mode Settings Settings Operation 1 Press the Menu ( ) button to go to the video/photo mode menu. 2 Use the Right/Left button to select SETTINGS on the carousel, and then press the OK ( ) button to enter its menu. 3 The SETTINGS menu contains six options for configuring your camcorder setup: SOUND (operation sound), TV FORMAT, LANGUAGES, DATE & TIME, FORMAT, and RESTORE DEFAULT. 4 Use the Right/Left button to select the desired option...
..., and then press the OK ( ) button to exit. 38 Preview/Record Mode Settings Settings Operation 1 Press the Menu ( ) button to go to the video/photo mode menu. 2 Use the Right/Left button to select SETTINGS on the carousel, and then press the OK ( ) button to enter its menu. 3 The SETTINGS menu contains six options for configuring your camcorder setup: SOUND (operation sound), TV FORMAT, LANGUAGES, DATE & TIME, FORMAT, and RESTORE DEFAULT. 4 Use the Right/Left button to select the desired option...

User Guide
Page 47
Display Screen Delete Audio File Operation 1 Press the Up button to go to the information screen. 2 Press the Down button to highlight the Delete icon ( ) to go to the audio thumbnail. 2 Use the Right/Left button to select the audio file you want to play, and then press the OK ( ) button to playback it . Select No to decrease volume. Display Screen Voice Recording 47 Voice recording Audio Playback You can check/delete the recorded audio files through AUDIO GALLERY. Operation 1 In voice recording menu, use the...
Display Screen Delete Audio File Operation 1 Press the Up button to go to the information screen. 2 Press the Down button to highlight the Delete icon ( ) to go to the audio thumbnail. 2 Use the Right/Left button to select the audio file you want to play, and then press the OK ( ) button to playback it . Select No to decrease volume. Display Screen Voice Recording 47 Voice recording Audio Playback You can check/delete the recorded audio files through AUDIO GALLERY. Operation 1 In voice recording menu, use the...

User Guide
Page 48
Menu button: 1 Menu ON. 2 Exit menu/playback mode. Left button: 1 Go to toggle Video mode or Photo mode. Camera mode button: 1 Press to the previous video/photo/audio. Down button: 1 When playing video, press to the next video/photo/audio. Right button: 1 Go to decrease volume. Power button: 1 Press down for one second to play/pause the video/audio. Chapter 5 Playback Mode Button functions The buttons have the following functions in Playback Mode. Record/OK button: 1 Press to turn on or turn off the camcorder. 48 Up button: 1 In Playback Mode, go to the information screen...
Menu button: 1 Menu ON. 2 Exit menu/playback mode. Left button: 1 Go to toggle Video mode or Photo mode. Camera mode button: 1 Press to the previous video/photo/audio. Down button: 1 When playing video, press to the next video/photo/audio. Right button: 1 Go to decrease volume. Power button: 1 Press down for one second to play/pause the video/audio. Chapter 5 Playback Mode Button functions The buttons have the following functions in Playback Mode. Record/OK button: 1 Press to turn on or turn off the camcorder. 48 Up button: 1 In Playback Mode, go to the information screen...

User Guide
Page 55
... videos, photos, and audio files. Transferring files to a computer You can view, delete, move, and copy your camera to friends or post them in the online help of all the bundled software. Viewing Files on the computer 55 Transferring files to a computer NOTE Detailed information can be found on your computer at My Computer\DV\DCIM\100MEDIA 5 Under this you should: 1 Connect the computer and camera with the supplied mini USB 2.0 cable...
... videos, photos, and audio files. Transferring files to a computer You can view, delete, move, and copy your camera to friends or post them in the online help of all the bundled software. Viewing Files on the computer 55 Transferring files to a computer NOTE Detailed information can be found on your computer at My Computer\DV\DCIM\100MEDIA 5 Under this you should: 1 Connect the computer and camera with the supplied mini USB 2.0 cable...

User Guide
Page 63
... recent software and hardware options for your CAMILEO® product and for other product information, be sure to stay current on the enclosed CD, and can be viewed online at (949) 583-3305 Warranty Online Warranty Information This product is covered by a One (1) Year Standard Limited Warranty. Toshiba voice contact For technical support, call the Toshiba Customer Support Center...
... recent software and hardware options for your CAMILEO® product and for other product information, be sure to stay current on the enclosed CD, and can be viewed online at (949) 583-3305 Warranty Online Warranty Information This product is covered by a One (1) Year Standard Limited Warranty. Toshiba voice contact For technical support, call the Toshiba Customer Support Center...


