User Guide
Page 4
... remote control supplied with any other charger. If the battery compartment cannot be shortened. ❖ Never install or remove the battery without first turning off the power and disconnecting the AC adaptor. ❖ Only use of properly. If swallowed, the button cell battery can explode if not replaced, used , handled or disposed of the remote control and contact the manufacturer. 4 About the battery ❖ Use only batteries recommended by TOSHIBA...
... remote control supplied with any other charger. If the battery compartment cannot be shortened. ❖ Never install or remove the battery without first turning off the power and disconnecting the AC adaptor. ❖ Only use of properly. If swallowed, the button cell battery can explode if not replaced, used , handled or disposed of the remote control and contact the manufacturer. 4 About the battery ❖ Use only batteries recommended by TOSHIBA...
User Guide
Page 8
...26 Video recording 27 Photo recording 28 Using Digital Light or Light function 28 Using the Zoom function 28 Menu options/operations 29 Video Setting options 30 Photo Setting options 36 Effects 40 Deleting files 43 Chapter 4: Playback Mode 46 Button functions 46 LCD touch screen information 47 Notification icons 47 Touch function icons 48 Playback mode operations 49 Video Playback 50 Photo Playback 50 Delete a file in Playback mode 50 Video Trim 51 Chapter 5: Camcorder Settings 52 Setup Menu 52 Menu Sound 52 TV 53 Language 53 Time Settings 54 Format 54 Default Setting...
...26 Video recording 27 Photo recording 28 Using Digital Light or Light function 28 Using the Zoom function 28 Menu options/operations 29 Video Setting options 30 Photo Setting options 36 Effects 40 Deleting files 43 Chapter 4: Playback Mode 46 Button functions 46 LCD touch screen information 47 Notification icons 47 Touch function icons 48 Playback mode operations 49 Video Playback 50 Photo Playback 50 Delete a file in Playback mode 50 Video Trim 51 Chapter 5: Camcorder Settings 52 Setup Menu 52 Menu Sound 52 TV 53 Language 53 Time Settings 54 Format 54 Default Setting...
User Guide
Page 10
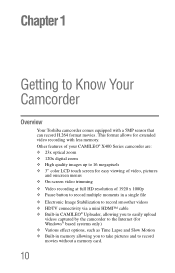
... Time Lapse and Slow Motion ❖ Built-in CAMILEO® Uploader, allowing you to easily upload videos captured by the camcorder to the Internet (for extended video recording with a 5MP sensor that can record H.264 format movies. Other features of your CAMILEO® X400 Series camcorder are: ❖ 23x optical zoom ❖ 120x digital zoom ❖ High quality images up to 16 megapixels ❖ 3" color LCD touch screen for easy viewing of video, pictures...
... Time Lapse and Slow Motion ❖ Built-in CAMILEO® Uploader, allowing you to easily upload videos captured by the camcorder to the Internet (for extended video recording with a 5MP sensor that can record H.264 format movies. Other features of your CAMILEO® X400 Series camcorder are: ❖ 23x optical zoom ❖ 120x digital zoom ❖ High quality images up to 16 megapixels ❖ 3" color LCD touch screen for easy viewing of video, pictures...
User Guide
Page 11
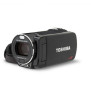
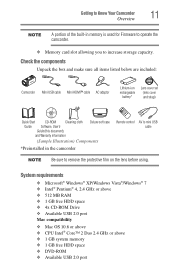
... storage capacity. Check the components Unpack the box and make sure all items listed below are included: Camcorder Mini USB cable Mini HDMI™ cable AC adaptor Lithium-ion rechargeable battery* Lens cover set (lens cover and strap) Quick Start CD-ROM Cleaning cloth Guide Software, User's Guide (this document), and Warranty information Deluxe soft case (Sample Illustration) Components *Preinstalled in memory is used for Firmware to operate the camcorder. ❖ Memory card slot allowing...
... storage capacity. Check the components Unpack the box and make sure all items listed below are included: Camcorder Mini USB cable Mini HDMI™ cable AC adaptor Lithium-ion rechargeable battery* Lens cover set (lens cover and strap) Quick Start CD-ROM Cleaning cloth Guide Software, User's Guide (this document), and Warranty information Deluxe soft case (Sample Illustration) Components *Preinstalled in memory is used for Firmware to operate the camcorder. ❖ Memory card slot allowing...
User Guide
Page 16
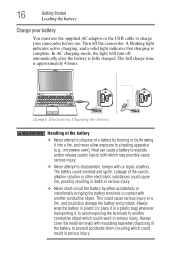
... allow exposure to charge your battery You must use the supplied AC adaptor or the USB cable to a heating apparatus (e.g., microwave oven). A blinking light indicates active charging, and a solid light indicates that charging is fully charged. 16 Getting Started Loading the battery Charge your camcorder before use. This could cause...short-circuit the battery by throwing it , to avoid exposing the terminals to explode and/or release caustic liquid, both which could result in serious injury. In AC charging mode, the light will turn off the camcorder. Turn off automatically after...
... allow exposure to charge your battery You must use the supplied AC adaptor or the USB cable to a heating apparatus (e.g., microwave oven). A blinking light indicates active charging, and a solid light indicates that charging is fully charged. 16 Getting Started Loading the battery Charge your camcorder before use. This could cause...short-circuit the battery by throwing it , to avoid exposing the terminals to explode and/or release caustic liquid, both which could result in serious injury. In AC charging mode, the light will turn off the camcorder. Turn off automatically after...
User Guide
Page 18
...10070; Always immediately turn on the product's power again until an authorized Toshiba service provider has checked it off and disconnect the power cable/cord plug from the plug socket and stop using the battery if you might have...help prevent the electrolyte fluid from contacting your body, immediately wash it for the product to cool down before removing the battery, in order to avoid any part of data. 18 Getting Started Loading the battery Battery safety ❖ Never allow caustic electrolyte fluid leaked from the battery to heat exposure. Continued use , such as abnormal sound...
...10070; Always immediately turn on the product's power again until an authorized Toshiba service provider has checked it off and disconnect the power cable/cord plug from the plug socket and stop using the battery if you might have...help prevent the electrolyte fluid from contacting your body, immediately wash it for the product to cool down before removing the battery, in order to avoid any part of data. 18 Getting Started Loading the battery Battery safety ❖ Never allow caustic electrolyte fluid leaked from the battery to heat exposure. Continued use , such as abnormal sound...
User Guide
Page 22
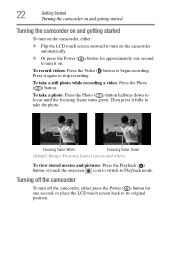
... photo. Focusing frame: White Focusing frame: Green (Sample Image) Focusing frames (green and white) To view stored movies and pictures: Press the Playback ( ) button or touch the onscreen icon to switch to take a still photo while recording a video: Press the Photo ( ) button. To record videos: Press the Video ( ) button to begin recording. 22 Getting Started Turning the camcorder on and getting started Turning the camcorder on and getting started To turn on the camcorder, either: ❖ Flip the LCD touch screen...
... photo. Focusing frame: White Focusing frame: Green (Sample Image) Focusing frames (green and white) To view stored movies and pictures: Press the Playback ( ) button or touch the onscreen icon to switch to take a still photo while recording a video: Press the Photo ( ) button. To record videos: Press the Video ( ) button to begin recording. 22 Getting Started Turning the camcorder on and getting started Turning the camcorder on and getting started To turn on the camcorder, either: ❖ Flip the LCD touch screen...
User Guide
Page 23
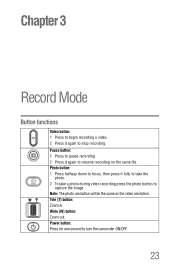
Chapter 3 Record Mode Button functions Video button: 1 Press to begin recording a video. 2 Press it again to turn the camcorder ON/OFF. 23 Tele (T) button: Zoom in. Power button: Press for one second to stop recording. Pause button: 1 Press to pause recording. 2 Press it fully to take the photo. 2 To take a photo during video recording press the photo button to resume recording on the same file. Wide (W) button: Zoom out. Note: The photo resolution will be the same as the video resolution. Photo button: 1 Press halfway down to focus, then press it again to capture the image.
Chapter 3 Record Mode Button functions Video button: 1 Press to begin recording a video. 2 Press it again to turn the camcorder ON/OFF. 23 Tele (T) button: Zoom in. Power button: Press for one second to stop recording. Pause button: 1 Press to pause recording. 2 Press it fully to take the photo. 2 To take a photo during video recording press the photo button to resume recording on the same file. Wide (W) button: Zoom out. Note: The photo resolution will be the same as the video resolution. Photo button: 1 Press halfway down to focus, then press it again to capture the image.
User Guide
Page 24
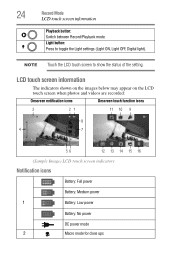
... photos and videos are recorded: Onscreen notification icons Onscreen touch function icons 3 21 11 10 9 8 4 7 56 12 13 14 15 16 (Sample Image) LCD touch screen indicators Notification icons Battery: Full power Battery: Medium power 1 Battery: Low power Battery: No power DC power mode 2 Macro mode for close ups Light button: Press to show the status of the setting. NOTE Touch the LCD touch screen to toggle the Light settings (Light ON, Light OFF, Digital light). 24 Record Mode LCD touch screen information Playback button: Switch...
... photos and videos are recorded: Onscreen notification icons Onscreen touch function icons 3 21 11 10 9 8 4 7 56 12 13 14 15 16 (Sample Image) LCD touch screen indicators Notification icons Battery: Full power Battery: Medium power 1 Battery: Low power Battery: No power DC power mode 2 Macro mode for close ups Light button: Press to show the status of the setting. NOTE Touch the LCD touch screen to toggle the Light settings (Light ON, Light OFF, Digital light). 24 Record Mode LCD touch screen information Playback button: Switch...
User Guide
Page 25
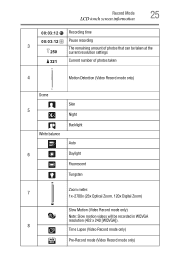
... screen information 00:03:12 Recording time 00:03:12 Pause recording 3 The remaining amount of photos that can be taken at the 250 current resolution settings 321 Current number of photos taken 4 Motion Detection (Video Record mode only) Scene 5 Skin Night White balance Backlight Auto 6 Daylight Fluorescent Tungsten Zoom meter: 7 1x~2700x (23x Optical Zoom, 120x Digital Zoom) Slow Motion (Video Record mode only) Note: Slow motion videos will be recorded in WQVGA resolution (432 x 240 [WQVGA]). 8 Time Lapse (Video Record mode...
... screen information 00:03:12 Recording time 00:03:12 Pause recording 3 The remaining amount of photos that can be taken at the 250 current resolution settings 321 Current number of photos taken 4 Motion Detection (Video Record mode only) Scene 5 Skin Night White balance Backlight Auto 6 Daylight Fluorescent Tungsten Zoom meter: 7 1x~2700x (23x Optical Zoom, 120x Digital Zoom) Slow Motion (Video Record mode only) Note: Slow motion videos will be recorded in WQVGA resolution (432 x 240 [WQVGA]). 8 Time Lapse (Video Record mode...
User Guide
Page 27
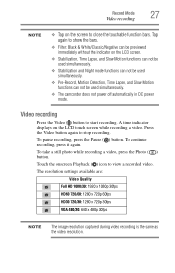
... Slow Motion functions can be used simultaneously. ❖ The camcorder does not power off automatically in DC power mode. To pause recording, press the Pause ( ) button. To continue recording, press it again. Tap again to show the bars. ❖ Filter: Black & White/Classic/Negative can not be previewed immediately without the indicator on the screen to view a recorded video. Video recording Press the Video ( ) button to stop recording. A time indicator displays on the LCD touch screen while recording a video. Press the Video button...
... Slow Motion functions can be used simultaneously. ❖ The camcorder does not power off automatically in DC power mode. To pause recording, press the Pause ( ) button. To continue recording, press it again. Tap again to show the bars. ❖ Filter: Black & White/Classic/Negative can not be previewed immediately without the indicator on the screen to view a recorded video. Video recording Press the Video ( ) button to stop recording. A time indicator displays on the LCD touch screen while recording a video. Press the Video button...
User Guide
Page 28
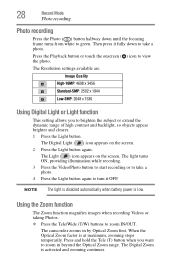
... Standard-5MP: 2592 x 1944 Low-3MP: 2048 x 1536 Using Digital Light or Light function This setting allows you want to zoom in by Optical Zoom first. The Digital Zoom is at maximum, zooming stops temporarily. The Digital Light ( ) icon appears on the screen. Then press it OFF. NOTE The light is disabled automatically when battery power is low. 28 Record Mode Photo recording Photo recording Press the Photo ( ) button halfway down to green. Press and hold the...
... Standard-5MP: 2592 x 1944 Low-3MP: 2048 x 1536 Using Digital Light or Light function This setting allows you want to zoom in by Optical Zoom first. The Digital Zoom is at maximum, zooming stops temporarily. The Digital Light ( ) icon appears on the screen. Then press it OFF. NOTE The light is disabled automatically when battery power is low. 28 Record Mode Photo recording Photo recording Press the Photo ( ) button halfway down to green. Press and hold the...
User Guide
Page 30
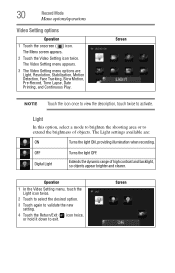
OFF Digital Light Turns the light OFF. The Light settings available are : Light, Resolution, Stabilization, Motion Detection, Face Tracking, Slow Motion, Pre-Record, Time Lapse, Date Printing, and Continuous Play. 30 Record Mode Menu options/operations Video Setting options Operation 1 Touch the onscreen ( ) icon. The Video Setting menu appears. 3 The Video Setting menu options are : ON Turns the light ON, providing illumination when recording. Light In this option, select a mode to brighten the shooting area or to extend the brightness of high contrast and...
OFF Digital Light Turns the light OFF. The Light settings available are : Light, Resolution, Stabilization, Motion Detection, Face Tracking, Slow Motion, Pre-Record, Time Lapse, Date Printing, and Continuous Play. 30 Record Mode Menu options/operations Video Setting options Operation 1 Touch the onscreen ( ) icon. The Video Setting menu appears. 3 The Video Setting menu options are : ON Turns the light ON, providing illumination when recording. Light In this option, select a mode to brighten the shooting area or to extend the brightness of high contrast and...
User Guide
Page 33
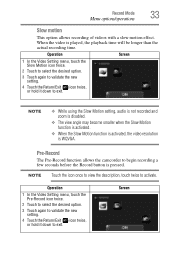
NOTE ❖ While using the Slow Motion setting, audio is not recorded and zoom is disabled. ❖ The view angle may become smaller when the Slow Motion function is activated. ❖ When the Slow Motion function is activated, the video resolution is pressed. NOTE Touch the icon once to view the description, touch twice to exit. Pre-Record The Pre-Record function allows the camcorder to exit. Operation 1 In the Video Setting menu, touch the Pre...
NOTE ❖ While using the Slow Motion setting, audio is not recorded and zoom is disabled. ❖ The view angle may become smaller when the Slow Motion function is activated. ❖ When the Slow Motion function is activated, the video resolution is pressed. NOTE Touch the icon once to view the description, touch twice to exit. Pre-Record The Pre-Record function allows the camcorder to exit. Operation 1 In the Video Setting menu, touch the Pre...

User Guide
Page 39
Four manual ISO sensitivity settings are : 2 seconds Displays one photo every two seconds. 5 seconds Displays one photo every five seconds. 10 seconds Displays one after another in a slideshow in a poorly lit location, or for a subject moving at a high rate of speed. Record Mode 39 Menu options/operations ISO The camcorder automatically adjusts the ISO setting of time. Use the higher setting to exit. Auto Sets the ISO setting automatically according to conditions...
Four manual ISO sensitivity settings are : 2 seconds Displays one photo every two seconds. 5 seconds Displays one photo every five seconds. 10 seconds Displays one after another in a slideshow in a poorly lit location, or for a subject moving at a high rate of speed. Record Mode 39 Menu options/operations ISO The camcorder automatically adjusts the ISO setting of time. Use the higher setting to exit. Auto Sets the ISO setting automatically according to conditions...
User Guide
Page 47
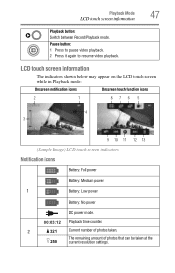
... Record/Playback mode. LCD touch screen information The indicators shown below may appear on the LCD touch screen while in Playback mode: Onscreen notification icons Onscreen touch function icons 2 1 876 5 4 3 9 10 11 12 13 (Sample Image) LCD touch screen indicators Notification icons Battery: Full power Battery: Medium power 1 Battery: Low power Battery: No power DC power mode. 00:03:12 Playback time counter. 2 321 Current number of photos that can be taken at the 250 current resolution settings. Pause button...
... Record/Playback mode. LCD touch screen information The indicators shown below may appear on the LCD touch screen while in Playback mode: Onscreen notification icons Onscreen touch function icons 2 1 876 5 4 3 9 10 11 12 13 (Sample Image) LCD touch screen indicators Notification icons Battery: Full power Battery: Medium power 1 Battery: Low power Battery: No power DC power mode. 00:03:12 Playback time counter. 2 321 Current number of photos that can be taken at the 250 current resolution settings. Pause button...
User Guide
Page 52
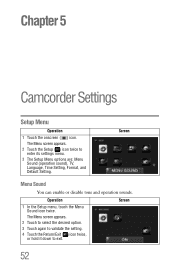
.... 2 Touch to select the desired option. 3 Touch again to validate the setting. 4 Touch the Return/Exit ( ) icon twice, or hold it down to enter its settings menu. 3 The Setup Menu options are: Menu Sound (operation sound), TV, Language, Time Setting, Format, and Default Setting. Screen 52 Chapter 5 Camcorder Settings Setup Menu Operation 1 Touch the onscreen ( ) icon. The Menu screen appears. 2 Touch the Setup ( ) icon twice to exit. Screen Menu Sound You can enable or disable tone and operation sounds.
.... 2 Touch to select the desired option. 3 Touch again to validate the setting. 4 Touch the Return/Exit ( ) icon twice, or hold it down to enter its settings menu. 3 The Setup Menu options are: Menu Sound (operation sound), TV, Language, Time Setting, Format, and Default Setting. Screen 52 Chapter 5 Camcorder Settings Setup Menu Operation 1 Touch the onscreen ( ) icon. The Menu screen appears. 2 Touch the Setup ( ) icon twice to exit. Screen Menu Sound You can enable or disable tone and operation sounds.
User Guide
Page 54
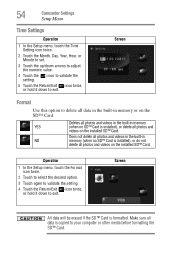
... (when no SD™ Card is copied to your computer or other media before formatting the SD™ Card. Does not delete all data in the built-in NO memory (when no SD™ Card is formatted. Screen Format Use this option to delete all photos and videos in the built-in memory or on the installed SD™ Card. 54 Camcorder Settings Setup Menu Time Settings Operation 1 In the Setup menu, touch the Time Setting icon twice. 2 Touch the...
... (when no SD™ Card is copied to your computer or other media before formatting the SD™ Card. Does not delete all data in the built-in NO memory (when no SD™ Card is formatted. Screen Format Use this option to delete all photos and videos in the built-in memory or on the installed SD™ Card. 54 Camcorder Settings Setup Menu Time Settings Operation 1 In the Setup menu, touch the Time Setting icon twice. 2 Touch the...
User Guide
Page 55
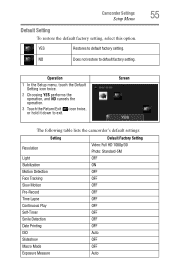
... to default factory setting. Camcorder Settings Setup Menu Default Setting To restore the default factory setting, select this option. Screen The following table lists the camcorder's default settings: Setting Default Factory Setting Resolution Video: Full HD 1080p/30 Photo: Standard-5M Light OFF Stabilization ON Motion Detection OFF Face Tracking OFF Slow Motion OFF Pre-Record OFF Time Lapse OFF Continuous Play OFF Self-Timer OFF Smile Detection OFF Date Printing OFF ISO Auto Slideshow OFF...
... to default factory setting. Camcorder Settings Setup Menu Default Setting To restore the default factory setting, select this option. Screen The following table lists the camcorder's default settings: Setting Default Factory Setting Resolution Video: Full HD 1080p/30 Photo: Standard-5M Light OFF Stabilization ON Motion Detection OFF Face Tracking OFF Slow Motion OFF Pre-Record OFF Time Lapse OFF Continuous Play OFF Self-Timer OFF Smile Detection OFF Date Printing OFF ISO Auto Slideshow OFF...
User Guide
Page 73
... Information 73 Warranty Warranty Online Warranty Information This product comes with a One (1) Year Standard Limited Warranty. Warranty Service Customers located in the fifty (50) United States and District of Columbia may obtain warranty service by visiting the Toshiba Acclaim Web site at www.acclaim.toshiba.com or by contacting the telephone support center at 1-949-583...
... Information 73 Warranty Warranty Online Warranty Information This product comes with a One (1) Year Standard Limited Warranty. Warranty Service Customers located in the fifty (50) United States and District of Columbia may obtain warranty service by visiting the Toshiba Acclaim Web site at www.acclaim.toshiba.com or by contacting the telephone support center at 1-949-583...


