
User Guide
Page 21
Contents 21 Setting up your software 40 Registering your computer with Toshiba 41 Adding optional external devices 41 Adding memory (optional 41 Installing a memory module 42 Removing a memory module 47 Checking total memory 49 Recovering the Internal Storage Drive 49 Recovering to out-of-box state (recommended recovery method 51 Recovering to a custom size partition 53...
Contents 21 Setting up your software 40 Registering your computer with Toshiba 41 Adding optional external devices 41 Adding memory (optional 41 Installing a memory module 42 Removing a memory module 47 Checking total memory 49 Recovering the Internal Storage Drive 49 Recovering to out-of-box state (recommended recovery method 51 Recovering to a custom size partition 53...

User Guide
Page 23
... your computer to a network .........114 Exploring audio features 114 Recording sounds 114 Using external speakers or headphones..........115 Using the Web Camera 116 Using the Memory card reader 117 Inserting memory media 117 Removing memory media 118 Chapter 5: Utilities 119 TOSHIBA Assist 120 Connect 121 Secure 122 Protect & Fix 123 Optimize 124...
... your computer to a network .........114 Exploring audio features 114 Recording sounds 114 Using external speakers or headphones..........115 Using the Web Camera 116 Using the Memory card reader 117 Inserting memory media 117 Removing memory media 118 Chapter 5: Utilities 119 TOSHIBA Assist 120 Connect 121 Secure 122 Protect & Fix 123 Optimize 124...
User Guide
Page 24
... 127 Using a user password 129 Deleting a user password 129 TOSHIBA PC Diagnostic Tool Utility 130 TOSHIBA HDD Protection Utility 131 Fn-esse 132 Starting Fn-esse 132 TOSHIBA SD™ Memory Card Format Utility .........133 TOSHIBA Power Saver 134 Preset Power Profiles 135 Quickly creating a new ...power profile 135 Customizing a power profile 135 Mouse Utility 136 TOSHIBA Hardware Setup 137 USB Sleep and Charge ...
... 127 Using a user password 129 Deleting a user password 129 TOSHIBA PC Diagnostic Tool Utility 130 TOSHIBA HDD Protection Utility 131 Fn-esse 132 Starting Fn-esse 132 TOSHIBA SD™ Memory Card Format Utility .........133 TOSHIBA Power Saver 134 Preset Power Profiles 135 Quickly creating a new ...power profile 135 Customizing a power profile 135 Mouse Utility 136 TOSHIBA Hardware Setup 137 USB Sleep and Charge ...

User Guide
Page 34
... serious injury. 34 Getting Started Setting up your software" on page 40 before you must complete all setup steps up to , a mouse, keyboard, printer, and memory. Your computer contains a rechargeable main battery that cools the CPU by drawing outside air into the computer. To use it. Always make sure your computer...
... serious injury. 34 Getting Started Setting up your software" on page 40 before you must complete all setup steps up to , a mouse, keyboard, printer, and memory. Your computer contains a rechargeable main battery that cools the CPU by drawing outside air into the computer. To use it. Always make sure your computer...

User Guide
Page 41
... use complex software or process large amounts of today's popular applications. Your computer comes with your system or visit accessories.toshiba.com. Adding optional external devices NOTE Before adding external devices or memory, Toshiba recommends setting up your computer for the first time you may want to the Internet. See "Setting up your...
... use complex software or process large amounts of today's popular applications. Your computer comes with your system or visit accessories.toshiba.com. Adding optional external devices NOTE Before adding external devices or memory, Toshiba recommends setting up your computer for the first time you may want to the Internet. See "Setting up your...
User Guide
Page 42
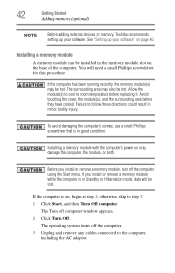
... condition. Failure to the computer, including the AC adaptor. 42 Getting Started Adding memory (optional) NOTE Before adding external devices or memory, Toshiba recommends setting up your software. Installing a memory module A memory module can be hot. If the computer is in the memory module slot on , begin at step 1; You will be hot. Avoid touching the...
... condition. Failure to the computer, including the AC adaptor. 42 Getting Started Adding memory (optional) NOTE Before adding external devices or memory, Toshiba recommends setting up your software. Installing a memory module A memory module can be hot. If the computer is in the memory module slot on , begin at step 1; You will be hot. Avoid touching the...
User Guide
Page 43
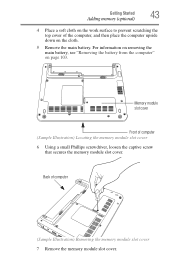
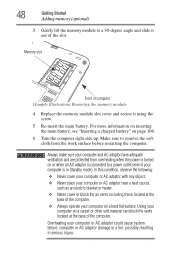
... slot cover 6 Using a small Phillips screwdriver, loosen the captive screw that secures the memory module slot cover. Getting Started Adding memory (optional) 43 4 Place a soft cloth on the work surface to prevent scratching the top cover of the computer, and then place the computer upside down ...on page 103. For information on removing the main battery, see "Removing the battery from the computer" on the cloth. 5 Remove the main battery. Memory module slot cover Front of computer (Sample Illustration) Removing the...
... slot cover 6 Using a small Phillips screwdriver, loosen the captive screw that secures the memory module slot cover. Getting Started Adding memory (optional) 43 4 Place a soft cloth on the work surface to prevent scratching the top cover of the computer, and then place the computer upside down ...on page 103. For information on removing the main battery, see "Removing the battery from the computer" on the cloth. 5 Remove the main battery. Memory module slot cover Front of computer (Sample Illustration) Removing the...

User Guide
Page 44
...Sample Illustration) Aligning the memory module with its sides, avoiding any static electricity you may cause memory access problems. 9 If replacing an existing memory module, remove this memory module by performing steps 2-3 of "Removing a memory module" on page 47. 10 Carefully remove the new memory module from its antistatic... slot on the underside of the computer. 12 Pick up . Avoid touching the connector on the memory module or on the connector may have built up the memory module by its connector. Position the module toward the socket, aligning the connector's notch with the ...
...Sample Illustration) Aligning the memory module with its sides, avoiding any static electricity you may cause memory access problems. 9 If replacing an existing memory module, remove this memory module by performing steps 2-3 of "Removing a memory module" on page 47. 10 Carefully remove the new memory module from its antistatic... slot on the underside of the computer. 12 Pick up . Avoid touching the connector on the memory module or on the connector may have built up the memory module by its connector. Position the module toward the socket, aligning the connector's notch with the ...
User Guide
Page 45
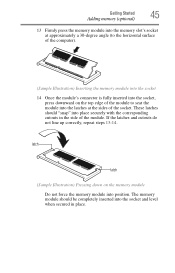
...latch (Sample Illustration) Pressing down on the top edge of the module to seat the module into position. Getting Started Adding memory (optional) 45 13 Firmly press the memory module into the memory slot's socket at approximately a 30-degree angle (to the horizontal surface of the computer). (Sample Illustration) Inserting the... into the socket 14 Once the module's connector is fully inserted into the socket, press downward on the memory module Do not force the memory module into the latches at the sides of the socket. If the latches and cutouts do not line up correctly, repeat steps ...
...latch (Sample Illustration) Pressing down on the top edge of the module to seat the module into position. Getting Started Adding memory (optional) 45 13 Firmly press the memory module into the memory slot's socket at approximately a 30-degree angle (to the horizontal surface of the computer). (Sample Illustration) Inserting the... into the socket 14 Once the module's connector is fully inserted into the socket, press downward on the memory module Do not force the memory module into the latches at the sides of the socket. If the latches and cutouts do not line up correctly, repeat steps ...
User Guide
Page 46
... computer on a carpet or other soft material can block the vents located at the base of computer (Sample Illustration) Inserting the memory module into the slot 15 Replace the memory module slot cover and secure it using the screw. 16 Re-insert the main battery. For more information on inserting the main... ventilation and are protected from overheating when the power is in serious injury. 18 Reconnect the cables. 19 Restart the computer. 46 Getting Started Adding memory (optional) Memory slot Front of the computer.
... computer on a carpet or other soft material can block the vents located at the base of computer (Sample Illustration) Inserting the memory module into the slot 15 Replace the memory module slot cover and secure it using the screw. 16 Re-insert the main battery. For more information on inserting the main... ventilation and are protected from overheating when the power is in serious injury. 18 Reconnect the cables. 19 Restart the computer. 46 Getting Started Adding memory (optional) Memory slot Front of the computer.

User Guide
Page 47
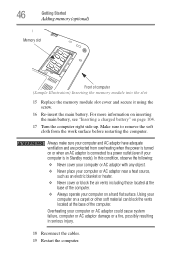
...verify that the computer has recognized it down the computer and open the memory module slot cover. The memory module pops up the computer. Removing a memory module If you need to remove a memory module: 1 Complete steps 1-8 in "Checking total memory" on and data in Standby or Hibernation mode. If you turn it... you turn it on, perform the following message appears when you turn the power on . Do not try to work. Getting Started Adding memory (optional) 47 TECHNICAL NOTE: You must have at least ten seconds, then turn on page 42 to Continue If the computer hangs up the...
...verify that the computer has recognized it down the computer and open the memory module slot cover. The memory module pops up the computer. Removing a memory module If you need to remove a memory module: 1 Complete steps 1-8 in "Checking total memory" on and data in Standby or Hibernation mode. If you turn it... you turn it on, perform the following message appears when you turn the power on . Do not try to work. Getting Started Adding memory (optional) 47 TECHNICAL NOTE: You must have at least ten seconds, then turn on page 42 to Continue If the computer hangs up the...
User Guide
Page 48
... sure your computer is turned on a carpet or other soft material can block the vents located at the base of the computer. Memory slot Front of the slot. 48 Getting Started Adding memory (optional) 3 Gently lift the memory module to a 30-degree angle and slide it out of computer (Sample Illustration) Removing the...
... sure your computer is turned on a carpet or other soft material can block the vents located at the base of the computer. Memory slot Front of the slot. 48 Getting Started Adding memory (optional) 3 Gently lift the memory module to a 30-degree angle and slide it out of computer (Sample Illustration) Removing the...

User Guide
Page 49
... partition" on page 42), and then check that the computer has recognized the change a memory module, you may have at accessories.toshiba.com. See "Recovering to its outof-box state. Checking total memory When you to specify a custom size for the computer to out-of -box state (...on page 51. Recovering the Internal Storage Drive NOTE To purchase an optional external optical drive or USB Flash drive, visit the Toshiba Web site at least one memory module installed for the C: partition and then restores your internal storage drive if necessary. Note: With this : 1 Click Start...
... partition" on page 42), and then check that the computer has recognized the change a memory module, you may have at accessories.toshiba.com. See "Recovering to its outof-box state. Checking total memory When you to specify a custom size for the computer to out-of -box state (...on page 51. Recovering the Internal Storage Drive NOTE To purchase an optional external optical drive or USB Flash drive, visit the Toshiba Web site at least one memory module installed for the C: partition and then restores your internal storage drive if necessary. Note: With this : 1 Click Start...
User Guide
Page 74
... Be sure to save your work first. You should save your internal storage drive. Standby saves the current state of the computer to memory so that, when you restart the computer, you can continue working from where you left off the computer or using Hibernation mode. &#...will be lost. 74 Getting Started Turning off the computer ❖ Since information is being retrieved from the internal storage drive rather than from memory, restarting from Hibernation takes a little more time and consumes more main battery power than when restarting from Standby. ❖ When starting up...
... Be sure to save your work first. You should save your internal storage drive. Standby saves the current state of the computer to memory so that, when you restart the computer, you can continue working from where you left off the computer or using Hibernation mode. &#...will be lost. 74 Getting Started Turning off the computer ❖ Since information is being retrieved from the internal storage drive rather than from memory, restarting from Hibernation takes a little more time and consumes more main battery power than when restarting from Standby. ❖ When starting up...

User Guide
Page 82
... to the internal storage drive at preset intervals. Your work " on page 89 for details. 82 See "Saving your work stays in the computer's temporary memory until you last saved. This feature saves your battery runs out of charge while you are using goes down and you must restart your computer...
... to the internal storage drive at preset intervals. Your work " on page 89 for details. 82 See "Saving your work stays in the computer's temporary memory until you last saved. This feature saves your battery runs out of charge while you are using goes down and you must restart your computer...

User Guide
Page 94
...toshiba.com. NOTE For optimum DVD performance, it is consuming full power. To ensure that the battery maintains its ability to be replaced. If the computer is continuously operated on AC power, either through an AC adaptor or a port replicator (if applicable to retain a charge. The Lithium-Ion battery has no memory... specific test settings. The battery life rating is only achieved on the select models and configurations tested by Toshiba under any individual user. Actual battery life may vary considerably from specifications depending on product model, configuration, ...
...toshiba.com. NOTE For optimum DVD performance, it is consuming full power. To ensure that the battery maintains its ability to be replaced. If the computer is continuously operated on AC power, either through an AC adaptor or a port replicator (if applicable to retain a charge. The Lithium-Ion battery has no memory... specific test settings. The battery life rating is only achieved on the select models and configurations tested by Toshiba under any individual user. Actual battery life may vary considerably from specifications depending on product model, configuration, ...

User Guide
Page 96
... battery power until it reaches room temperature (50 to 80 degrees Fahrenheit, 10 to recharge. The RTC battery powers the System Time Clock and BIOS memory used to select a power level setting that the battery charges to its full capacity, wait until the battery discharges completely. 96 Mobile Computing Charging batteries...
... battery power until it reaches room temperature (50 to 80 degrees Fahrenheit, 10 to recharge. The RTC battery powers the System Time Clock and BIOS memory used to select a power level setting that the battery charges to its full capacity, wait until the battery discharges completely. 96 Mobile Computing Charging batteries...
User Guide
Page 98
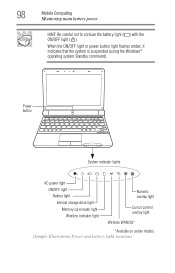
... the battery light ( ) with the ON/OFF light ( ). Power button System indicator lights AC power light ON/OFF light Battery light Internal storage drive light Memory card reader light Wireless indicator light Numeric overlay light Cursor control overlay light Wireless WAN/3G* *Available on certain models (Sample Illustration) Power and battery...
... the battery light ( ) with the ON/OFF light ( ). Power button System indicator lights AC power light ON/OFF light Battery light Internal storage drive light Memory card reader light Wireless indicator light Numeric overlay light Cursor control overlay light Wireless WAN/3G* *Available on certain models (Sample Illustration) Power and battery...
User Guide
Page 116
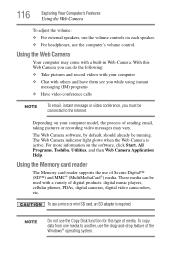
...NOTE Do not use the drag-and-drop feature of the Windows® operating system. Depending on the software, click Start, All Programs, Toshiba, Utilities, and then Web Camera Application Help. Using the Web Camera Your computer may vary. For more information on your computer ❖ ..., digital cameras, digital video camcorders, etc. To use a micro or mini SD card, an SD adapter is active. Using the Memory card reader The Memory card reader supports the use the computer's volume control. The Web Camera software, by default, should already be connected to another, use...
...NOTE Do not use the drag-and-drop feature of the Windows® operating system. Depending on the software, click Start, All Programs, Toshiba, Utilities, and then Web Camera Application Help. Using the Web Camera Your computer may vary. For more information on your computer ❖ ..., digital cameras, digital video camcorders, etc. To use a micro or mini SD card, an SD adapter is active. Using the Memory card reader The Memory card reader supports the use the computer's volume control. The Web Camera software, by default, should already be connected to another, use...

User Guide
Page 117
...unable to prepare the media for removal by clicking on the Safely Remove Hardware and Eject Media icon in place. (Sample Illustration) Inserting memory media When inserting memory media, do not touch the metal contacts. The card pops out slightly. If the computer has a spring-loaded adapter slot, see... the System tray and then selecting the card or device you to release it. Exploring Your Computer's Features Using the Memory card reader 117 Inserting memory media The following instructions apply to static electricity, which can be removed now, the system displays Safe to remove.
...unable to prepare the media for removal by clicking on the Safely Remove Hardware and Eject Media icon in place. (Sample Illustration) Inserting memory media When inserting memory media, do not touch the metal contacts. The card pops out slightly. If the computer has a spring-loaded adapter slot, see... the System tray and then selecting the card or device you to release it. Exploring Your Computer's Features Using the Memory card reader 117 Inserting memory media The following instructions apply to static electricity, which can be removed now, the system displays Safe to remove.


