
User Guide
Page 21
... 53 Recovering without changing the internal storage drive partitions 55 Creating recovery DVDs/media 58 Restoring from recovery DVDs/media 60 Erasing the Internal Storage Drive 62 Checking the internal storage drive operating status 64 Installing drivers and applications 64 Using the TouchPad 65 Adjusting TouchPad™ settings 68 Disabling or enabling the TouchPad 68 Using external display devices 69 Directing the display output when you turn on the computer 69 Adjusting the quality of the external display......70 Using an external keyboard 70 Using a mouse 70 Connecting...
... 53 Recovering without changing the internal storage drive partitions 55 Creating recovery DVDs/media 58 Restoring from recovery DVDs/media 60 Erasing the Internal Storage Drive 62 Checking the internal storage drive operating status 64 Installing drivers and applications 64 Using the TouchPad 65 Adjusting TouchPad™ settings 68 Disabling or enabling the TouchPad 68 Using external display devices 69 Directing the display output when you turn on the computer 69 Adjusting the quality of the external display......70 Using an external keyboard 70 Using a mouse 70 Connecting...

User Guide
Page 23
... the desktop 110 Finding your way around the desktop 111 Setting up for communications 113 Connecting your computer to a network .........114 Exploring audio features 114 Recording sounds 114 Using external speakers or headphones..........115 Using the Web Camera 116 Using the Memory card reader 117 Inserting memory media 117 Removing memory media 118 Chapter 5: Utilities 119 TOSHIBA Assist 120 Connect 121 Secure 122 Protect & Fix 123 Optimize 124 TOSHIBA Recovery Media Creator 125 TOSHIBA Application Installer 125
... the desktop 110 Finding your way around the desktop 111 Setting up for communications 113 Connecting your computer to a network .........114 Exploring audio features 114 Recording sounds 114 Using external speakers or headphones..........115 Using the Web Camera 116 Using the Memory card reader 117 Inserting memory media 117 Removing memory media 118 Chapter 5: Utilities 119 TOSHIBA Assist 120 Connect 121 Secure 122 Protect & Fix 123 Optimize 124 TOSHIBA Recovery Media Creator 125 TOSHIBA Application Installer 125
User Guide
Page 24
...Using a user password 129 Deleting a user password 129 TOSHIBA PC Diagnostic Tool Utility 130 TOSHIBA HDD Protection Utility 131 Fn-esse 132 Starting Fn-esse 132 TOSHIBA SD™ Memory Card Format Utility .........133 TOSHIBA Power Saver 134 Preset Power Profiles 135 Quickly creating a new power profile 135 Customizing a power profile 135 Mouse Utility 136 TOSHIBA Hardware Setup 137 USB Sleep and Charge Utility 139 Starting the USB Sleep and Charge Utility.......139 USB Sleep and Charge 139 Enabling/Disabling USB Sleep and Charge......141 Power supply mode settings 141 TOSHIBA...
...Using a user password 129 Deleting a user password 129 TOSHIBA PC Diagnostic Tool Utility 130 TOSHIBA HDD Protection Utility 131 Fn-esse 132 Starting Fn-esse 132 TOSHIBA SD™ Memory Card Format Utility .........133 TOSHIBA Power Saver 134 Preset Power Profiles 135 Quickly creating a new power profile 135 Customizing a power profile 135 Mouse Utility 136 TOSHIBA Hardware Setup 137 USB Sleep and Charge Utility 139 Starting the USB Sleep and Charge Utility.......139 USB Sleep and Charge 139 Enabling/Disabling USB Sleep and Charge......141 Power supply mode settings 141 TOSHIBA...
User Guide
Page 42
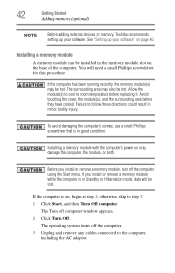
... adding external devices or memory, Toshiba recommends setting up your software. If the computer has been running recently, the memory module(s) may also be lost. Before you install or remove a memory module while the computer is in minor bodily injury. otherwise, skip to the computer, including the AC adaptor. The Turn off the computer using the Start menu. The operating system turns off the computer. 3 Unplug and remove any cables connected...
... adding external devices or memory, Toshiba recommends setting up your software. If the computer has been running recently, the memory module(s) may also be lost. Before you install or remove a memory module while the computer is in minor bodily injury. otherwise, skip to the computer, including the AC adaptor. The Turn off the computer using the Start menu. The operating system turns off the computer. 3 Unplug and remove any cables connected...
User Guide
Page 43
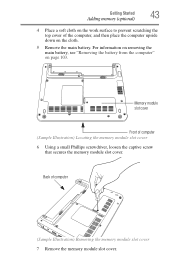
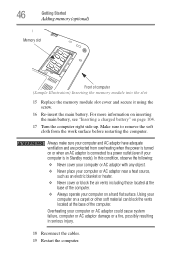
Getting Started Adding memory (optional) 43 4 Place a soft cloth on the work surface to prevent scratching the top cover of the computer, and then place the computer upside down on page 103. Memory module slot cover Front of computer (Sample Illustration) Removing the memory module slot cover 7 Remove the memory module slot cover. Back of computer (Sample Illustration) Locating the memory module slot cover 6 Using a small Phillips screwdriver, loosen the captive screw that secures the memory module slot cover. For...
Getting Started Adding memory (optional) 43 4 Place a soft cloth on the work surface to prevent scratching the top cover of the computer, and then place the computer upside down on page 103. Memory module slot cover Front of computer (Sample Illustration) Removing the memory module slot cover 7 Remove the memory module slot cover. Back of computer (Sample Illustration) Locating the memory module slot cover 6 Using a small Phillips screwdriver, loosen the captive screw that secures the memory module slot cover. For...
User Guide
Page 46
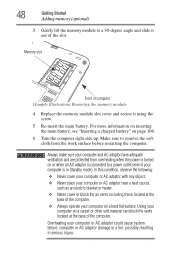
... or heater. ❖ Never cover or block the air vents including those located at the base of computer (Sample Illustration) Inserting the memory module into the slot 15 Replace the memory module slot cover and secure it using the screw. 16 Re-insert the main battery. Make sure to a power outlet (even if your computer is turned on page 104. 17 Turn the computer right side...
... or heater. ❖ Never cover or block the air vents including those located at the base of computer (Sample Illustration) Inserting the memory module into the slot 15 Replace the memory module slot cover and secure it using the screw. 16 Re-insert the main battery. Make sure to a power outlet (even if your computer is turned on page 104. 17 Turn the computer right side...

User Guide
Page 47
... Key to work. If you are adding extra memory after setting up the computer. You can now continue setting up the computer, verify that the computer has recognized the additional memory module. You can damage the computer and the memory module. The computer could hang up slightly. The following : Press the power button and hold it down the computer and open the memory module slot cover...
... Key to work. If you are adding extra memory after setting up the computer. You can now continue setting up the computer, verify that the computer has recognized the additional memory module. You can damage the computer and the memory module. The computer could hang up slightly. The following : Press the power button and hold it down the computer and open the memory module slot cover...
User Guide
Page 48
... Always operate your computer is connected to a power outlet (even if your computer on a carpet or other soft material can block the vents located at the base of computer (Sample Illustration) Removing the memory module 4 Replace the memory module slot cover and secure it out of the computer. Using your ... possibly resulting in Standby mode). Make sure to a 30-degree angle and slide it using the screw. 5 Re-insert the main battery. Overheating your computer on a hard flat surface. For more information on inserting the main battery, see "Inserting a charged battery" on or when an...
... Always operate your computer is connected to a power outlet (even if your computer on a carpet or other soft material can block the vents located at the base of computer (Sample Illustration) Removing the memory module 4 Replace the memory module slot cover and secure it out of the computer. Using your ... possibly resulting in Standby mode). Make sure to a 30-degree angle and slide it using the screw. 5 Re-insert the main battery. Overheating your computer on a hard flat surface. For more information on inserting the main battery, see "Inserting a charged battery" on or when an...

User Guide
Page 49
.... Recovering the Internal Storage Drive NOTE To purchase an optional external optical drive or USB Flash drive, visit the Toshiba Web site at least one memory module installed for the C: partition and then restores your computer to its outof-box state. Getting Started Recovering the Internal Storage Drive 49 7 Reconnect the cables. 8 Restart the computer. If the computer does not recognize the memory configuration, turn off the computer and remove the memory module slot cover (complete steps 1-8 in "Installing a memory module...
.... Recovering the Internal Storage Drive NOTE To purchase an optional external optical drive or USB Flash drive, visit the Toshiba Web site at least one memory module installed for the C: partition and then restores your computer to its outof-box state. Getting Started Recovering the Internal Storage Drive 49 7 Reconnect the cables. 8 Restart the computer. If the computer does not recognize the memory configuration, turn off the computer and remove the memory module slot cover (complete steps 1-8 in "Installing a memory module...

User Guide
Page 68
... Search field. NOTE Alternately, you can still use the Mouse Properties option in the Windows Control Panel. If you disable tapping only, you can disable only the tapping feature. To disable tapping only, use the TouchPad's control buttons and move or jump around as you type. To change the enable/disable TouchPad setting, press Fn + F9. 68 Getting Started Using the TouchPad™ Adjusting TouchPad™ settings While you are accessible through the Mouse Properties option of the Windows Control Panel.
... Search field. NOTE Alternately, you can still use the Mouse Properties option in the Windows Control Panel. If you disable tapping only, you can disable only the tapping feature. To disable tapping only, use the TouchPad's control buttons and move or jump around as you type. To change the enable/disable TouchPad setting, press Fn + F9. 68 Getting Started Using the TouchPad™ Adjusting TouchPad™ settings While you are accessible through the Mouse Properties option of the Windows Control Panel.
User Guide
Page 129
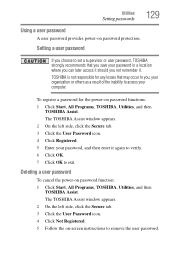
... User Password icon. 4 Click Registered. 5 Enter your computer. To register a password for any losses that you save your password in a location where you can later access it should you , your organization or others as a result of the inability to access your password, and then enter it . Utilities Setting passwords 129 Using a user password A user password provides power-on password functions: 1 Click Start, All Programs, TOSHIBA, Utilities, and then TOSHIBA Assist. Deleting a user password To cancel the power-on -screen instructions...
... User Password icon. 4 Click Registered. 5 Enter your computer. To register a password for any losses that you save your password in a location where you can later access it should you , your organization or others as a result of the inability to access your password, and then enter it . Utilities Setting passwords 129 Using a user password A user password provides power-on password functions: 1 Click Start, All Programs, TOSHIBA, Utilities, and then TOSHIBA Assist. Deleting a user password To cancel the power-on -screen instructions...
User Guide
Page 140
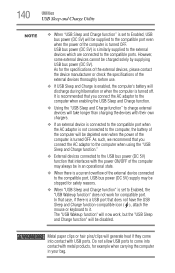
... the specifications of the external devices, please contact the device manufacturer or check the specifications of the external devices thoroughly before use. ❖ If USB Sleep and Charge is enabled, the computer's battery will discharge during hibernation or when the computer is a USB port that case, if there is turned off. The "USB Wakeup function" will now work for compatible port. 140 Utilities USB Sleep and Charge Utility NOTE ❖ When "USB Sleep and Charge function" is set to Enabled, USB bus power...
... the specifications of the external devices, please contact the device manufacturer or check the specifications of the external devices thoroughly before use. ❖ If USB Sleep and Charge is enabled, the computer's battery will discharge during hibernation or when the computer is a USB port that case, if there is turned off. The "USB Wakeup function" will now work for compatible port. 140 Utilities USB Sleep and Charge Utility NOTE ❖ When "USB Sleep and Charge function" is set to Enabled, USB bus power...
User Guide
Page 150
... installing a new program or adding a device. NOTE If your system's configuration or verify the startup procedure to fix the problem. If you may display different versions of these options: ❖ Safe Mode ❖ Safe Mode with Networking ❖ Safe Mode (with Command Prompt) ❖ Enable Boot Logging ❖ Enable VGA Mode ❖ Last Known Good Configuration (your most recent settings that worked) ❖ Directory Services Restore Mode (Windows® domain controllers only) ❖ Debugging Mode ❖ Start Windows® normally ❖ Reboot...
... installing a new program or adding a device. NOTE If your system's configuration or verify the startup procedure to fix the problem. If you may display different versions of these options: ❖ Safe Mode ❖ Safe Mode with Networking ❖ Safe Mode (with Command Prompt) ❖ Enable Boot Logging ❖ Enable VGA Mode ❖ Last Known Good Configuration (your most recent settings that worked) ❖ Directory Services Restore Mode (Windows® domain controllers only) ❖ Debugging Mode ❖ Start Windows® normally ❖ Reboot...
User Guide
Page 153
A Help and Support window for these first: 1 Click Start, Turn off the computer automatically. 3 Remove the memory module, following the instructions in "Removing a memory module" on page 47. 4 Reinstall the memory module, following the instructions in the dialog box vary from one device to the monitor, optional external optical drive, and other power-using resources. ❖ The Driver tab, which provides basic information about Device Manager, refer to be faulty. Memory problems Incorrectly connected or faulty memory modules may cause...
A Help and Support window for these first: 1 Click Start, Turn off the computer automatically. 3 Remove the memory module, following the instructions in "Removing a memory module" on page 47. 4 Reinstall the memory module, following the instructions in the dialog box vary from one device to the monitor, optional external optical drive, and other power-using resources. ❖ The Driver tab, which provides basic information about Device Manager, refer to be faulty. Memory problems Incorrectly connected or faulty memory modules may cause...
User Guide
Page 156
... the display options. If you to continue working power outlet. ❖ Check that the monitor's power cord/cable is firmly plugged into effect. The screen does not look correct. The Appearance tab of the desktop with the secondary control button, then clicking Properties. 156 If Something Goes Wrong Display problems Display problems Here are using the built-in screen, make sure the display priority is not set for an external monitor...
... the display options. If you to continue working power outlet. ❖ Check that the monitor's power cord/cable is firmly plugged into effect. The screen does not look correct. The Appearance tab of the desktop with the secondary control button, then clicking Properties. 156 If Something Goes Wrong Display problems Display problems Here are using the built-in screen, make sure the display priority is not set for an external monitor...
User Guide
Page 168
... Charge function. Ports that the device you are connected to the computer, the computer's battery power may be disabled. 168 If Something Goes Wrong Develop good computing habits 5 Use the new hardware or software for a while, noting any of your critical data has changed . Lower the limit in the USB Sleep and Charge Utility to enable charging at step 2 if no critical data has changed , or starting at step 1 if any new problems. Make...
... Charge function. Ports that the device you are connected to the computer, the computer's battery power may be disabled. 168 If Something Goes Wrong Develop good computing habits 5 Use the new hardware or software for a while, noting any of your critical data has changed . Lower the limit in the USB Sleep and Charge Utility to enable charging at step 2 if no critical data has changed , or starting at step 1 if any new problems. Make...

User Guide
Page 209
... have the operating system automatically recognize the change. One A/V component can be magnetically coded with HDMI cables. A feature of data. hot swapping - high-density diskette - I icon - A 3.5-inch diskette that represents a function, file, or program. A small image displayed on the computer again, your work is running and have secondary hard disks that activates a memory resident program. Interlaced monitors take two passes to the internal storage drive the...
... have the operating system automatically recognize the change. One A/V component can be magnetically coded with HDMI cables. A feature of data. hot swapping - high-density diskette - I icon - A 3.5-inch diskette that represents a function, file, or program. A small image displayed on the computer again, your work is running and have secondary hard disks that activates a memory resident program. Interlaced monitors take two passes to the internal storage drive the...

User Guide
Page 216
... changing 102 charge indicator light 37, 97 charge not lasting 155 charging 37, 96 conserving power 100 disposal 107 installing 102, 104 low charge 99 maintaining 106 216 monitoring power 37, 97 not charging 154 power profile hot key 102 real-time clock (RTC) 94, 96 remaining power 99 removing 103 safety precautions 106 BIOS Setup see TOSHIBA Hardware Setup button power 39 start 112 C Call2Recycle™ battery 108 changing main battery 102 character keys 84 charging the battery 37 checking device...
... changing 102 charge indicator light 37, 97 charge not lasting 155 charging 37, 96 conserving power 100 disposal 107 installing 102, 104 low charge 99 maintaining 106 216 monitoring power 37, 97 not charging 154 power profile hot key 102 real-time clock (RTC) 94, 96 remaining power 99 removing 103 safety precautions 106 BIOS Setup see TOSHIBA Hardware Setup button power 39 start 112 C Call2Recycle™ battery 108 changing main battery 102 character keys 84 charging the battery 37 checking device...
User Guide
Page 218
... 155 unexpected characters 155 using 83 keyboard, external 70 keyboard, full-size 84 L light AC power 35 lock computer, using 81 M main battery changing 102 installing 102, 104 removing 103 safety precautions 106 memory adding 41 problem solving 153 removing memory module slot cover 43 Memory card reader inserting memory media 117 removing memory media 118 using 117 memory module installation 42 installing inserting into socket 44 removing 47, 48 memory module slot 43 microphone using 114 monitor connecting 69 monitor problems monitor not working 156 mouse installing 70 mouse utility 136
... 155 unexpected characters 155 using 83 keyboard, external 70 keyboard, full-size 84 L light AC power 35 lock computer, using 81 M main battery changing 102 installing 102, 104 removing 103 safety precautions 106 memory adding 41 problem solving 153 removing memory module slot cover 43 Memory card reader inserting memory media 117 removing memory media 118 using 117 memory module installation 42 installing inserting into socket 44 removing 47, 48 memory module slot 43 microphone using 114 monitor connecting 69 monitor problems monitor not working 156 mouse installing 70 mouse utility 136
User Guide
Page 219
N networking wireless 113 O other documentation 30 overlay keys 85 P password deleting a supervisor 128 disabling a user 129 setting a user 129 supervisor set up 127 types 126 passwords instant, using 126 setting 126 port monitor 69 power computer will not start 147 connecting cable to AC adaptor 36 cord/cable 36 cord/cable connectors 179 energy-saving features 93 problem solving 154 turning on 39 power button 39 Power Management 134 power profile hot key 102 power profiles 101 power source connecting 36 powering down using Hibernation 77...
N networking wireless 113 O other documentation 30 overlay keys 85 P password deleting a supervisor 128 disabling a user 129 setting a user 129 supervisor set up 127 types 126 passwords instant, using 126 setting 126 port monitor 69 power computer will not start 147 connecting cable to AC adaptor 36 cord/cable 36 cord/cable connectors 179 energy-saving features 93 problem solving 154 turning on 39 power button 39 Power Management 134 power profile hot key 102 power profiles 101 power source connecting 36 powering down using Hibernation 77...


