
Owners Manual
Page 1
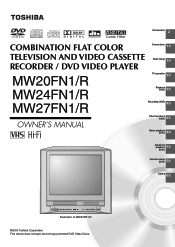
DIGITAL VIDEO Introduction 2 COMBINATION FLAT COLOR Connections 14 TELEVISION AND VIDEO CASSETTE Basicsetup 19 RECORDER / DVD VIDEO PLAYER MW20FN1/R MW24FN1/R TV operation 23 Playback (VCR) 35 MW27FN1/R Recording (VCR) 40 OWNER'S MANUAL Other functions (VCR) 45 Basic playback (DVD) 49 Advanced playback 52 (DVD) Function setup (DVD) 56 Others 62 Illustration of MW20FN1/R ©2003 Toshiba Corporation This device does not tape-record copy protected DVD Video Discs.
DIGITAL VIDEO Introduction 2 COMBINATION FLAT COLOR Connections 14 TELEVISION AND VIDEO CASSETTE Basicsetup 19 RECORDER / DVD VIDEO PLAYER MW20FN1/R MW24FN1/R TV operation 23 Playback (VCR) 35 MW27FN1/R Recording (VCR) 40 OWNER'S MANUAL Other functions (VCR) 45 Basic playback (DVD) 49 Advanced playback 52 (DVD) Function setup (DVD) 56 Others 62 Illustration of MW20FN1/R ©2003 Toshiba Corporation This device does not tape-record copy protected DVD Video Discs.

Owners Manual
Page 2
... COVER (OR BACK). WARNING: TO REDUCE THE RISK OF FIRE OR ELECTRIC SHOCK, do not expose this equipment. Consult the dealer or an experienced radio/TV technician for compliance with the instructions, may be determined by the party responsible for help. COPYRIGHT: It is no guarantee that may cause harmful interference...
... COVER (OR BACK). WARNING: TO REDUCE THE RISK OF FIRE OR ELECTRIC SHOCK, do not expose this equipment. Consult the dealer or an experienced radio/TV technician for compliance with the instructions, may be determined by the party responsible for help. COPYRIGHT: It is no guarantee that may cause harmful interference...

Owners Manual
Page 6
... three hours. For stubborn dirt, soak the cloth in a humid place. If you just turned on a shaky or unstable surface such as insect spray, near a TV, radio, or VCR, the playback picture may damage the surface of the unit. Wait! Do not leave rubber or plastic products in a room where you... three hours, the unit will seldom occur. Notes on locating Place the unit on and use , be distorted. When you move the unit from the TV, radio, or VCR. When you do not use the unit when moisture condensation may not function properly in use the unit occasionally. Do not use...
... three hours. For stubborn dirt, soak the cloth in a humid place. If you just turned on a shaky or unstable surface such as insect spray, near a TV, radio, or VCR, the playback picture may damage the surface of the unit. Wait! Do not leave rubber or plastic products in a room where you... three hours, the unit will seldom occur. Notes on locating Place the unit on and use , be distorted. When you move the unit from the TV, radio, or VCR. When you do not use the unit when moisture condensation may not function properly in use the unit occasionally. Do not use...
Owners Manual
Page 8
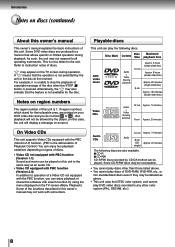
... played. If region numbers, which stand for the disc. As such, the unit may appear on the TV screen during playback. " " may not respond to instruction notes of this unit is 1. Notes on the TV screen (Menu Playback). Some of this unit. Alternatively, the " " may be labeled as an audio CD. •...
... played. If region numbers, which stand for the disc. As such, the unit may appear on the TV screen during playback. " " may not respond to instruction notes of this unit is 1. Notes on the TV screen (Menu Playback). Some of this unit. Alternatively, the " " may be labeled as an audio CD. •...

Owners Manual
Page 9
...language/Subtitles ....... 54 Changing angles/Title selection/DVD menu... 55 Function setup (DVD) Setting language 56 Setting the aspect ratio of TV screen/ Setting on screen display 57 Dynamic Range Control 58 Parental control setting 59 To change the parental level 60 Temporary disabling of...Others Before calling service personnel 62 Reception disturbances 64 Language code list 65 Specifications 66 Limited warranty 67 Recording (VCR) Recording a TV program 40 One-touch Timer Recording (OTR 42 Timer recording 43 Other functions (VCR) Setting the surround sound/ Setting the stable...
...language/Subtitles ....... 54 Changing angles/Title selection/DVD menu... 55 Function setup (DVD) Setting language 56 Setting the aspect ratio of TV screen/ Setting on screen display 57 Dynamic Range Control 58 Parental control setting 59 To change the parental level 60 Temporary disabling of...Others Before calling service personnel 62 Reception disturbances 64 Language code list 65 Specifications 66 Limited warranty 67 Recording (VCR) Recording a TV program 40 One-touch Timer Recording (OTR 42 Timer recording 43 Other functions (VCR) Setting the surround sound/ Setting the stable...
Owners Manual
Page 11
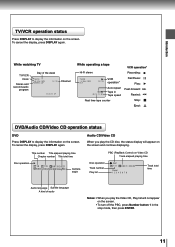
... operation Track number Play list PBC T 1/8 0:02:31 0:53:09 Playlist 1 2 3 4 5 6 7 8 Track total time Audio language Subtitle language A kind of the week TV/VCR 8 : 47AM MON STEREO SAP CH 125 Channel 00 : 00 : 00 SP While operating a tape VCR operation* Hi-Fi stereo Recording...Play : Fast-forward : Rewind : Stop : Eject : DVD/Audio CD/Video CD operation status DVD Press DISPLAY to display the information on the screen. Introduction TV/VCR operation status Press DISPLAY to display the information on the screen. To cancel the display, press DISPLAY again. While watching...
... operation Track number Play list PBC T 1/8 0:02:31 0:53:09 Playlist 1 2 3 4 5 6 7 8 Track total time Audio language Subtitle language A kind of the week TV/VCR 8 : 47AM MON STEREO SAP CH 125 Channel 00 : 00 : 00 SP While operating a tape VCR operation* Hi-Fi stereo Recording...Play : Fast-forward : Rewind : Stop : Eject : DVD/Audio CD/Video CD operation status DVD Press DISPLAY to display the information on the screen. Introduction TV/VCR operation status Press DISPLAY to display the information on the screen. To cancel the display, press DISPLAY again. While watching...
Owners Manual
Page 12
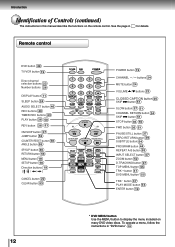
... remote control. To operate a menu, follow the instructions in this manual describe the functions on many DVD video discs. Remote control DVD button 49 TV/VCR button 19 Direct channel selection buttons 23 Number buttons 28 DISPLAY button 11 SLEEP button 24 AUDIO SELECT button 46 REC buttons 40 TIMER...button 55 SP/SLP button 40 RETURN button 56 MENU button 19 SETUP button 56 Direction buttons 19 (// / ) CANCEL button 22 CLEAR button 53 TV/VCR DVD POWER 123 CHANNEL 456 789 DISPLAY 0 MUTE VOLUME SLEEP AUDIO CHANNEL CLOSED SELECT RETURN CAPTION TIMER REC SKIP REC SKIP SLOW PLAY REV...
... remote control. To operate a menu, follow the instructions in this manual describe the functions on many DVD video discs. Remote control DVD button 49 TV/VCR button 19 Direct channel selection buttons 23 Number buttons 28 DISPLAY button 11 SLEEP button 24 AUDIO SELECT button 46 REC buttons 40 TIMER...button 55 SP/SLP button 40 RETURN button 56 MENU button 19 SETUP button 56 Direction buttons 19 (// / ) CANCEL button 22 CLEAR button 53 TV/VCR DVD POWER 123 CHANNEL 456 789 DISPLAY 0 MUTE VOLUME SLEEP AUDIO CHANNEL CLOSED SELECT RETURN CAPTION TIMER REC SKIP REC SKIP SLOW PLAY REV...
Owners Manual
Page 13
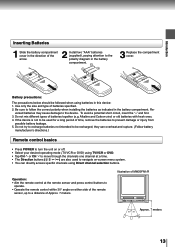
... at a time. • The Direction buttons ( / / / ) are also used for a long period of time, remove the batteries to be followed when using TV/VCR or DVD. • Tap CH or CH to move through the channels one channel at the remote sensor and press control buttons to operate...(Follow battery manufacturer's directions.) Remote control basics • Press POWER to turn the unit on or off. • Select your desired operating mode (TV/VCR or DVD) using batteries in this device: 1. Illustration of Approx. 7 meters. Be sure to a distance of MW20FN1/R Approx. 7 meters 13
... at a time. • The Direction buttons ( / / / ) are also used for a long period of time, remove the batteries to be followed when using TV/VCR or DVD. • Tap CH or CH to move through the channels one channel at the remote sensor and press control buttons to operate...(Follow battery manufacturer's directions.) Remote control basics • Press POWER to turn the unit on or off. • Select your desired operating mode (TV/VCR or DVD) using batteries in this device: 1. Illustration of Approx. 7 meters. Be sure to a distance of MW20FN1/R Approx. 7 meters 13

Owners Manual
Page 14
... the Combination VHF/UHF Antenna to the Antenna Jack. Combiner VHF 75 ohm UHF 300 ohm 14 Connections Antenna connections If you are using a cable TV service (CATV), see page 15 for Cable TV connections. Attach the Combiner to the Antenna Jack.
... the Combination VHF/UHF Antenna to the Antenna Jack. Combiner VHF 75 ohm UHF 300 ohm 14 Connections Antenna connections If you are using a cable TV service (CATV), see page 15 for Cable TV connections. Attach the Combiner to the Antenna Jack.
Owners Manual
Page 15
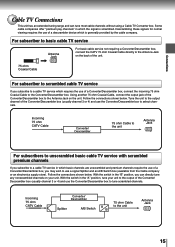
... in the "A" position, tune your unit. Incoming 75 ohm CATV Cable Converter/ Descrambler Splitter A/B Switch A B 75 ohm Cable to a cable TV service which the signal is generally provided by the cable company. Incoming 75 ohm CATV Cable Converter/ Descrambler 75 ohm Cable to the unit Antenna...If you may wish to use of the Converter/Descrambler box (usually channel 3 or 4) and use the Converter/Descrambler box to a cable TV service in which requires the use a signal Splitter and an A/B Switch box (available from the Cable company or an electronics supply store)....
... in the "A" position, tune your unit. Incoming 75 ohm CATV Cable Converter/ Descrambler Splitter A/B Switch A B 75 ohm Cable to a cable TV service which the signal is generally provided by the cable company. Incoming 75 ohm CATV Cable Converter/ Descrambler 75 ohm Cable to the unit Antenna...If you may wish to use of the Converter/Descrambler box (usually channel 3 or 4) and use the Converter/Descrambler box to a cable TV service in which requires the use a signal Splitter and an A/B Switch box (available from the Cable company or an electronics supply store)....

Owners Manual
Page 16
... to optional equipment Before connecting the unit to other equipment, be sure to turn off the amplifier before making any connections. You can enjoy the TV game, camcorder or high quality dynamic sounds of DVD video discs or audio CDs by a sudden high volume sound. • Turn off the ... and unplug all of the equipment from the tuner and radio. • The output sound of the unit has a wide dynamic range. Connecting a camcorder or a TV game Select "LINE 2" using the INPUT SELECT button. VHF/UHF OUT PUT VIDEO DIGITAL AUDIO COAXIAL L AUDIO R LINE 1 IN VIDEO L(MONO) AUDIO R To ...
... to optional equipment Before connecting the unit to other equipment, be sure to turn off the amplifier before making any connections. You can enjoy the TV game, camcorder or high quality dynamic sounds of DVD video discs or audio CDs by a sudden high volume sound. • Turn off the ... and unplug all of the equipment from the tuner and radio. • The output sound of the unit has a wide dynamic range. Connecting a camcorder or a TV game Select "LINE 2" using the INPUT SELECT button. VHF/UHF OUT PUT VIDEO DIGITAL AUDIO COAXIAL L AUDIO R LINE 1 IN VIDEO L(MONO) AUDIO R To ...
Owners Manual
Page 19
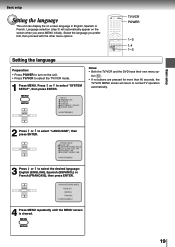
...STANDARD TIME DAYLIGHT SAVING TIME 〈 / /ENTER/MENU〉 3 Press or to normal TV operation automatically. tion 56 . • If no buttons are pressed for more than 60 seconds, the TV/VCR MENU screen will automatically appear on the screen when you prefer first, then proceed with the... other menu options. Basic setup Setting the language This unit can display the on the unit. • Press TV/VCR to select the TV/VCR mode. 1 Press MENU. TV/VCR POWER 1-3 1,4 1-3 Setting the language Preparation: • Press POWER to turn on screen language in English, Spanish or...
...STANDARD TIME DAYLIGHT SAVING TIME 〈 / /ENTER/MENU〉 3 Press or to normal TV operation automatically. tion 56 . • If no buttons are pressed for more than 60 seconds, the TV/VCR MENU screen will automatically appear on the screen when you prefer first, then proceed with the... other menu options. Basic setup Setting the language This unit can display the on the unit. • Press TV/VCR to select the TV/VCR mode. 1 Press MENU. TV/VCR POWER 1-3 1,4 1-3 Setting the language Preparation: • Press POWER to turn on screen language in English, Spanish or...
Owners Manual
Page 20
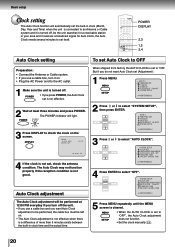
...if the reception condition is not set, check the antenna condition. Auto Clock adjustment The Auto Clock adjustment will light. ENTER M E N U TIMER REC SET TV SETUP CH SETUP AUTO REPEAT ON OFF SYSTEM SETUP 〈 / /ENTER/MENU〉 3 Press or ENTER to select "OFF". POWER DISPLAY 2,3 1,5 2,4...is set (Adjustment): 1 Press MENU. POWER POWER 3 Press DISPLAY to select "SYSTEM SETUP", then press ENTER. MENU SETUP M E N U TIMER REC SET TV SETUP CH SETUP AUTO REPEAT ON OFF SYSTEM SETUP 〈 / /ENTER/MENU〉 2 Press or to check the clock on . • The Auto ...
...if the reception condition is not set, check the antenna condition. Auto Clock adjustment The Auto Clock adjustment will light. ENTER M E N U TIMER REC SET TV SETUP CH SETUP AUTO REPEAT ON OFF SYSTEM SETUP 〈 / /ENTER/MENU〉 3 Press or ENTER to select "OFF". POWER DISPLAY 2,3 1,5 2,4...is set (Adjustment): 1 Press MENU. POWER POWER 3 Press DISPLAY to select "SYSTEM SETUP", then press ENTER. MENU SETUP M E N U TIMER REC SET TV SETUP CH SETUP AUTO REPEAT ON OFF SYSTEM SETUP 〈 / /ENTER/MENU〉 2 Press or to check the clock on . • The Auto ...
Owners Manual
Page 21
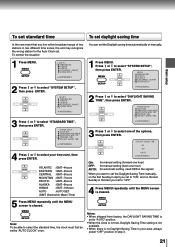
..., the unit may recognize the wrong station for manual setting (back one of two stations in step 3. 21 MENU SETUP M E N U TIMER REC SET TV SETUP CH SETUP AUTO REPEAT ON OFF SYSTEM SETUP 〈 / /ENTER/MENU〉 2 Press or to select "SYSTEM SETUP", then press ENTER. Basic setup...setting (forward one hour) OFF: for the Auto Clock set the Daylight saving time automatically or manually. 1 Press MENU. ENTER M E N U TIMER REC SET TV SETUP CH SETUP AUTO REPEAT ON OFF SYSTEM SETUP 〈 / /ENTER/MENU〉 3 Press or to select "DAYLIGHT SAVING TIME", then press ENTER. MENU ENTER...
..., the unit may recognize the wrong station for manual setting (back one of two stations in step 3. 21 MENU SETUP M E N U TIMER REC SET TV SETUP CH SETUP AUTO REPEAT ON OFF SYSTEM SETUP 〈 / /ENTER/MENU〉 2 Press or to select "SYSTEM SETUP", then press ENTER. Basic setup...setting (forward one hour) OFF: for the Auto Clock set the Daylight saving time automatically or manually. 1 Press MENU. ENTER M E N U TIMER REC SET TV SETUP CH SETUP AUTO REPEAT ON OFF SYSTEM SETUP 〈 / /ENTER/MENU〉 3 Press or to select "DAYLIGHT SAVING TIME", then press ENTER. MENU ENTER...

Owners Manual
Page 22
.... (WED) October, 2003. 1 Press MENU. In this case, reset the present time. • When you set the month, then press ENTER. ENTER M E N U TIMER REC SET TV SETUP CH SETUP AUTO REPEAT ON OFF SYSTEM SETUP 〈 / /ENTER/MENU〉 3 Press or to change in step 4.
.... (WED) October, 2003. 1 Press MENU. In this case, reset the present time. • When you set the month, then press ENTER. ENTER M E N U TIMER REC SET TV SETUP CH SETUP AUTO REPEAT ON OFF SYSTEM SETUP 〈 / /ENTER/MENU〉 3 Press or to change in step 4.
Owners Manual
Page 23
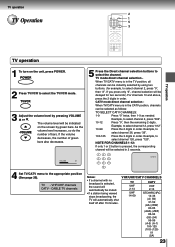
...two buttons. (for two seconds.) For channels 10 and above, press the 2 digits in order. Example, to select the channel. TV - CATV mode direct channel selection - VOLUME 32 5 Press the Direct channel selection buttons to select channel 2, press "002". 10-12... be selected as follows: TO SELECT CATV CHANNELS: 1-9 Press "0" twice, then 1-9 as needed. TV operation 2 TV Operation 1 5 3 TV operation TV operation 1 To turn on the screen by pressing VOLUME L or M. TV/VCR 3 Adjust the volume level by green bars. Example, to select channel 2, press "0", then ...
...two buttons. (for two seconds.) For channels 10 and above, press the 2 digits in order. Example, to select the channel. TV - CATV mode direct channel selection - VOLUME 32 5 Press the Direct channel selection buttons to select channel 2, press "002". 10-12... be selected as follows: TO SELECT CATV CHANNELS: 1-9 Press "0" twice, then 1-9 as needed. TV operation 2 TV Operation 1 5 3 TV operation TV operation 1 To turn on the screen by pressing VOLUME L or M. TV/VCR 3 Adjust the volume level by green bars. Example, to select channel 2, press "0", then ...
Owners Manual
Page 24
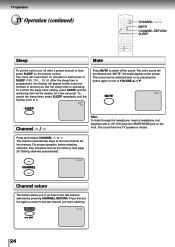
... MUTE Channel / Note: To listen through the headphone, insert a headphone (not supplied) with a 1/8" mini plug into memory. The sound from the TV speaker is operating. For proper operation, before selecting channels, they should be silenced and "MUTE" will appear briefly every ten minutes to the last channel...the sleep time is programmed, the display will briefly appear on the screen. SLEEP 120 SLEEP Press MUTE to turn off the sound. TV operation TV Operation (continued) CHANNEL / MUTE CHANNEL RETURN SLEEP Sleep Mute To set the unit to switch off after a preset amount of time,...
... MUTE Channel / Note: To listen through the headphone, insert a headphone (not supplied) with a 1/8" mini plug into memory. The sound from the TV speaker is operating. For proper operation, before selecting channels, they should be silenced and "MUTE" will appear briefly every ten minutes to the last channel...the sleep time is programmed, the display will briefly appear on the screen. SLEEP 120 SLEEP Press MUTE to turn off the sound. TV operation TV Operation (continued) CHANNEL / MUTE CHANNEL RETURN SLEEP Sleep Mute To set the unit to switch off after a preset amount of time,...
Owners Manual
Page 25
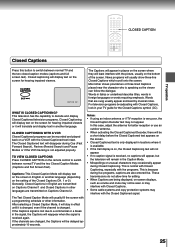
...25 CLOSED CAPTIONING WITH A VCR Closed Captioned programs can follow the dialogue. Notes: • If using an indoor antenna or if TV reception is normal with Closed Captioning, especially with a programming schedule or other information. This is very poor, the Closed Caption Decoder ...• Misspellings or unusual characters may not appear. If the channels are sung usually appear enclosed by musical notes. CLOSED CAPTION TV operation Closed Captions Press this case, adjust the antenna for the Closed Captions symbol (CC). Words in italics or underlined describe ...
...25 CLOSED CAPTIONING WITH A VCR Closed Captioned programs can follow the dialogue. Notes: • If using an indoor antenna or if TV reception is normal with Closed Captioning, especially with a programming schedule or other information. This is very poor, the Closed Caption Decoder ...• Misspellings or unusual characters may not appear. If the channels are sung usually appear enclosed by musical notes. CLOSED CAPTION TV operation Closed Captions Press this case, adjust the antenna for the Closed Captions symbol (CC). Words in italics or underlined describe ...
Owners Manual
Page 26
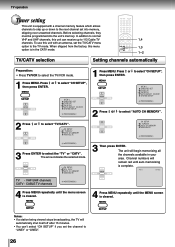
...". The unit will begin memorizing all the channels available in the CATV mode. 1,4 1,3 1-2 TV/CATV selection Setting channels automatically Preparation: • Press TV/VCR to the TV mode. ENTER AUTO CH 002 TV - VHF/UHF channels CATV - Before selecting channels, they must be programmed into memory, skipping over...15 minutes. • You can receive up or down to the next channel set the TV/CATV menu option to select the TV/VCR mode. 1 Press MENU. The arrow indicates the selected mode. ENTER CH SETUP TV CATV AUTO CH MEMORY ADD/DELETE á / /ENTER/MENUñ 〈 / ...
...". The unit will begin memorizing all the channels available in the CATV mode. 1,4 1,3 1-2 TV/CATV selection Setting channels automatically Preparation: • Press TV/VCR to the TV mode. ENTER AUTO CH 002 TV - VHF/UHF channels CATV - Before selecting channels, they must be programmed into memory, skipping over...15 minutes. • You can receive up or down to the next channel set the TV/CATV menu option to select the TV/VCR mode. 1 Press MENU. The arrow indicates the selected mode. ENTER CH SETUP TV CATV AUTO CH MEMORY ADD/DELETE á / /ENTER/MENUñ 〈 / ...
Owners Manual
Page 27
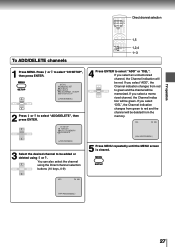
...", then press ENTER. DEL CH 003 〈0-9/ / /ENTER/MENU〉 5 Press MENU repeatedly until the MENU screen is cleared. ENTER CH SETUP TV CATV AUTO CH MEMORY ADD/DELETE 〈 / /ENTER/MENU〉 3 Select the desired channel to select "ADD" or "DEL". If you select...or . If you select "ADD", the Channel indication changes from the memory. MENU SETUP ADD CH 003 〈0-9/ / /ENTER/MENU〉 27 TV operation Direct channel selection 1,5 1,2,4 1-3 To ADD/DELETE channels 1 Press MENU. If you select "DEL", the Channel indication changes from green to ...
...", then press ENTER. DEL CH 003 〈0-9/ / /ENTER/MENU〉 5 Press MENU repeatedly until the MENU screen is cleared. ENTER CH SETUP TV CATV AUTO CH MEMORY ADD/DELETE 〈 / /ENTER/MENU〉 3 Select the desired channel to select "ADD" or "DEL". If you select...or . If you select "ADD", the Channel indication changes from the memory. MENU SETUP ADD CH 003 〈0-9/ / /ENTER/MENU〉 27 TV operation Direct channel selection 1,5 1,2,4 1-3 To ADD/DELETE channels 1 Press MENU. If you select "DEL", the Channel indication changes from green to ...


