
User Manual
Page 8
REC indicator 32 REC button 32 VOLUME ▲/▼ buttons 19 PHONE jack 19 LINE IN (VIDEO/AUDIO) 36 FF (Fast Forward) button 28 REW (Rewind) button 28 STOP/EJECT button 27 PLAY button 28 CHANNEL ▲/▼ buttons 19 Rear panel Illustration of controls See the page in for details. jack 11 8 5S20101A [E]p06-10 8 12/16/04, 4:27 PM Introduction Identification of MV13Q41 ANT. Front panel Illustration of MV13Q41 Power button Remote sensor 10 Cassette loading slot 27 TIMER REC indicator !"
REC indicator 32 REC button 32 VOLUME ▲/▼ buttons 19 PHONE jack 19 LINE IN (VIDEO/AUDIO) 36 FF (Fast Forward) button 28 REW (Rewind) button 28 STOP/EJECT button 27 PLAY button 28 CHANNEL ▲/▼ buttons 19 Rear panel Illustration of controls See the page in for details. jack 11 8 5S20101A [E]p06-10 8 12/16/04, 4:27 PM Introduction Identification of MV13Q41 ANT. Front panel Illustration of MV13Q41 Power button Remote sensor 10 Cassette loading slot 27 TIMER REC indicator !"

User Manual
Page 9
... button 32 COUNTER RESET button 30 5S20101A [E]p06-10 9 9 12/16/04, 4:27 PM See the page in this manual describe the functions on the remote control. EJECT button 27 TV MONITOR button 31 Direct channel selection buttons (0-9) 18 Number buttons (0-9) 22 DISPLAY button 17 PROGRAM button 24 CH / button 19 INPUT... CH RTN button 19 Direction buttons ( / / / ) 13 MENU button 14 PAUSE/STILL button 29 PLAY button 28 INDEX button 31 REV button 28 TRK- Introduction Remote control The instructions in for details.
... button 32 COUNTER RESET button 30 5S20101A [E]p06-10 9 9 12/16/04, 4:27 PM See the page in this manual describe the functions on the remote control. EJECT button 27 TV MONITOR button 31 Direct channel selection buttons (0-9) 18 Number buttons (0-9) 22 DISPLAY button 17 PROGRAM button 24 CH / button 19 INPUT... CH RTN button 19 Direction buttons ( / / / ) 13 MENU button 14 PAUSE/STILL button 29 PLAY button 28 INDEX button 31 REV button 28 TRK- Introduction Remote control The instructions in for details.

User Manual
Page 10
...8226; You can directly access specific channels using batteries in this device: 1. Illustration of MV13Q41 Operation: • Aim the remote control at the remote sensor and press control buttons to operate. • Operate the remote control within 30° angle on or off. • Tap CH or to move through the channels one channel at a ...not intended to the polarity diagram in the battery compartment. 3 Replace the compartment cover. they can overheat and rupture. (Follow battery manufacturer's directions.) Remote control basics • Press POWER to turn the unit on either side of the...
...8226; You can directly access specific channels using batteries in this device: 1. Illustration of MV13Q41 Operation: • Aim the remote control at the remote sensor and press control buttons to operate. • Operate the remote control within 30° angle on or off. • Tap CH or to move through the channels one channel at a ...not intended to the polarity diagram in the battery compartment. 3 Replace the compartment cover. they can overheat and rupture. (Follow battery manufacturer's directions.) Remote control basics • Press POWER to turn the unit on either side of the...

User Manual
Page 14
... you use a cable box, turn off . Notes: • If the unit does not operate properly, or No key operation (by the unit and/or the remote control): Static electricity, etc., may not function 3 Press B or A to select "OFF". Disconnect the AC power cord once, then connect it on the screen. 8 : 47AM MON...
... you use a cable box, turn off . Notes: • If the unit does not operate properly, or No key operation (by the unit and/or the remote control): Static electricity, etc., may not function 3 Press B or A to select "OFF". Disconnect the AC power cord once, then connect it on the screen. 8 : 47AM MON...

User Manual
Page 19
... every ten minutes to remind you to go back to 0. The channel automatically stops at the next channel set into the PHONE jack on the remote control. After the sleep time is operating. TV operation SLEEP CH RTN CH / VOL +/-
... every ten minutes to remind you to go back to 0. The channel automatically stops at the next channel set into the PHONE jack on the remote control. After the sleep time is operating. TV operation SLEEP CH RTN CH / VOL +/-
User Manual
Page 27
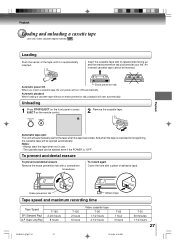
... the cassette tape with its beginning, the cassette tape will start automatically. Unloading 1 Press STOP/EJECT on the front panel or press EJECT on the remote control. 2 Remove the cassette tape. Automatic tape eject This unit will turn ON automatically. Automatic power ON Erase prevention tab When you insert a cassette tape the...
... the cassette tape with its beginning, the cassette tape will start automatically. Unloading 1 Press STOP/EJECT on the front panel or press EJECT on the remote control. 2 Remove the cassette tape. Automatic tape eject This unit will turn ON automatically. Automatic power ON Erase prevention tab When you insert a cassette tape the...
User Manual
Page 34
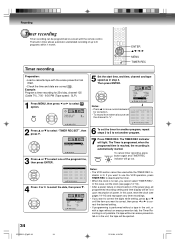
... the time and date are correct 16 . The built-in - Timer recording ENTER ▲/▼/B/ A MENU TIMER REC Preparation: • Load a cassette tape with the remote control. TIMER REC SET DATE 2 3(THU) START 7:0 0PM END 9:3 0PM CH 125 SPEED SLP / / / / ENTER/MENU Notes: • Press ▲ to move cursor backward for correction...
... the time and date are correct 16 . The built-in - Timer recording ENTER ▲/▼/B/ A MENU TIMER REC Preparation: • Load a cassette tape with the remote control. TIMER REC SET DATE 2 3(THU) START 7:0 0PM END 9:3 0PM CH 125 SPEED SLP / / / / ENTER/MENU Notes: • Press ▲ to move cursor backward for correction...

User Manual
Page 39
...OR SERVICE THE UNIT BY REMOVING THE REAR COVER. Timer recording does not work . Video heads are weak. Clean the video heads. 39 Aim the remote control at the sensor. Operate within 5 m or reduce the light of the room. 10 Clear the path of the beam. 10 Replace the batteries.... (the TIMER REC indicator is an obstacle in the unit once does not improve the picture, play it several times before requesting service. The remote control is not set correctly. The batteries are dirty. This signifies that the heads become dirty enough to produce clear pictures. • To help ...
...OR SERVICE THE UNIT BY REMOVING THE REAR COVER. Timer recording does not work . Video heads are weak. Clean the video heads. 39 Aim the remote control at the sensor. Operate within 5 m or reduce the light of the room. 10 Clear the path of the beam. 10 Replace the batteries.... (the TIMER REC indicator is an obstacle in the unit once does not improve the picture, play it several times before requesting service. The remote control is not set correctly. The batteries are dirty. This signifies that the heads become dirty enough to produce clear pictures. • To help ...

User Manual
Page 40
...Audio track: Tape speed: F.FWD/REW time: Speed search: GENERAL Power source: Power consumption: Dimensions: Weight: Terminals: Storage temperature: Operating temperature: Remote control: Accessories: MV13Q41 13 inches* (335.4 mm diagonal) Quartz PLL frequency synthesized VHF 2-13 UHF 14-69 Cable TV 14-36 (A)-(W) 37-59...95-99 (A-5)-(A-1) 100-125 (100)-(125) 01 (5A) VHF/UHF In 75 ohms coaxial 1-1/2 x 2-11/16 inches (38 x 69 mm), 8 ohm 1.5W MV20Q41 20 inches* (508.0 mm diagonal) 3 inches (76.2 mm), 8 ohm x 2 0.75W + 0.75W VHS, 2 rotary heads helical scanning system NTSC color VHS ...
...Audio track: Tape speed: F.FWD/REW time: Speed search: GENERAL Power source: Power consumption: Dimensions: Weight: Terminals: Storage temperature: Operating temperature: Remote control: Accessories: MV13Q41 13 inches* (335.4 mm diagonal) Quartz PLL frequency synthesized VHF 2-13 UHF 14-69 Cable TV 14-36 (A)-(W) 37-59...95-99 (A-5)-(A-1) 100-125 (100)-(125) 01 (5A) VHF/UHF In 75 ohms coaxial 1-1/2 x 2-11/16 inches (38 x 69 mm), 8 ohm 1.5W MV20Q41 20 inches* (508.0 mm diagonal) 3 inches (76.2 mm), 8 ohm x 2 0.75W + 0.75W VHS, 2 rotary heads helical scanning system NTSC color VHS ...


