User Manual
Page 2
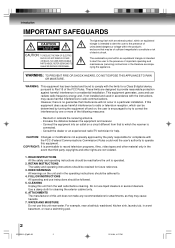
... make any recommendations for a Class B digital device, pursuant to Part 15 of this unit from that to which can radiate radio frequency energy and, if not installed and used in accordance with arrowhead symbol, within an equilateral triangle is intended to alert the user to the presence of uninsulated dangerous voltage within an equilateral triangle is operated. 2. REFER SERVICING...
... make any recommendations for a Class B digital device, pursuant to Part 15 of this unit from that to which can radiate radio frequency energy and, if not installed and used in accordance with arrowhead symbol, within an equilateral triangle is intended to alert the user to the presence of uninsulated dangerous voltage within an equilateral triangle is operated. 2. REFER SERVICING...

User Manual
Page 4
... that the cable ground shall be connected to the grounding system of the building, as close to this unit yourself as the original part. For example: a. Adjust only those that provides guidelines for service. 19. When the power-supply cord or plug is in damage and will often require extensive work by following the operating instructions. NOTE TO CABLE TV SYSTEM INSTALLER This...
... that the cable ground shall be connected to the grounding system of the building, as close to this unit yourself as the original part. For example: a. Adjust only those that provides guidelines for service. 19. When the power-supply cord or plug is in damage and will often require extensive work by following the operating instructions. NOTE TO CABLE TV SYSTEM INSTALLER This...
User Manual
Page 6
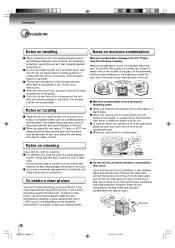
...VCR, the playback picture may become warm after you place this case, place the unit away from the air conditioner directly hits the unit. Do not use volatile liquids, such as it was originally packed at the factory. When the unit is not in use a chemical saturated cloth to remove the video cassette turn...and rear panels of use the unit when moisture condensation may be sure to clean the unit, follow that product's instructions. Moisture condensation damages the unit. To obtain a clear picture, we recommend regular inspection and maintenance (cleaning or parts replacement) ...
...VCR, the playback picture may become warm after you place this case, place the unit away from the air conditioner directly hits the unit. Do not use volatile liquids, such as it was originally packed at the factory. When the unit is not in use a chemical saturated cloth to remove the video cassette turn...and rear panels of use the unit when moisture condensation may be sure to clean the unit, follow that product's instructions. Moisture condensation damages the unit. To obtain a clear picture, we recommend regular inspection and maintenance (cleaning or parts replacement) ...
User Manual
Page 7
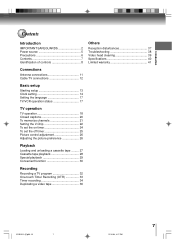
... of controls 8 Others Reception disturbances 37 Troubleshooting 38 Video head cleaning 39 Specifications 40 Limited warranty 41 Connections Antenna connections 11 Cable TV connections 12 Basic setup Starting setup 13 Clock setting 14 Setting the language 17 TV/VCR operation status 17 TV operation TV operation 18 Closed captions 20 To memorize channels 21 Setting the V-Chip 22 To set the on timer 24 To set the off timer 25 Picture control adjustment 26 Adjusting the picture preference 26 Playback Loading and unloading...
... of controls 8 Others Reception disturbances 37 Troubleshooting 38 Video head cleaning 39 Specifications 40 Limited warranty 41 Connections Antenna connections 11 Cable TV connections 12 Basic setup Starting setup 13 Clock setting 14 Setting the language 17 TV/VCR operation status 17 TV operation TV operation 18 Closed captions 20 To memorize channels 21 Setting the V-Chip 22 To set the on timer 24 To set the off timer 25 Picture control adjustment 26 Adjusting the picture preference 26 Playback Loading and unloading...

User Manual
Page 9
...+ button 29 TIMER REC button 34 SPEED button 32 COUNTER RESET button 30 5S20101A [E]p06-10 9 9 12/16/04, 4:27 PM button 29 REC button 32 ZERO RETURN button 31 POWER button 13 SLEEP button 19 CM SKIP button 29 D.TRACKING button 29 VOL +/- Introduction Remote control The instructions in for details. EJECT button 27 TV MONITOR button 31 Direct channel selection buttons (0-9) 18 Number buttons (0-9) 22 DISPLAY button 17 PROGRAM button 24 CH / button 19 INPUT button 36 CH RTN button 19 Direction buttons ( / / / ) 13 MENU button...
...+ button 29 TIMER REC button 34 SPEED button 32 COUNTER RESET button 30 5S20101A [E]p06-10 9 9 12/16/04, 4:27 PM button 29 REC button 32 ZERO RETURN button 31 POWER button 13 SLEEP button 19 CM SKIP button 29 D.TRACKING button 29 VOL +/- Introduction Remote control The instructions in for details. EJECT button 27 TV MONITOR button 31 Direct channel selection buttons (0-9) 18 Number buttons (0-9) 22 DISPLAY button 17 PROGRAM button 24 CH / button 19 INPUT button 36 CH RTN button 19 Direction buttons ( / / / ) 13 MENU button...

User Manual
Page 10
... diagram in the battery compartment. 3 Replace the compartment cover. they can directly access specific channels using batteries in this device: 1. Approx. 5 meters 10 5S20101A [E]p06-10 10 12/16/04, 4:27 PM Be sure to the device. Illustration of MV13Q41 Operation: • Aim the remote control at a time. • The Direction buttons (▲/▼/B/A) are also used for a long period of batteries specified. 2. Introduction Identification of controls (continued) Inserting batteries 1 Open the battery...
... diagram in the battery compartment. 3 Replace the compartment cover. they can directly access specific channels using batteries in this device: 1. Approx. 5 meters 10 5S20101A [E]p06-10 10 12/16/04, 4:27 PM Be sure to the device. Illustration of MV13Q41 Operation: • Aim the remote control at a time. • The Direction buttons (▲/▼/B/A) are also used for a long period of batteries specified. 2. Introduction Identification of controls (continued) Inserting batteries 1 Open the battery...
User Manual
Page 12
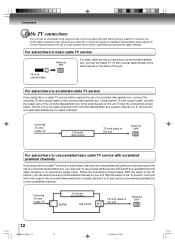
... the switch in which the signal is generally provided by the cable company. Some cable companies offer "premium pay channels" in the "A" position, tune your unit. Using another 75 ohm coaxial cable, connect the output jack of the converter/descrambler box to select channels. For subscribers to basic cable TV service Antenna jack For basic cable service not requiring a converter/descrambler box, connect the Cable TV 75 ohm coaxial cable directly...
... the switch in which the signal is generally provided by the cable company. Some cable companies offer "premium pay channels" in the "A" position, tune your unit. Using another 75 ohm coaxial cable, connect the output jack of the converter/descrambler box to select channels. For subscribers to basic cable TV service Antenna jack For basic cable service not requiring a converter/descrambler box, connect the Cable TV 75 ohm coaxial cable directly...
User Manual
Page 13
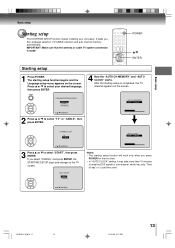
... setup 1 Press POWER. AUTO SETUP START CANCEL Notes: • The starting setup function begins and the Language setup menu appears on the screen. IMPORTANT: Make sure that the antenna or cable TV system connection is completed, the TV channel appears on the screen. After the starting setup is made! It leads you select "CANCEL" and press ENTER, the STARTING SETUP stops and changes to select your unit easily. Basic setup Basic setup Starting setup...
... setup 1 Press POWER. AUTO SETUP START CANCEL Notes: • The starting setup function begins and the Language setup menu appears on the screen. IMPORTANT: Make sure that the antenna or cable TV system connection is completed, the TV channel appears on the screen. After the starting setup is made! It leads you select "CANCEL" and press ENTER, the STARTING SETUP stops and changes to select your unit easily. Basic setup Basic setup Starting setup...

User Manual
Page 14
... TIME DAYLIGHT SAVING TIME / / / / MENU Auto clock adjustment The auto clock adjustment will be left on . • Plug the AC power cord to the AC outlet. Basic setup Clock setting The auto clock function will automatically set the built-in clock (Month, Day, Year and Time) when the unit is connected to an antenna or cable system and it is set to "OFF", the auto clock adjustment does not function. • Set the clock manually 16 . The auto clock may affect the player's operation...
... TIME DAYLIGHT SAVING TIME / / / / MENU Auto clock adjustment The auto clock adjustment will be left on . • Plug the AC power cord to the AC outlet. Basic setup Clock setting The auto clock function will automatically set the built-in clock (Month, Day, Year and Time) when the unit is connected to an antenna or cable system and it is set to "OFF", the auto clock adjustment does not function. • Set the clock manually 16 . The auto clock may affect the player's operation...

User Manual
Page 16
... time manually for timer recordings, ON/OFF timer and daylight saving time if the auto clock process did not set the month, then press ▼. CLOCK SET MONTH DAY YEAR TIME 3 26(SAT) 2005 8:30AM / / / / ENTER/MENU 5 After setting the clock, date and time starts functioning automatically. 8:30 AM SAT To make corrections any time during the process Press ▲ or ▼ repeatedly until the item you can change blinks, then set...
... time manually for timer recordings, ON/OFF timer and daylight saving time if the auto clock process did not set the month, then press ▼. CLOCK SET MONTH DAY YEAR TIME 3 26(SAT) 2005 8:30AM / / / / ENTER/MENU 5 After setting the clock, date and time starts functioning automatically. 8:30 AM SAT To make corrections any time during the process Press ▲ or ▼ repeatedly until the item you can change blinks, then set...
User Manual
Page 18
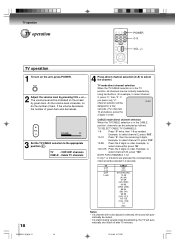
...; If a station being viewed stops broadcasting, the TV will be selected in order. Example, to select channel 120, press "120". The volume level will auto- Cable TV channels 4 Press direct channel selection (0-9) to select channel 2, press "002". 10-12: Press "0", then the remaining 2 digits. Example, to select the channel. TV mode direct channel selection When the TV/CABLE selection is selected, the sound will be indicated on the unit, press POWER. 2 Adjust the volume level by green bars...
...; If a station being viewed stops broadcasting, the TV will be selected in order. Example, to select channel 120, press "120". The volume level will auto- Cable TV channels 4 Press direct channel selection (0-9) to select channel 2, press "002". 10-12: Press "0", then the remaining 2 digits. Example, to select the channel. TV mode direct channel selection When the TV/CABLE selection is selected, the sound will be indicated on the unit, press POWER. 2 Adjust the volume level by green bars...
User Manual
Page 22
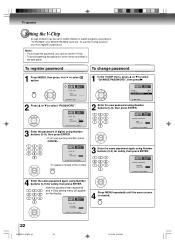
... the password (4 digits) using Number buttons (0-9) for safety, then press ENTER. 0-9/ENTER/CANCEL/MENU 4 Enter the same password again using Number buttons (0-9), then press ENTER. • If you must register a password. Now the password was registered and V-Chip setting menu will appear on the display. V-CHIP SET CONFIRM PASSWORD : 0-9/ENTER/CANCEL/MENU 4 Press MENU repeatedly until the menu screen is cleared. 22 5S20101A [E]p22-26 22 12/16/04, 4:28 PM TV operation Setting...
... the password (4 digits) using Number buttons (0-9) for safety, then press ENTER. 0-9/ENTER/CANCEL/MENU 4 Enter the same password again using Number buttons (0-9), then press ENTER. • If you must register a password. Now the password was registered and V-Chip setting menu will appear on the display. V-CHIP SET CONFIRM PASSWORD : 0-9/ENTER/CANCEL/MENU 4 Press MENU repeatedly until the menu screen is cleared. 22 5S20101A [E]p22-26 22 12/16/04, 4:28 PM TV operation Setting...
User Manual
Page 27
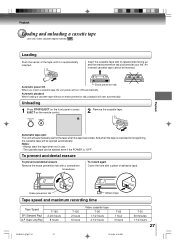
... unit power will be ejected automatically. Screwdriver To record again Cover the hole with its beginning, the cassette tape will turn ON automatically. An inverted cassette tape cannot be ejected even if the POWER is automatically...eject This unit will start automatically. To prevent accidental erasure To prevent accidental erasure Remove the erase prevention tab with a screwdriver. Playback Loading and unloading a cassette tape Use only video cassette tapes marked . Unloading 1 Press STOP/EJECT on the front panel or press EJECT on the remote control. 2 Remove...
... unit power will be ejected automatically. Screwdriver To record again Cover the hole with its beginning, the cassette tape will turn ON automatically. An inverted cassette tape cannot be ejected even if the POWER is automatically...eject This unit will start automatically. To prevent accidental erasure To prevent accidental erasure Remove the erase prevention tab with a screwdriver. Playback Loading and unloading a cassette tape Use only video cassette tapes marked . Unloading 1 Press STOP/EJECT on the front panel or press EJECT on the remote control. 2 Remove...
User Manual
Page 34
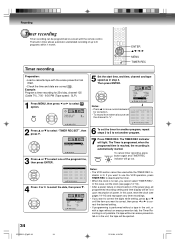
... set , you want to use the VCR operation, press TIMER REC to deactivate the timer. • When the clock is in the unit, the tape will be used while the TIMER REC in- TIMER REC SET AUTO REPEAT OFF / / / MENU 3 Press ▲ or ▼ to select one of the program line, then press ENTER. 5 Set the start time, end time, channel and tape speed as in timer allows automatic unattended recording of power...
... set , you want to use the VCR operation, press TIMER REC to deactivate the timer. • When the clock is in the unit, the tape will be used while the TIMER REC in- TIMER REC SET AUTO REPEAT OFF / / / MENU 3 Press ▲ or ▼ to select one of the program line, then press ENTER. 5 Set the start time, end time, channel and tape speed as in timer allows automatic unattended recording of power...
User Manual
Page 36
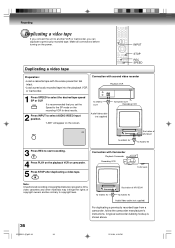
... VIDEO IN To AUDIO IN 3 Press REC to select AUDIO/VIDEO input position. To VIDEO OUT Audio/Video cable (not supplied) To AUDIO OUT Recording VCR LINE Illustration of MV13Q41 To AUDIO IN Audio/Video cable (not supplied) For duplicating a previously recorded tape from a camcorder, follow the camcorder manufacturer's instructions. INPUT Duplicating a video tape STOP REC SPEED Preparation: • Load a cassette tape with second video recorder Playback VCR 1 Press SPEED to copyright laws. Recording Duplicating a video tape If you connect...
... VIDEO IN To AUDIO IN 3 Press REC to select AUDIO/VIDEO input position. To VIDEO OUT Audio/Video cable (not supplied) To AUDIO OUT Recording VCR LINE Illustration of MV13Q41 To AUDIO IN Audio/Video cable (not supplied) For duplicating a previously recorded tape from a camcorder, follow the camcorder manufacturer's instructions. INPUT Duplicating a video tape STOP REC SPEED Preparation: • Load a cassette tape with second video recorder Playback VCR 1 Press SPEED to copyright laws. Recording Duplicating a video tape If you connect...

User Manual
Page 38
.../CABLE selection is not connected or possible local interference. TV station experiencing problems. Antenna (CABLE) connector is not set to the appropriate position. The MUTE button is not activated. TV shuts off. Closed caption is depressed. TV station stopped broadcasting. The CLOSED CAPTION button is in the appropriate position. POSSIBLE SOLUTIONS PAGE Connect the AC power cord to turn on , the Cassette is depressed. Check picture control adjustments...
.../CABLE selection is not connected or possible local interference. TV station experiencing problems. Antenna (CABLE) connector is not set to the appropriate position. The MUTE button is not activated. TV shuts off. Closed caption is depressed. TV station stopped broadcasting. The CLOSED CAPTION button is in the appropriate position. POSSIBLE SOLUTIONS PAGE Connect the AC power cord to turn on , the Cassette is depressed. Check picture control adjustments...

User Manual
Page 39
... require cleaning, use only good quality VHS tapes. DO NOT ATTEMPT TO CLEAN THE VIDEO HEADS OR SERVICE THE UNIT BY REMOVING THE REAR COVER. The batteries are not inserted correctly. buttons on the screen. Operate within 5 m or reduce the light of the room. 10 Clear the path of the beam. 10 Replace the batteries. 10 Insert correctly. 10 Video head cleaning VIDEO HEAD CLOGGING...
... require cleaning, use only good quality VHS tapes. DO NOT ATTEMPT TO CLEAN THE VIDEO HEADS OR SERVICE THE UNIT BY REMOVING THE REAR COVER. The batteries are not inserted correctly. buttons on the screen. Operate within 5 m or reduce the light of the room. 10 Clear the path of the beam. 10 Replace the batteries. 10 Insert correctly. 10 Video head cleaning VIDEO HEAD CLOGGING...

User Manual
Page 40
SLP: 11.12 mm/sec. Others Specifications TELEVISION Picture tube: Tuner type: Receiving channels: Antenna input: Speaker: Audio output power: VCR Video system: Video signal: Cassette tape: Audio track: Tape speed: F.FWD/REW time: Speed search: GENERAL Power source: Power consumption: Dimensions: Weight: Terminals: Storage temperature: Operating temperature: Remote control: Accessories: MV13Q41 13 inches* (335.4 mm diagonal) Quartz PLL frequency synthesized VHF 2-13 UHF 14-69 Cable TV 14-36 (A)-(W) 37-59 (AA...
SLP: 11.12 mm/sec. Others Specifications TELEVISION Picture tube: Tuner type: Receiving channels: Antenna input: Speaker: Audio output power: VCR Video system: Video signal: Cassette tape: Audio track: Tape speed: F.FWD/REW time: Speed search: GENERAL Power source: Power consumption: Dimensions: Weight: Terminals: Storage temperature: Operating temperature: Remote control: Accessories: MV13Q41 13 inches* (335.4 mm diagonal) Quartz PLL frequency synthesized VHF 2-13 UHF 14-69 Cable TV 14-36 (A)-(W) 37-59 (AA...

User Manual
Page 41
... (90) day warranty for set installation, set to provide you with the first rental or thirty (30) days from the date of one way to enable TACP to an Authorized TACP Service Station. You should read this owner's manual thoroughly before operating this warranty. You are your rights under this product. This is replaced after the date of Picture Tube TACP further...
... (90) day warranty for set installation, set to provide you with the first rental or thirty (30) days from the date of one way to enable TACP to an Authorized TACP Service Station. You should read this owner's manual thoroughly before operating this warranty. You are your rights under this product. This is replaced after the date of Picture Tube TACP further...

User Manual
Page 42
... enforce any obligation of TACP arising under any statute, or law of these warranties in this warranty or under this manual and checking the section " Troubleshooting" and you still find the nearest Toshiba Authorized Service Station. ( 2 ) Please present your home when warranty service is authorized to change, modify or extend the terms of the United States or any manner whatsoever...
... enforce any obligation of TACP arising under any statute, or law of these warranties in this warranty or under this manual and checking the section " Troubleshooting" and you still find the nearest Toshiba Authorized Service Station. ( 2 ) Please present your home when warranty service is authorized to change, modify or extend the terms of the United States or any manner whatsoever...


