

User Manual
Page 7
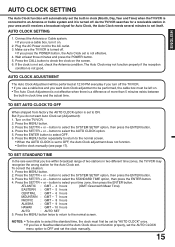
PREPARATION SAFETY PRECAUTIONS ...6 LOCATION OF CONTROLS ...8 REMOTE CONTROL ...9 ANTENNA CONNECTIONS ...11 CABLE TV CONNECTIONS ...13 SETTING THE LANGUAGE ...14 AUTO CLOCK SETTING ...15 MANUAL CLOCK SETTING ...17 TV OPERATION TV OPERATION ...18 TO MEMORIZE CHANNELS ...22 TO SET THE ON TIMER ...25 TO SET THE OFF TIMER ...26 PICTURE CONTROL ADJUSTMENTS ...27 PLAYBACK LOADING AND...
PREPARATION SAFETY PRECAUTIONS ...6 LOCATION OF CONTROLS ...8 REMOTE CONTROL ...9 ANTENNA CONNECTIONS ...11 CABLE TV CONNECTIONS ...13 SETTING THE LANGUAGE ...14 AUTO CLOCK SETTING ...15 MANUAL CLOCK SETTING ...17 TV OPERATION TV OPERATION ...18 TO MEMORIZE CHANNELS ...22 TO SET THE ON TIMER ...25 TO SET THE OFF TIMER ...26 PICTURE CONTROL ADJUSTMENTS ...27 PLAYBACK LOADING AND...

User Manual
Page 11
...12 18 25 26 13 19 5 27 20 14 6 15 21 7 28 DESCRIPTION OF CONTROLS 1. CLOSED CAPTION Button - Press to adjust tracking manually. 19. Press the + button to change to a higher numbered channel set into memory. In the Play mode, this button rapidly winds the tape... Displays the present time/day of tracking to display the On-Screen menu function. 5. Buttons - CHANNEL RETURN Button - Press again to turn the TV/VCR off automatically after up to decrease the volume level. 20. CALL Button - During recording, this button temporarily stops the tape. VOLUME + /...
...12 18 25 26 13 19 5 27 20 14 6 15 21 7 28 DESCRIPTION OF CONTROLS 1. CLOSED CAPTION Button - Press to adjust tracking manually. 19. Press the + button to change to a higher numbered channel set into memory. In the Play mode, this button rapidly winds the tape... Displays the present time/day of tracking to display the On-Screen menu function. 5. Buttons - CHANNEL RETURN Button - Press again to turn the TV/VCR off automatically after up to decrease the volume level. 20. CALL Button - During recording, this button temporarily stops the tape. VOLUME + /...
User Manual
Page 17
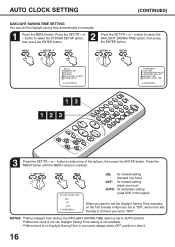
... press the ENTER button. 4. NOTES: • To be able to OFF, the Auto Clock adjustment does not function. • Set the clock manually (see page 17). Press the CALL button to the normal screen. • When the AUTO CLOCK is set (Adjustment): 1. button to OFF and... time zone, then press the ENTER button. Press the SET/TR + or - Press the MENU button repeatedly to return to check the clock on the TV/VCR. 2. ATLANTIC : GMT - 4 hours (GMT: Greenwich Mean Time) EASTERN : GMT - 5 hours CENTRAL : GMT - 6 hours MOUNTAIN : GMT - 7 hours PACIFIC : GMT - 8 hours ALASKA : GMT ...
... press the ENTER button. 4. NOTES: • To be able to OFF, the Auto Clock adjustment does not function. • Set the clock manually (see page 17). Press the CALL button to the normal screen. • When the AUTO CLOCK is set (Adjustment): 1. button to OFF and... time zone, then press the ENTER button. Press the SET/TR + or - Press the MENU button repeatedly to return to check the clock on the TV/VCR. 2. ATLANTIC : GMT - 4 hours (GMT: Greenwich Mean Time) EASTERN : GMT - 5 hours CENTRAL : GMT - 6 hours MOUNTAIN : GMT - 7 hours PACIFIC : GMT - 8 hours ALASKA : GMT ...
User Manual
Page 18
REC CH- button to select one hour) AUTO: for automatic setting (read XDS in the signal) When you want to set the Daylight Saving Time manually, on the last Sunday in step 3. 16 Press the MENU button until the MENU screen is no Daylight Saving Time in your area, always select ... 3 SKIP RCEOSUENTTER INPUT SEARCH POWER SELECT VOL+ PAUSE/STILL 3 Press the SET/TR + or - MENU SET/TR ENTER SET/TR ENTER MENU TIMER REC SET TV SETUP CH SETUP AUTO REPEAT ON OFF SYSTEM SETUP á+/Ð/ENTER/MENUñ SYSTEM SETUP CLOCK SET LANGUAGE/IDIOMA/LANGUE AUTO CLOCK ON OFF...
REC CH- button to select one hour) AUTO: for automatic setting (read XDS in the signal) When you want to set the Daylight Saving Time manually, on the last Sunday in step 3. 16 Press the MENU button until the MENU screen is no Daylight Saving Time in your area, always select ... 3 SKIP RCEOSUENTTER INPUT SEARCH POWER SELECT VOL+ PAUSE/STILL 3 Press the SET/TR + or - MENU SET/TR ENTER SET/TR ENTER MENU TIMER REC SET TV SETUP CH SETUP AUTO REPEAT ON OFF SYSTEM SETUP á+/Ð/ENTER/MENUñ SYSTEM SETUP CLOCK SET LANGUAGE/IDIOMA/LANGUE AUTO CLOCK ON OFF...

User Manual
Page 19
... set the date and time manually for Timer Recordings, ON/OFF Timer and Daylight Saving Time if the Auto Clock process did not set correctly. • To move cursor backward, press the CANCEL button. 17 MENU SET/TR ENTER SET/TR ENTER MENU TIMER REC SET TV SETUP CH SETUP AUTO REPEAT...
... set the date and time manually for Timer Recordings, ON/OFF Timer and Daylight Saving Time if the Auto Clock process did not set correctly. • To move cursor backward, press the CANCEL button. 17 MENU SET/TR ENTER SET/TR ENTER MENU TIMER REC SET TV SETUP CH SETUP AUTO REPEAT...

User Manual
Page 47
..., 13 Press the CLOSED CAPTION button to turn on the closed captions. buttons on the screen. Aim the remote control at the sensor. TV signal is too far or too much light in the path of Clear the path of automatic tracking circuit. The video cassette's erase prevention ...tab is set . Adjust tracking manually using the SET/TR +/- OFF Timer is broken off . Replace the batteries. 10 The batteries are weak. Set Sleep Timer to "CANCEL". Try...
..., 13 Press the CLOSED CAPTION button to turn on the closed captions. buttons on the screen. Aim the remote control at the sensor. TV signal is too far or too much light in the path of Clear the path of automatic tracking circuit. The video cassette's erase prevention ...tab is set . Adjust tracking manually using the SET/TR +/- OFF Timer is broken off . Replace the batteries. 10 The batteries are weak. Set Sleep Timer to "CANCEL". Try...

