Satellite M505 Resource Guide
Page 39
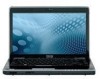
Adding memory (optional) 39 The following screen may need to work. The memory module pops up . 7 Reconnect the cables. 8 Restart the computer. TECHNICAL NOTE: You must remove the top module first before ...
Adding memory (optional) 39 The following screen may need to work. The memory module pops up . 7 Reconnect the cables. 8 Restart the computer. TECHNICAL NOTE: You must remove the top module first before ...
Satellite M505 Resource Guide
Page 40
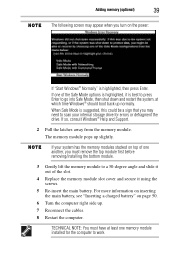
...the ExpressCard into the slot until it . To insert an ExpressCard: 1 Locate the ExpressCard slot on your display are an intrinsic characteristic of the screen while on battery power. Removing an ExpressCard® 1 Prepare the card for safe removal, a message will deteriorate. 40 Your computer's TFT display... Your computer's TFT display Small bright dots may appear on your screen display when you insert it locks in the Notification Area and then selecting the card or device you can be able to do anything ...
...the ExpressCard into the slot until it . To insert an ExpressCard: 1 Locate the ExpressCard slot on your display are an intrinsic characteristic of the screen while on battery power. Removing an ExpressCard® 1 Prepare the card for safe removal, a message will deteriorate. 40 Your computer's TFT display... Your computer's TFT display Small bright dots may appear on your screen display when you insert it locks in the Notification Area and then selecting the card or device you can be able to do anything ...
Satellite M505 Resource Guide
Page 42
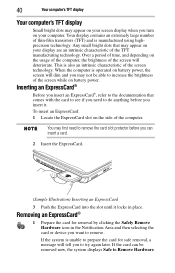
...For these reasons, your finger along the right edge of the secondary (right-hand) button depends on previous video platforms. These features include wide-screen movies, multiple language tracks, digital surround sound, multiple camera angles, and interactive menus. That is counted as you play a DVD disc from ... it uses the right mouse button. 42 Using the optical drive Because the TouchPad is much smaller than the display screen, moving your cursor across the screen often means having to move the cursor to the item, then press and release the primary (left mouse button....
...For these reasons, your finger along the right edge of the secondary (right-hand) button depends on previous video platforms. These features include wide-screen movies, multiple language tracks, digital surround sound, multiple camera angles, and interactive menus. That is counted as you play a DVD disc from ... it uses the right mouse button. 42 Using the optical drive Because the TouchPad is much smaller than the display screen, moving your cursor across the screen often means having to move the cursor to the item, then press and release the primary (left mouse button....
Satellite M505 Resource Guide
Page 55
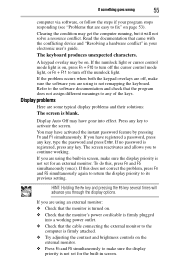
...; Check that the cable connecting the external monitor to the software documentation and check that are some typical display problems and their solutions: The screen is blank. To do this does not correct the problem, press Fn and F5 simultaneously again to return the display priority to any key,...of the keys. If the numlock light or cursor control mode light is not remapping the keyboard. Press any key. If you to activate the screen. If you through the display options. If no password is registered, press any key to continue working power outlet. ❖ Check that the...
...; Check that the cable connecting the external monitor to the software documentation and check that are some typical display problems and their solutions: The screen is blank. To do this does not correct the problem, press Fn and F5 simultaneously again to return the display priority to any key,...of the keys. If the numlock light or cursor control mode light is not remapping the keyboard. Press any key. If you to activate the screen. If you through the display options. If no password is registered, press any key to continue working power outlet. ❖ Check that the...
Satellite M505 Resource Guide
Page 56
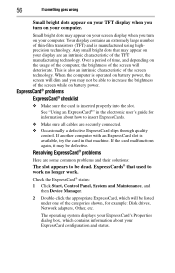
... dots that used to be defective. Over a period of time, and depending on the usage of the computer, the brightness of the screen will dim and you may appear on your display are securely connected. ❖ Occasionally a defective ExpressCard slips through quality control. ExpressCard®...work no longer work. This is also an intrinsic characteristic of thin-film transistors (TFT) and is operated on battery power, the screen will deteriorate. ExpressCards® that may not be listed under one of the categories shown, for information about your ExpressCard configuration and ...
... dots that used to be defective. Over a period of time, and depending on the usage of the computer, the brightness of the screen will dim and you may appear on your display are securely connected. ❖ Occasionally a defective ExpressCard slips through quality control. ExpressCard®...work no longer work. This is also an intrinsic characteristic of thin-film transistors (TFT) and is operated on battery power, the screen will deteriorate. ExpressCards® that may not be listed under one of the categories shown, for information about your ExpressCard configuration and ...
Satellite M505 Resource Guide
Page 59
... drive) removing 45 computer moving 47 setting up 34 59 computing tips 41 connecting AC adaptor 31 power cord/cable 32 printer 33 D display problems screen is blank 55 disposing of used batteries 52 double-click 42 DVD using 42 DVD-ROM or multi-function drive inserting discs 44 removing 45...
... drive) removing 45 computer moving 47 setting up 34 59 computing tips 41 connecting AC adaptor 31 power cord/cable 32 printer 33 D display problems screen is blank 55 disposing of used batteries 52 double-click 42 DVD using 42 DVD-ROM or multi-function drive inserting discs 44 removing 45...
Satellite M505 Resource Guide
Page 61
61 with computer on 46 ExpressCards® 40 main battery 49 memory module 38 S safety disposing of batteries 52 precautions 29 safety precautions main battery 51 saving files 41 screen problems blank screen 55 setting battery notification 49 setting up AC adaptor 31 computer 34 work environment 29 specifications Features and specifications 58 T tips on computing 41 Toshiba accessories memory 33 TouchPad™ control buttons 42 ON/OFF button 42 primary button 42 secondary button 42 using 41 U USB-compatible printer 33 W Web sites 57
61 with computer on 46 ExpressCards® 40 main battery 49 memory module 38 S safety disposing of batteries 52 precautions 29 safety precautions main battery 51 saving files 41 screen problems blank screen 55 setting battery notification 49 setting up AC adaptor 31 computer 34 work environment 29 specifications Features and specifications 58 T tips on computing 41 Toshiba accessories memory 33 TouchPad™ control buttons 42 ON/OFF button 42 primary button 42 secondary button 42 using 41 U USB-compatible printer 33 W Web sites 57

User Guide
Page 55
...you turn on the computer for the first time Small bright dots may appear on the usage of the computer, the brightness of the screen technology. Any small bright dots that all drives and slots are an intrinsic characteristic of the TFT manufacturing technology. When the computer is operated... on battery power, the screen will dim and you plan to use AC power rather than battery power) are properly connected and ready. 2 Check to increase the brightness...
...you turn on the computer for the first time Small bright dots may appear on the usage of the computer, the brightness of the screen technology. Any small bright dots that all drives and slots are an intrinsic characteristic of the TFT manufacturing technology. When the computer is operated... on battery power, the screen will dim and you plan to use AC power rather than battery power) are properly connected and ready. 2 Check to increase the brightness...
User Guide
Page 56
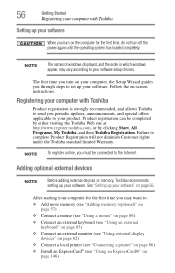
..., announcements, and special offers applicable to your product. See "Setting up your software" on -screen instructions. Product registration can be connected to the Internet. Registering your computer with Toshiba Setting up your software When you turn on the computer for the first time you may vary according... computer, the Setup Wizard guides you through steps to complete Product Registration will not diminish Customer rights under the Toshiba standard limited Warranty. Failure to set up your software. Adding optional external devices NOTE Before adding external devices or memory...
..., announcements, and special offers applicable to your product. See "Setting up your software" on -screen instructions. Product registration can be connected to the Internet. Registering your computer with Toshiba Setting up your software When you turn on the computer for the first time you may vary according... computer, the Setup Wizard guides you through steps to complete Product Registration will not diminish Customer rights under the Toshiba standard limited Warranty. Failure to set up your software. Adding optional external devices NOTE Before adding external devices or memory...

User Guide
Page 63
... normally. In either of the above cases, the Sleep configuration will be lost. You can damage the computer and the memory module. NOTE The following screen may appear when you may need to go into Safe Mode, then shut down and restart the system, at which time Windows® should boot...
... normally. In either of the above cases, the Sleep configuration will be lost. You can damage the computer and the memory module. NOTE The following screen may appear when you may need to go into Safe Mode, then shut down and restart the system, at which time Windows® should boot...
User Guide
Page 67
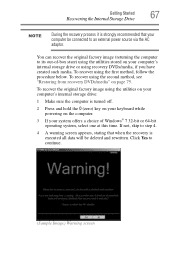
... using the utilities on your computer's internal storage drive: 1 Make sure the computer is executed all data will be connected to continue. (Sample Image) Warning screen Click Yes to an external power source via the AC adaptor. Getting Started 67 Recovering the Internal Storage Drive NOTE During the recovery process it... while powering on the computer. 3 If your computer's internal storage drive or using the utilities stored on page 75. If not, skip to step 4. 4 A warning screen appears, stating that your computer be deleted and rewritten.
... using the utilities on your computer's internal storage drive: 1 Make sure the computer is executed all data will be connected to continue. (Sample Image) Warning screen Click Yes to an external power source via the AC adaptor. Getting Started 67 Recovering the Internal Storage Drive NOTE During the recovery process it... while powering on the computer. 3 If your computer's internal storage drive or using the utilities stored on page 75. If not, skip to step 4. 4 A warning screen appears, stating that your computer be deleted and rewritten.

User Guide
Page 68
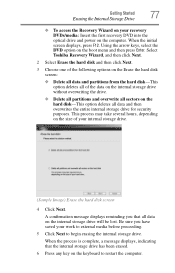
Select Recover to out-of-box state. (Sample Image) Recovery of Factory Default Software screen appears. 68 Getting Started Recovering the Internal Storage Drive 5 When the Toshiba Recovery Wizard opens and the Selecting a process screen displays, select Recovery of Factory Default Software and then click Next. (Sample Image) Selecting a Process screen 6 The Recovery of Factory Default Software screen
Select Recover to out-of-box state. (Sample Image) Recovery of Factory Default Software screen appears. 68 Getting Started Recovering the Internal Storage Drive 5 When the Toshiba Recovery Wizard opens and the Selecting a process screen displays, select Recovery of Factory Default Software and then click Next. (Sample Image) Selecting a Process screen 6 The Recovery of Factory Default Software screen

User Guide
Page 70
Click Yes to continue. (Sample Image) Warning screen 5 When the Toshiba Recovery Wizard opens and the Selecting a process screen displays, select Recovery of Factory Default Software and then click Next. (Sample Image) Selecting a Process screen 70 Getting Started Recovering the Internal Storage Drive 4 A warning screen appears, stating that when the recovery is executed all data will be deleted and rewritten.
Click Yes to continue. (Sample Image) Warning screen 5 When the Toshiba Recovery Wizard opens and the Selecting a process screen displays, select Recovery of Factory Default Software and then click Next. (Sample Image) Selecting a Process screen 70 Getting Started Recovering the Internal Storage Drive 4 A warning screen appears, stating that when the recovery is executed all data will be deleted and rewritten.

User Guide
Page 71
... to save your computer be affected. Be sure to save your work to restart the computer. If you that all information stored on -screen arrow buttons in The size of drive C: field to begin the recovery. Getting Started 71 Recovering the Internal Storage Drive 6 The Recovery ...of Factory Default Software screen 7 Use the on the C: drive. When the process is strongly recommended that the C: drive has been recovered. 10 Press any information on...
... to save your computer be affected. Be sure to save your work to restart the computer. If you that all information stored on -screen arrow buttons in The size of drive C: field to begin the recovery. Getting Started 71 Recovering the Internal Storage Drive 6 The Recovery ...of Factory Default Software screen 7 Use the on the C: drive. When the process is strongly recommended that the C: drive has been recovered. 10 Press any information on...

User Guide
Page 72
... drive: 1 Make sure the computer is executed all data will be deleted and rewritten. If not, skip to continue. (Sample Image) Warning screen Click Yes to step 4. 4 A warning screen appears stating that when the recovery is turned off. 2 Press and hold the 0 (zero) key on your keyboard while powering on the computer...
... drive: 1 Make sure the computer is executed all data will be deleted and rewritten. If not, skip to continue. (Sample Image) Warning screen Click Yes to step 4. 4 A warning screen appears stating that when the recovery is turned off. 2 Press and hold the 0 (zero) key on your keyboard while powering on the computer...

User Guide
Page 73
... process. Getting Started 73 Recovering the Internal Storage Drive 5 When the Toshiba Recovery Wizard opens and the Selecting a process screen displays, select Recovery of Factory Default Software and then click Next. (Sample Image) Selecting a Process screen 6 The Recovery of Factory Default Software screen 7 Click Next. Select Recover without changing the hard drive partitions. (Sample...
... process. Getting Started 73 Recovering the Internal Storage Drive 5 When the Toshiba Recovery Wizard opens and the Selecting a process screen displays, select Recovery of Factory Default Software and then click Next. (Sample Image) Selecting a Process screen 6 The Recovery of Factory Default Software screen 7 Click Next. Select Recover without changing the hard drive partitions. (Sample...
User Guide
Page 74
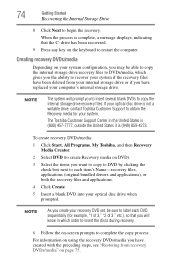
... DVDs/media Depending on the keyboard to copy the internal storage drive recovery files. outside the United States it is not a writable drive, contact Toshiba Customer Support to obtain the Recovery media for example, "1 of 3," "2 of 3," etc.), so that you will prompt you to insert several...files to DVDs/media, which order to insert the discs during recovery. 6 Follow the on-screen prompts to create Recovery media on page 75. If your computer's internal storage drive. The Toshiba Customer Support Center in which gives you the ability to each DVD sequentially (for your optical...
... DVDs/media Depending on the keyboard to copy the internal storage drive recovery files. outside the United States it is not a writable drive, contact Toshiba Customer Support to obtain the Recovery media for example, "1 of 3," "2 of 3," etc.), so that you will prompt you to insert several...files to DVDs/media, which order to insert the discs during recovery. 6 Follow the on-screen prompts to create Recovery media on page 75. If your computer's internal storage drive. The Toshiba Customer Support Center in which gives you the ability to each DVD sequentially (for your optical...
User Guide
Page 75
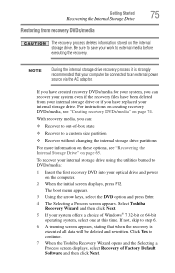
... is strongly recommended that your computer be deleted and rewritten. Be sure to save your work to continue. 7 When the Toshiba Recovery Wizard opens and the Selecting a Process screen displays, select Recovery of Windows® 7 32-bit or 64-bit operating system, select one at this time. Click ... power on page 74. To recover your internal storage drive using the utilities burned to an external power source via the AC adaptor. Select Toshiba Recovery Wizard and then click Next. 5 If your system offers a choice of Factory Default Software and then click Next. Getting Started 75 ...
... is strongly recommended that your computer be deleted and rewritten. Be sure to save your work to continue. 7 When the Toshiba Recovery Wizard opens and the Selecting a Process screen displays, select Recovery of Windows® 7 32-bit or 64-bit operating system, select one at this time. Click ... power on page 74. To recover your internal storage drive using the utilities burned to an external power source via the AC adaptor. Select Toshiba Recovery Wizard and then click Next. 5 If your system offers a choice of Factory Default Software and then click Next. Getting Started 75 ...
User Guide
Page 76
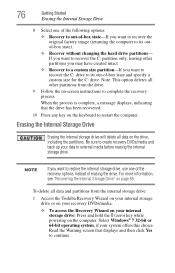
...data to its out-of-box state and specify a custom size for the C: drive. Read the Warning screen that the drive has been recovered. 10 Press any key on -screen instructions to continue. 76 Getting Started Erasing the Internal Storage Drive 8 Select one of the recovery options ...drive, including the partitions. If you want to recover the C: partition only, leaving other partitions from the internal storage drive: 1 Access the Toshiba Recovery Wizard on your internal storage drive or on your recovery DVDs/media. ❖ To access the Recovery Wizard on your system offers this ...
...data to its out-of-box state and specify a custom size for the C: drive. Read the Warning screen that the drive has been recovered. 10 Press any key on -screen instructions to continue. 76 Getting Started Erasing the Internal Storage Drive 8 Select one of the recovery options ...drive, including the partitions. If you want to recover the C: partition only, leaving other partitions from the internal storage drive: 1 Access the Toshiba Recovery Wizard on your internal storage drive or on your recovery DVDs/media. ❖ To access the Recovery Wizard on your system offers this ...
User Guide
Page 77
...drive. ❖ Delete all partitions and overwrite all data and then overwrites the entire internal storage drive for security purposes. When the initial screen displays, press F12. Select Toshiba Recovery Wizard, and then click Next. 2 Select Erase the hard disk and then click Next. 3 Choose one of the following options... you have saved your recovery DVDs/media: Insert the first recovery DVD into the optical drive and power on the Erase the hard disk screen: ❖ Delete all data and partitions from the hard disk-This option deletes all data on the boot menu and then press Enter....
...drive. ❖ Delete all partitions and overwrite all data and then overwrites the entire internal storage drive for security purposes. When the initial screen displays, press F12. Select Toshiba Recovery Wizard, and then click Next. 2 Select Erase the hard disk and then click Next. 3 Choose one of the following options... you have saved your recovery DVDs/media: Insert the first recovery DVD into the optical drive and power on the Erase the hard disk screen: ❖ Delete all data and partitions from the hard disk-This option deletes all data on the boot menu and then press Enter....


