

Owner's Manual - English
Page 1
Introduction Connections Basic Setup TOSHIBA DVD VIDEO RECORDER / VIDEO CASSETTE RECORDER D-VR660KU DVD VIDEO RECORDER / VIDEO CASSETTE RECORDER D-VR660KU OWNER'S MANUAL Disc Management Recording Playback Editing Function Setup VCR Function Printed in the spaces below. Model ...number: Serial number: 2007/12/26 14:43:20 Others Refer to these numbers in China E9MG0UD_D-VR660KU_cover.indd 2-3 1VMN24613 / E9MG0UD © 2008 Toshiba Corporation Owner...
Introduction Connections Basic Setup TOSHIBA DVD VIDEO RECORDER / VIDEO CASSETTE RECORDER D-VR660KU DVD VIDEO RECORDER / VIDEO CASSETTE RECORDER D-VR660KU OWNER'S MANUAL Disc Management Recording Playback Editing Function Setup VCR Function Printed in the spaces below. Model ...number: Serial number: 2007/12/26 14:43:20 Others Refer to these numbers in China E9MG0UD_D-VR660KU_cover.indd 2-3 1VMN24613 / E9MG0UD © 2008 Toshiba Corporation Owner...
Owner's Manual - English
Page 2
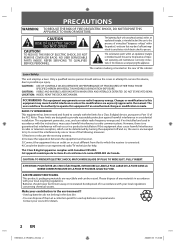
... used up batteries do not belong in the dust bin. • You can radiate radio frequency energy and, if not installed and used in the manual. Make your local recycling regulations. The exclamation point within the product's enclosure that interference will not occur in accordance with Canadian ICES-003. Only a qualified...
... used up batteries do not belong in the dust bin. • You can radiate radio frequency energy and, if not installed and used in the manual. Make your local recycling regulations. The exclamation point within the product's enclosure that interference will not occur in accordance with Canadian ICES-003. Only a qualified...

Owner's Manual - English
Page 4
...are questions regarding your TV set compatibility with 480 progressive scan output, it from devices of intense heat. quick setup guide OWNER'S MANUAL Notice for servicing. Do not place the unit directly on this unit, unplug the power cord immediately and take the unit to our... the "standard definition" output. Grasp it away from AC outlet. In case of picture problems with this 480p DVD recorder, please contact Toshiba Customer Service. Do not block the ventilation holes on top of the unit. patents and other limited viewing uses only unless otherwise authorized by...
...are questions regarding your TV set compatibility with 480 progressive scan output, it from devices of intense heat. quick setup guide OWNER'S MANUAL Notice for servicing. Do not place the unit directly on this unit, unplug the power cord immediately and take the unit to our... the "standard definition" output. Grasp it away from AC outlet. In case of picture problems with this 480p DVD recorder, please contact Toshiba Customer Service. Do not block the ventilation holes on top of the unit. patents and other limited viewing uses only unless otherwise authorized by...

Owner's Manual - English
Page 5
... AM radio to a station with a cleaning cloth. Cleaning the Cabinet • Wipe the front panel and other U.S. Cleaning the Disc Lens • If this owner's manual, the laser optical pickup unit may become blurred or interrupted while the TV program reception is a new audio codec developed by Microsoft® in this...
... AM radio to a station with a cleaning cloth. Cleaning the Cabinet • Wipe the front panel and other U.S. Cleaning the Disc Lens • If this owner's manual, the laser optical pickup unit may become blurred or interrupted while the TV program reception is a new audio codec developed by Microsoft® in this...

Owner's Manual - English
Page 6
... Setup INITIAL SETTING 26 CHANNEL SETTING 27 Auto Channel Scan 27 Adding/Deleting Channels 28 SETTING THE CLOCK 30 Auto Clock Setting 30 Manual Clock Setting 31 Daylight Saving Time 31 TUNER SETTINGS 32 Switching Analog Mode / Digital Mode 32 Channel Selection 32 Selecting TV Audio...DTV Closed Caption 35 Closed Caption Style 36 Disc Management FORMATTING A DISC 38 Choosing the Recording Format of a Brand-New DVD-RW 38 Reformatting a Disc Manually 39 SETTING A DISC TO PROTECT 40 PLAYING THE DISCS IN OTHER DVD PLAYERS . . . . . 41 Auto Finalizing 41 Finalizing a Disc 42 ...
... Setup INITIAL SETTING 26 CHANNEL SETTING 27 Auto Channel Scan 27 Adding/Deleting Channels 28 SETTING THE CLOCK 30 Auto Clock Setting 30 Manual Clock Setting 31 Daylight Saving Time 31 TUNER SETTINGS 32 Switching Analog Mode / Digital Mode 32 Channel Selection 32 Selecting TV Audio...DTV Closed Caption 35 Closed Caption Style 36 Disc Management FORMATTING A DISC 38 Choosing the Recording Format of a Brand-New DVD-RW 38 Reformatting a Disc Manually 39 SETTING A DISC TO PROTECT 40 PLAYING THE DISCS IN OTHER DVD PLAYERS . . . . . 41 Auto Finalizing 41 Finalizing a Disc 42 ...

Owner's Manual - English
Page 8
... sound system. Compatibility DVD mode Available for what disc type each function is, we put on titles. Although DVD+RW/+R are offered with this Owner's Manual To specify for playing back discs on regular DVD players, including computer DVD drives compatible with Dolby Digital or DTS, you can divide or combine...
... sound system. Compatibility DVD mode Available for what disc type each function is, we put on titles. Although DVD+RW/+R are offered with this Owner's Manual To specify for playing back discs on regular DVD players, including computer DVD drives compatible with Dolby Digital or DTS, you can divide or combine...
Owner's Manual - English
Page 15
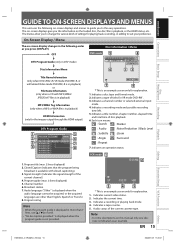
... be acquired, or the acquired languages are other than 7 lines, use [K / L] to suit your preference. OFF DTV Program Guide (only in the following on this manual, only one disc type is displayed in playback) HDMI Information (only for playing back, recording, or editing to scroll. • "No description provided." Indicates a title...
... be acquired, or the acquired languages are other than 7 lines, use [K / L] to suit your preference. OFF DTV Program Guide (only in the following on this manual, only one disc type is displayed in playback) HDMI Information (only for playing back, recording, or editing to scroll. • "No description provided." Indicates a title...

Owner's Manual - English
Page 20
... a stereo audio/video RF modulator. RF MODULATOR CONNECTION If your TV has antenna in jack only, it according to the manual supplied with the RF modulator. In this case, follow the manual supplied with the RF modulator. 4) Plug in this unit S-VIDEO DVD/VCR DVD OUT DVD/VCR DIGITAL AUDIO S-VIDEO COMPONENT...
... a stereo audio/video RF modulator. RF MODULATOR CONNECTION If your TV has antenna in jack only, it according to the manual supplied with the RF modulator. In this case, follow the manual supplied with the RF modulator. 4) Plug in this unit S-VIDEO DVD/VCR DVD OUT DVD/VCR DIGITAL AUDIO S-VIDEO COMPONENT...

Owner's Manual - English
Page 22
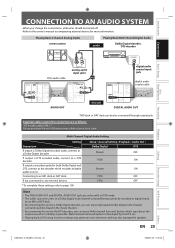
... of your display device. To set "Progressive" to hear the sound being output from the VIDEO OUT or S-VIDEO OUT jack. Check your TV owner's manual for DVD only analog audio TV AUDIO OUT VIDEO OUT (DVD/VCR) Method 1 good picture S-VIDEO IN Method 2 better picture COMPONENT VIDEO IN Y (Green) PB...
... of your display device. To set "Progressive" to hear the sound being output from the VIDEO OUT or S-VIDEO OUT jack. Check your TV owner's manual for DVD only analog audio TV AUDIO OUT VIDEO OUT (DVD/VCR) Method 1 good picture S-VIDEO IN Method 2 better picture COMPONENT VIDEO IN Y (Green) PB...
Owner's Manual - English
Page 25
... theaters. • By connecting this unit to the DTS decoder, you change the connections, all devices should be turned off. • Refer to the owner's manual accompanying external devices for both Dolby Digital and DTS, connect to a Dolby Digital decoder. Multi-channel Surround System is encoded audio for more information. If...
... theaters. • By connecting this unit to the DTS decoder, you change the connections, all devices should be turned off. • Refer to the owner's manual accompanying external devices for both Dolby Digital and DTS, connect to a Dolby Digital decoder. Multi-channel Surround System is encoded audio for more information. If...

Owner's Manual - English
Page 26
... using basic cable) The channels broadcasted in TV and DTV are automatically scanned and memorized. Select the input to which the unit is available in "Manual Clock Setting" on page 31. • If a PBS (public broadcasting station) is connected. 2 Use [K / L] to select your area. Initial Setting Channel Preset Make sure the...
... using basic cable) The channels broadcasted in TV and DTV are automatically scanned and memorized. Select the input to which the unit is available in "Manual Clock Setting" on page 31. • If a PBS (public broadcasting station) is connected. 2 Use [K / L] to select your area. Initial Setting Channel Preset Make sure the...
Owner's Manual - English
Page 27
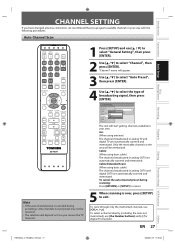
... TV channels. 4 Use [K / L] to select "Channel", then press [ENTER]. General Setting Playback Display Video Recording Clock Channel DivX HDMI Reset All Auto Preset Auto Preset Manual Preset TV Audio Select Air Cable Cable (Extended Scan) The unit will appear. 3 Use [K / L] to exit. Air: (When using basic cable) The channels broadcasted in...
... TV channels. 4 Use [K / L] to select "Channel", then press [ENTER]. General Setting Playback Display Video Recording Clock Channel DivX HDMI Reset All Auto Preset Auto Preset Manual Preset TV Audio Select Air Cable Cable (Extended Scan) The unit will appear. 3 Use [K / L] to exit. Air: (When using basic cable) The channels broadcasted in...
Owner's Manual - English
Page 28
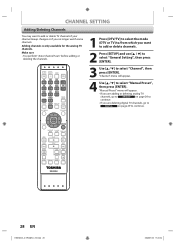
... DISPLAY AUDIO DISC MENU TOP MENU 1 Press [DTV/TV] to select the mode (DTV or TV) to/from which you no longer watch some channels. "Manual Preset" menu will appear. 4 Use [K / L] to add or delete TV channels if your channel lineup changes or if you want to select... "Manual Preset", then press [ENTER]. OPEN/ INPUT CLOSE SELECT HDMI .@/: ABC DEF GHI JKL MNO CH PQRS TUV WXYZ SPACE TIMER PROG. CLEAR ENTER RETURN INSTANT 1....
... DISPLAY AUDIO DISC MENU TOP MENU 1 Press [DTV/TV] to select the mode (DTV or TV) to/from which you no longer watch some channels. "Manual Preset" menu will appear. 4 Use [K / L] to add or delete TV channels if your channel lineup changes or if you want to select... "Manual Preset", then press [ENTER]. OPEN/ INPUT CLOSE SELECT HDMI .@/: ABC DEF GHI JKL MNO CH PQRS TUV WXYZ SPACE TIMER PROG. CLEAR ENTER RETURN INSTANT 1....

Owner's Manual - English
Page 29
...channels, you cannot recover the deleted channels once they are deleted unless you can continue adding or deleting channels. 7 Press [SETUP] to exit. Manual Preset Your setting will automatically switch to the next channel so that you perform the auto channel preset again. 7 Press [SETUP] to exit. ..."Add" or "Delete", then press [ENTER]. Then select the next channel to delete. • If the setting is complete, press [RETURN] to activate "Manual Preset". Recording Playback Editing Function Setup VCR Function Others E9MG0UD_D-VR660KU_EN.indd 29 EN 29 2008/01/29 17:20:35
...channels, you cannot recover the deleted channels once they are deleted unless you can continue adding or deleting channels. 7 Press [SETUP] to exit. Manual Preset Your setting will automatically switch to the next channel so that you perform the auto channel preset again. 7 Press [SETUP] to exit. ..."Add" or "Delete", then press [ENTER]. Then select the next channel to delete. • If the setting is complete, press [RETURN] to activate "Manual Preset". Recording Playback Editing Function Setup VCR Function Others E9MG0UD_D-VR660KU_EN.indd 29 EN 29 2008/01/29 17:20:35

Owner's Manual - English
Page 30
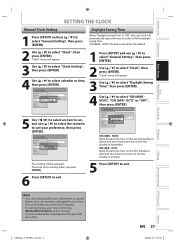
General Setting Playback Display Video Recording Clock Channel DivX HDMI Reset All Clock Setting Auto Clock SAetutitnogClock Setting Daylight Saving Time OFF Auto Manual CLEAR ENTER RETURN 5 Press [SETUP] to select "Auto", then press [ENTER]. SE-R0294 Note • The unit receives the clock data...press [ENTER]. Auto Clock Setting This unit can set the clock. This unit will appear. If not, follow "Auto Clock Setting" below . 1 Select "Manual" at 12:00 a.m/p.m from the PBS channel when the power is effective for auto clock setting. 2 Use [the Number buttons] or [K / L] to...
General Setting Playback Display Video Recording Clock Channel DivX HDMI Reset All Clock Setting Auto Clock SAetutitnogClock Setting Daylight Saving Time OFF Auto Manual CLEAR ENTER RETURN 5 Press [SETUP] to select "Auto", then press [ENTER]. SE-R0294 Note • The unit receives the clock data...press [ENTER]. Auto Clock Setting This unit can set the clock. This unit will appear. If not, follow "Auto Clock Setting" below . 1 Select "Manual" at 12:00 a.m/p.m from the PBS channel when the power is effective for auto clock setting. 2 Use [the Number buttons] or [K / L] to...
Owner's Manual - English
Page 31
...ENTER]. 2 Use [K / L] to select "Clock", then press [ENTER]. OCT) OFF ON (MAR - The clock start counting when you set the clock manually. • For setting the day, year, hour and minute, [the Number buttons] can set , and use [K / L] to select the contents to 2057.... Introduction Connections Basic Setup Disc Management SETTING THE CLOCK Manual Clock Setting 1 Press [SETUP] and use [K / L] to select "ON (MAR NOV)", "ON (APR - "ON (MAR - Recording Playback Editing Function...
...ENTER]. 2 Use [K / L] to select "Clock", then press [ENTER]. OCT) OFF ON (MAR - The clock start counting when you set the clock manually. • For setting the day, year, hour and minute, [the Number buttons] can set , and use [K / L] to select the contents to 2057.... Introduction Connections Basic Setup Disc Management SETTING THE CLOCK Manual Clock Setting 1 Press [SETUP] and use [K / L] to select "ON (MAR NOV)", "ON (APR - "ON (MAR - Recording Playback Editing Function...
Owner's Manual - English
Page 32
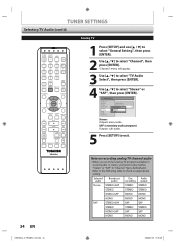
... watch. TUNER SETTINGS Switching Analog Mode / Digital Mode You can watch each minor channel program being broadcast on remote control. [CH / ] Use [CH / ] to change manually by using [CH / ] 32 EN E9MG0UD_D-VR660KU_EN.indd 32 2008/01/29 17:20:37 For 1-digit number e.g.) 2 ch: [0] + [2], [2] + [-] or [2] + leave it for 2 seconds. About...
... watch. TUNER SETTINGS Switching Analog Mode / Digital Mode You can watch each minor channel program being broadcast on remote control. [CH / ] Use [CH / ] to change manually by using [CH / ] 32 EN E9MG0UD_D-VR660KU_EN.indd 32 2008/01/29 17:20:37 For 1-digit number e.g.) 2 ch: [0] + [2], [2] + [-] or [2] + leave it for 2 seconds. About...
Owner's Manual - English
Page 34
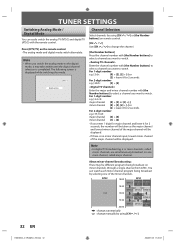
... second audio or stereo, you have to check an appropriate setting. General Setting Playback Display Video Recording Clock Channel DivX HDMI Reset All Auto Preset Manual Preset TV AudioTVSeAleucdtio Select Stereo SAP Stereo: Outputs main-audio. Refer to the following table to select either "Stereo" or "SAP" in "Channel" menu beforehand...
... second audio or stereo, you have to check an appropriate setting. General Setting Playback Display Video Recording Clock Channel DivX HDMI Reset All Auto Preset Manual Preset TV AudioTVSeAleucdtio Select Stereo SAP Stereo: Outputs main-audio. Refer to the following table to select either "Stereo" or "SAP" in "Channel" menu beforehand...
Owner's Manual - English
Page 38
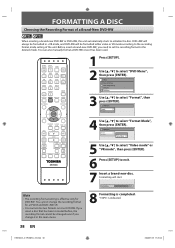
... formatted in the main menu. 8 Formatting is completed. Before insert a brand-new DVD-RW, you change the recording format for DVD-RW. You can also manually format a DVD-RW once it in +VR mode, and DVD-RW will start. DVD Menu Format Finalize 4 Use [K / L] to select "Format", then press [ENTER]. If...
... formatted in the main menu. 8 Formatting is completed. Before insert a brand-new DVD-RW, you change the recording format for DVD-RW. You can also manually format a DVD-RW once it in +VR mode, and DVD-RW will start. DVD Menu Format Finalize 4 Use [K / L] to select "Format", then press [ENTER]. If...

Owner's Manual - English
Page 39
...]. 2 Use [K / L] to 6 in order to erase all content of a Brand-New DVD-RW" on page 38.) 6 Formatting is indicated. Introduction Connections FORMATTING A DISC Reformatting a Disc Manually Basic Setup Disc Management Recording Playback If you are erased. • For DVD-RW, make sure that the recording format is set to the desired...
...]. 2 Use [K / L] to 6 in order to erase all content of a Brand-New DVD-RW" on page 38.) 6 Formatting is indicated. Introduction Connections FORMATTING A DISC Reformatting a Disc Manually Basic Setup Disc Management Recording Playback If you are erased. • For DVD-RW, make sure that the recording format is set to the desired...


