
User Guide
Page 15
...to your Google™ Account 43 Setting up Wi-Fi® and Bluetooth® connections 45 Registering your Toshiba device 46 Backing up your data 46 Backing up data using TOSHIBA File Manager 46 Backing up data using your Google™ Account 46 Restoring your data using your Google™... Account 47 Navigation and features 48 Home screen 49 Touch screen navigation 50 Navigating the Home screen 51 System bar 51 Securing your tablet 54
...to your Google™ Account 43 Setting up Wi-Fi® and Bluetooth® connections 45 Registering your Toshiba device 46 Backing up your data 46 Backing up data using TOSHIBA File Manager 46 Backing up data using your Google™ Account 46 Restoring your data using your Google™... Account 47 Navigation and features 48 Home screen 49 Touch screen navigation 50 Navigating the Home screen 51 System bar 51 Securing your tablet 54
User Guide
Page 16
... Applications settings 76 Accounts & sync settings 77 Privacy settings 78 Storage settings 79 Language & input settings 79 Accessibility settings 82 Date & time settings 82 About tablet 83
... Applications settings 76 Accounts & sync settings 77 Privacy settings 78 Storage settings 79 Language & input settings 79 Accessibility settings 82 Date & time settings 82 About tablet 83
User Guide
Page 17
Contents 17 Chapter 3: Working with Apps 85 Downloading Toshiba Apps 85 TOSHIBA Media Player 85 Apps 86 Downloading from Android Market 86 Preinstalled Apps on your tablet 86 Uninstalling Apps on your tablet 87 Chapter 4: Exploring the Features on your Device 88 Using the onscreen ...95 Using an external keyboard 95 Using an external mouse 95 Using a docking station 96 Connecting your tablet to a docking station 96 Chapter 5: Utilities 98 TOSHIBA Service Station 99 Check for application updates 100 Downloading updates 100 Installing updates 101 Downloading and installing ...
Contents 17 Chapter 3: Working with Apps 85 Downloading Toshiba Apps 85 TOSHIBA Media Player 85 Apps 86 Downloading from Android Market 86 Preinstalled Apps on your tablet 86 Uninstalling Apps on your tablet 87 Chapter 4: Exploring the Features on your Device 88 Using the onscreen ...95 Using an external keyboard 95 Using an external mouse 95 Using a docking station 96 Connecting your tablet to a docking station 96 Chapter 5: Utilities 98 TOSHIBA Service Station 99 Check for application updates 100 Downloading updates 100 Installing updates 101 Downloading and installing ...

User Guide
Page 19
.... With your Toshiba tablet device, you can watch movies, listen to your favorite music, read books, play games and do much more detailed information about your particular model, please visit Toshiba's Web site at tabletsupport.toshiba.com. While Toshiba has made every effort at tabletsupport.toshiba.com. 19... about the features and specifications on your device, or to stay current with the various device software or hardware options, visit Toshiba's Web site at the time of publication to ensure the accuracy of powerful, portable, multimedia. NOTE The product specifications and ...
.... With your Toshiba tablet device, you can watch movies, listen to your favorite music, read books, play games and do much more detailed information about your particular model, please visit Toshiba's Web site at tabletsupport.toshiba.com. While Toshiba has made every effort at tabletsupport.toshiba.com. 19... about the features and specifications on your device, or to stay current with the various device software or hardware options, visit Toshiba's Web site at the time of publication to ensure the accuracy of powerful, portable, multimedia. NOTE The product specifications and ...
User Guide
Page 20
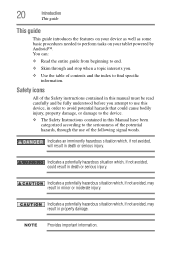
... Manual have been categorized according to the seriousness of the potential hazards, through the use of contents and the index to perform tasks on your tablet powered by Android™. Safety icons All of the Safety instructions contained in death or serious injury. Indicates a potentially hazardous situation which , if not avoided...
... Manual have been categorized according to the seriousness of the potential hazards, through the use of contents and the index to perform tasks on your tablet powered by Android™. Safety icons All of the Safety instructions contained in death or serious injury. Indicates a potentially hazardous situation which , if not avoided...
User Guide
Page 25
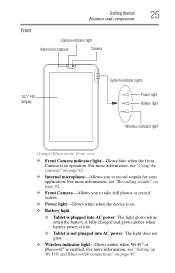
...; Front Camera-Allows you to take still photos or record videos. ❖ Power light-Glows white when the device is on. ❖ Battery light ❖ Tablet is plugged into AC power: The light glows white when the battery is fully charged and glows amber when battery power is low. ❖...; Tablet is not plugged into AC power: The light does not glow. ❖ Wireless indicator light-Glows amber when Wi-Fi® or Bluetooth® is ...
...; Front Camera-Allows you to take still photos or record videos. ❖ Power light-Glows white when the device is on. ❖ Battery light ❖ Tablet is plugged into AC power: The light glows white when the battery is fully charged and glows amber when battery power is low. ❖...; Tablet is not plugged into AC power: The light does not glow. ❖ Wireless indicator light-Glows amber when Wi-Fi® or Bluetooth® is ...

User Guide
Page 33
... the device To remove the battery: NOTE Remove the SD™ Card from the device. 1 Turn the tablet's power off and remove all cables and peripherals that are connected to the device. 2 Turn the tablet upside down and slide the cover lock to the lock. Getting Started 33 Changing the battery Changing...
... the device To remove the battery: NOTE Remove the SD™ Card from the device. 1 Turn the tablet's power off and remove all cables and peripherals that are connected to the device. 2 Turn the tablet upside down and slide the cover lock to the lock. Getting Started 33 Changing the battery Changing...
User Guide
Page 34
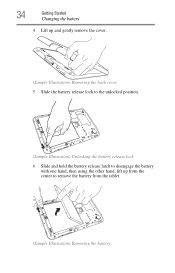
34 Getting Started Changing the battery 4 Lift up and gently remove the cover. (Sample Illustration) Removing the back cover 5 Slide the battery release lock to the unlocked position. (Sample Illustration) Unlocking the battery release lock 6 Slide and hold the battery release latch to disengage the battery with one hand, then using the other hand, lift up from the center to remove the battery from the tablet. (Sample Illustration) Removing the battery
34 Getting Started Changing the battery 4 Lift up and gently remove the cover. (Sample Illustration) Removing the back cover 5 Slide the battery release lock to the unlocked position. (Sample Illustration) Unlocking the battery release lock 6 Slide and hold the battery release latch to disengage the battery with one hand, then using the other hand, lift up from the center to remove the battery from the tablet. (Sample Illustration) Removing the battery
User Guide
Page 35
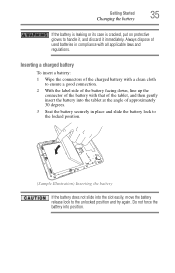
Always dispose of used batteries in compliance with that of the tablet, and then gently insert the battery into the tablet at the angle of approximately 30 degrees. 3 Seat the battery securely in place and slide the battery lock to the locked position. (Sample Illustration) Inserting ...
Always dispose of used batteries in compliance with that of the tablet, and then gently insert the battery into the tablet at the angle of approximately 30 degrees. 3 Seat the battery securely in place and slide the battery lock to the locked position. (Sample Illustration) Inserting ...
User Guide
Page 38
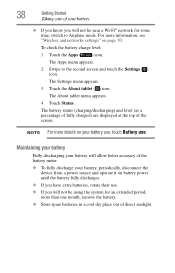
The Settings menu appears. 3 Touch the About tablet ( ) icon. The About tablet menu appears. 4 Touch Status. Maintaining your battery Fully discharging your battery will allow better accuracy of the battery meter. ❖ To fully discharge your battery, ...
The Settings menu appears. 3 Touch the About tablet ( ) icon. The About tablet menu appears. 4 Touch Status. Maintaining your battery Fully discharging your battery will allow better accuracy of the battery meter. ❖ To fully discharge your battery, ...
User Guide
Page 41
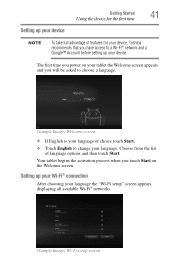
...® networks. (Sample Image) Wi-Fi setup screen Choose from the list of language options and then touch Start. Your tablet begins the activation process when you touch Start on your tablet the Welcome screen appears and you will be asked to choose a language. (Sample Image) Welcome screen ❖ If English is... device. Getting Started 41 Using the device for the first time Setting up your device NOTE To take full advantage of features for your device, Toshiba recommends that you have access to change your language. The first time you power on the Welcome screen.
...® networks. (Sample Image) Wi-Fi setup screen Choose from the list of language options and then touch Start. Your tablet begins the activation process when you touch Start on your tablet the Welcome screen appears and you will be asked to choose a language. (Sample Image) Welcome screen ❖ If English is... device. Getting Started 41 Using the device for the first time Setting up your device NOTE To take full advantage of features for your device, Toshiba recommends that you have access to change your language. The first time you power on the Welcome screen.
User Guide
Page 44
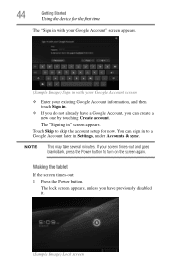
... Create account. The lock screen appears, unless you have a Google Account, you do not already have previously disabled it. (Sample Image) Lock screen Waking the tablet If the screen times-out: 1 Press the Power button. 44 Getting Started Using the device for now. NOTE This may take several minutes. If your...
... Create account. The lock screen appears, unless you have a Google Account, you do not already have previously disabled it. (Sample Image) Lock screen Waking the tablet If the screen times-out: 1 Press the Power button. 44 Getting Started Using the device for now. NOTE This may take several minutes. If your...
User Guide
Page 47
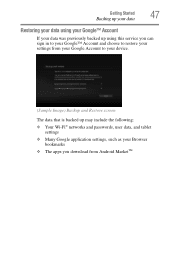
Getting Started 47 Backing up your data Restoring your data using your Google™ Account If your data was previously backed up using this service you can sign in to your Google™ Account and choose to restore your settings from your Google Account to your device. (Sample Image) Backup and Restore screen The data that is backed up may include the following: ❖ Your Wi-Fi® networks and passwords, user data, and tablet settings ❖ Many Google application settings, such as your Browser bookmarks ❖ The apps you download from Android MarketTM
Getting Started 47 Backing up your data Restoring your data using your Google™ Account If your data was previously backed up using this service you can sign in to your Google™ Account and choose to restore your settings from your Google Account to your device. (Sample Image) Backup and Restore screen The data that is backed up may include the following: ❖ Your Wi-Fi® networks and passwords, user data, and tablet settings ❖ Many Google application settings, such as your Browser bookmarks ❖ The apps you download from Android MarketTM
User Guide
Page 48
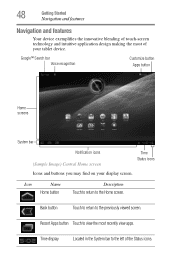
... button Apps button Home screens System bar Notification icons (Sample Image) Central Home screen Time Status icons Icons and buttons you may find on your tablet device. Icon Name Home button Description Touch to return to the previously viewed screen. 48 Getting Started Navigation and features Navigation and features Your device...
... button Apps button Home screens System bar Notification icons (Sample Image) Central Home screen Time Status icons Icons and buttons you may find on your tablet device. Icon Name Home button Description Touch to return to the previously viewed screen. 48 Getting Started Navigation and features Navigation and features Your device...
User Guide
Page 51
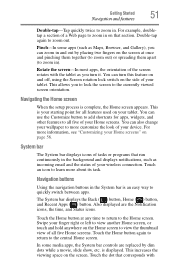
... viewing space on the Home screen to zoom in and out by dim dots while a movie, slide show, etc. For more information, see "Customizing your tablet. System bar The System bar displays icons of the screen rotates with Touch an icon to learn more customize the look of your wireless connection... zoom in the System bar is an easy way to quickly switch between apps. Touch the dot that corresponds with the tablet as incoming email and the status of your tablet. You can use the Customize button to add shortcuts for all five of your finger right or left to view another...
... viewing space on the Home screen to zoom in and out by dim dots while a movie, slide show, etc. For more information, see "Customizing your tablet. System bar The System bar displays icons of the screen rotates with Touch an icon to learn more customize the look of your wireless connection... zoom in the System bar is an easy way to quickly switch between apps. Touch the dot that corresponds with the tablet as incoming email and the status of your tablet. You can use the Customize button to add shortcuts for all five of your finger right or left to view another...
User Guide
Page 52
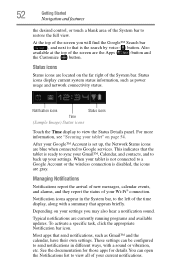
... status. Status icons Status icons are located on the far right of your Wi-Fi® connection. For more information, see "Securing your tablet" on your settings you will find the Google™ Search bar ( ), and next to the left of your current notifications. Managing Notifications... as Gmail™ and the calendar, have their own settings. Notification icons appear in different ways, with a summary that the tablet is set up your tablet is not connected to Google services. Also available at the top of the screen are gray. Depending on page 54. To activate...
... status. Status icons Status icons are located on the far right of your Wi-Fi® connection. For more information, see "Securing your tablet" on your settings you will find the Google™ Search bar ( ), and next to the left of your current notifications. Managing Notifications... as Gmail™ and the calendar, have their own settings. Notification icons appear in different ways, with a summary that the tablet is set up your tablet is not connected to Google services. Also available at the top of the screen are gray. Depending on page 54. To activate...
User Guide
Page 54
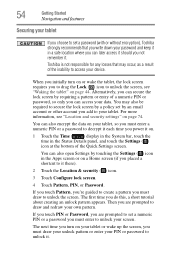
.... 3 Touch Configure lock screen. 4 Touch Pattern, PIN, or Password. 54 Getting Started Navigation and features Securing your tablet If you choose to set a password (with or without encryption), Toshiba strongly recommends that may also be required to secure the lock screen by a policy set a numeric PIN or a password... touch the time in a safe location where you can access your screen. Toshiba is not responsible for any losses that you write down your tablet. The next time you turn on or wake the tablet, the lock screen requires you to drag the Lock ( ) icon to unlock...
.... 3 Touch Configure lock screen. 4 Touch Pattern, PIN, or Password. 54 Getting Started Navigation and features Securing your tablet If you choose to set a password (with or without encryption), Toshiba strongly recommends that may also be required to secure the lock screen by a policy set a numeric PIN or a password... touch the time in a safe location where you can access your screen. Toshiba is not responsible for any losses that you write down your tablet. The next time you turn on or wake the tablet, the lock screen requires you to drag the Lock ( ) icon to unlock...
User Guide
Page 55
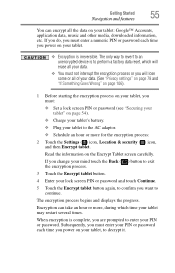
... encryption is to continue. The only way to revert to an unencrypted device is complete, you want to perform a factory data reset, which time your tablet may restart several times. Encryption can encrypt all of your data. (See "Privacy settings" on page 78 and "If Something Goes Wrong" on page 106...55 Navigation and features You can take an hour or more for the encryption process: 2 Touch the Settings ( ) icon, Location & security ( ) icon, and then Encrypt tablet. If you do, you must not interrupt the encryption process or you will lose some or all the data on the Encrypt...
... encryption is to continue. The only way to revert to an unencrypted device is complete, you want to perform a factory data reset, which time your tablet may restart several times. Encryption can encrypt all of your data. (See "Privacy settings" on page 78 and "If Something Goes Wrong" on page 106...55 Navigation and features You can take an hour or more for the encryption process: 2 Touch the Settings ( ) icon, Location & security ( ) icon, and then Encrypt tablet. If you do, you must not interrupt the encryption process or you will lose some or all the data on the Encrypt...

User Guide
Page 57
... hold the icon, and then drag and drop it on the screen. ❖ Gallery-Opens a thumbnail page, displaying the images you have taken with the tablet's camera. The Remove button appears in the top right corner of the screen. 2 Touch Wallpapers. 3 Touch Wallpapers, Gallery, or Live wallpapers. ❖... wallpaper is set as a wallpaper. ❖ Live wallpapers-Opens a thumbnail page, displaying the sample live wallpapers that came preinstalled on your tablet. To add the item back to your Home screen, see "Adding an item to preview it on the screen. Removing an item from the...
... hold the icon, and then drag and drop it on the screen. ❖ Gallery-Opens a thumbnail page, displaying the images you have taken with the tablet's camera. The Remove button appears in the top right corner of the screen. 2 Touch Wallpapers. 3 Touch Wallpapers, Gallery, or Live wallpapers. ❖... wallpaper is set as a wallpaper. ❖ Live wallpapers-Opens a thumbnail page, displaying the sample live wallpapers that came preinstalled on your tablet. To add the item back to your Home screen, see "Adding an item to preview it on the screen. Removing an item from the...
User Guide
Page 58
... is a good idea to use your device for a while. If you do not intend to turn off your device when you must turn off your tablet. Shut down if you will not be using the device for several days or if you are using the shut down option to the last... change the screen time-out setting, see "Screen settings" on the device again, the system automatically returns to turn off the device: Shut down your tablet. When turning on page 73. Always back up your data and settings before turning the device on again.
... is a good idea to use your device for a while. If you do not intend to turn off your device when you must turn off your tablet. Shut down if you will not be using the device for several days or if you are using the shut down option to the last... change the screen time-out setting, see "Screen settings" on the device again, the system automatically returns to turn off the device: Shut down your tablet. When turning on page 73. Always back up your data and settings before turning the device on again.


