
Owners Manual
Page 8
... REGZA-LINK® connection 17 Connecting a digital audio system 18 Connecting a personal computer (PC 18 Chapter 3: Using the remote control 20 Installing the remote control batteries 20 Remote control effective range 20 Learning about the remote control 21 Chapter 4: Menu layout and navigation 22 Main menu layout 22 Setup/Installation menu layout 23 Navigating the menu system...Specifications 55 Acceptable signal formats for PC IN and HDMI terminals 56 Limited United States Warranty for LCD Televisions....... 57 Limited Canadian Warranty for Toshiba Brand Flat Panel Televisions 58
... REGZA-LINK® connection 17 Connecting a digital audio system 18 Connecting a personal computer (PC 18 Chapter 3: Using the remote control 20 Installing the remote control batteries 20 Remote control effective range 20 Learning about the remote control 21 Chapter 4: Menu layout and navigation 22 Main menu layout 22 Setup/Installation menu layout 23 Navigating the menu system...Specifications 55 Acceptable signal formats for PC IN and HDMI terminals 56 Limited United States Warranty for LCD Televisions....... 57 Limited Canadian Warranty for Toshiba Brand Flat Panel Televisions 58

Owners Manual
Page 10
... channels into the TV's channel memory ( page 25). 11 For details on the TV. If the TV stops responding to the remote control or TV control panel and you have connected all cables and devices, plug in the power cords for your new TV! 10 Chapter 1: Introduction Overview of...using its many exciting features. 1 Carefully read the important safety, installation, care, and service information. THIS TYPE OF DAMAGE IS NOT COVERED UNDER THE TOSHIBA WARRANTY. 3 Do not plug in any power cords until AFTER you cannot turn on using the TV's features, see Chapters 6 and 7. 12 For ...
... channels into the TV's channel memory ( page 25). 11 For details on the TV. If the TV stops responding to the remote control or TV control panel and you have connected all cables and devices, plug in the power cords for your new TV! 10 Chapter 1: Introduction Overview of...using its many exciting features. 1 Carefully read the important safety, installation, care, and service information. THIS TYPE OF DAMAGE IS NOT COVERED UNDER THE TOSHIBA WARRANTY. 3 Do not plug in any power cords until AFTER you cannot turn on using the TV's features, see Chapters 6 and 7. 12 For ...

Owners Manual
Page 11
... is necessary to turn off . Chapter 1: Introduction TV front and side panel controls and connections Model 65HT2U is used in this remote sensor ( "Remote control effective range" on page 20). 3無 POWER - If the TV stops responding to the controls on the remote control or TV control panel and you are viewing. 10無 HDMI® IN - Press...
... is necessary to turn off . Chapter 1: Introduction TV front and side panel controls and connections Model 65HT2U is used in this remote sensor ( "Remote control effective range" on page 20). 3無 POWER - If the TV stops responding to the controls on the remote control or TV control panel and you are viewing. 10無 HDMI® IN - Press...

Owners Manual
Page 14
Use the Cable box controls to your VCR's audio out terminal using the white audio cable only. • Standard audio cables. Note: When you use a Cable box, you may not ... United States and other countries, and may subject you to civil and criminal liability. 14 on the TV.* ** To select the video input source, press remote control ( page 21). Select the VIDEO video input source on the TV.* To view the camcorder video: Select the VIDEO video input source on the...
Use the Cable box controls to your VCR's audio out terminal using the white audio cable only. • Standard audio cables. Note: When you use a Cable box, you may not ... United States and other countries, and may subject you to civil and criminal liability. 14 on the TV.* ** To select the video input source, press remote control ( page 21). Select the VIDEO video input source on the TV.* To view the camcorder video: Select the VIDEO video input source on the...

Owners Manual
Page 15
... and record antenna channels: Turn ON the VCR. Tune the VCR to the channel to view the DVD. ** To select the video input source, press remote control ( page 21). Chapter 2: Connecting your TV Connecting a DVD player with ColorStream® (component video), a VCR, and a satellite receiver TV back panel From antenna Stereo...
... and record antenna channels: Turn ON the VCR. Tune the VCR to the channel to view the DVD. ** To select the video input source, press remote control ( page 21). Chapter 2: Connecting your TV Connecting a DVD player with ColorStream® (component video), a VCR, and a satellite receiver TV back panel From antenna Stereo...
Owners Manual
Page 16
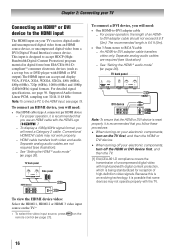
... stereo to RCA Y-cable −− An HDMI-to-DVI adapter cable transfers video only. on the TV.* ** To select the video input source, press remote control ( page 21). To view the HDMI device video: Select the HDMI 1, HDMI 2 or HDMI 3 video input source on the 16 For detailed signal specifications...
... stereo to RCA Y-cable −− An HDMI-to-DVI adapter cable transfers video only. on the TV.* ** To select the video input source, press remote control ( page 21). To view the HDMI device video: Select the HDMI 1, HDMI 2 or HDMI 3 video input source on the 16 For detailed signal specifications...

Owners Manual
Page 17
...;• For proper operation, it is limited to the individual instruction manuals for compatibility information. For details, see page 47. However, Toshiba is not liable for each device. • The REGZA-LINK® feature uses the CEC technology as you desire ( page 48... incorporating Toshiba's REGZA-LINK®. Chapter 2: Connecting your TV REGZA-LINK® connection You can control the basic functions of setup and operations, see the operation manual for those operations. For an explanation of connected audio/video devices using the TV's remote control if you...
...;• For proper operation, it is limited to the individual instruction manuals for compatibility information. For details, see page 47. However, Toshiba is not liable for each device. • The REGZA-LINK® feature uses the CEC technology as you desire ( page 48... incorporating Toshiba's REGZA-LINK®. Chapter 2: Connecting your TV REGZA-LINK® connection You can control the basic functions of setup and operations, see the operation manual for those operations. For an explanation of connected audio/video devices using the TV's remote control if you...
Owners Manual
Page 18
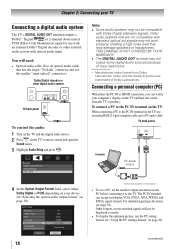
... use with an external Dolby® Digital decoder or other digital audio system TV back panel To control the audio: 1無 Turn on the TV and the digital audio device. 2無 Press on the TV's remote control and open the Sound menu. 3無 Highlight Audio Setup and press . Older audio systems that are...
... use with an external Dolby® Digital decoder or other digital audio system TV back panel To control the audio: 1無 Turn on the TV and the digital audio device. 2無 Press on the TV's remote control and open the Sound menu. 3無 Highlight Audio Setup and press . Older audio systems that are...
Owners Manual
Page 20
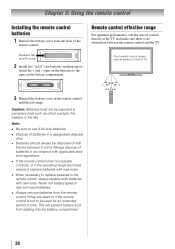
... to the signs on the batteries to replace batteries in mind. Caution: Batteries must not be disposed of batteries in the remote control until the tab snaps. Chapter 3: Using the remote control Installing the remote control batteries 1無 Remove the battery cover from leaking into the battery compartment. 16.4 ft (5m) 20 Squeeze tab and lift...
... to the signs on the batteries to replace batteries in mind. Caution: Batteries must not be disposed of batteries in the remote control until the tab snaps. Chapter 3: Using the remote control Installing the remote control batteries 1無 Remove the battery cover from leaking into the battery compartment. 16.4 ft (5m) 20 Squeeze tab and lift...

Owners Manual
Page 21
... view the picture moving picture ( page 34). 7無 Channel Numbers (0-9, -/100) directly tune channels. Chapter 3: Using the remote control Learning about the remote control Only the buttons used to tune digital channels ( page 31) or to edit the Favorites List ( page 29). 8無...13無 VOL + - Note: The error message "NOT AVAILABLE" may appear if you to control Toshiba REGZA-LINK compatible devices via HDMI connection. ( Page 47, REGZA-LINK playback device control) 21無 STOP Stops the tape or DVD. 22無 PLAY Begins playback of current ...
... view the picture moving picture ( page 34). 7無 Channel Numbers (0-9, -/100) directly tune channels. Chapter 3: Using the remote control Learning about the remote control Only the buttons used to tune digital channels ( page 31) or to edit the Favorites List ( page 29). 8無...13無 VOL + - Note: The error message "NOT AVAILABLE" may appear if you to control Toshiba REGZA-LINK compatible devices via HDMI connection. ( Page 47, REGZA-LINK playback device control) 21無 STOP Stops the tape or DVD. 22無 PLAY Begins playback of current ...
Owners Manual
Page 22
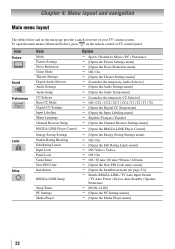
To open the main menus (illustrated below and on the remote control or TV control panel. Icon Picture Sound Preferences Locks Setup Item Mode Picture Settings Noise Reduction Game Mode Theater Settings Digital Audio Selector Audio Settings Audio Setup CC ... the Input Labeling menu] English / Français / Español [Opens the Channel Browser Settings menu] [Opens the REGZA-LINK Player Control] [Opens the Energy Saving Settings menu] Off / On [Opens the Edit Rating Limits menu] Off / Video / Video+ Off / On ...
To open the main menus (illustrated below and on the remote control or TV control panel. Icon Picture Sound Preferences Locks Setup Item Mode Picture Settings Noise Reduction Game Mode Theater Settings Digital Audio Selector Audio Settings Audio Setup CC ... the Input Labeling menu] English / Français / Español [Opens the Channel Browser Settings menu] [Opens the REGZA-LINK Player Control] [Opens the Energy Saving Settings menu] Off / On [Opens the Edit Rating Limits menu] Off / Video / Video+ Off / On ...

Owners Manual
Page 23
... buttons on the signal the TV is opened, use the up/down/left/ right arrow buttons (pqtu) on the remote control or pq on the TV control panel to move in the corresponding direction in the menu.) • All menus close automatically if you do not make..., except the signal meter menu, which closes automatically after about 5 minutes. • To close a menu instantly, press . 23 on the remote control or TV control panel, open the Installation menu (illustrated below), press Setup menu, select Installation, and press . Chapter 4: Menu layout and navigation Setup/Installation menu...
... buttons on the signal the TV is opened, use the up/down/left/ right arrow buttons (pqtu) on the remote control or pq on the TV control panel to move in the corresponding direction in the menu.) • All menus close automatically if you do not make..., except the signal meter menu, which closes automatically after about 5 minutes. • To close a menu instantly, press . 23 on the remote control or TV control panel, open the Installation menu (illustrated below), press Setup menu, select Installation, and press . Chapter 4: Menu layout and navigation Setup/Installation menu...

Owners Manual
Page 25
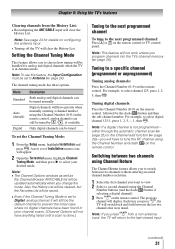
...will automatically cycle through the channels the message "Scanning channels, please wait" appears. 5無 To cancel channel programming, press on the remote control (or highlight Cancel in the channel memory. The TV will take substantially longer than when the antenna input is finished, you have ...from being viewed, channel positions can manually add or erase individual channels in the channel memory, you press or on the remote control or TV control panel, your TV Programming channels into the TV's channel memory When you must use the Channel Number buttons on the channels...
...will automatically cycle through the channels the message "Scanning channels, please wait" appears. 5無 To cancel channel programming, press on the remote control (or highlight Cancel in the channel memory. The TV will take substantially longer than when the antenna input is finished, you have ...from being viewed, channel positions can manually add or erase individual channels in the channel memory, you press or on the remote control or TV control panel, your TV Programming channels into the TV's channel memory When you must use the Channel Number buttons on the channels...

Owners Manual
Page 26
... mode (Auto, Digital, or Analog). (Auto is grayed out in the menu. (Also see page 12 and "Setting the PC Audio" on the remote control to tune blocked channels unless you unlock them. ( Page 41 Locking channels) To manually add digital subchannels on a physical channel: Use the Channel ... your TV 3無 Press p or q to select a channel position to remove channel Press while the message is on the remote control. To block channels in the box. Press 1 on remote to be selected with or ; If not, the TV will be output. Chapter 5: Setting up your settings, highlight Done and...
... mode (Auto, Digital, or Analog). (Auto is grayed out in the menu. (Also see page 12 and "Setting the PC Audio" on the remote control to tune blocked channels unless you unlock them. ( Page 41 Locking channels) To manually add digital subchannels on a physical channel: Use the Channel ... your TV 3無 Press p or q to select a channel position to remove channel Press while the message is on the remote control. To block channels in the box. Press 1 on remote to be selected with or ; If not, the TV will be output. Chapter 5: Setting up your settings, highlight Done and...

Owners Manual
Page 28
...appear. Video Audio Receiver Cable Compact Disc DTV 4無 Press or to highlight HDMI 1, HDMI 2, or HDMI 3. on the remote control or TV control 2無 And then either: a) Press 0-6, or b) Repeatedly press on . ••When selecting input sources using , some... REGZA-LINK® devices may automatically turn on the remote control and then press to hide an unused input in the Input Selection screen and in the Channel Browser™ Inputs list) Note: If ...
...appear. Video Audio Receiver Cable Compact Disc DTV 4無 Press or to highlight HDMI 1, HDMI 2, or HDMI 3. on the remote control or TV control 2無 And then either: a) Press 0-6, or b) Repeatedly press on . ••When selecting input sources using , some... REGZA-LINK® devices may automatically turn on the remote control and then press to hide an unused input in the Input Selection screen and in the Channel Browser™ Inputs list) Note: If ...

Owners Manual
Page 30
...28961; While watching TV, press or to open the Channel Browser™: • Press or on the remote control. • Press to surf backward through the previously tuned channels/inputs. Once another list has been selected, the Channel Browser™ will open...or will bring up the Channel Browser™ Favorites list regardless of the Channel Browser™. In Select mode, when you stop on the remote control. • All channels that cannot be tuned (for various reasons), the TV will be repeated in the History List, but you stop...
...28961; While watching TV, press or to open the Channel Browser™: • Press or on the remote control. • Press to surf backward through the previously tuned channels/inputs. Once another list has been selected, the Channel Browser™ will open...or will bring up the Channel Browser™ Favorites list regardless of the Channel Browser™. In Select mode, when you stop on the remote control. • All channels that cannot be tuned (for various reasons), the TV will be repeated in the History List, but you stop...
Owners Manual
Page 31
... channels can still be tuned To set to a specific channel (programmed or unprogrammed) Tuning analog channels: Press the Channel Number (0-9) on the remote control or TV control panel. For example, to select digital channel 125-1, press 1, 2, 5, -, 1, then . For example, to select channel 125, press 1, 2,...a scan is not programmed- Tuning to Antenna ( page 24). Tuning digital channels: Press the Channel Number (0-9) on the remote control, followed by / , if available Only digital channels can be the default channel to prevent the initial case where no digital channels...
... channels can still be tuned To set to a specific channel (programmed or unprogrammed) Tuning analog channels: Press the Channel Number (0-9) on the remote control or TV control panel. For example, to select digital channel 125-1, press 1, 2, 5, -, 1, then . For example, to select channel 125, press 1, 2,...a scan is not programmed- Tuning to Antenna ( page 24). Tuning digital channels: Press the Channel Number (0-9) on the remote control, followed by / , if available Only digital channels can be the default channel to prevent the initial case where no digital channels...

Owners Manual
Page 32
... to fill the width of the screen but the left and right edges are examples only. To select the picture size using the remote control: 1無 Press on the remote control. 2無 While the Picture Size menu is open . 32 To select the picture size using the menus: 1無 Select Picture Size in the...
... to fill the width of the screen but the left and right edges are examples only. To select the picture size using the remote control: 1無 Press on the remote control. 2無 While the Picture Size menu is open . 32 To select the picture size using the menus: 1無 Select Picture Size in the...

Owners Manual
Page 37
.... For example, a station might broadcast another language as a second audio program. Chapter 6: Using the TV's features Adjusting the audio Muting the sound Press on the remote control to conveniently switch between audio tracks on a digital channel (for more information on closed caption modes. Using the digital audio selector You can be heard...
.... For example, a station might broadcast another language as a second audio program. Chapter 6: Using the TV's features Adjusting the audio Muting the sound Press on the remote control to conveniently switch between audio tracks on a digital channel (for more information on closed caption modes. Using the digital audio selector You can be heard...
Owners Manual
Page 40
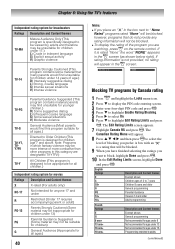
...; Press to select On. 6無 Press to adults (continued) however, programs that many parents would find this category are watching, press on the remote control. The Edit Rating Limits screen appears. 7無 Highlight Canada RS and press .
...; Press to select On. 6無 Press to adults (continued) however, programs that many parents would find this category are watching, press on the remote control. The Edit Rating Limits screen appears. 7無 Highlight Canada RS and press .


