User Manual
Page 2
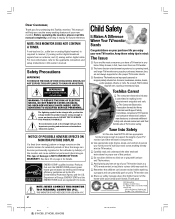
... owner's manual. The consumer electronics industry is NOT COVERED BY YOUR WARRANTY. Avoid placing any item on page 4 for . A set by the U.S. NO USER-SERVICEABLE PARTS INSIDE. REFER SERVICING TO QUALIFIED SERVICE PERSONNEL. Department of your TV/monitor (such as a VCR, remote control, or toy) that a curious child may reach for details. Do not allow children to support the weight of Energy. Thank you that the voltage inside...
... owner's manual. The consumer electronics industry is NOT COVERED BY YOUR WARRANTY. Avoid placing any item on page 4 for . A set by the U.S. NO USER-SERVICEABLE PARTS INSIDE. REFER SERVICING TO QUALIFIED SERVICE PERSONNEL. Department of your TV/monitor (such as a VCR, remote control, or toy) that a curious child may reach for details. Do not allow children to support the weight of Energy. Thank you that the voltage inside...
User Manual
Page 4
... of the screen); The picture can become frequent or continuous, unplug the power cord and contact a Toshiba Authorized Service Center. 33) Possible Adverse Effects on Monitor Picture Display: If a fixed (non-moving) pattern or image remains on or off the monitor for 6 to 7 hours to allow the condensation to determine that do not use , the monitor may form on a 4:3 aspect ratio display (with gray or black bars at...
... of the screen); The picture can become frequent or continuous, unplug the power cord and contact a Toshiba Authorized Service Center. 33) Possible Adverse Effects on Monitor Picture Display: If a fixed (non-moving) pattern or image remains on or off the monitor for 6 to 7 hours to allow the condensation to determine that do not use , the monitor may form on a 4:3 aspect ratio display (with gray or black bars at...
User Manual
Page 5
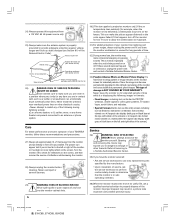
... sections during installation. SUCH DAMAGE IS NOT COVERED UNDER THE TOSHIBA LIMITED WARRANTY. 3) Always keep the top and bottom sections of the monitor cabinet in a particular installation. SUCH DAMAGE IS NOT COVERED UNDER THE TOSHIBA LIMITED WARRANTY. #01E_02-05_51HC85 5 Black (E) 51HC85, 57HC85, 65HC85 5 05.4.28, 6:16 PM However, there is connected. • Consult the dealer or an experienced radio/TV technician for...
... sections during installation. SUCH DAMAGE IS NOT COVERED UNDER THE TOSHIBA LIMITED WARRANTY. 3) Always keep the top and bottom sections of the monitor cabinet in a particular installation. SUCH DAMAGE IS NOT COVERED UNDER THE TOSHIBA LIMITED WARRANTY. #01E_02-05_51HC85 5 Black (E) 51HC85, 57HC85, 65HC85 5 05.4.28, 6:16 PM However, there is connected. • Consult the dealer or an experienced radio/TV technician for...
User Manual
Page 6
... 21 Programming the remote control to operate your other devices 22 Remote control codes 22 Setting up your Monitor 24 Turning on the Monitor 24 Learning about the menu system 24 Changing the on-screen display language 25 Adjusting the color convergence 25 Operating your Monitor 27 Viewing the wide-screen picture formats (480i, 480p, and 1080i signals only 27 Selecting the picture size 27 Scrolling the TheaterWide® picture (TheaterWide 2 and 3 only 29 Using the AUTO ASPECT feature 30 Using...
... 21 Programming the remote control to operate your other devices 22 Remote control codes 22 Setting up your Monitor 24 Turning on the Monitor 24 Learning about the menu system 24 Changing the on-screen display language 25 Adjusting the color convergence 25 Operating your Monitor 27 Viewing the wide-screen picture formats (480i, 480p, and 1080i signals only 27 Selecting the picture size 27 Scrolling the TheaterWide® picture (TheaterWide 2 and 3 only 29 Using the AUTO ASPECT feature 30 Using...
User Manual
Page 7
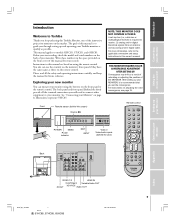
... front panel or the remote control. The goal of this manual is required to receive: (1) analog and/or digital broadcast signals from an antenna; Before you start reading, check the model and serial numbers on the back of your monitor. A set the convergence. THIS MONITOR REQUIRES COLOR CONVERGENCE ADJUSTMENT AFTER SETTING UP. The back panel and front panel (behind the door) TOP Remote control INPUT RECALL POWER INFO 123 456 78 +10 100 0 MENU 9 ENT PIC SIZE MENU DVDMENU...
... front panel or the remote control. The goal of this manual is required to receive: (1) analog and/or digital broadcast signals from an antenna; Before you start reading, check the model and serial numbers on the back of your monitor. A set the convergence. THIS MONITOR REQUIRES COLOR CONVERGENCE ADJUSTMENT AFTER SETTING UP. The back panel and front panel (behind the door) TOP Remote control INPUT RECALL POWER INFO 123 456 78 +10 100 0 MENU 9 ENT PIC SIZE MENU DVDMENU...
User Manual
Page 8
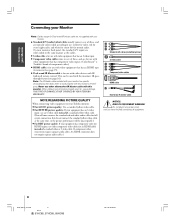
... your monitor has specific characteristics that has an S-video input. ● Component video cables come in any power cords until you have finished connecting all equipment. An HDMI connection does not require separate audio cables.) NOTICE: RISK OF EQUIPMENT DAMAGE! Never use : yellow for video, red for stereo right audio, and white for stereo left (or mono) audio. This can cause damage. Setting up your TV Using the TV's Features Appendix Index 8 #01E_08-17_51HC85 8 Black (E) 51HC85, 57HC85...
... your monitor has specific characteristics that has an S-video input. ● Component video cables come in any power cords until you have finished connecting all equipment. An HDMI connection does not require separate audio cables.) NOTICE: RISK OF EQUIPMENT DAMAGE! Never use : yellow for video, red for stereo right audio, and white for stereo left (or mono) audio. This can cause damage. Setting up your TV Using the TV's Features Appendix Index 8 #01E_08-17_51HC85 8 Black (E) 51HC85, 57HC85...
User Manual
Page 10
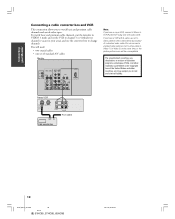
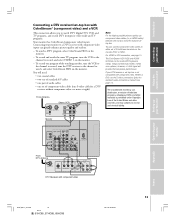
... TV Using the TV's Features Appendix Index 10 #01E_08-17_51HC85 10 Black (E) 51HC85, 57HC85, 65HC85 05.4.28, 6:16 PM Stereo VCR IN from ANT OUT to TV CH 3 CH 4 VIDEO OUT IN IN OUT L R AUDIO From cable Cable converter box Setting up your Monitor Using the Remote Control Connecting a cable converter box and VCR This connection allows you have a VCR with S-video, use an Svideo cable (in your area), and use , distribution, or revision of television programs, videotapes, DVDs...
... TV Using the TV's Features Appendix Index 10 #01E_08-17_51HC85 10 Black (E) 51HC85, 57HC85, 65HC85 05.4.28, 6:16 PM Stereo VCR IN from ANT OUT to TV CH 3 CH 4 VIDEO OUT IN IN OUT L R AUDIO From cable Cable converter box Setting up your Monitor Using the Remote Control Connecting a cable converter box and VCR This connection allows you have a VCR with S-video, use an Svideo cable (in your area), and use , distribution, or revision of television programs, videotapes, DVDs...
User Manual
Page 13
... VIDEO 1 on the monitor (HD1 or HD2). For HDMI or DVI connection, see page 11). OUT 1 OUT 2 IR From DTV Antenna Satellite IN Y PB PR S-VIDEO COMPONENT VIDEO VIDEO OUT AUDIO OUT L L R R DTV Receiver with Progressive (480p, 720p) and Interlaced (480i, 1080i) scan systems; You will provide the best picture performance. Introduction Connecting your Monitor Using the remote control Setting up your Monitor Connecting a DTV receiver/set of component video cables (one S-video cable for a DTV receiver without component video...
... VIDEO 1 on the monitor (HD1 or HD2). For HDMI or DVI connection, see page 11). OUT 1 OUT 2 IR From DTV Antenna Satellite IN Y PB PR S-VIDEO COMPONENT VIDEO VIDEO OUT AUDIO OUT L L R R DTV Receiver with Progressive (480p, 720p) and Interlaced (480i, 1080i) scan systems; You will provide the best picture performance. Introduction Connecting your Monitor Using the remote control Setting up your Monitor Connecting a DTV receiver/set of component video cables (one S-video cable for a DTV receiver without component video...

User Manual
Page 15
... box or DVD player with 1080i high-definition video signals, but will need : • one pair of high-definition video signals. THIS MONITOR IS NOT INTENDED FOR USE WITH A PC. [1] HDMI = High-Definition Multimedia Interface. [2] DVI = Digital Video Interface. [3] HDCP = High-bandwidth Digital Content Protection. [4] EIA/CEA-861/861B compliance covers the transmission of HDMI Licensing, LLC. 15 #01E_08-17_51HC85 15 Black (E) 51HC85, 57HC85, 65HC85 05.4.28, 6:16 PM Because this connection, the HDMI terminal...
... box or DVD player with 1080i high-definition video signals, but will need : • one pair of high-definition video signals. THIS MONITOR IS NOT INTENDED FOR USE WITH A PC. [1] HDMI = High-Definition Multimedia Interface. [2] DVI = Digital Video Interface. [3] HDCP = High-bandwidth Digital Content Protection. [4] EIA/CEA-861/861B compliance covers the transmission of HDMI Licensing, LLC. 15 #01E_08-17_51HC85 15 Black (E) 51HC85, 57HC85, 65HC85 05.4.28, 6:16 PM Because this connection, the HDMI terminal...
User Manual
Page 19
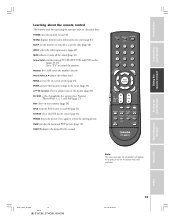
Setting up your Monitor Operating your Monitor Using the remote control Learning about the remote control The buttons used for a function that is not available. Press again to control the monitor. Numbers (0-9, 100) enters the numbers directly VOL (volume) y z adjusts the volume level MENU accesses the on-screen system (page 24) ENTER activates the function settings in the menu (page 24) y z x • (arrows) select or adjust items in the menus (page 24) PIC SIZE cycles through...
Setting up your Monitor Operating your Monitor Using the remote control Learning about the remote control The buttons used for a function that is not available. Press again to control the monitor. Numbers (0-9, 100) enters the numbers directly VOL (volume) y z adjusts the volume level MENU accesses the on-screen system (page 24) ENTER activates the function settings in the menu (page 24) y z x • (arrows) select or adjust items in the menus (page 24) PIC SIZE cycles through...
User Manual
Page 22
... 1 - 4 using the remote control to enter the 3-digit code for a DVD player or HTIB [home theater in a box]). 3. For future reference, write down RECALL, press the Channel Number buttons to operate the device, see pages 20-21. 1. INPUT RECALL POWER INFO 123 456 789 +10 100 0 ENT MENU RECALL POWER Channel Number buttons TOP EXIT AR PIC SIZE ENTEERNT MENU DVDMENU ER TV CBL/SAT CH VCR DVD CLE VOL POP DIRECT CH MUTE SLEEP Device Switch TV...
... 1 - 4 using the remote control to enter the 3-digit code for a DVD player or HTIB [home theater in a box]). 3. For future reference, write down RECALL, press the Channel Number buttons to operate the device, see pages 20-21. 1. INPUT RECALL POWER INFO 123 456 789 +10 100 0 ENT MENU RECALL POWER Channel Number buttons TOP EXIT AR PIC SIZE ENTEERNT MENU DVDMENU ER TV CBL/SAT CH VCR DVD CLE VOL POP DIRECT CH MUTE SLEEP Device Switch TV...
User Manual
Page 24
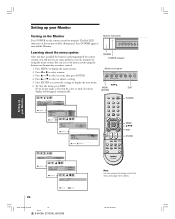
... on the monitor by using the buttons on the monitor or remote control. 1. Press y or z to select or adjust a setting. 5. You can change the background of the menu. Monitor front panel MENU VOLUME EXIT INPUT Learning about the menu system After you have installed the batteries and programmed the remote control, you do not make a selection for details. : SELECT EXIT : END 24 Using the TV's Features Appendix Index #01E_24-26_51HC85 24 Black (E) 51HC85, 57HC85...
... on the monitor by using the buttons on the monitor or remote control. 1. Press y or z to select or adjust a setting. 5. You can change the background of the menu. Monitor front panel MENU VOLUME EXIT INPUT Learning about the menu system After you have installed the batteries and programmed the remote control, you do not make a selection for details. : SELECT EXIT : END 24 Using the TV's Features Appendix Index #01E_24-26_51HC85 24 Black (E) 51HC85, 57HC85...
User Manual
Page 25
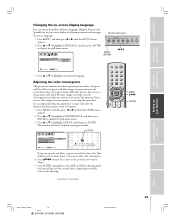
... Black (E) 51HC85, 57HC85, 65HC85 05.4.28, 6:16 PM 25 Press y or z to select RED or BLUE adjusting mode (red crossed lines or blue crossed lines), depending on which color needs adjusting. (continued on for the on your monitor screen, skip this procedure. Press MENU, and then press x or • until the SET UP menu appears. Introduction Connecting your Monitor Using the remote control Setting up your Monitor Changing the on-screen display language You can see clear images on -screen display...
... Black (E) 51HC85, 57HC85, 65HC85 05.4.28, 6:16 PM 25 Press y or z to select RED or BLUE adjusting mode (red crossed lines or blue crossed lines), depending on which color needs adjusting. (continued on for the on your monitor screen, skip this procedure. Press MENU, and then press x or • until the SET UP menu appears. Introduction Connecting your Monitor Using the remote control Setting up your Monitor Changing the on-screen display language You can see clear images on -screen display...

User Manual
Page 27
... your monitor screen for extended periods of time. Introduction Connecting your Monitor Using the remote control Operating your Monitor Viewing the wide-screen picture formats (480i, 480p, and 1080i signals only) You can become permanently ingrained in the PICTURE menu. See item 33 on page 4 for 1080i format programs.) The way the image displays in Natural size on the next page. Press the corresponding number button (0-4) or press y or z to you are viewing. Fixed...
... your monitor screen for extended periods of time. Introduction Connecting your Monitor Using the remote control Operating your Monitor Viewing the wide-screen picture formats (480i, 480p, and 1080i signals only) You can become permanently ingrained in the PICTURE menu. See item 33 on page 4 for 1080i format programs.) The way the image displays in Natural size on the next page. Press the corresponding number button (0-4) or press y or z to you are viewing. Fixed...

User Manual
Page 36
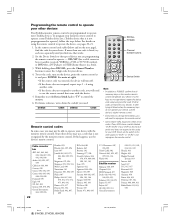
...) before closing the Picture menu or the monitor will replace the dashes in the Picture menu. Press z or y to PREFERENCE in the display. The new PIN code is now active. Introduction Connecting your TV Using the Remote Control Changing the PIN code 1. The numbers you prefer, then press ENTER. P I CTURE MODE P I CTURE SETT I NGS D I SPLAY FORMAT C I NEMA MODE CONVERGENCE SPORTS STANDARD MOV I N CODE 2562 Monitor front panel MENU VOLUME EXIT INPUT x •zy MENU (ENTER) 0-9 : SELECT ENTER : SET 3.
...) before closing the Picture menu or the monitor will replace the dashes in the Picture menu. Press z or y to PREFERENCE in the display. The new PIN code is now active. Introduction Connecting your TV Using the Remote Control Changing the PIN code 1. The numbers you prefer, then press ENTER. P I CTURE MODE P I CTURE SETT I NGS D I SPLAY FORMAT C I NEMA MODE CONVERGENCE SPORTS STANDARD MOV I N CODE 2562 Monitor front panel MENU VOLUME EXIT INPUT x •zy MENU (ENTER) 0-9 : SELECT ENTER : SET 3.
User Manual
Page 37
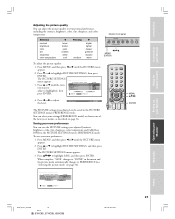
... contrast brightness color tint sharpness color temperature x lower darker paler reddish softer cool Pressing medium • higher lighter deeper greenish sharper warm Monitor front panel MENU VOLUME EXIT INPUT x •zy MENU (ENTER) To adjust the picture quality: 1. The PICTURE SETTINGS menu appears. 3. You can be saved in the menu and the picture mode automatically changes to PREFERENCE (see "Selecting the picture mode" on page 36. TOP EXIT AR PIC SIZE ENTEERNT INPUT RECALL POWER...
... contrast brightness color tint sharpness color temperature x lower darker paler reddish softer cool Pressing medium • higher lighter deeper greenish sharper warm Monitor front panel MENU VOLUME EXIT INPUT x •zy MENU (ENTER) To adjust the picture quality: 1. The PICTURE SETTINGS menu appears. 3. You can be saved in the menu and the picture mode automatically changes to PREFERENCE (see "Selecting the picture mode" on page 36. TOP EXIT AR PIC SIZE ENTEERNT INPUT RECALL POWER...

User Manual
Page 39
... display format (for 480p signals only) You can be obtained by setting the CINEMA MODE to highlight CINEMA MODE, and then press ENTER. 3. Press y or z to the following factory settings: Mode sports Tint center (0) Contrast max (100) Sharpness center (50) Brightness center (50) Color temperature cool Color center (50) CableClear DNR auto To reset your picture setting adjustments: 1. Introduction Connecting your Monitor Using the remote control Setting up your Monitor Resetting your picture setting adjustments The RESET function adjusts the picture settings...
... display format (for 480p signals only) You can be obtained by setting the CINEMA MODE to highlight CINEMA MODE, and then press ENTER. 3. Press y or z to the following factory settings: Mode sports Tint center (0) Contrast max (100) Sharpness center (50) Brightness center (50) Color temperature cool Color center (50) CableClear DNR auto To reset your picture setting adjustments: 1. Introduction Connecting your Monitor Using the remote control Setting up your Monitor Resetting your picture setting adjustments The RESET function adjusts the picture settings...
User Manual
Page 49
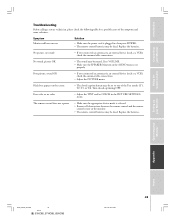
... external device (such as a VCR), check the antenna/cable connections. • Adjust the PICTURE menu. Using the remote control Setting up your Monitor Operating your Monitor Troubleshooting Before calling a service technician, please check the following table for a possible cause of the Text modes (T1, T2, T3, or T4). Replace the batteries. No sound, picture OK • The sound may be muted. Turn closed caption feature may be set properly. Press VOLUME. • Make sure the SPEAKERS function in the PICTURE SETTINGS menu...
... external device (such as a VCR), check the antenna/cable connections. • Adjust the PICTURE menu. Using the remote control Setting up your Monitor Operating your Monitor Troubleshooting Before calling a service technician, please check the following table for a possible cause of the Text modes (T1, T2, T3, or T4). Replace the batteries. No sound, picture OK • The sound may be muted. Turn closed caption feature may be set properly. Press VOLUME. • Make sure the SPEAKERS function in the PICTURE SETTINGS menu...
User Manual
Page 50
... that have discovered, the defect. MONITORS PURCHASED ANYWHERE OUTSIDE OF THE U.S.A., INCLUDING, WITHOUT LIMITATION, CANADA AND MEXICO, AND USED IN THE U.S.A., ARE NOT COVERED BY THESE WARRANTIES. use or malfunction through simultaneous use in materials or workmanship for set installation, setup, adjustment of customer controls, and installation or repair of instructions furnished by this monitor. Owner's Manual and Product Registration Card Read this owner's manual thoroughly before operating this warranty.
... that have discovered, the defect. MONITORS PURCHASED ANYWHERE OUTSIDE OF THE U.S.A., INCLUDING, WITHOUT LIMITATION, CANADA AND MEXICO, AND USED IN THE U.S.A., ARE NOT COVERED BY THESE WARRANTIES. use or malfunction through simultaneous use in materials or workmanship for set installation, setup, adjustment of customer controls, and installation or repair of instructions furnished by this monitor. Owner's Manual and Product Registration Card Read this owner's manual thoroughly before operating this warranty.

User Manual
Page 51
...Monitor Index A A/V cables (standard 8 Audio OUT sound, selecting 46 Audio system connection 17 Auto aspect 30 B BACKGROUND selection 46 Back of the monitor 7 C CableClear® DNR 38 Cable converter box connection 10 Camcorder connection 14 Cinema mode 39 Clock, setting 42 Closed caption 41 Color convergence 25 Color temperature 38 ColorStream® (component video) cables 8 Convergence adjustment 25 D Display format 39 Double-window ("POP") feature 31 DTV receiver connection 13 DVD connection 11, 12 F H I Front of the monitor 7 HDMI™ connection 15 INPUT button...
...Monitor Index A A/V cables (standard 8 Audio OUT sound, selecting 46 Audio system connection 17 Auto aspect 30 B BACKGROUND selection 46 Back of the monitor 7 C CableClear® DNR 38 Cable converter box connection 10 Camcorder connection 14 Cinema mode 39 Clock, setting 42 Closed caption 41 Color convergence 25 Color temperature 38 ColorStream® (component video) cables 8 Convergence adjustment 25 D Display format 39 Double-window ("POP") feature 31 DTV receiver connection 13 DVD connection 11, 12 F H I Front of the monitor 7 HDMI™ connection 15 INPUT button...


