
User Guide
Page 10
... mode 56 Setting the HDMI® audio mode 56 Viewing the digital signal meter 57 Setting the time zone 58 Viewing the system status 58 Resetting Factory Defaults 59 Chapter 6: Using the TV's features 60 Selecting the video input source 60 Labeling the video input sources 62
... mode 56 Setting the HDMI® audio mode 56 Viewing the digital signal meter 57 Setting the time zone 58 Viewing the system status 58 Resetting Factory Defaults 59 Chapter 6: Using the TV's features 60 Selecting the video input source 60 Labeling the video input sources 62
User Guide
Page 19
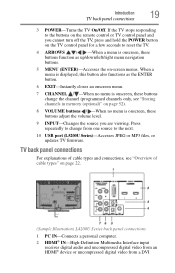
.... 9 INPUT-Changes the source you cannot turn off the TV, press and hold the POWER button on the TV control panel for a few seconds to reset the TV. 4 ARROWS / / / -When a menu is onscreen, these buttons function as up/down/left/right menu navigation buttons. 5 MENU (ENTER)-Accesses the on page 22...
.... 9 INPUT-Changes the source you cannot turn off the TV, press and hold the POWER button on the TV control panel for a few seconds to reset the TV. 4 ARROWS / / / -When a menu is onscreen, these buttons function as up/down/left/right menu navigation buttons. 5 MENU (ENTER)-Accesses the on page 22...
User Guide
Page 32
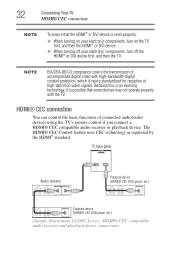
... ensure that some devices may not operate properly with high-bandwidth digital content protection, which is possible that the HDMI® or DVI device is reset properly: ❖ When turning on your electronic components, turn on the TV first, and then the HDMI® or DVI device. ❖ When turning off...
... ensure that some devices may not operate properly with high-bandwidth digital content protection, which is possible that the HDMI® or DVI device is reset properly: ❖ When turning on your electronic components, turn on the TV first, and then the HDMI® or DVI device. ❖ When turning off...

User Guide
Page 35
... Your TV 35 Connecting a digital audio system 4 Press the ( / arrow) buttons to select Digital Output Format. 5 Press the ( / arrow) buttons to the factory defaults, highlight Reset, and then press the ENTER button. THIS DAMAGE IS NOT COVERED BY YOUR WARRANTY. ❖ The DIGITAL AUDIO OUT terminal may not be compatible with...
... Your TV 35 Connecting a digital audio system 4 Press the ( / arrow) buttons to select Digital Output Format. 5 Press the ( / arrow) buttons to the factory defaults, highlight Reset, and then press the ENTER button. THIS DAMAGE IS NOT COVERED BY YOUR WARRANTY. ❖ The DIGITAL AUDIO OUT terminal may not be compatible with...

User Guide
Page 50
... Setup process and press the POWER button before completing all the steps, the Initial Setup window will appear every time you first turn on or reset the TV, the Initial Setup window will appear. 1 In the Menu Language field, press the ( / arrow) buttons to select your preferred language. 2 Press the ( / arrow...
... Setup process and press the POWER button before completing all the steps, the Initial Setup window will appear every time you first turn on or reset the TV, the Initial Setup window will appear. 1 In the Menu Language field, press the ( / arrow) buttons to select your preferred language. 2 Press the ( / arrow...
User Guide
Page 59
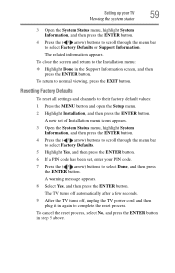
... turns off, unplug the TV power cord and then plug it in step 5 above. The related information appears. Resetting Factory Defaults To reset all settings and channels to complete the reset process. To cancel the reset process, select No, and press the ENTER button in again to their factory default values: 1 Press the MENU...
... turns off, unplug the TV power cord and then plug it in step 5 above. The related information appears. Resetting Factory Defaults To reset all settings and channels to complete the reset process. To cancel the reset process, select No, and press the ENTER button in again to their factory default values: 1 Press the MENU...

User Guide
Page 64
...inputs if you connected a VCR to ColorStream® HD, a video recorder to HDMI 1, and a DVD player to the factory default labels, highlight Reset and press the ENTER button. Input selection screens To clear the input labels: 1 Press the MENU button and open the Preferences menu. 2 Highlight ...Input Labeling, and then press the ENTER button. 3 Highlight Reset, and then press the ENTER button. 64 Using the TV's features Labeling the video input sources 5 To save the new input labels, highlight Done...
...inputs if you connected a VCR to ColorStream® HD, a video recorder to HDMI 1, and a DVD player to the factory default labels, highlight Reset and press the ENTER button. Input selection screens To clear the input labels: 1 Press the MENU button and open the Preferences menu. 2 Highlight ...Input Labeling, and then press the ENTER button. 3 Highlight Reset, and then press the ENTER button. 64 Using the TV's features Labeling the video input sources 5 To save the new input labels, highlight Done...

User Guide
Page 67
... Off. NOTE HDMI® CEC List is automatically grayed out and set to Off when Enable HDMI® CEC is switched to factory defaults, highlight Reset, and then press the ENTER button. To open the Channel Browser: ❖ Press BACK CB or NEXT CB arrow buttons on page 111. 8 To save...
... Off. NOTE HDMI® CEC List is automatically grayed out and set to Off when Enable HDMI® CEC is switched to factory defaults, highlight Reset, and then press the ENTER button. To open the Channel Browser: ❖ Press BACK CB or NEXT CB arrow buttons on page 111. 8 To save...

User Guide
Page 76
The adjustment range is from -5 to the factory defaults, highlight Reset and then press the ENTER button. To revert to +10. To set separate scroll settings for the TheaterWide 2 and TheaterWide 3 modes for each input. NOTE ...
The adjustment range is from -5 to the factory defaults, highlight Reset and then press the ENTER button. To revert to +10. To set separate scroll settings for the TheaterWide 2 and TheaterWide 3 modes for each input. NOTE ...

User Guide
Page 77
... 1, HDMI 2, or HDMI 4 input. To revert to the PC input. Aspect Ratio of the following input sources is not applicable to the factory defaults, highlight Reset and then press the ENTER button.
... 1, HDMI 2, or HDMI 4 input. To revert to the PC input. Aspect Ratio of the following input sources is not applicable to the factory defaults, highlight Reset and then press the ENTER button.

User Guide
Page 78
... and criminal liability. Using the FREEZE feature To use the FREEZE feature: 1 When watching the TV, press the FREEZE button to the factory defaults, highlight Reset and press the ENTER button. To set the Cinema Mode to Video, select Video in FREEZE mode for 480i and 1080i signals) 1 Press the MENU...
... and criminal liability. Using the FREEZE feature To use the FREEZE feature: 1 When watching the TV, press the FREEZE button to the factory defaults, highlight Reset and press the ENTER button. To set the Cinema Mode to Video, select Video in FREEZE mode for 480i and 1080i signals) 1 Press the MENU...

User Guide
Page 81
....) (Sample Illustration) Viewing captions You can use any of the primary language in the Preference mode, see "Selecting the picture mode" on page 79 until Reset is selected. Using the TV's features 81 Using closed captions 3 Press the ( / arrow) buttons to select the picture quality you began adjusting the picture settings...
....) (Sample Illustration) Viewing captions You can use any of the primary language in the Preference mode, see "Selecting the picture mode" on page 79 until Reset is selected. Using the TV's features 81 Using closed captions 3 Press the ( / arrow) buttons to select the picture quality you began adjusting the picture settings...

User Guide
Page 83
... CC Mode) for that characteristic. 4 To save the new settings, highlight Done, and then press the ENTER button. To revert to the factory defaults, highlight Reset, and then press the ENTER button. When such services are not available, the CC Selector presents a default list of services. Using the TV's features 83...
... CC Mode) for that characteristic. 4 To save the new settings, highlight Done, and then press the ENTER button. To revert to the factory defaults, highlight Reset, and then press the ENTER button. When such services are not available, the CC Selector presents a default list of services. Using the TV's features 83...

User Guide
Page 85
...10070; You can transmit a second audio program (SAP) containing a second language, music or other audio information (when provided by individual stations). To reset the settings to reduce the noise. To listen in Stereo mode because it outputs the type of sound being broadcast (stereo or monaural). ❖ ...If the sound is noisy, select Mono to the factory defaults, highlight Reset, and then press the ENTER button. When the TV receives a stereo or SAP broadcast, an icon or word "SAP" appears when the INFO ...
...10070; You can transmit a second audio program (SAP) containing a second language, music or other audio information (when provided by individual stations). To reset the settings to reduce the noise. To listen in Stereo mode because it outputs the type of sound being broadcast (stereo or monaural). ❖ ...If the sound is noisy, select Mono to the factory defaults, highlight Reset, and then press the ENTER button. When the TV receives a stereo or SAP broadcast, an icon or word "SAP" appears when the INFO ...

User Guide
Page 86
... you are watching is no sound at all in SAP mode. For example, a station might broadcast another language as a second audio program. To reset the settings to Stereo mode. NOTE ❖ A second audio program (SAP) can adjust the audio quality by adjusting the bass, treble and balance... then press the ( / arrow) buttons to select the language you prefer. If this happens, set the MTS feature to the factory defaults, highlight Reset, and then press the ENTER button. To listen to a second audio program on an ATSC digital station (if available), highlight the Language field in ...
... you are watching is no sound at all in SAP mode. For example, a station might broadcast another language as a second audio program. To reset the settings to Stereo mode. NOTE ❖ A second audio program (SAP) can adjust the audio quality by adjusting the bass, treble and balance... then press the ( / arrow) buttons to select the language you prefer. If this happens, set the MTS feature to the factory defaults, highlight Reset, and then press the ENTER button. To listen to a second audio program on an ATSC digital station (if available), highlight the Language field in ...

User Guide
Page 88
.... 2 Highlight Audio Setup, and then press the ENTER button. 3 In the Digital Output Format field, select either Compressed or Standard. To reset the settings to the factory defaults, highlight Reset, and then press the ENTER button. 88 Using the TV's features Adjusting the audio When you connect a Dolby® Digital decoder or...
.... 2 Highlight Audio Setup, and then press the ENTER button. 3 In the Digital Output Format field, select either Compressed or Standard. To reset the settings to the factory defaults, highlight Reset, and then press the ENTER button. 88 Using the TV's features Adjusting the audio When you connect a Dolby® Digital decoder or...

User Guide
Page 101
Mode: Horizontal Position Vertical Position Clock Phase Sampling Clocks Reset Description: Moves the picture left/right. The adjustment range is within ±10 from center.* Highlight this feature will be grayed out in the Setup ...
Mode: Horizontal Position Vertical Position Clock Phase Sampling Clocks Reset Description: Moves the picture left/right. The adjustment range is within ±10 from center.* Highlight this feature will be grayed out in the Setup ...

User Guide
Page 114
... Setup and press the ENTER button. 2 Press the ( / arrow) buttons to highlight Enable HDMI® CEC. 3 Press the ( / arrow) buttons to the factory defaults, highlight Reset and press the ENTER button. Displaying TV status information To display TV status information using the RECALL button: ❖ Press the RECALL button on the...
... Setup and press the ENTER button. 2 Press the ( / arrow) buttons to highlight Enable HDMI® CEC. 3 Press the ( / arrow) buttons to the factory defaults, highlight Reset and press the ENTER button. Displaying TV status information To display TV status information using the RECALL button: ❖ Press the RECALL button on the...

User Guide
Page 117
... the picture. Using the TV's Advanced Features Using the advanced picture settings 117 4 Press the ( / arrow) buttons to Preference. To revert the factory defaults, highlight Reset, and then press the ENTER button.
... the picture. Using the TV's Advanced Features Using the advanced picture settings 117 4 Press the ( / arrow) buttons to Preference. To revert the factory defaults, highlight Reset, and then press the ENTER button.
User Guide
Page 118
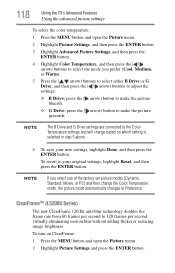
To turn on which setting is selected in step 5 above. 6 To save your original settings, highlight Reset, and then press the ENTER button. NOTE If you prefer (Cool, Medium, or Warm). 5 Press the ( / arrow) buttons to select either B Drive or G Drive, and ...
To turn on which setting is selected in step 5 above. 6 To save your original settings, highlight Reset, and then press the ENTER button. NOTE If you prefer (Cool, Medium, or Warm). 5 Press the ( / arrow) buttons to select either B Drive or G Drive, and ...


