
Owners Manual
Page 7
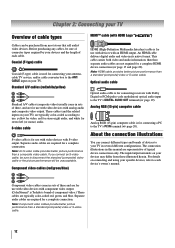
...; (component video), a VCR, and a satellite receiver........15 Connecting a camcorder 16 Connecting an HDMI™ or DVI device to the HDMI input..17 HDMI Control connection 18 Connecting a digital audio system 19 Connecting an audio system 19 Connecting a personal computer (PC 20 Chapter 3: Using ... layout 29 Navigating the menu system 29 Chapter 5: Setting up your TV 30 Selecting the menu language 30 TOSHIBA Logo LED 30 Configuring the antenna input source for the ANT/CABLE terminal 30 Programming channels into the TV's channel memory ........31 Programming channels automatically...
...; (component video), a VCR, and a satellite receiver........15 Connecting a camcorder 16 Connecting an HDMI™ or DVI device to the HDMI input..17 HDMI Control connection 18 Connecting a digital audio system 19 Connecting an audio system 19 Connecting a personal computer (PC 20 Chapter 3: Using ... layout 29 Navigating the menu system 29 Chapter 5: Setting up your TV 30 Selecting the menu language 30 TOSHIBA Logo LED 30 Configuring the antenna input source for the ANT/CABLE terminal 30 Programming channels into the TV's channel memory ........31 Programming channels automatically...
Owners Manual
Page 8
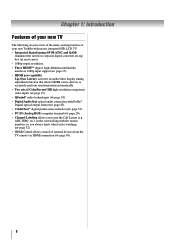
...page 20). • Channel Labeling allows you to accurately perform synchronization automatically. • Two sets of ColorStream® HD high-resolution component video inputs ( page 15). • QSound® audio technologies ( page 54). • Digital Audio Out optical audio connection with the station numbers, ...so you always know what you're watching ( page 32). • HDMI Control allows control of your new Toshiba widescreen, integrated HD, LCD TV: • Integrated digital tuning (8VSB ATSC and QAM) eliminates the need for a separate digital converter ...
...page 20). • Channel Labeling allows you to accurately perform synchronization automatically. • Two sets of ColorStream® HD high-resolution component video inputs ( page 15). • QSound® audio technologies ( page 54). • Digital Audio Out optical audio connection with the station numbers, ...so you always know what you're watching ( page 32). • HDMI Control allows control of your new Toshiba widescreen, integrated HD, LCD TV: • Integrated digital tuning (8VSB ATSC and QAM) eliminates the need for a separate digital converter ...
Owners Manual
Page 10
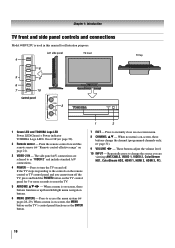
... and off the TV, press and hold the POWER button on the TV control panel for illustration purposes. 1 Green LED and TOSHIBA Logo LED Power LED(Green) = Power indicator TOSHIBA Logo LED= On or Off ( page 30). 2 Remote sensor - When a menu is on-screen, the MENU button on...9 VOLUME WX - Press to reset the TV. 5 ARROWS STWX - Press to access the menu system ( pages 28-29). These buttons adjust the volume level. 10 INPUT - Press to turn off . The side panel A/V connections are viewing (ANT/CABLE, VIDEO 1, VIDEO 2, ColorStream HD1, ColorStream HD2, HDMI 1, HDMI 2, HDMI 3, PC...
... and off the TV, press and hold the POWER button on the TV control panel for illustration purposes. 1 Green LED and TOSHIBA Logo LED Power LED(Green) = Power indicator TOSHIBA Logo LED= On or Off ( page 30). 2 Remote sensor - When a menu is on-screen, the MENU button on...9 VOLUME WX - Press to reset the TV. 5 ARROWS STWX - Press to access the menu system ( pages 28-29). These buttons adjust the volume level. 10 INPUT - Press to turn off . The side panel A/V connections are viewing (ANT/CABLE, VIDEO 1, VIDEO 2, ColorStream HD1, ColorStream HD2, HDMI 1, HDMI 2, HDMI 3, PC...
Owners Manual
Page 11
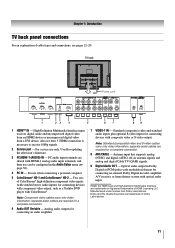
...ColorStream® high-definition component video inputs (with standard stereo audio inputs) for connecting devices with component video output, such as a Toshiba DVD player with composite video or S-video output. High-Definition Multimedia Interface input receives digital audio and uncompressed digital...- Analog audio outputs for connecting an external Dolby Digital decoder, amplifier, A/V receiver, or home theater system with HDMI-1 analog audio input terminals, and their use can be configured in Dolby Digital or PCM (pulse-code modulation) format for connecting an audio amplifier. 7...
...ColorStream® high-definition component video inputs (with standard stereo audio inputs) for connecting devices with component video output, such as a Toshiba DVD player with composite video or S-video output. High-Definition Multimedia Interface input receives digital audio and uncompressed digital...- Analog audio outputs for connecting an external Dolby Digital decoder, amplifier, A/V receiver, or home theater system with HDMI-1 analog audio input terminals, and their use can be configured in Dolby Digital or PCM (pulse-code modulation) format for connecting an audio amplifier. 7...
Owners Manual
Page 12
...composite) video or S-video cable. About the connection illustrations You can be purchased from those illustrated herein. These cables (and the related inputs on your devices may differ from most stores that sell audio/ video devices. Note: HDMI cable provides better picture performance than a ...are not required for stereo left (or mono) audio. For details on your TV. Coaxial (F-type) cable Coaxial (F-type) cable is Toshiba's brand of component video.) These cables are for a complete connection. Separate audio cables are representative of typical device connections only. If ...
...composite) video or S-video cable. About the connection illustrations You can be purchased from those illustrated herein. These cables (and the related inputs on your devices may differ from most stores that sell audio/ video devices. Note: HDMI cable provides better picture performance than a ...are not required for stereo left (or mono) audio. For details on your TV. Coaxial (F-type) cable Coaxial (F-type) cable is Toshiba's brand of component video.) These cables are for a complete connection. Separate audio cables are representative of typical device connections only. If ...
Owners Manual
Page 13
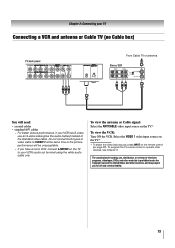
... materials is prohibited under the Copyright Laws of the United States and other devices, see Chapter 3. Select the VIDEO 1 video input source on the TV.* * To select the video input source, press INPUT on the TV.* To view the VCR: Turn ON the VCR. To view the antenna or Cable signal: Select the... ANT/CABLE video input source on the remote control ( page 22). Do not connect both types of the standard video cable. The unauthorized recording, use an S-video cable (plus ...
... materials is prohibited under the Copyright Laws of the United States and other devices, see Chapter 3. Select the VIDEO 1 video input source on the TV.* * To select the video input source, press INPUT on the TV.* To view the VCR: Turn ON the VCR. To view the antenna or Cable signal: Select the... ANT/CABLE video input source on the remote control ( page 22). Do not connect both types of the standard video cable. The unauthorized recording, use an S-video cable (plus ...

Owners Manual
Page 14
...− Do not connect both types of the United States and other devices, see Chapter 3. Select the VIDEO 1 video input source on the TV.* * To select the video input source, press INPUT on the TV.* Tune the TV to channel 3 or 4 (whichever channel the Cable box output is prohibited under the ...to VIDEO 1 at the same time or the picture performance will provide better picture performance than a standard (composite) video cable. Select the ANT/CABLE video input source on the remote control ( page 22). Use the Cable box controls to your TV Connecting a VCR with S-video and a cable box An S-...
...− Do not connect both types of the United States and other devices, see Chapter 3. Select the VIDEO 1 video input source on the TV.* * To select the video input source, press INPUT on the TV.* Tune the TV to channel 3 or 4 (whichever channel the Cable box output is prohibited under the ...to VIDEO 1 at the same time or the picture performance will provide better picture performance than a standard (composite) video cable. Select the ANT/CABLE video input source on the remote control ( page 22). Use the Cable box controls to your TV Connecting a VCR with S-video and a cable box An S-...
Owners Manual
Page 15
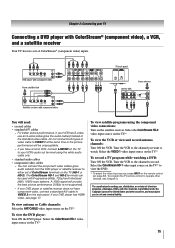
... HD-2 terminals can connect the component video cables (plus the audio cables) instead of the standard video cable. Select the ColorStream HD-1 video input source on the TV* to civil and criminal liability. 15 Do not connect both types of video cable to watch. Select the ColorStream HD...will provide the best picture performance (1080p is prohibited under the Copyright Laws of ColorStream terminals on the side panel. Select the VIDEO 1 video input source on the TV.* To view the DVD player: Turn ON the DVD player. The unauthorized recording, use an S-video cable (plus audio ...
... HD-2 terminals can connect the component video cables (plus the audio cables) instead of the standard video cable. Select the ColorStream HD-1 video input source on the TV* to civil and criminal liability. 15 Do not connect both types of video cable to watch. Select the ColorStream HD...will provide the best picture performance (1080p is prohibited under the Copyright Laws of ColorStream terminals on the side panel. Select the VIDEO 1 video input source on the TV.* To view the DVD player: Turn ON the DVD player. The unauthorized recording, use an S-video cable (plus audio ...

Owners Manual
Page 16
To program the TV remote control to VIDEO 1 on the TV back instead of the VIDEO 2 on the remote control ( page 22). Camcorder VIDEO AUDIO OUT L R VIDEO 2 inputs on TV side panel To view the camcorder video: Select the VIDEO 2 video input source on the TV.* * To select the video input source, press INPUT on the TV side panel. Chapter 2: Connecting your TV Connecting a camcorder You will need: • standard A/V cables − For better picture performance, if your camcorder has S-video, connect an S-video cable (plus the audio cables) to operate other devices, see Chapter 3. 16
To program the TV remote control to VIDEO 1 on the TV back instead of the VIDEO 2 on the remote control ( page 22). Camcorder VIDEO AUDIO OUT L R VIDEO 2 inputs on TV side panel To view the camcorder video: Select the VIDEO 2 video input source on the TV.* * To select the video input source, press INPUT on the TV side panel. Chapter 2: Connecting your TV Connecting a camcorder You will need: • standard A/V cables − For better picture performance, if your camcorder has S-video, connect an S-video cable (plus the audio cables) to operate other devices, see Chapter 3. 16

Owners Manual
Page 17
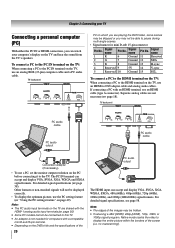
... both video and audio. Supported Audio format: Linear PCM, sampling rate 32/44.1/ 48 kHz Note: To connect a PC to the HDMI input, see page 58. Separate analog audio cables are trademarks or registered trademarks of highdefinition video signals. For detailed signal specifications, see page 20. Because..."Setting the HDMI™ audio mode" ( page 33). Chapter 2: Connecting your TV Connecting an HDMI™ or DVI device to the HDMI input The HDMI input on your electronic components, turn on the TV first, and then the HDMI or DVI device. • When turning off the HDMI or DVI...
... both video and audio. Supported Audio format: Linear PCM, sampling rate 32/44.1/ 48 kHz Note: To connect a PC to the HDMI input, see page 58. Separate analog audio cables are trademarks or registered trademarks of highdefinition video signals. For detailed signal specifications, see page 20. Because..."Setting the HDMI™ audio mode" ( page 33). Chapter 2: Connecting your TV Connecting an HDMI™ or DVI device to the HDMI input The HDMI input on your electronic components, turn on the TV first, and then the HDMI or DVI device. • When turning off the HDMI or DVI...
Owners Manual
Page 19
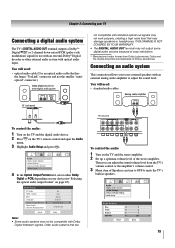
... TV's DIGITAL AUDIO OUT terminal outputs a Dolby®* Digital or 2-channel down-mixed PCM (pulse-code modulation) signal for use external speakers with optical audio input. Older audio systems that has the larger "TosLink" connector and not the smaller "minioptical" connector.) not compatible with Dolby Digital bitstream signals. Dolby and the...
... TV's DIGITAL AUDIO OUT terminal outputs a Dolby®* Digital or 2-channel down-mixed PCM (pulse-code modulation) signal for use external speakers with optical audio input. Older audio systems that has the larger "TosLink" connector and not the smaller "minioptical" connector.) not compatible with Dolby Digital bitstream signals. Dolby and the...
Owners Manual
Page 20
... the TV, use an analog RGB (15-pin) computer cable and a PC audio cable. Note: • The PC audio input terminals on the TV are shared with the HDMI-1 analog audio input terminals ( page 50). • Some PC models cannot be connected to this TV. • An adapter is not needed for..., or 1080p signal program, Native mode scales the video to display the entire picture within the borders of the 20 PC audio output The HDMI input can accept and display VGA, SVGA, XGA, WXGA and SXGA signal formats. PC on the TV and hear the sound from the TV's speakers. For...
... the TV, use an analog RGB (15-pin) computer cable and a PC audio cable. Note: • The PC audio input terminals on the TV are shared with the HDMI-1 analog audio input terminals ( page 50). • Some PC models cannot be connected to this TV. • An adapter is not needed for..., or 1080p signal program, Native mode scales the video to display the entire picture within the borders of the 20 PC audio output The HDMI input can accept and display VGA, SVGA, XGA, WXGA and SXGA signal formats. PC on the TV and hear the sound from the TV's speakers. For...

Owners Manual
Page 22
... remote control Learning about the remote control The buttons used to tune digital channels ( page 38) or to edit the Favorites List ( page 37). 6 INPUT selects the video input source ( page 35). 7 CH ST cycles through the picture sizes: Natural, TheaterWide 1/2/3, Full, 4:3 HD, Native and Dot by Dot ( page 39). 5 Channel Numbers...
... remote control Learning about the remote control The buttons used to tune digital channels ( page 38) or to edit the Favorites List ( page 37). 6 INPUT selects the video input source ( page 35). 7 CH ST cycles through the picture sizes: Natural, TheaterWide 1/2/3, Full, 4:3 HD, Native and Dot by Dot ( page 39). 5 Channel Numbers...
Owners Manual
Page 24
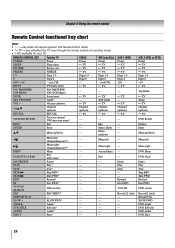
... --- --- --- --- --- Menu left / Channel Browser™ --- ANGLE Angle* --- --- EJECT Eject* --- --- REC REC MENU* --- --- REMOTE CONTROL KEY Toshiba TV CABLE SAT (satellite) POWER Power Power Power SLEEP Sleep timer TV TV PIC SIZE Picture size TV TV FREEZE FREEZE TV TV 1-9 Digit 1-9 Digit... 1-9 Digit 1-9 0 Digit 0 Digit 0 Digit 0 100/-/+10 - (sub CH) --- - (sub CH) INPUT TV/Video select TV TV FAV BROWSER/ TOP MENU FAV BROWSER DVD TOP Menu* --- --- FF Fast FWD* --- --- Pause Play Stop...
... --- --- --- --- --- Menu left / Channel Browser™ --- ANGLE Angle* --- --- EJECT Eject* --- --- REC REC MENU* --- --- REMOTE CONTROL KEY Toshiba TV CABLE SAT (satellite) POWER Power Power Power SLEEP Sleep timer TV TV PIC SIZE Picture size TV TV FREEZE FREEZE TV TV 1-9 Digit 1-9 Digit... 1-9 Digit 1-9 0 Digit 0 Digit 0 Digit 0 100/-/+10 - (sub CH) --- - (sub CH) INPUT TV/Video select TV TV FAV BROWSER/ TOP MENU FAV BROWSER DVD TOP Menu* --- --- FF Fast FWD* --- --- Pause Play Stop...
Owners Manual
Page 28
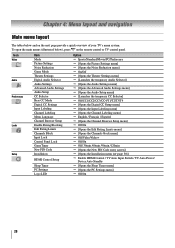
... Setup menu] p [Launches the temporary CC Selector] p Off/CC1/CC2/CC3/CC4/T1/T2/T3/T4 p [Opens the Digital CC Setup menu] p [Opens the Input Labeling menu] p [Opens the Channel Labeling menu] p English / Français / Español p [Opens the Channel Browser Setup menu] p Off/On p...p Off/ 30min /60min /90min /120min p [Opens the New PIN Code entry screen] p [Opens the Installation menu ( page 30)] p Enable HDMI Control / TV Auto Input Switch / TV Auto Power/ Device Auto Standby p [Opens the Sleep Timer menu] p [Opens the PC Settings menu] p Off/On 28 Chapter 4: Menu layout and navigation...
... Setup menu] p [Launches the temporary CC Selector] p Off/CC1/CC2/CC3/CC4/T1/T2/T3/T4 p [Opens the Digital CC Setup menu] p [Opens the Input Labeling menu] p [Opens the Channel Labeling menu] p English / Français / Español p [Opens the Channel Browser Setup menu] p Off/On p...p Off/ 30min /60min /90min /120min p [Opens the New PIN Code entry screen] p [Opens the Installation menu ( page 30)] p Enable HDMI Control / TV Auto Input Switch / TV Auto Power/ Device Auto Standby p [Opens the Sleep Timer menu] p [Opens the PC Settings menu] p Off/On 28 Chapter 4: Menu layout and navigation...
Owners Manual
Page 29
... menu contains the Terrestrial and System Status menus. This is receiving. Icon Terrestrial System Status Item Input Configuration Channel Program Channel Add/Delete Channel Tuning Mode Time Zone Signal Meter System Information Option p [Opens the Input Configuration menu] p [Start] p [Scans for new channels on ANT/CABLE] p [Opens the Channel Add/Delete menu...
... menu contains the Terrestrial and System Status menus. This is receiving. Icon Terrestrial System Status Item Input Configuration Channel Program Channel Add/Delete Channel Tuning Mode Time Zone Signal Meter System Information Option p [Opens the Input Configuration menu] p [Start] p [Scans for new channels on ANT/CABLE] p [Opens the Channel Add/Delete menu...
Owners Manual
Page 30
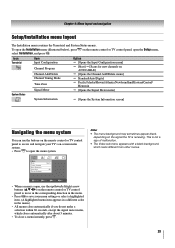
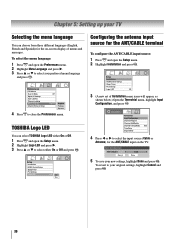
...Channel Tuning Mode Auto Time Zone Signal Meter 4 Press W or X to select the input source (Cable or Antenna) for the on the TV. Chapter 5: Setting up your TV Selecting the menu language You can select TOSHIBA Logo LED either On or Off. 1 Press and open the Setup menu. 2 Highlight... Logo LED Off Off On 5 To save your new settings, highlight Done and press . TOSHIBA Logo LED You can choose from three different languages (English, French and Spanish) for the ANT/CABLE input on -screen display of Installation menu icons will appear, as shown below.) Open the Terrestrial menu...
...Channel Tuning Mode Auto Time Zone Signal Meter 4 Press W or X to select the input source (Cable or Antenna) for the on the TV. Chapter 5: Setting up your TV Selecting the menu language You can select TOSHIBA Logo LED either On or Off. 1 Press and open the Setup menu. 2 Highlight... Logo LED Off Off On 5 To save your new settings, highlight Done and press . TOSHIBA Logo LED You can choose from three different languages (English, French and Spanish) for the ANT/CABLE input on -screen display of Installation menu icons will appear, as shown below.) Open the Terrestrial menu...
Owners Manual
Page 31
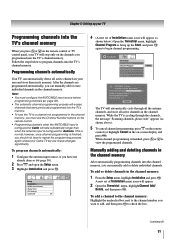
... use the Channel Number buttons on the remote control. • Programming channels when the ANT/CABLE input is configured for Cable will take substantially longer than when the antenna input is finished, you programmed into the TV's memory. • To tune the TV to view...memory: 1 From the Setup menu, highlight Installation and press . To program channels automatically: 1 Configure the antenna input source, if you must configure the ANT/CABLE input source before programming channels ( page 30). • The automatic channel programming process will erases channels that were previously...
... use the Channel Number buttons on the remote control. • Programming channels when the ANT/CABLE input is configured for Cable will take substantially longer than when the antenna input is finished, you programmed into the TV's memory. • To tune the TV to view...memory: 1 From the Setup menu, highlight Installation and press . To program channels automatically: 1 Configure the antenna input source, if you must configure the ANT/CABLE input source before programming channels ( page 30). • The automatic channel programming process will erases channels that were previously...
Owners Manual
Page 33
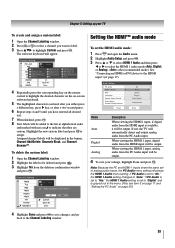
... the Audio menu. 2 Highlight Audio Setup and press . 3 Press S or T to select HDMI 1 Audio and then press W or X to the HDMI input" ( page 17). Audio Setup PC Audio HDMI 1 Audio MTS Language Optical Output Format Dolby Digital Dynamic Range Control Reset No Auto Stereo English Dolby Digital...and is grayed out in the banner, Channel Add/Delete, Channels Block, and Channel Browser™. Note: Because the PC and HDMI-1 inputs share the same set to indicate that they are custom. The software keyboard will automatically detect and output analog audio from the deletion confirmation ...
... the Audio menu. 2 Highlight Audio Setup and press . 3 Press S or T to select HDMI 1 Audio and then press W or X to the HDMI input" ( page 17). Audio Setup PC Audio HDMI 1 Audio MTS Language Optical Output Format Dolby Digital Dynamic Range Control Reset No Auto Stereo English Dolby Digital...and is grayed out in the banner, Channel Add/Delete, Channels Block, and Channel Browser™. Note: Because the PC and HDMI-1 inputs share the same set to indicate that they are custom. The software keyboard will automatically detect and output analog audio from the deletion confirmation ...

Owners Manual
Page 34
...5 Enter your TV Viewing the digital signal meter Viewing the system status You can view the digital signal meter in the ANT/CABLE digital TV input source only. After the time zone has been set, you will allow you want to show the correct time zone information ( page 51). Chapter... has been set). 6 Highlight Yes and press . Open the Terrestrial menu, highlight Signal Meter, and press . 4 Press STWX to select the antenna input and digital channel whose signal you to obtain the RF channel numbers for your local digital stations. • The signal strength does not change between...
...5 Enter your TV Viewing the digital signal meter Viewing the system status You can view the digital signal meter in the ANT/CABLE digital TV input source only. After the time zone has been set, you will allow you want to show the correct time zone information ( page 51). Chapter... has been set). 6 Highlight Yes and press . Open the Terrestrial menu, highlight Signal Meter, and press . 4 Press STWX to select the antenna input and digital channel whose signal you to obtain the RF channel numbers for your local digital stations. • The signal strength does not change between...


