
Owners Manual
Page 6
...TV. Environmental Protection Agency. Dolby and the double-D symbol are trademarks of Dolby Laboratories. • HDMI, the HDMI logo and High-Definition Multimedia Interface are not an indication of HDMI Licensing LLC. 6 Ph: 1-800-631-3811 Note: This equipment has been tested and found ... • Consult the dealer or an experienced radio/TV technician for help. FCC Declaration of Conformity Compliance Statement (Part 15): The Toshiba 40RV52U, 40RV525U, and 46RV525U Televisions comply with the limits for a Class B digital device, pursuant to which can radiate radio frequency energy...
...TV. Environmental Protection Agency. Dolby and the double-D symbol are trademarks of Dolby Laboratories. • HDMI, the HDMI logo and High-Definition Multimedia Interface are not an indication of HDMI Licensing LLC. 6 Ph: 1-800-631-3811 Note: This equipment has been tested and found ... • Consult the dealer or an experienced radio/TV technician for help. FCC Declaration of Conformity Compliance Statement (Part 15): The Toshiba 40RV52U, 40RV525U, and 46RV525U Televisions comply with the limits for a Class B digital device, pursuant to which can radiate radio frequency energy...
Owners Manual
Page 7
...DVD player with ColorStream® (component video), a VCR, and a satellite receiver........15 Connecting a camcorder 16 Connecting an HDMI™ or DVI device to the HDMI input..17 HDMI Control connection 18 Connecting a digital audio system 19 Connecting an audio system 19 Connecting a personal computer (PC 20 Chapter ...Setup/Installation menu layout 29 Navigating the menu system 29 Chapter 5: Setting up your TV 30 Selecting the menu language 30 TOSHIBA Logo LED 30 Configuring the antenna input source for the ANT/CABLE terminal 30 Programming channels into the TV's channel memory ...
...DVD player with ColorStream® (component video), a VCR, and a satellite receiver........15 Connecting a camcorder 16 Connecting an HDMI™ or DVI device to the HDMI input..17 HDMI Control connection 18 Connecting a digital audio system 19 Connecting an audio system 19 Connecting a personal computer (PC 20 Chapter ...Setup/Installation menu layout 29 Navigating the menu system 29 Chapter 5: Setting up your TV 30 Selecting the menu language 30 TOSHIBA Logo LED 30 Configuring the antenna input source for the ANT/CABLE terminal 30 Programming channels into the TV's channel memory ...
Owners Manual
Page 8
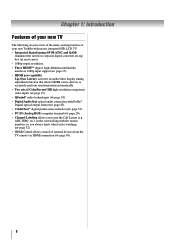
Chapter 1: Introduction Features of your new TV The following are just a few of the many exciting features of your new Toshiba widescreen, integrated HD, LCD TV: • Integrated digital tuning (8VSB ATSC and QAM) eliminates the need for a separate digital converter set-... ( page 53). • PC IN (Analog RGB) computer terminal ( page 20). • Channel Labeling allows you 're watching ( page 32). • HDMI Control allows control of ColorStream® HD high-resolution component video inputs ( page 15). • QSound® audio technologies ( page 54). • Digital Audio Out...
Chapter 1: Introduction Features of your new TV The following are just a few of the many exciting features of your new Toshiba widescreen, integrated HD, LCD TV: • Integrated digital tuning (8VSB ATSC and QAM) eliminates the need for a separate digital converter set-... ( page 53). • PC IN (Analog RGB) computer terminal ( page 20). • Channel Labeling allows you 're watching ( page 32). • HDMI Control allows control of ColorStream® HD high-resolution component video inputs ( page 15). • QSound® audio technologies ( page 54). • Digital Audio Out...
Owners Manual
Page 10
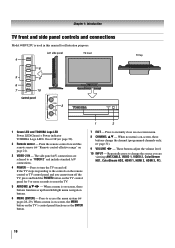
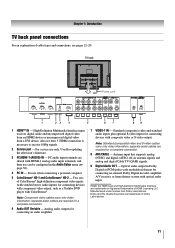
The side panel A/V connections are viewing (ANT/CABLE, VIDEO 1, VIDEO 2, ColorStream HD1, ColorStream HD2, HDMI 1, HDMI 2, HDMI 3, PC). 10 If the TV stops responding to the controls on the remote control or TV control panel and you are referred to reset the ... on and off the TV, press and hold the POWER button on the TV control panel for illustration purposes. 1 Green LED and TOSHIBA Logo LED Power LED(Green) = Power indicator TOSHIBA Logo LED= On or Off ( page 30). 2 Remote sensor - Chapter 1: Introduction TV front and side panel controls and connections Model 40RV525U...
The side panel A/V connections are viewing (ANT/CABLE, VIDEO 1, VIDEO 2, ColorStream HD1, ColorStream HD2, HDMI 1, HDMI 2, HDMI 3, PC). 10 If the TV stops responding to the controls on the remote control or TV control panel and you are referred to reset the ... on and off the TV, press and hold the POWER button on the TV control panel for illustration purposes. 1 Green LED and TOSHIBA Logo LED Power LED(Green) = Power indicator TOSHIBA Logo LED= On or Off ( page 30). 2 Remote sensor - Chapter 1: Introduction TV front and side panel controls and connections Model 40RV525U...
Owners Manual
Page 11
.... 6 Audio OUT Variable - Also see pages 12-20. 1 HDMI™ IN - HDMI, the HDMI logo and High-Definition Multimedia Interface are required for connecting devices with component video output, such as a Toshiba DVD player with ColorStream®. Used for updating the television's firmware.... 3 PC/HDMI-1 (AUDIO) IN - Manufactured under license from a DVI device. Note: Component video cables...
.... 6 Audio OUT Variable - Also see pages 12-20. 1 HDMI™ IN - HDMI, the HDMI logo and High-Definition Multimedia Interface are required for connecting devices with component video output, such as a Toshiba DVD player with ColorStream®. Used for updating the television's firmware.... 3 PC/HDMI-1 (AUDIO) IN - Manufactured under license from a DVI device. Note: Component video cables...
Owners Manual
Page 12
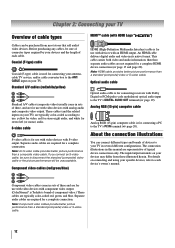
...TV in several different configurations. Standard A/V cables (red/white/yellow) Standard A/V cables (composite video) usually come in its native format. Note: HDMI cable provides better picture performance than a standard (composite) video or S-video cable. Coaxial (F-type) cable Coaxial (F-type) cable is used for...These cables are typically color-coded according to the TV's DIGITAL AUDIO OUT terminal ( page 19). S-video cable S-video cable is Toshiba's brand of connector types required by your TV) are typically color-coded red, green, and blue. This cable carries both video and...
...TV in several different configurations. Standard A/V cables (red/white/yellow) Standard A/V cables (composite video) usually come in its native format. Note: HDMI cable provides better picture performance than a standard (composite) video or S-video cable. Coaxial (F-type) cable Coaxial (F-type) cable is used for...These cables are typically color-coded according to the TV's DIGITAL AUDIO OUT terminal ( page 19). S-video cable S-video cable is Toshiba's brand of connector types required by your TV) are typically color-coded red, green, and blue. This cable carries both video and...
Owners Manual
Page 15
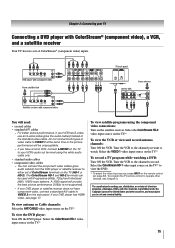
... the same time or the picture performance will need: • coaxial cables • standard A/V cables − For better picture performance, if your DVD player has HDMI video, see Chapter 3. Select the ColorStream HD-2 video input source on the TV.* To view the DVD player: Turn ON the DVD player. To program...
... the same time or the picture performance will need: • coaxial cables • standard A/V cables − For better picture performance, if your DVD player has HDMI video, see Chapter 3. Select the ColorStream HD-2 video input source on the TV.* To view the DVD player: Turn ON the DVD player. To program...

Owners Manual
Page 17
... on your electronic components, turn on your electronic components, turn off your TV receives digital audio and uncompressed digital video from an HDMI source device, or uncompressed digital video from EIA/CEA-861-D-compliant[1] consumer electronic devices (such as a set-top box or DVD player with... PCM, sampling rate 32/44.1/ 48 kHz Note: To connect a PC to the HDMI input, see illustration). − See "Setting the HDMI™ audio mode" ( page 33). To view the HDMI device video: Select the HDMI 1, HDMI 2 or HDMI 3 video input source on the TV.* * To select the video input source, press...
... on your electronic components, turn on your electronic components, turn off your TV receives digital audio and uncompressed digital video from an HDMI source device, or uncompressed digital video from EIA/CEA-861-D-compliant[1] consumer electronic devices (such as a set-top box or DVD player with... PCM, sampling rate 32/44.1/ 48 kHz Note: To connect a PC to the HDMI input, see illustration). − See "Setting the HDMI™ audio mode" ( page 33). To view the HDMI device video: Select the HDMI 1, HDMI 2 or HDMI 3 video input source on the TV.* * To select the video input source, press...
Owners Manual
Page 18
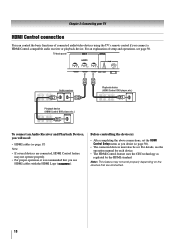
...connect an Audio Receiver and Playback Devices, you desire ( page 50). • The connected devices must also be set the HDMI Control Setup menu as regulated by the HDMI standard. For details, see page 50. Before controlling the device(s): • After completing the above connections, set . For ...an explanation of connected audio/video devices using the TV's remote control if you use HDMI cables with the HDMI Logo ( ). Note : This feature may not operate properly. • For proper operation, it is recommended that are connected...
...connect an Audio Receiver and Playback Devices, you desire ( page 50). • The connected devices must also be set the HDMI Control Setup menu as regulated by the HDMI standard. For details, see page 50. Before controlling the device(s): • After completing the above connections, set . For ...an explanation of connected audio/video devices using the TV's remote control if you use HDMI cables with the HDMI Logo ( ). Note : This feature may not operate properly. • For proper operation, it is recommended that are connected...
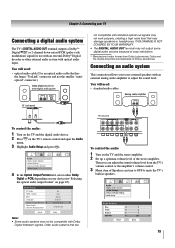
Owners Manual
Page 19
... audio cable that has the larger "TosLink" connector and not the smaller "minioptical" connector.) not compatible with Dolby Digital bitstream signals. Audio Setup PC Audio HDMI 1 Audio MTS Language Optical Output Format Dolby Digital Dynamic Range Control Reset No Auto Stereo English Dolby Digital Compressed Done Note: • Some audio systems...
... audio cable that has the larger "TosLink" connector and not the smaller "minioptical" connector.) not compatible with Dolby Digital bitstream signals. Audio Setup PC Audio HDMI 1 Audio MTS Language Optical Output Format Dolby Digital Dynamic Range Control Reset No Auto Stereo English Dolby Digital Compressed Done Note: • Some audio systems...
Owners Manual
Page 20
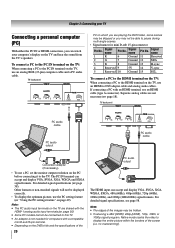
..., 1080i, or 1080p signal program, Native mode scales the video to display the entire picture within the borders of the 20 PC audio output The HDMI input can accept and display VGA, SVGA, XGA, WXGA, SXGA, 480i (60Hz), 480p (60Hz), 720p (60Hz), 1080i (60Hz), and 1080p (24Hz/60Hz) signal formats.... a PC to the PC IN terminal on the TV: When connecting a PC to pause during multi-angle scenes. • Signal names for computers with the HDMI-1 analog audio input terminals ( page 50). • Some PC models cannot be displayed correctly. • To display the optimum picture, use the PC setting...
..., 1080i, or 1080p signal program, Native mode scales the video to display the entire picture within the borders of the 20 PC audio output The HDMI input can accept and display VGA, SVGA, XGA, WXGA, SXGA, 480i (60Hz), 480p (60Hz), 720p (60Hz), 1080i (60Hz), and 1080p (24Hz/60Hz) signal formats.... a PC to the PC IN terminal on the TV: When connecting a PC to pause during multi-angle scenes. • Signal names for computers with the HDMI-1 analog audio input terminals ( page 50). • Some PC models cannot be displayed correctly. • To display the optimum picture, use the PC setting...
Owners Manual
Page 28
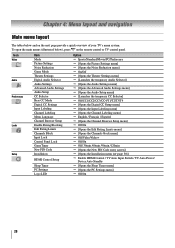
... Labeling Menu Language Channel Browser Setup Enable Rating Blocking Edit Rating Limits Channels Block Input Lock Control Panel Lock GameTimer New PIN Code Installation HDMI Control Setup Sleep Timer PC Settings Logo LED Option p Sports/Standard/Movie/PC/Preference p [Opens the Picture Settings menu] p [Opens...p Off/On p Off/ 30min /60min /90min /120min p [Opens the New PIN Code entry screen] p [Opens the Installation menu ( page 30)] p Enable HDMI Control / TV Auto Input Switch / TV Auto Power/ Device Auto Standby p [Opens the Sleep Timer menu] p [Opens the PC Settings menu] p Off/On 28...
... Labeling Menu Language Channel Browser Setup Enable Rating Blocking Edit Rating Limits Channels Block Input Lock Control Panel Lock GameTimer New PIN Code Installation HDMI Control Setup Sleep Timer PC Settings Logo LED Option p Sports/Standard/Movie/PC/Preference p [Opens the Picture Settings menu] p [Opens...p Off/On p Off/ 30min /60min /90min /120min p [Opens the New PIN Code entry screen] p [Opens the Installation menu ( page 30)] p Enable HDMI Control / TV Auto Input Switch / TV Auto Power/ Device Auto Standby p [Opens the Sleep Timer menu] p [Opens the PC Settings menu] p Off/On 28...
Owners Manual
Page 30
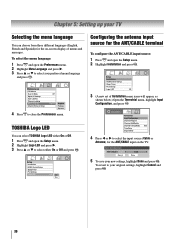
Setup Installation HDMI Control Setup Sleep Timer PC Settings Logo LED Off 3 (A new set of menus and messages. TOSHIBA Logo LED You can choose from three different languages (English, French and Spanish) for the on the TV. Installation Terrestrial Input ...S or T to select your original settings, highlight Cancel and press . 30 Setup Installation HDMI Control Setup Sleep Timer PC Settings Logo LED Off Off On 5 To save your TV Selecting the menu language You can select TOSHIBA Logo LED either On or Off. 1 Press and open the Preferences menu. 2 Highlight Menu...
Setup Installation HDMI Control Setup Sleep Timer PC Settings Logo LED Off 3 (A new set of menus and messages. TOSHIBA Logo LED You can choose from three different languages (English, French and Spanish) for the on the TV. Installation Terrestrial Input ...S or T to select your original settings, highlight Cancel and press . 30 Setup Installation HDMI Control Setup Sleep Timer PC Settings Logo LED Off Off On 5 To save your TV Selecting the menu language You can select TOSHIBA Logo LED either On or Off. 1 Press and open the Preferences menu. 2 Highlight Menu...
Owners Manual
Page 31
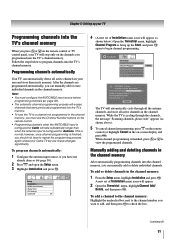
Setup Installation HDMI Control Setup Sleep Timer PC Settings Logo LED Off 4 (A new set of Installation menu icons will appear, as shown above). 5 To cancel channel programming, press ...
Setup Installation HDMI Control Setup Sleep Timer PC Settings Logo LED Off 4 (A new set of Installation menu icons will appear, as shown above). 5 To cancel channel programming, press ...
Owners Manual
Page 33
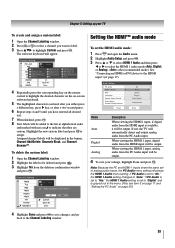
... Block, and Channel Browser™. If PC Audio is the recommended mode.) See "Connecting an HDMI or DVI device to indicate that they are custom. Audio Setup PC Audio HDMI 1 Audio MTS Language Optical Output Format Dolby Digital Dynamic Range Control Reset No Auto Stereo English Dolby... Digital Compressed Done Mode Auto Digital Analog Description When viewing the HDMI 1 input, if digital audio from the HDMI input will be output. When viewing the HDMI 1 input, digital audio from the HDMI input is grayed out in alphabetical order and marked with an icon to ...
... Block, and Channel Browser™. If PC Audio is the recommended mode.) See "Connecting an HDMI or DVI device to indicate that they are custom. Audio Setup PC Audio HDMI 1 Audio MTS Language Optical Output Format Dolby Digital Dynamic Range Control Reset No Auto Stereo English Dolby... Digital Compressed Done Mode Auto Digital Analog Description When viewing the HDMI 1 input, if digital audio from the HDMI input will be output. When viewing the HDMI 1 input, digital audio from the HDMI input is grayed out in alphabetical order and marked with an icon to ...
Owners Manual
Page 35
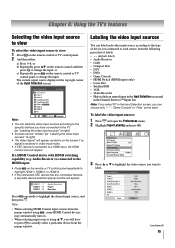
...the remote or TV control panel repeatedly to actually select a particular device from the following preset list of the Input Selection screen. HDMI 1 - 1 HDMI 1 - 2 HDMI 1 - 3 Audio Receiver Player Recorder Press repeatedly to change the input. Preferences CC Selector Off Base CC Mode Off CC1 ...You can choose only "- -", "Game Console" or "Hide" as the label. Input Labeling Video 1 Video 2 ColorStream HD 1 ColorStream HD 2 HDMI 1 HDMI 2 HDMI 3 PC Reset VCR Cable Video Recorder Hide DTV Satellite/DSS DV D -- or c) Repeatedly press on the remote control or TV control panel to view...
...the remote or TV control panel repeatedly to actually select a particular device from the following preset list of the Input Selection screen. HDMI 1 - 1 HDMI 1 - 2 HDMI 1 - 3 Audio Receiver Player Recorder Press repeatedly to change the input. Preferences CC Selector Off Base CC Mode Off CC1 ...You can choose only "- -", "Game Console" or "Hide" as the label. Input Labeling Video 1 Video 2 ColorStream HD 1 ColorStream HD 2 HDMI 1 HDMI 2 HDMI 3 PC Reset VCR Cable Video Recorder Hide DTV Satellite/DSS DV D -- or c) Repeatedly press on the remote control or TV control panel to view...
Owners Manual
Page 36
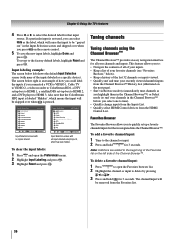
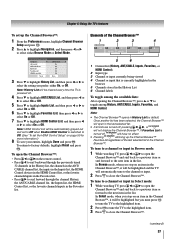
... allows you connected a VCR to VIDEO 1, Cable TV to VIDEO 2, a video recorder to ColorStream HD1, a DTV settop box to HDMI 3. Tuning channels Tuning channels using the Channel Browser™ The Channel Browser™ provides an easy navigation interface for 3 seconds. Input ...Selection 0 ANT/CABLE 1 Video 1 2 Video 2 3 ColorStream HD1 4 ColorStream HD2 5 HDMI 1 6 HDMI 2 7 HDMI 3 8 PC ANT/CABLE 0 - 8 / INPUT to the factory default labels, highlight Reset and press . The channel/input will be removed from ...
... allows you connected a VCR to VIDEO 1, Cable TV to VIDEO 2, a video recorder to ColorStream HD1, a DTV settop box to HDMI 3. Tuning channels Tuning channels using the Channel Browser™ The Channel Browser™ provides an easy navigation interface for 3 seconds. Input ...Selection 0 ANT/CABLE 1 Video 1 2 Video 2 3 ColorStream HD1 4 ColorStream HD2 5 HDMI 1 6 HDMI 2 7 HDMI 3 8 PC ANT/CABLE 0 - 8 / INPUT to the factory default labels, highlight Reset and press . The channel/input will be removed from ...
Owners Manual
Page 37
... labels To toggle among the available lists: After opening the Channel Browser™, press S or T to select either On, or Off. Note: HDMI Control List will bring up the Channel Browser™: 1 From the Preferences menu, highlight Channel Browser Setup and press . 2 Press S to highlight... Navigation, and then press W or X to toggle among History, ANT/CABLE, Inputs, Favorites, and HDMI Control. If Favorites List is switched to close the Channel Browser™. (continued) 37 Note: • The Channel Browser™ opens in History List...
... labels To toggle among the available lists: After opening the Channel Browser™, press S or T to select either On, or Off. Note: HDMI Control List will bring up the Channel Browser™: 1 From the Preferences menu, highlight Channel Browser Setup and press . 2 Press S to highlight... Navigation, and then press W or X to toggle among History, ANT/CABLE, Inputs, Favorites, and HDMI Control. If Favorites List is switched to close the Channel Browser™. (continued) 37 Note: • The Channel Browser™ opens in History List...
Owners Manual
Page 40
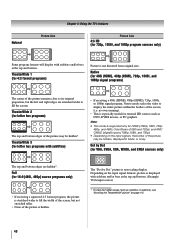
...). • Depending on the input signal formats, picture is supported only for letter box programs with subtitles) • If receiving a 480i (HDMI), 480p (HDMI), 720p, 1080i, or 1080p signal program, Native mode scales the video to fill the width of the picture is non-scaling display. Full (...movies, or PC graphics. Note: • This mode is displayed with sidebars and/or bars at the top and bottom. Native (for 480i (HDMI), 480p (HDMI), 720p, 1080i, and 1080p signal programs) The center of the picture remains close to fill the screen. Dot by Dot" picture is hidden. ...
...). • Depending on the input signal formats, picture is supported only for letter box programs with subtitles) • If receiving a 480i (HDMI), 480p (HDMI), 720p, 1080i, or 1080p signal program, Native mode scales the video to fill the width of the picture is non-scaling display. Full (...movies, or PC graphics. Note: • This mode is displayed with sidebars and/or bars at the top and bottom. Native (for 480i (HDMI), 480p (HDMI), 720p, 1080i, and 1080p signal programs) The center of the picture remains close to fill the screen. Dot by Dot" picture is hidden. ...
Owners Manual
Page 41
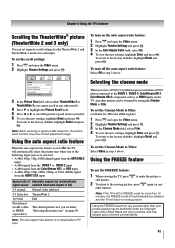
... Theater Settings Sports Off 3 In the Picture Size field, select either TheaterWide 2 or TheaterWide 3 (you view a DVD (3:2 pulldown processed) from the HDMI 1/2/3 input Aspect ratio of the United States and other mode). 4 Press T to highlight the Picture Scroll field. 5 Press W or X to scroll...ratio feature is On) 4:3 normal Natural (with sidebars) 4:3 letter box TheaterWide 2 16:9 full Full Not defined (no ID-1 data or HDMI aspect data) The current picture size you to the factory defaults, highlight Reset and press . Chapter 6: Using the TV's features Scrolling the TheaterWide...
... Theater Settings Sports Off 3 In the Picture Size field, select either TheaterWide 2 or TheaterWide 3 (you view a DVD (3:2 pulldown processed) from the HDMI 1/2/3 input Aspect ratio of the United States and other mode). 4 Press T to highlight the Picture Scroll field. 5 Press W or X to scroll...ratio feature is On) 4:3 normal Natural (with sidebars) 4:3 letter box TheaterWide 2 16:9 full Full Not defined (no ID-1 data or HDMI aspect data) The current picture size you to the factory defaults, highlight Reset and press . Chapter 6: Using the TV's features Scrolling the TheaterWide...


