

Owners Manual
Page 2
... route all instructions supplied by the display and wall mount manufacturers. • If you are inappropriately situated on a "larger than a UL Listed wall bracket appropriate for the size and weight of electric shock to constitute a risk of this television for purchasing this Toshiba LCD TV. WARNING: TO REDUCE THE RISK OF ELECTRIC SHOCK, DO NOT REMOVE COVER (OR BACK). However, flat panel displays are not always supported on...
... route all instructions supplied by the display and wall mount manufacturers. • If you are inappropriately situated on a "larger than a UL Listed wall bracket appropriate for the size and weight of electric shock to constitute a risk of this television for purchasing this Toshiba LCD TV. WARNING: TO REDUCE THE RISK OF ELECTRIC SHOCK, DO NOT REMOVE COVER (OR BACK). However, flat panel displays are not always supported on...
Owners Manual
Page 3
.... • NEVER allow your body to help maintain reliable operation of the unit. The slots and openings are provided for replacement of the obsolete outlet. 10) Protect the power cord from being walked on the rear of the TV to operate this equipment under the rules of plug to drapes, curtains, or walls; Additional Safety Precautions 14a) CAUTION: If...
.... • NEVER allow your body to help maintain reliable operation of the unit. The slots and openings are provided for replacement of the obsolete outlet. 10) Protect the power cord from being walked on the rear of the TV to operate this equipment under the rules of plug to drapes, curtains, or walls; Additional Safety Precautions 14a) CAUTION: If...
Owners Manual
Page 4
... in safe operating condition. 39) The cold cathode fluorescent lamp in the LCD panel contains a small amount of the panel. When selecting a location for the television, avoid locations where the screen may be damaged by the approved method for long periods of time. 34) During normal use the TV in a room whose temperature is thundering, do not touch the connecting cables or...
... in safe operating condition. 39) The cold cathode fluorescent lamp in the LCD panel contains a small amount of the panel. When selecting a location for the television, avoid locations where the screen may be damaged by the approved method for long periods of time. 34) During normal use the TV in a room whose temperature is thundering, do not touch the connecting cables or...
Owners Manual
Page 7
... Changing your PIN code 46 Blocking TV programs and movies by rating (V-Chip 46 Downloading an additional rating system for blocking TV programs and movies 47 Blocking channels 48 Unlocking programs temporarily 48 Using the input lock feature 48 Using the GameTimer 49 Using the control panel lock feature 49 Using the PC settings feature 49 Setting the PC Audio 50 Setting the sleep timer 50 Using HDMI Control 50 Displaying TV status information 51 Understanding the auto power...
... Changing your PIN code 46 Blocking TV programs and movies by rating (V-Chip 46 Downloading an additional rating system for blocking TV programs and movies 47 Blocking channels 48 Unlocking programs temporarily 48 Using the input lock feature 48 Using the GameTimer 49 Using the control panel lock feature 49 Using the PC settings feature 49 Setting the PC Audio 50 Setting the sleep timer 50 Using HDMI Control 50 Displaying TV status information 51 Understanding the auto power...
Owners Manual
Page 11
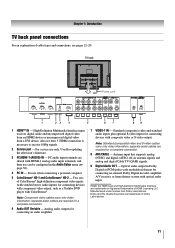
...Multimedia Interface input receives digital audio and uncompressed digital video from an HDMI device or uncompressed digital video from Dolby Laboratories. Antenna input that supports analog (NTSC) and digital (ATSC) off-air antenna signals and analog and digital Cable TV (QAM) signals. 9 Digital Audio OUT - Dolby and the double-D symbol are shared with optical audio input. HDMI connection is necessary to receive 1080p signals. 2 Service port - For use only. Analog audio outputs for updating the television's firmware. 3 PC/HDMI-1 (AUDIO) IN - PC audio input terminals are...
...Multimedia Interface input receives digital audio and uncompressed digital video from an HDMI device or uncompressed digital video from Dolby Laboratories. Antenna input that supports analog (NTSC) and digital (ATSC) off-air antenna signals and analog and digital Cable TV (QAM) signals. 9 Digital Audio OUT - Dolby and the double-D symbol are shared with optical audio input. HDMI connection is necessary to receive 1080p signals. 2 Service port - For use only. Analog audio outputs for updating the television's firmware. 3 PC/HDMI-1 (AUDIO) IN - PC audio input terminals are...
Owners Manual
Page 12
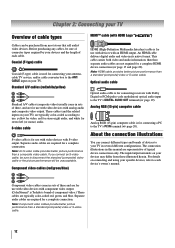
...'s owner's manual. Component video cables (red/green/blue) HDMI (High-Definition Multimedia Interface) cable is used for a complete HDMI device connection ( page 17 and page 20). Before purchasing any cables, be purchased from those illustrated herein. About the connection illustrations You can be sure of connector types required by your TV) are for use with video devices with Dolby Digital or PCM (pulse-code modulation) optical audio input to use with devices with S-video output...
...'s owner's manual. Component video cables (red/green/blue) HDMI (High-Definition Multimedia Interface) cable is used for a complete HDMI device connection ( page 17 and page 20). Before purchasing any cables, be purchased from those illustrated herein. About the connection illustrations You can be sure of connector types required by your TV) are for use with video devices with Dolby Digital or PCM (pulse-code modulation) optical audio input to use with devices with S-video output...

Owners Manual
Page 14
... connect both types of the United States and other materials is set to). The unauthorized recording, use, distribution, or revision of television programs, videotapes, DVDs, and other countries, and may not be unacceptable. • standard audio cables − If you to civil and criminal liability. 14 Select the ANT/CABLE video input source on the TV.* Tune the TV to channel 3 or 4 (whichever channel the Cable box output...
... connect both types of the United States and other materials is set to). The unauthorized recording, use, distribution, or revision of television programs, videotapes, DVDs, and other countries, and may not be unacceptable. • standard audio cables − If you to civil and criminal liability. 14 Select the ANT/CABLE video input source on the TV.* Tune the TV to channel 3 or 4 (whichever channel the Cable box output...
Owners Manual
Page 19
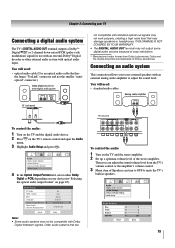
...To control the audio: 1 Turn on the TV's remote control and open the Audio menu. 3 Highlight Audio Setup and press . Audio Digital Audio Selector Audio Settings Advanced Audio Settings Audio Setup 4 In the Optical Output Format field, select either Dolby Digital or PCM, depending on your TV Connecting a digital audio system The TV's DIGITAL AUDIO OUT terminal outputs a Dolby®* Digital or 2-channel down-mixed PCM (pulse-code modulation) signal for use external speakers with optical audio input. Audio Setup PC Audio HDMI 1 Audio MTS Language Optical Output Format Dolby Digital...
...To control the audio: 1 Turn on the TV's remote control and open the Audio menu. 3 Highlight Audio Setup and press . Audio Digital Audio Selector Audio Settings Advanced Audio Settings Audio Setup 4 In the Optical Output Format field, select either Dolby Digital or PCM, depending on your TV Connecting a digital audio system The TV's DIGITAL AUDIO OUT terminal outputs a Dolby®* Digital or 2-channel down-mixed PCM (pulse-code modulation) signal for use external speakers with optical audio input. Audio Setup PC Audio HDMI 1 Audio MTS Language Optical Output Format Dolby Digital...
Owners Manual
Page 20
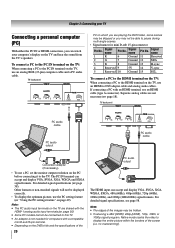
... audio output PC audio cable Conversion adapter (if necessary) • To use an analog RGB (15-pin) computer cable and a PC audio cable. Other formats or non-standard signals will not be hidden. • If receiving a 480i (HDMI), 480p (HDMI), 720p, 1080i, or 1080p signal program, Native mode scales the video to display the entire picture within the borders of the screen (i.e. no overscanning). Signal name Pin No. For detailed signal specifications ( page 58). To connect...
... audio output PC audio cable Conversion adapter (if necessary) • To use an analog RGB (15-pin) computer cable and a PC audio cable. Other formats or non-standard signals will not be hidden. • If receiving a 480i (HDMI), 480p (HDMI), 720p, 1080i, or 1080p signal program, Native mode scales the video to display the entire picture within the borders of the screen (i.e. no overscanning). Signal name Pin No. For detailed signal specifications ( page 58). To connect...

Owners Manual
Page 22
... picture ( page 41). 3 SLEEP accesses the sleep timer ( page 50). 4 PIC SIZE cycles through programmed channels when no menu is on-screen, these buttons select or adjust programming menus. (Also see the remote control functional key chart ( page 24). 1 POWER turns the TV on -screen menus. 19 MODE SELECT switch switches between TV, CABLE/SAT, AUX 1, and AUX 2 modes ( page 23). Note: The error message "NOT AVAILABLE" may appear if you press a key for operating...
... picture ( page 41). 3 SLEEP accesses the sleep timer ( page 50). 4 PIC SIZE cycles through programmed channels when no menu is on-screen, these buttons select or adjust programming menus. (Also see the remote control functional key chart ( page 24). 1 POWER turns the TV on -screen menus. 19 MODE SELECT switch switches between TV, CABLE/SAT, AUX 1, and AUX 2 modes ( page 23). Note: The error message "NOT AVAILABLE" may appear if you press a key for operating...
Owners Manual
Page 28
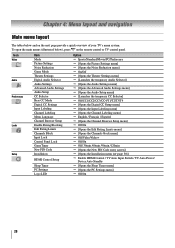
... ), press on the next page provide a quick overview of your TV's menu system. Icon Video Audio Preferences Locks Setup Item Mode Picture Settings Noise Reduction Game Mode Theater Settings Digital Audio Selector Audio Settings Advanced Audio Settings Audio Setup CC Selector Base CC Mode Digital CC Settings Input Labeling Channel Labeling Menu Language Channel Browser Setup Enable Rating Blocking Edit Rating Limits Channels Block Input Lock Control Panel Lock GameTimer New PIN Code Installation HDMI Control Setup Sleep Timer PC Settings Logo LED Option p Sports/Standard/Movie/PC/Preference...
... ), press on the next page provide a quick overview of your TV's menu system. Icon Video Audio Preferences Locks Setup Item Mode Picture Settings Noise Reduction Game Mode Theater Settings Digital Audio Selector Audio Settings Advanced Audio Settings Audio Setup CC Selector Base CC Mode Digital CC Settings Input Labeling Channel Labeling Menu Language Channel Browser Setup Enable Rating Blocking Edit Rating Limits Channels Block Input Lock Control Panel Lock GameTimer New PIN Code Installation HDMI Control Setup Sleep Timer PC Settings Logo LED Option p Sports/Standard/Movie/PC/Preference...
Owners Manual
Page 29
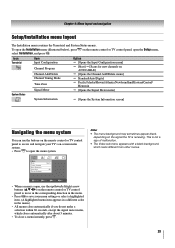
... Channel Program Channel Add/Delete Channel Tuning Mode Time Zone Signal Meter System Information Option p [Opens the Input Configuration menu] p [Start] p [Scans for new channels on ANT/CABLE] p [Opens the Channel Add/Delete menu] p Standard/Auto/Digital p Pacific/Alaska/Hawaii/Atlantic/Newfoundland/Eastern/Central/ Mountain p [Opens the Signal Meter menu] p [Opens the System Information screen] Navigating the menu system You can use the up/down/left/right arrow buttons (STWX) on the remote control...
... Channel Program Channel Add/Delete Channel Tuning Mode Time Zone Signal Meter System Information Option p [Opens the Input Configuration menu] p [Start] p [Scans for new channels on ANT/CABLE] p [Opens the Channel Add/Delete menu] p Standard/Auto/Digital p Pacific/Alaska/Hawaii/Atlantic/Newfoundland/Eastern/Central/ Mountain p [Opens the Signal Meter menu] p [Opens the System Information screen] Navigating the menu system You can use the up/down/left/right arrow buttons (STWX) on the remote control...
Owners Manual
Page 30
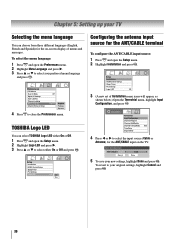
... close the Preferences menu. Setup Installation HDMI Control Setup Sleep Timer PC Settings Logo LED Off Off On 5 To save your TV Selecting the menu language You can select TOSHIBA Logo LED either On or Off and press . Installation Terrestrial Input Configuration Channel Program Channel Add/Delete Channel Tuning Mode Auto Time Zone Signal Meter 4 Press W or X to your preferred menu language and press . 4 Press Preferences CC Selector Base CC Mode Digital CC Settings Input Labeling Channel Labeling Menu Language Channel Browser Setup Off...
... close the Preferences menu. Setup Installation HDMI Control Setup Sleep Timer PC Settings Logo LED Off Off On 5 To save your TV Selecting the menu language You can select TOSHIBA Logo LED either On or Off and press . Installation Terrestrial Input Configuration Channel Program Channel Add/Delete Channel Tuning Mode Auto Time Zone Signal Meter 4 Press W or X to your preferred menu language and press . 4 Press Preferences CC Selector Base CC Mode Digital CC Settings Input Labeling Channel Labeling Menu Language Channel Browser Setup Off...
Owners Manual
Page 31
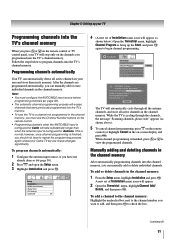
... active channels in its memory. Setup Installation HDMI Control Setup Sleep Timer PC Settings Logo LED Off 4 (A new set of Installation menu icons will stop only on the channels you should not have not already done so ( page 30). 2 Press and open the Setup menu. 3 Highlight Installation and press . When channel programming is normal; Follow the steps below .) Open the Terrestrial menu, highlight Channel Program to view the programmed channels. Programming channels automatically Your TV can manually add...
... active channels in its memory. Setup Installation HDMI Control Setup Sleep Timer PC Settings Logo LED Off 4 (A new set of Installation menu icons will stop only on the channels you should not have not already done so ( page 30). 2 Press and open the Setup menu. 3 Highlight Installation and press . When channel programming is normal; Follow the steps below .) Open the Terrestrial menu, highlight Channel Program to view the programmed channels. Programming channels automatically Your TV can manually add...
Owners Manual
Page 33
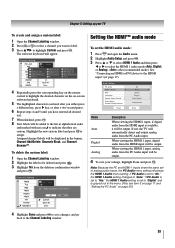
... and HDMI-1 inputs share the same set to "No," the HDMI 1 Audio setting changes to assign. Chapter 5: Setting up your settings, highlight Done and press . Highlight the new custom label and press to "Auto." Audio Setup PC Audio HDMI 1 Audio MTS Language Optical Output Format Dolby Digital Dynamic Range Control Reset No Auto Stereo English Dolby Digital Compressed Done Mode Auto Digital Analog Description When viewing the HDMI 1 input, if digital audio from the HDMI input will be added to the list in the menu. (Also...
... and HDMI-1 inputs share the same set to "No," the HDMI 1 Audio setting changes to assign. Chapter 5: Setting up your settings, highlight Done and press . Highlight the new custom label and press to "Auto." Audio Setup PC Audio HDMI 1 Audio MTS Language Optical Output Format Dolby Digital Dynamic Range Control Reset No Auto Stereo English Dolby Digital Compressed Done Mode Auto Digital Analog Description When viewing the HDMI 1 input, if digital audio from the HDMI input will be added to the list in the menu. (Also...

Owners Manual
Page 50
... connected to enter the length of analog audio inputs, the PC Audio menu setting influences the HDMI 1 Audio menu setting. To set the sleep timer using the PC IN terminal and an analog RGB cable. ( page 20) To set of time in the HDMI Control Setup menu are connected. Please check the manual for the devices. Note: Because the PC and HDMI-1 inputs share the same set the PC Audio: 1 Press and open the Setup menu. 2 Highlight Sleep Timer and press . 3 Press the Number buttons...
... connected to enter the length of analog audio inputs, the PC Audio menu setting influences the HDMI 1 Audio menu setting. To set the sleep timer using the PC IN terminal and an analog RGB cable. ( page 20) To set of time in the HDMI Control Setup menu are connected. Please check the manual for the devices. Note: Because the PC and HDMI-1 inputs share the same set the PC Audio: 1 Press and open the Setup menu. 2 Highlight Sleep Timer and press . 3 Press the Number buttons...
Owners Manual
Page 55
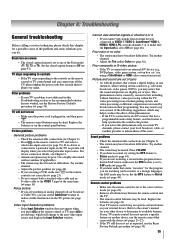
... not receiving a second audio program from channels 3 or 4, make sure on another channel. • Adjust the Tint and/or Color ( page 42). Noisy picture • If you are using a ColorStream or HDMI video connection instead. Set the closed caption feature is set to inform them of this issue. Press VOLUME. • If you hear no picture will change to an external A/V device (e.g., DVD player, video game system, set-top box, etc.) try setting the MTS feature to Stereo mode...
... not receiving a second audio program from channels 3 or 4, make sure on another channel. • Adjust the Tint and/or Color ( page 42). Noisy picture • If you are using a ColorStream or HDMI video connection instead. Set the closed caption feature is set to inform them of this issue. Press VOLUME. • If you hear no picture will change to an external A/V device (e.g., DVD player, video game system, set-top box, etc.) try setting the MTS feature to Stereo mode...

Owners Manual
Page 56
... HDMI Control operation • The HDMI Control feature is available for Toshiba HDMI Control compatible devices. • Make sure the HDMI cables with the connected HDMI Control device. Unblock the channel ( page 48). • If you are used. • When the connected HDMI Control device does not work properly with the latest HDMI TV products, due to use the Reset Factory Defaults procedure ( page 34). For Legacy HDMI source • Some legacy HDMI sources may have changed settings of the device, turn...
... HDMI Control operation • The HDMI Control feature is available for Toshiba HDMI Control compatible devices. • Make sure the HDMI cables with the connected HDMI Control device. Unblock the channel ( page 48). • If you are used. • When the connected HDMI Control device does not work properly with the latest HDMI TV products, due to use the Reset Factory Defaults procedure ( page 34). For Legacy HDMI source • Some legacy HDMI sources may have changed settings of the device, turn...
Owners Manual
Page 59
... The warranty for set installation, setup, adjustment of customer controls, and installation or repair of antenna systems are effective only if this LCD Television is needed: (1) To find the nearest TACP Authorized Service Station, visit TACP's website at www.tacp.toshiba.com/service or contact TACP's Consumer Solution Center toll free at www.tacp.toshiba.com/service as soon as lightning or fluctuations in electric power), improper installation...
... The warranty for set installation, setup, adjustment of customer controls, and installation or repair of antenna systems are effective only if this LCD Television is needed: (1) To find the nearest TACP Authorized Service Station, visit TACP's website at www.tacp.toshiba.com/service or contact TACP's Consumer Solution Center toll free at www.tacp.toshiba.com/service as soon as lightning or fluctuations in electric power), improper installation...
Owners Manual
Page 61
..., POINT OF SALE DISPLAY, ETC.). Critical Applications The Television you and TCL. ASSUME SOLE AND FULL RESPONSIBILITY FOR SUCH USE. YOU MUST READ AND FOLLOW ALL SET-UP AND USAGE INSTRUCTIONS IN THE APPLICABLE USER GUIDES AND/OR MANUALS. THIS WARRANTY DOES NOT APPLY AND SHALL BE VOID AND UNENFORCEABLE IF THE TELEVISION IS OPENED, SERVICED, OR REPAIRED BY PERSONS OTHER THAN...
..., POINT OF SALE DISPLAY, ETC.). Critical Applications The Television you and TCL. ASSUME SOLE AND FULL RESPONSIBILITY FOR SUCH USE. YOU MUST READ AND FOLLOW ALL SET-UP AND USAGE INSTRUCTIONS IN THE APPLICABLE USER GUIDES AND/OR MANUALS. THIS WARRANTY DOES NOT APPLY AND SHALL BE VOID AND UNENFORCEABLE IF THE TELEVISION IS OPENED, SERVICED, OR REPAIRED BY PERSONS OTHER THAN...


