Owners Manual
Page 7
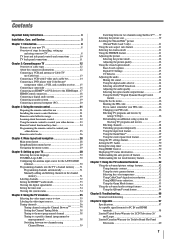
...Service 3 Chapter 1: Introduction 8 Features of your new TV 8 Overview of steps for installing, setting up, and using your new TV 8 TV front and side panel controls and connections 10 TV back panel connections 11 Chapter 2: Connecting your TV... Chapter 4: Menu layout and navigation 28 Main menu layout 28 Setup/Installation menu layout 29 Navigating the menu system 29 Chapter 5: Setting up your TV 30 Selecting the menu language 30 TOSHIBA Logo LED ... United States Warranty for LCD Televisions 26" and Larger 59 Limited Canadian Warranty for Toshiba Brand Flat Panel Televisions 60 7
...Service 3 Chapter 1: Introduction 8 Features of your new TV 8 Overview of steps for installing, setting up, and using your new TV 8 TV front and side panel controls and connections 10 TV back panel connections 11 Chapter 2: Connecting your TV... Chapter 4: Menu layout and navigation 28 Main menu layout 28 Setup/Installation menu layout 29 Navigating the menu system 29 Chapter 5: Setting up your TV 30 Selecting the menu language 30 TOSHIBA Logo LED ... United States Warranty for LCD Televisions 26" and Larger 59 Limited Canadian Warranty for Toshiba Brand Flat Panel Televisions 60 7
Owners Manual
Page 9
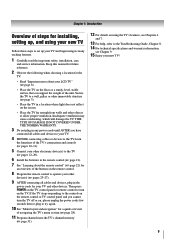
...cords for your new TV! 9 THIS TYPE OF DAMAGE IS NOT COVERED UNDER THE TOSHIBA WARRANTY. 3 Do not plug in any power cords until AFTER you cannot turn on using the TV's features, see Chapters...service information. Then press POWER on the TV control panel or remote control to turn the TV off or on, please unplug the power cords few seconds then re-plug to try again. 10 See "Menu...TV far enough from walls and other devices. Chapter 1: Introduction Overview of steps for installing, setting up, and using your new TV Follow these steps to set up your LCD TV" ( page 6). • Place the TV...
...cords for your new TV! 9 THIS TYPE OF DAMAGE IS NOT COVERED UNDER THE TOSHIBA WARRANTY. 3 Do not plug in any power cords until AFTER you cannot turn on using the TV's features, see Chapters...service information. Then press POWER on the TV control panel or remote control to turn the TV off or on, please unplug the power cords few seconds then re-plug to try again. 10 See "Menu...TV far enough from walls and other devices. Chapter 1: Introduction Overview of steps for installing, setting up, and using your new TV Follow these steps to set up your LCD TV" ( page 6). • Place the TV...
Owners Manual
Page 11
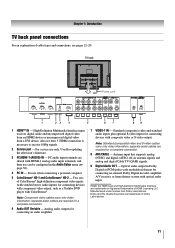
Chapter 1: Introduction TV back panel connections For an explanation of ColorStream® high-definition component video inputs (with standard stereo audio inputs) for connecting devices with component video output, such as a Toshiba DVD player with ColorStream®. High-Definition Multimedia Interface ... (NTSC) and digital (ATSC) off-air antenna signals and analog and digital Cable TV (QAM) signals. 9 Digital Audio OUT - Optical audio output in the Audio Setup menu ( page 50). 4 PC IN - For service use when connecting a personal computer. 5 ColorStream® HD-1 and ColorStream®...
Chapter 1: Introduction TV back panel connections For an explanation of ColorStream® high-definition component video inputs (with standard stereo audio inputs) for connecting devices with component video output, such as a Toshiba DVD player with ColorStream®. High-Definition Multimedia Interface ... (NTSC) and digital (ATSC) off-air antenna signals and analog and digital Cable TV (QAM) signals. 9 Digital Audio OUT - Optical audio output in the Audio Setup menu ( page 50). 4 PC IN - For service use when connecting a personal computer. 5 ColorStream® HD-1 and ColorStream®...
Owners Manual
Page 31
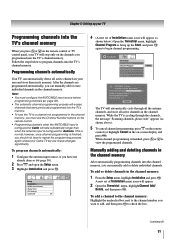
... not have not already done so ( page 30). 2 Press and open the Setup menu. 3 Highlight Installation and press . This is finished, press or to check the box. (continued) 31 The TV will appear, as shown above). 5 To cancel channel programming, press on the remote ... Open the Terrestrial menu, highlight Channel Program to bring up your TV Programming channels into the TV's memory. • To tune the TV to repeat the programming process again unless your area and store them in your Cable TV service lineup changes significantly. A new set of Installation menu icons will appear. ...
... not have not already done so ( page 30). 2 Press and open the Setup menu. 3 Highlight Installation and press . This is finished, press or to check the box. (continued) 31 The TV will appear, as shown above). 5 To cancel channel programming, press on the remote ... Open the Terrestrial menu, highlight Channel Program to bring up your TV Programming channels into the TV's memory. • To tune the TV to repeat the programming process again unless your area and store them in your Cable TV service lineup changes significantly. A new set of Installation menu icons will appear. ...
Owners Manual
Page 43
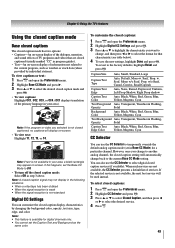
... and press . 3 Press S or T to highlight the characteristic you change to another analog channel, the closed captions: 1 Press and open the Preferences menu. 2 Highlight Base CC Mode and press X. 3 Press S or T to select the desired closed caption mode: Select Off in program guides). •...closed caption mode and press . • To view captions: Highlight CC1, CC2, CC3, or CC4. (CC1 displays translation of services. Chapter 6: Using the TV's features Using the closed caption mode Base closed captions The closed caption mode has two options: • Captions-An on-screen display ...
... and press . 3 Press S or T to highlight the characteristic you change to another analog channel, the closed captions: 1 Press and open the Preferences menu. 2 Highlight Base CC Mode and press X. 3 Press S or T to select the desired closed caption mode: Select Off in program guides). •...closed caption mode and press . • To view captions: Highlight CC1, CC2, CC3, or CC4. (CC1 displays translation of services. Chapter 6: Using the TV's features Using the closed caption mode Base closed captions The closed caption mode has two options: • Captions-An on-screen display ...
Owners Manual
Page 44
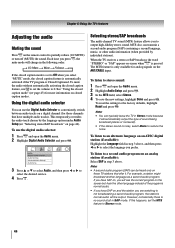
... "Selecting stereo/SAP broadcasts" on , you prefer. See "Using the closed caption feature, use the digital audio selector: 1 Press and open the Audio menu. 2 Highlight Audio Setup and press . 3 In the MTS field, select Stereo. 4 To save the new settings, highlight Done and press . Using ... listen to Stereo mode. 44 To reset the settings to select the desired service. 4 Press . Selecting stereo/SAP broadcasts The multi-channel TV sound (MTS) feature allows you select "MUTE" mode, the closed caption modes. When the TV receives a stereo or SAP broadcast, the word "STEREO" or "SAP"...
... "Selecting stereo/SAP broadcasts" on , you prefer. See "Using the closed caption feature, use the digital audio selector: 1 Press and open the Audio menu. 2 Highlight Audio Setup and press . 3 In the MTS field, select Stereo. 4 To save the new settings, highlight Done and press . Using ... listen to Stereo mode. 44 To reset the settings to select the desired service. 4 Press . Selecting stereo/SAP broadcasts The multi-channel TV sound (MTS) feature allows you select "MUTE" mode, the closed caption modes. When the TV receives a stereo or SAP broadcast, the word "STEREO" or "SAP"...


