
Printable Spec Sheet
Page 1
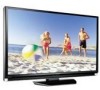
...Toshiba's new 10-bit LCD provides 64 times more colors than a standard 8-bit panel, offering smoother transitions between color changes and during subtle shade transitions. • Plus, the new xvYCC color standard provides 1.8 times more enjoyable. • 3 HDMI™ with CE-Link allows simplified two-way control between the TV... picture quality. • PixelPure 3G™ 14-Bit Internal Digital Video Processing - 40RF35OU PRELIMINARY • Beautifully-designed 40" Screen Size (measured diagonally) Super Narrow Bezel Design (under 1" wide) fits into spaces that are more vibrant, ...
...Toshiba's new 10-bit LCD provides 64 times more colors than a standard 8-bit panel, offering smoother transitions between color changes and during subtle shade transitions. • Plus, the new xvYCC color standard provides 1.8 times more enjoyable. • 3 HDMI™ with CE-Link allows simplified two-way control between the TV... picture quality. • PixelPure 3G™ 14-Bit Internal Digital Video Processing - 40RF35OU PRELIMINARY • Beautifully-designed 40" Screen Size (measured diagonally) Super Narrow Bezel Design (under 1" wide) fits into spaces that are more vibrant, ...

Owner's Manual - English
Page 1
... in the spaces below. Model number: Serial number: YC/M VX1A00065000 Integrated High Definition LCD Television HIGH-DEFINITION TELEVISION 40RF350U 46RF350U For an overview of your TV. For details, please contact your TV antenna installer, cable provider, or satellite provider. © 2007 TOSHIBA CORPORATION All Rights Reserved Owner's Record The model number and serial number are...
... in the spaces below. Model number: Serial number: YC/M VX1A00065000 Integrated High Definition LCD Television HIGH-DEFINITION TELEVISION 40RF350U 46RF350U For an overview of your TV. For details, please contact your TV antenna installer, cable provider, or satellite provider. © 2007 TOSHIBA CORPORATION All Rights Reserved Owner's Record The model number and serial number are...

Owner's Manual - English
Page 2
...they are popular purchases; a The consumer electronics industry is intended to alert the user to persons. a Do not allow children to Article 820-40 of your home. Eads St. www.CE.org CEA is a reminder to call the CATV system installer's attention to climb on page 3. ... and weight of your new TV, keep it nearby for purchasing this television. For additional antenna grounding information, see items 27 and 28 on page 4. 2 Child Safety It Makes A Difference Where Your TV Stands Congratulations on top of this Toshiba LCD TV. Thank you enjoy your TV (such as close to the...
...they are popular purchases; a The consumer electronics industry is intended to alert the user to persons. a Do not allow children to Article 820-40 of your home. Eads St. www.CE.org CEA is a reminder to call the CATV system installer's attention to climb on page 3. ... and weight of your new TV, keep it nearby for purchasing this television. For additional antenna grounding information, see items 27 and 28 on page 4. 2 Child Safety It Makes A Difference Where Your TV Stands Congratulations on top of this Toshiba LCD TV. Thank you enjoy your TV (such as close to the...

Owner's Manual - English
Page 3
...To avoid damage to this apparatus during lightning storms or when unused for your safety. The LCD panel inside the TV contains glass and a toxic liquid. Hooks Clip Clip TV side TV top 21) The apparatus shall not be exposed to dripping or splashing and that can be...) Only use caution when moving the cart/apparatus combination to prevent blade exposure. • To prevent electric shock, match wide blade of the TV. Installation, Care, and Service Installation Follow these instructions. 3) Heed all warnings. 4) Follow all instructions. 5) Do not use the polarized plug...
...To avoid damage to this apparatus during lightning storms or when unused for your safety. The LCD panel inside the TV contains glass and a toxic liquid. Hooks Clip Clip TV side TV top 21) The apparatus shall not be exposed to dripping or splashing and that can be...) Only use caution when moving the cart/apparatus combination to prevent blade exposure. • To prevent electric shock, match wide blade of the TV. Installation, Care, and Service Installation Follow these instructions. 3) Heed all warnings. 4) Follow all instructions. 5) Do not use the polarized plug...
Owner's Manual - English
Page 4
...) Always operate this product can accidentally touch overhead power lines. Avoid contact with a sharp or heavy object. 36) • The LCD screen of this equipment from a 120 VAC, 60 Hz power source only. 27) Always make occasional snapping or popping sounds. Never ...attempt to environmental considerations. Note: The lamp(s) inside this manual to a Toshiba Authorized Service Center. 38) If you have the TV serviced: • Ask the service technician to use only replacement parts specified by the manufacturer. • Upon completion...
...) Always operate this product can accidentally touch overhead power lines. Avoid contact with a sharp or heavy object. 36) • The LCD screen of this equipment from a 120 VAC, 60 Hz power source only. 27) Always make occasional snapping or popping sounds. Never ...attempt to environmental considerations. Note: The lamp(s) inside this manual to a Toshiba Authorized Service Center. 38) If you have the TV serviced: • Ask the service technician to use only replacement parts specified by the manufacturer. • Upon completion...

Owner's Manual - English
Page 5
...are required for installation. 2) Unplug and remove any cables and/or other immovable structure. Five screws 5 Choosing a location for your LCD TV To Display your LCD TV using a Wall Bracket: If you have removed all five screws holding the pedestal stand in place, remove the pedestal stand from ...Note: Extreme care should always be removed without tools. 3) Remove the five screws shown in the diagram below . To Display your LCD TV on the included Pedestal Stand: Observe the following safety precautions: 1) Read and Follow the pedestal assembly instructions included with the pedestal. ...
...are required for installation. 2) Unplug and remove any cables and/or other immovable structure. Five screws 5 Choosing a location for your LCD TV To Display your LCD TV using a Wall Bracket: If you have removed all five screws holding the pedestal stand in place, remove the pedestal stand from ...Note: Extreme care should always be removed without tools. 3) Remove the five screws shown in the diagram below . To Display your LCD TV on the included Pedestal Stand: Observe the following safety precautions: 1) Read and Follow the pedestal assembly instructions included with the pedestal. ...

Owner's Manual - English
Page 6
...TV. moving image is : Toshiba America Consumer Products, L.L.C. 82 Totowa Rd. Dolby and the double-D symbol are registered trademarks of Dolby Laboratories. • HDMI, the HDMI logo and High-Definition Multimedia Interface are trademarks of SRS Labs, Inc. FCC Declaration of Conformity Compliance Statement (Part 15): The Toshiba 40RF350U... is viewed from Dolby Laboratories. However, there is no guarantee that involve shooting a "gun" type of LCD Display technology and are not visible when the picture is subject to provide reasonable protection against harmful interference in ...
...TV. moving image is : Toshiba America Consumer Products, L.L.C. 82 Totowa Rd. Dolby and the double-D symbol are registered trademarks of Dolby Laboratories. • HDMI, the HDMI logo and High-Definition Multimedia Interface are trademarks of SRS Labs, Inc. FCC Declaration of Conformity Compliance Statement (Part 15): The Toshiba 40RF350U... is viewed from Dolby Laboratories. However, there is no guarantee that involve shooting a "gun" type of LCD Display technology and are not visible when the picture is subject to provide reasonable protection against harmful interference in ...
Owner's Manual - English
Page 7
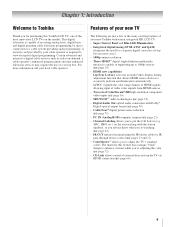
... 3 Chapter 1: Introduction 9 Welcome to Toshiba 9 Features of your new TV 9 Overview of steps for installing, setting up, and using your new TV 10 TV front and side panel controls and connections 11 TV back panel connections 12 Chapter 2: Connecting your TV 13 Overview of cable types 13 About ... the antenna input source for the ANT terminal 39 Programming channels into the TV's channel memory . . . . 40 Programming channels automatically 40 Manually adding and deleting channels in the channel memory 40 Setting the Auto Input feature 41 Labeling channels 42 Setting the HDMI™...
... 3 Chapter 1: Introduction 9 Welcome to Toshiba 9 Features of your new TV 9 Overview of steps for installing, setting up, and using your new TV 10 TV front and side panel controls and connections 11 TV back panel connections 12 Chapter 2: Connecting your TV 13 Overview of cable types 13 About ... the antenna input source for the ANT terminal 39 Programming channels into the TV's channel memory . . . . 40 Programming channels automatically 40 Manually adding and deleting channels in the channel memory 40 Setting the Auto Input feature 41 Labeling channels 42 Setting the HDMI™...

Owner's Manual - English
Page 8
Chapter 7: Using the TV's advanced features 70 Using the advanced picture settings features 70 Using dynamic contrast 70 Using the static gamma feature 70 Selecting the color temperature 71 ... troubleshooting 75 LED indications 77 Chapter 9: Appendix 78 Specifications 78 Acceptable signal formats for PC IN and HDMI terminals 79 Limited United States Warranty for LCD Televisions 26" and Larger 80 Limited Canadian Warranty for Toshiba Brand Flat Panel Televisions 81 Index 84 8
Chapter 7: Using the TV's advanced features 70 Using the advanced picture settings features 70 Using dynamic contrast 70 Using the static gamma feature 70 Selecting the color temperature 71 ... troubleshooting 75 LED indications 77 Chapter 9: Appendix 78 Specifications 78 Acceptable signal formats for PC IN and HDMI terminals 79 Limited United States Warranty for LCD Televisions 26" and Larger 80 Limited Canadian Warranty for Toshiba Brand Flat Panel Televisions 81 Index 84 8
Owner's Manual - English
Page 9
...). • CableClear® digital picture noise reduction (- page 42). • IR OUT infrared terminal using the IR blaster cable for this Toshiba LCD TV, one of receiving analog basic, digital basic and digital premium cable television programming by your local cable operator. page 66). 9 page 16). ... the use of supporting up to put the Call Letters (e.g. Features of your new TV The following are just a few of the many exciting features of your new Toshiba widescreen, integrated HD, LCD TV: • Super Narrow Bezel and Blue LED Illumination. • Integrated digital tuning...
...). • CableClear® digital picture noise reduction (- page 42). • IR OUT infrared terminal using the IR blaster cable for this Toshiba LCD TV, one of receiving analog basic, digital basic and digital premium cable television programming by your local cable operator. page 66). 9 page 16). ... the use of supporting up to put the Call Letters (e.g. Features of your new TV The following are just a few of the many exciting features of your new Toshiba widescreen, integrated HD, LCD TV: • Super Narrow Bezel and Blue LED Illumination. • Integrated digital tuning...

Owner's Manual - English
Page 10
...THIS TYPE OF DAMAGE IS NOT COVERED UNDER THE TOSHIBA WARRANTY. 3 Do not plug in any power cords until the TV goes into the TV's channel memory (- page 24) for an overview of the buttons on the TV. When the TV is operating. page 40). 12 For details on , press and hold the...see Chapter 9. 15 Enjoy your new TV! 10 pages 11-12). 5 Connect your LCD TV" (- pages 27-35). 9 AFTER connecting all cables and devices to your TV. 4 BEFORE connecting cables or devices to the TV (- Chapter 1: Introduction Overview of steps for installing, setting up your TV and begin using its many exciting ...
...THIS TYPE OF DAMAGE IS NOT COVERED UNDER THE TOSHIBA WARRANTY. 3 Do not plug in any power cords until the TV goes into the TV's channel memory (- page 24) for an overview of the buttons on the TV. When the TV is operating. page 40). 12 For details on , press and hold the...see Chapter 9. 15 Enjoy your new TV! 10 pages 11-12). 5 Connect your LCD TV" (- pages 27-35). 9 AFTER connecting all cables and devices to your TV. 4 BEFORE connecting cables or devices to the TV (- Chapter 1: Introduction Overview of steps for installing, setting up your TV and begin using its many exciting ...

Owner's Manual - English
Page 11
... and side panel controls and connections TV front 1 Right side panel 5 9 6 10 7 8 11 Control panel 4 2 3 1 Illumination - Yellow = Power-On Mode indicator (- Press to access the menu system (- page 40). 10 VOLUME C c - "Selecting the Power-On Mode" on page 45) See "LED indications" on page 77 for additional information. 2 Green and Yellow LEDs...
... and side panel controls and connections TV front 1 Right side panel 5 9 6 10 7 8 11 Control panel 4 2 3 1 Illumination - Yellow = Power-On Mode indicator (- Press to access the menu system (- page 40). 10 VOLUME C c - "Selecting the Power-On Mode" on page 45) See "LED indications" on page 77 for additional information. 2 Green and Yellow LEDs...

Owner's Manual - English
Page 12
...output. You can be configured in Dolby Digital or PCM (pulse-code modulation) format for connecting devices with component video output, such as a Toshiba DVD player with optical audio input. 9 HDMI™ IN - Two sets of HDMI Licensing LLC. Antenna input that supports analog (NTSC) ...) for connecting an external Dolby Digital decoder, amplifier, A/V receiver, or home theater system with ColorStream®. Also see pages 13-22. 1 TV back 2 345 Power cord Cable Clamper 6 1 IR OUT - Used for updating the television's firmware. HDMI, the HDMI logo and High-Definition...
...output. You can be configured in Dolby Digital or PCM (pulse-code modulation) format for connecting devices with component video output, such as a Toshiba DVD player with optical audio input. 9 HDMI™ IN - Two sets of HDMI Licensing LLC. Antenna input that supports analog (NTSC) ...) for connecting an external Dolby Digital decoder, amplifier, A/V receiver, or home theater system with ColorStream®. Also see pages 13-22. 1 TV back 2 345 Power cord Cable Clamper 6 1 IR OUT - Used for updating the television's firmware. HDMI, the HDMI logo and High-Definition...

Owner's Manual - English
Page 13
...is for a complete connection. About the connection illustrations You can connect different types and brands of devices to your specific devices, refer to the TV's DIGITAL AUDIO OUT terminal (- Coaxial (F-type) cable Coaxial (F-type) cable is for a complete connection. Note: HDMI cable provides better picture ...its native format. Analog RGB (15-pin) computer cable Analog RGB (15-pin) computer cable is Toshiba's brand of component video.) These cables are for connecting your antenna, cable TV service, and/or cable converter box to use: yellow for video, red for stereo right audio,...
...is for a complete connection. About the connection illustrations You can connect different types and brands of devices to your specific devices, refer to the TV's DIGITAL AUDIO OUT terminal (- Coaxial (F-type) cable Coaxial (F-type) cable is for a complete connection. Note: HDMI cable provides better picture ...its native format. Analog RGB (15-pin) computer cable Analog RGB (15-pin) computer cable is Toshiba's brand of component video.) These cables are for connecting your antenna, cable TV service, and/or cable converter box to use: yellow for video, red for stereo right audio,...

Owner's Manual - English
Page 14
...have a mono VCR, connect L/MONO on the remote control (- If you to civil and criminal liability. 14 page 24). To program the TV remote control to TV TV lower back panel You will be unacceptable. - Chapter 2: Connecting your VCR has S-video, use , distribution, or revision of television programs, ... cable (plus the audio cables) instead of the standard video cable. For better picture performance, if your TV Connecting a VCR and antenna or Cable TV (no Cable box) TV upper back panel From Cable TV or antenna Stereo VCR VIDEO AUDIO L R IN CH 3 CH 4 OUT L R IN from ANT ...
...have a mono VCR, connect L/MONO on the remote control (- If you to civil and criminal liability. 14 page 24). To program the TV remote control to TV TV lower back panel You will be unacceptable. - Chapter 2: Connecting your VCR has S-video, use , distribution, or revision of television programs, ... cable (plus the audio cables) instead of the standard video cable. For better picture performance, if your TV Connecting a VCR and antenna or Cable TV (no Cable box) TV upper back panel From Cable TV or antenna Stereo VCR VIDEO AUDIO L R IN CH 3 CH 4 OUT L R IN from ANT ...

Owner's Manual - English
Page 15
...see Chapter 3. Note: When you use the remote control to program or access certain features on the TV to civil and criminal liability. 15 Use the Cable box controls to ). To program the TV remote control to operate other countries, and may not be unacceptable. • standard audio cables - ...view basic and premium Cable channels: Turn OFF the VCR. Select the VIDEO 1 video input source on the TV.* * To select the video input source, press INPUT on the TV.* Tune the TV to channel 3 or 4 (whichever channel the Cable box output is prohibited under the Copyright Laws of video ...
...see Chapter 3. Note: When you use the remote control to program or access certain features on the TV to civil and criminal liability. 15 Use the Cable box controls to ). To program the TV remote control to operate other countries, and may not be unacceptable. • standard audio cables - ...view basic and premium Cable channels: Turn OFF the VCR. Select the VIDEO 1 video input source on the TV.* * To select the video input source, press INPUT on the TV.* Tune the TV to channel 3 or 4 (whichever channel the Cable box output is prohibited under the Copyright Laws of video ...
Owner's Manual - English
Page 16
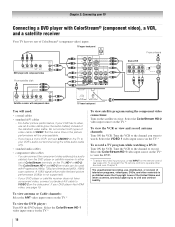
...channel to watch. Do not connect both types of ColorStream® (component video) inputs. Select the ColorStream HD-1 video input source on the TV.* To view satellite programs using the white audio cable only. • standard audio cables • component video cables - For better picture performance...antenna channels: Turn ON the VCR. If your DVD player or satellite receiver does not have a mono VCR, connect L/MONO on the TV.* To record a TV program while watching a DVD: Turn ON the VCR. The unauthorized recording, use an S-video cable (plus audio cables) from ANT ...
...channel to watch. Do not connect both types of ColorStream® (component video) inputs. Select the ColorStream HD-1 video input source on the TV.* To view satellite programs using the white audio cable only. • standard audio cables • component video cables - For better picture performance...antenna channels: Turn ON the VCR. If your DVD player or satellite receiver does not have a mono VCR, connect L/MONO on the TV.* To record a TV program while watching a DVD: Turn ON the VCR. The unauthorized recording, use an S-video cable (plus audio cables) from ANT ...

Owner's Manual - English
Page 17
... locate the device's infrared sensor: 1 Turn OFF the device. 2 Starting at the lower left corner of the device, place the end of the TV and press the button for example) To connect the IR blaster cable: 1 Locate the infrared sensor on , move the remote control slightly to the...through the TV to operate it behind the TV. 3 Plug the IR blaster cable's plug into the TV's IR OUT terminal. Chapter 2: Connecting your device. Without the IR OUT connection, the device typically would need : • dual-wand IR blaster cable (- page 13) • other audio/video cables as Toshiba infrared ...
... locate the device's infrared sensor: 1 Turn OFF the device. 2 Starting at the lower left corner of the device, place the end of the TV and press the button for example) To connect the IR blaster cable: 1 Locate the infrared sensor on , move the remote control slightly to the...through the TV to operate it behind the TV. 3 Plug the IR blaster cable's plug into the TV's IR OUT terminal. Chapter 2: Connecting your device. Without the IR OUT connection, the device typically would need : • dual-wand IR blaster cable (- page 13) • other audio/video cables as Toshiba infrared ...

Owner's Manual - English
Page 18
... AUDIO OUT L R VIDEO 2 inputs on TV right side panel To view the camcorder video: Select the VIDEO 2 video input source on the TV.* * To select the video input source, press INPUT on the TV right side panel. For better picture performance, if your TV Connecting a camcorder You will need: •...; standard A/V cables - To program the TV remote control to VIDEO 1 on the TV back instead of the ...
... AUDIO OUT L R VIDEO 2 inputs on TV right side panel To view the camcorder video: Select the VIDEO 2 video input source on the TV.* * To select the video input source, press INPUT on the TV right side panel. For better picture performance, if your TV Connecting a camcorder You will need: •...; standard A/V cables - To program the TV remote control to VIDEO 1 on the TV back instead of the ...
Owner's Manual - English
Page 19
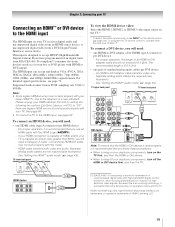
...(s) first and try setting the following two options (Lip-Sync Latency, xvYCC) to the HDMI input The HDMI input on your TV receives digital audio and uncompressed digital video from an HDMI source device, or uncompressed digital video from EIA/CEA-861-D-compliant[1] consumer ...OUT [1] EIA/CEA-861-D compliance covers the transmission of uncompressed digital video with the HDMI Logo ( ). - Because this mode. - To program the TV remote control to the HDMI input, see page 79. To connect a DVI device, you follow these procedures: • When turning on your electronic components,...
...(s) first and try setting the following two options (Lip-Sync Latency, xvYCC) to the HDMI input The HDMI input on your TV receives digital audio and uncompressed digital video from an HDMI source device, or uncompressed digital video from EIA/CEA-861-D-compliant[1] consumer ...OUT [1] EIA/CEA-861-D compliance covers the transmission of uncompressed digital video with the HDMI Logo ( ). - Because this mode. - To program the TV remote control to the HDMI input, see page 79. To connect a DVI device, you follow these procedures: • When turning on your electronic components,...


