
User Guide
Page 7
... warranty. ENERGY STAR® User Information ENERGY STAR User Information Statement: the factory default settings of malfunction, and is viewed from a normal viewing distance. To ensure your TV The following two conditions: (1) This device may not cause harmful interference, and (2) This... recommended for compliance to which can radiate radio frequency energy and, if not installed and used in a residential installation. therefore, Toshiba is : Toshiba America Information Systems, Inc. 9740 Irvine Blvd., Irvine, CA 92618. Such pixels are not an indication of malfunction; Caution: ...
... warranty. ENERGY STAR® User Information ENERGY STAR User Information Statement: the factory default settings of malfunction, and is viewed from a normal viewing distance. To ensure your TV The following two conditions: (1) This device may not cause harmful interference, and (2) This... recommended for compliance to which can radiate radio frequency energy and, if not installed and used in a residential installation. therefore, Toshiba is : Toshiba America Information Systems, Inc. 9740 Irvine Blvd., Irvine, CA 92618. Such pixels are not an indication of malfunction; Caution: ...
User Guide
Page 10
... Auto Tuning 52 Setting channel skip 55 Setting the AV input mode 56 Setting the HDMI® audio mode 56 Viewing the digital signal meter 57 Setting the time zone 58 Viewing the system status 58 Resetting Factory Defaults 59 Chapter 6: Using the TV's features 60 Selecting the video input source 60...
... Auto Tuning 52 Setting channel skip 55 Setting the AV input mode 56 Setting the HDMI® audio mode 56 Viewing the digital signal meter 57 Setting the time zone 58 Viewing the system status 58 Resetting Factory Defaults 59 Chapter 6: Using the TV's features 60 Selecting the video input source 60...
User Guide
Page 12
... feature 100 Setting the PC Audio 101 Using the Media Player 102 Auto Start function 103 To open the Media Player 103 Viewing photo files 105 Playing music files 106 Viewing photo files and playing music files at the same time 107 Sorting photo or music files 108 Setting the sleep timer...
... feature 100 Setting the PC Audio 101 Using the Media Player 102 Auto Start function 103 To open the Media Player 103 Viewing photo files 105 Playing music files 106 Viewing photo files and playing music files at the same time 107 Sorting photo or music files 108 Setting the sleep timer...
User Guide
Page 16
...Analog RGB)-Computer terminal, see "Connecting a computer to the TV's PC IN terminal" on page 36. ❖ HDMI® CEC-Allows control of your new Toshiba wide screen, integrated HD, LED TV: ❖ Integrated digital tuning (8VSB ATSC and QAM)- See "Connecting an HDMI® or DVI device to... view photo files and play music files, see "Connecting DVD player with Dolby® Digital optical output form. Eliminates the need for L5200U Series), see "...
...Analog RGB)-Computer terminal, see "Connecting a computer to the TV's PC IN terminal" on page 36. ❖ HDMI® CEC-Allows control of your new Toshiba wide screen, integrated HD, LED TV: ❖ Integrated digital tuning (8VSB ATSC and QAM)- See "Connecting an HDMI® or DVI device to... view photo files and play music files, see "Connecting DVD player with Dolby® Digital optical output form. Eliminates the need for L5200U Series), see "...
User Guide
Page 19
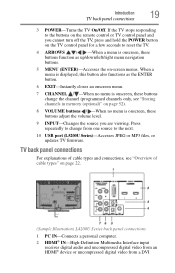
... MP3 files, or updates TV firmware. If the TV stops responding to the buttons on the remote control or TV control panel and you are viewing. TV back panel connections For explanations of cable types" on -screen menus. When a menu is displayed, this button also functions as the ENTER button. 6 EXIT...
... MP3 files, or updates TV firmware. If the TV stops responding to the buttons on the remote control or TV control panel and you are viewing. TV back panel connections For explanations of cable types" on -screen menus. When a menu is displayed, this button also functions as the ENTER button. 6 EXIT...
User Guide
Page 26
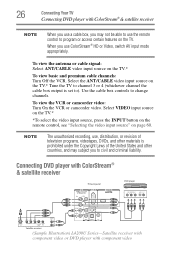
...TV.* *To select the video input source, press the INPUT button on the remote control, see "Selecting the video input source" on the TV.* To view basic and premium cable channels: Turn Off the VCR. NOTE The unauthorized recording, use, distribution, or revision of television programs, videotapes, DVDs, and other ... the United States and other countries, and may not be able to use ColorStream® HD or Video, switch AV input mode appropriately. To view the antenna or cable signal: Select ANT/CABLE video input source on page 60. Select the ANT/CABLE video input source on the TV. 26...
...TV.* *To select the video input source, press the INPUT button on the remote control, see "Selecting the video input source" on the TV.* To view basic and premium cable channels: Turn Off the VCR. NOTE The unauthorized recording, use, distribution, or revision of television programs, videotapes, DVDs, and other ... the United States and other countries, and may not be able to use ColorStream® HD or Video, switch AV input mode appropriately. To view the antenna or cable signal: Select ANT/CABLE video input source on page 60. Select the ANT/CABLE video input source on the TV. 26...
User Guide
Page 28
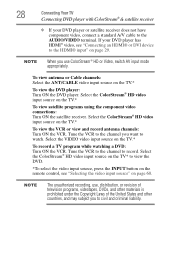
... input source on the TV.* To record a TV program while watching a DVD: Turn ON the VCR. To view antenna or Cable channels: Select the ANT/CABLE video input source on the TV.* To view satellite programs using the component video connections: Turn ON the satellite receiver. Select the ColorStream® HD video... the TV* to record. NOTE When you want to watch. Tune the VCR to the AUDIO/VIDEO terminal. Tune the VCR to the channel to view the DVD. *To select the video input source, press the INPUT button on the remote control, see "Connecting an HDMI® or DVI device to...
... input source on the TV.* To record a TV program while watching a DVD: Turn ON the VCR. To view antenna or Cable channels: Select the ANT/CABLE video input source on the TV.* To view satellite programs using the component video connections: Turn ON the satellite receiver. Select the ColorStream® HD video... the TV* to record. NOTE When you want to watch. Tune the VCR to the AUDIO/VIDEO terminal. Tune the VCR to the channel to view the DVD. *To select the video input source, press the INPUT button on the remote control, see "Connecting an HDMI® or DVI device to...
User Guide
Page 30
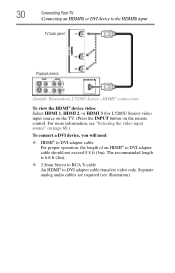
... Connecting an HDMI® or DVI device to the HDMI® input TV back panel Playback device (Sample Illustration) L5200U Series-HDMI® connections To view the HDMI® device video: Select HDMI 1, HDMI 2, or HDMI 3 (for L5200U Series) video input source on the TV. (Press the INPUT button on page...
... Connecting an HDMI® or DVI device to the HDMI® input TV back panel Playback device (Sample Illustration) L5200U Series-HDMI® connections To view the HDMI® device video: Select HDMI 1, HDMI 2, or HDMI 3 (for L5200U Series) video input source on the TV. (Press the INPUT button on page...

User Guide
Page 36
36 Connecting Your TV Connecting an analog audio system Connecting an analog audio system This connection allows you can view your computer's display on the TV and hear the sound from the TV's speakers. You will need standard audio cables. TV back panel Audio system (...
36 Connecting Your TV Connecting an analog audio system Connecting an analog audio system This connection allows you can view your computer's display on the TV and hear the sound from the TV's speakers. You will need standard audio cables. TV back panel Audio system (...

User Guide
Page 44
... tune channels. 44 Using the Remote Control Learning about the remote control 1 The POWER button turns the TV On/Off. Press again to the last viewed channel or source, see "Using the FREEZE feature" on page 70.
... tune channels. 44 Using the Remote Control Learning about the remote control 1 The POWER button turns the TV On/Off. Press again to the last viewed channel or source, see "Using the FREEZE feature" on page 70.
User Guide
Page 45
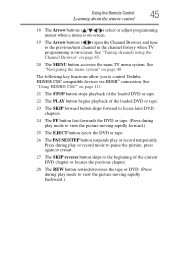
.... 28 The REW button rewinds/reverses the tape or DVD. (Press during play mode to view the picture moving rapidly backward.). See "Using HDMI® CEC" on page 48 The following key functions allow you to control Toshiba HDMI® CEC compatible devices via HDMI® connection. Using the Remote Control 45...SKIP forward button skips forward to locate later DVD chapters. 24 The FF button fast-forwards the DVD or tape. (Press during play mode to view the picture moving rapidly forward.) 25 The EJECT button ejects the DVD or tape. 26 The PAUSE/STEP button suspends play or record mode to...
.... 28 The REW button rewinds/reverses the tape or DVD. (Press during play mode to view the picture moving rapidly backward.). See "Using HDMI® CEC" on page 48 The following key functions allow you to control Toshiba HDMI® CEC compatible devices via HDMI® connection. Using the Remote Control 45...SKIP forward button skips forward to locate later DVD chapters. 24 The FF button fast-forwards the DVD or tape. (Press during play mode to view the picture moving rapidly forward.) 25 The EJECT button ejects the DVD or tape. 26 The PAUSE/STEP button suspends play or record mode to...
User Guide
Page 54
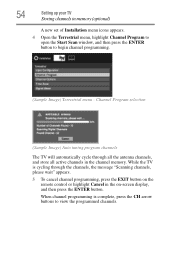
... of Installation menu icons appears. 4 Open the Terrestrial menu, highlight Channel Program to open the Start Scan window, and then press the ENTER button to view the programmed channels.
... of Installation menu icons appears. 4 Open the Terrestrial menu, highlight Channel Program to open the Start Scan window, and then press the ENTER button to view the programmed channels.
User Guide
Page 55
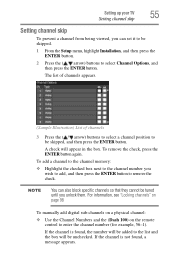
... then press the ENTER button to remove the check. Setting up your TV 55 Setting channel skip Setting channel skip To prevent a channel from being viewed, you can also block specific channels so that they cannot be skipped. 1 From the Setup menu, highlight Installation, and then press the ENTER button. 2 Press...
... then press the ENTER button to remove the check. Setting up your TV 55 Setting channel skip Setting channel skip To prevent a channel from being viewed, you can also block specific channels so that they cannot be skipped. 1 From the Setup menu, highlight Installation, and then press the ENTER button. 2 Press...

User Guide
Page 57
... PC Audio is set to "Yes" the HDMI 1 Audio setting is grayed out in the ANT/CABLE digital TV input source only. Viewing the digital signal meter You can view the digital signal meter in the menu. NOTE Because the PC and HDMI 1 inputs share the same set to "Digital" and is... press the ENTER button. See "Setting the PC Audio" on page 29. (Sample Image) HDMI® Audio mode selection Mode: Auto Digital Analog Description: When viewing the HDMI 1 input, if digital audio from the HDMI® input will be output. Setting up your TV 57...
... PC Audio is set to "Yes" the HDMI 1 Audio setting is grayed out in the ANT/CABLE digital TV input source only. Viewing the digital signal meter You can view the digital signal meter in the menu. NOTE Because the PC and HDMI 1 inputs share the same set to "Digital" and is... press the ENTER button. See "Setting the PC Audio" on page 29. (Sample Image) HDMI® Audio mode selection Mode: Auto Digital Analog Description: When viewing the HDMI 1 input, if digital audio from the HDMI® input will be output. Setting up your TV 57...

User Guide
Page 58
... ENTER button. 2 Highlight Time Zone, and then press the ENTER button. 3 Press the ( / arrow) buttons to specify the correct time zone for your viewing area. To set of Installation menu icons appears. 3 Open the Terrestrial menu, highlight Signal Meter, and then press the ENTER button. 4 Press the ( /...the ENTER button. This feature allows the TV status information to check. To close the screen and return to a virtual TV channel number. Viewing the system status 1 Press the MENU button and open the Setup menu. 2 Highlight Installation, and then press the ENTER button. A new...
... ENTER button. 2 Highlight Time Zone, and then press the ENTER button. 3 Press the ( / arrow) buttons to specify the correct time zone for your viewing area. To set of Installation menu icons appears. 3 Open the Terrestrial menu, highlight Signal Meter, and then press the ENTER button. 4 Press the ( /...the ENTER button. This feature allows the TV status information to check. To close the screen and return to a virtual TV channel number. Viewing the system status 1 Press the MENU button and open the Setup menu. 2 Highlight Installation, and then press the ENTER button. A new...
User Guide
Page 59
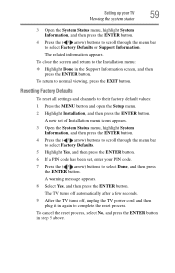
... the menu bar to select Factory Defaults. 5 Highlight Yes, and then press the ENTER button. 6 If a PIN code has been set, enter your TV 59 Viewing the system status 3 Open the System Status menu, highlight System Information, and then press the ENTER button. 4 Press the ( / arrow) buttons to scroll through the... Factory Defaults or Support Information. To return to the Installation menu: ❖ Highlight Done in step 5 above. To close the screen and return to normal viewing, press the EXIT button.
... the menu bar to select Factory Defaults. 5 Highlight Yes, and then press the ENTER button. 6 If a PIN code has been set, enter your TV 59 Viewing the system status 3 Open the System Status menu, highlight System Information, and then press the ENTER button. 4 Press the ( / arrow) buttons to scroll through the... Factory Defaults or Support Information. To return to the Installation menu: ❖ Highlight Done in step 5 above. To close the screen and return to normal viewing, press the EXIT button.

User Guide
Page 60
Chapter 6 Using the TV's features Selecting the video input source To select the video input source to view: 1 Press the INPUT button on the remote control or TV control panel. 2 Do one of the following: ❖ Press 0-4 (L4200U Series) or 0-5 (L5200U Series). ❖ Repeatedly press the ( / arrow) buttons on the remote control, and then press the ENTER button to change the input setting. 60
Chapter 6 Using the TV's features Selecting the video input source To select the video input source to view: 1 Press the INPUT button on the remote control or TV control panel. 2 Do one of the following: ❖ Press 0-4 (L4200U Series) or 0-5 (L5200U Series). ❖ Repeatedly press the ( / arrow) buttons on the remote control, and then press the ENTER button to change the input setting. 60

User Guide
Page 65
... 65 Tuning channels using the Channel Browser Tuning channels using the Channel Browser The Channel Browser provides an easy navigation interface for all your recently viewed channels/inputs from the Channel Browser History List. ❖ Surf via Browse mode (to immediately tune channels as you highlight them in the Channel Browser...
... 65 Tuning channels using the Channel Browser Tuning channels using the Channel Browser The Channel Browser provides an easy navigation interface for all your recently viewed channels/inputs from the Channel Browser History List. ❖ Surf via Browse mode (to immediately tune channels as you highlight them in the Channel Browser...

User Guide
Page 68
... the browser. 5 Channels stored in History List by default. 68 Using the TV's features Tuning channels using the Channel Browser 3 Channel or input currently being viewed. 4 Channel or input that is not turned to the channel until you press the ENTER button. 2 Press the ENTER button to tune the TV to...
... the browser. 5 Channels stored in History List by default. 68 Using the TV's features Tuning channels using the Channel Browser 3 Channel or input currently being viewed. 4 Channel or input that is not turned to the channel until you press the ENTER button. 2 Press the ENTER button to tune the TV to...

User Guide
Page 69
Press the BACK CB arrow button to the previously viewed channel or input. NOTE Whenever an item is selected that cannot be repeated in the History List, but instead is moved to the left, eventually ...
Press the BACK CB arrow button to the previously viewed channel or input. NOTE Whenever an item is selected that cannot be repeated in the History List, but instead is moved to the left, eventually ...


