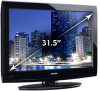
User Manual
Page 8
... to the HDMI input 16 Connecting a digital audio system 17 Connecting a personal computer (PC 17 Chapter 3: Using the remote control 19 Installing the remote control batteries 19 Remote control effective range 19 Learning about the remote control 20 Chapter 4: Menu layout and navigation 21 Main menu layout 21 Setup/Installation menu layout 22 Navigating... 51 Specifications 51 Acceptable signal formats for PC IN and HDMI terminals 52 Limited United States Warranty for LCD Televisions....... 53 Limited Canadian Warranty for Toshiba Brand Flat Panel Televisions 54
... to the HDMI input 16 Connecting a digital audio system 17 Connecting a personal computer (PC 17 Chapter 3: Using the remote control 19 Installing the remote control batteries 19 Remote control effective range 19 Learning about the remote control 20 Chapter 4: Menu layout and navigation 21 Main menu layout 21 Setup/Installation menu layout 22 Navigating... 51 Specifications 51 Acceptable signal formats for PC IN and HDMI terminals 52 Limited United States Warranty for LCD Televisions....... 53 Limited Canadian Warranty for Toshiba Brand Flat Panel Televisions 54
User Manual
Page 10
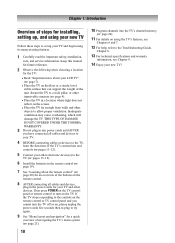
... the unit. Keep this manual for future reference. 2 Observe the following when choosing a location for the TV: • Read "Important notes about the remote control" ( page 20) for an overview of navigating the TV's menu system ( page 21). 10 10 Program channels into the TV's channel...11 For details on the TV. Inadequate ventilation may cause overheating, which will damage the TV. THIS TYPE OF DAMAGE IS NOT COVERED UNDER THE TOSHIBA WARRANTY. 3 Do not plug in any power cords until AFTER you cannot turn on using its many exciting features. 1 Carefully read the important ...
... the unit. Keep this manual for future reference. 2 Observe the following when choosing a location for the TV: • Read "Important notes about the remote control" ( page 20) for an overview of navigating the TV's menu system ( page 21). 10 10 Program channels into the TV's channel...11 For details on the TV. Inadequate ventilation may cause overheating, which will damage the TV. THIS TYPE OF DAMAGE IS NOT COVERED UNDER THE TOSHIBA WARRANTY. 3 Do not plug in any power cords until AFTER you cannot turn on using its many exciting features. 1 Carefully read the important ...
User Manual
Page 11
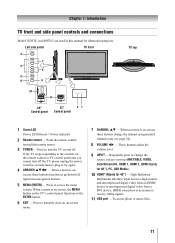
... from a DVI device. These buttons adjust the volume level. 9無 INPUT - Chapter 1: Introduction TV front and side panel controls and connections Model 32DT1U and 40FT1U are viewing (ANT/CABLE, VIDEO, ColorStream HD, HDMI 1, HDMI 2, HDMI 3(only for 40"), PC, USB Media). 10無 HDMI...7 4 8 5 6 9 10 11 40" 32" 21 Control panel Control panel TV top 1無 Green LED Power LED(Green) = Power indicator 2無 Remote sensor - Repeatedly press to receive 1080p signals. 11無 USB port - To access photo or music files. 11 Press to access the menu system. screen...
... from a DVI device. These buttons adjust the volume level. 9無 INPUT - Chapter 1: Introduction TV front and side panel controls and connections Model 32DT1U and 40FT1U are viewing (ANT/CABLE, VIDEO, ColorStream HD, HDMI 1, HDMI 2, HDMI 3(only for 40"), PC, USB Media). 10無 HDMI...7 4 8 5 6 9 10 11 40" 32" 21 Control panel Control panel TV top 1無 Green LED Power LED(Green) = Power indicator 2無 Remote sensor - Repeatedly press to receive 1080p signals. 11無 USB port - To access photo or music files. 11 Press to access the menu system. screen...

User Manual
Page 14
... your VCR's audio out terminal using the white audio cable only. • Standard audio cables (If you have a mono VCR) Note: When you use the remote control to change channels. Select the VIDEO video input source on the TV.* ** To select the video input source, press INPUT on the TV.* To... materials is set to civil and criminal liability. 14 To view the antenna or Cable signal: Select the ANT/CABLE video input source on the remote control ( page 20). To view the VCR: Turn ON the VCR.
... your VCR's audio out terminal using the white audio cable only. • Standard audio cables (If you have a mono VCR) Note: When you use the remote control to change channels. Select the VIDEO video input source on the TV.* ** To select the video input source, press INPUT on the TV.* To... materials is set to civil and criminal liability. 14 To view the antenna or Cable signal: Select the ANT/CABLE video input source on the remote control ( page 20). To view the VCR: Turn ON the VCR.
User Manual
Page 15
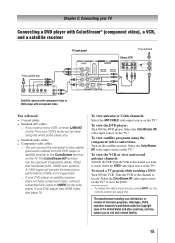
... source on the side panel. Tune the VCR to the channel to view the DVD. ** To select the video input source, press INPUT on the remote control ( page 20). The ColorStream HD terminal can connect the component video cables (plus audio cables) from ANT OUT to TV Y PB PR Satellite...
... source on the side panel. Tune the VCR to the channel to view the DVD. ** To select the video input source, press INPUT on the remote control ( page 20). The ColorStream HD terminal can connect the component video cables (plus audio cables) from ANT OUT to TV Y PB PR Satellite...
User Manual
Page 16
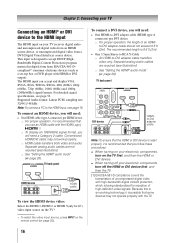
... with high-bandwidth digital content protection, which is recommended that you follow these procedures: •• When turning on your electronic components, turn on the remote control ( page 20). TV back panel DVI device VIDEO AUDIO L R IN IN OUT L R DVI / HDCP OUT HDMIto-DVI adapter cable Note: To ensure that...
... with high-bandwidth digital content protection, which is recommended that you follow these procedures: •• When turning on your electronic components, turn on the remote control ( page 20). TV back panel DVI device VIDEO AUDIO L R IN IN OUT L R DVI / HDCP OUT HDMIto-DVI adapter cable Note: To ensure that...

User Manual
Page 17
... TV back panel Optical audio cable To control the audio: 1無 Turn on the TV and the digital audio device. 2無 Press on the TV's remote control and open the Sound menu. 3無 Highlight Audio Setup and press . 4無 In the Optical Output Format field, select either the PC IN or...
... TV back panel Optical audio cable To control the audio: 1無 Turn on the TV and the digital audio device. 2無 Press on the TV's remote control and open the Sound menu. 3無 Highlight Audio Setup and press . 4無 In the Optical Output Format field, select either the PC IN or...
User Manual
Page 19
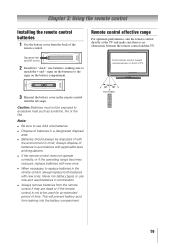
... until the tab snaps. Note: •• Be sure to the signs on front of with new ones. Point remote control toward remote sensor on the battery compartment. Caution: Batteries must not be disposed of TV. 3無 Reinsert the battery cover in a designated disposal area. &#... the batteries to use new and used for an extended period of batteries in accordance with applicable laws and regulations. •• If the remote control does not operate correctly, or if the operating range becomes reduced, replace batteries with new ones. •• When necessary to be...
... until the tab snaps. Note: •• Be sure to the signs on front of with new ones. Point remote control toward remote sensor on the battery compartment. Caution: Batteries must not be disposed of TV. 3無 Reinsert the battery cover in a designated disposal area. &#... the batteries to use new and used for an extended period of batteries in accordance with applicable laws and regulations. •• If the remote control does not operate correctly, or if the operating range becomes reduced, replace batteries with new ones. •• When necessary to be...
User Manual
Page 20
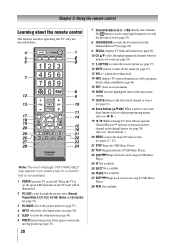
... ( page 24). 11無 C.CAPTION accesses the closed caption ( page 37). 12無 MUTE reduces or turns off . Chapter 3: Using the remote control Learning about the remote control The buttons used to tune digital channels or to edit the Favorites List ( page 29). 8無 FAV BROWSER accesses the Favorites...
... ( page 24). 11無 C.CAPTION accesses the closed caption ( page 37). 12無 MUTE reduces or turns off . Chapter 3: Using the remote control Learning about the remote control The buttons used to tune digital channels or to edit the Favorites List ( page 29). 8無 FAV BROWSER accesses the Favorites...
User Manual
Page 21
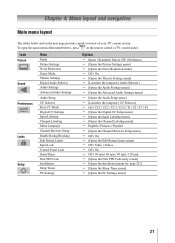
... tables below ), press on the next page provide a quick overview of your TV's menu system. To open the main menus (illustrated below and on the remote control or TV control panel. Icon Picture Sound Preferences Locks Setup Item Mode Picture Settings Noise Reduction Game Mode Theater Settings Digital Audio Selector Audio...
... tables below ), press on the next page provide a quick overview of your TV's menu system. To open the main menus (illustrated below and on the remote control or TV control panel. Icon Picture Sound Preferences Locks Setup Item Mode Picture Settings Noise Reduction Game Mode Theater Settings Digital Audio Selector Audio...

User Manual
Page 22
...except the signal meter menu, which closes automatically after about 5 minutes. • To close a menu instantly, press . 22 on the remote control or TV control panel, open the Icon Terrestrial Item Input Configuration Channel Program Channel Options Channel Tuning Mode Time Zone Signal Meter Option &#...; [Opens the System Information screen] Navigating the menu system You can use the up/down/left/right arrow buttons (pqtu) on the remote control or TV control panel to open the Installation menu (illustrated below), press Setup menu, select Installation, and press . Chapter 4: Menu...
...except the signal meter menu, which closes automatically after about 5 minutes. • To close a menu instantly, press . 22 on the remote control or TV control panel, open the Icon Terrestrial Item Input Configuration Channel Program Channel Options Channel Tuning Mode Time Zone Signal Meter Option &#...; [Opens the System Information screen] Navigating the menu system You can use the up/down/left/right arrow buttons (pqtu) on the remote control or TV control panel to open the Installation menu (illustrated below), press Setup menu, select Installation, and press . Chapter 4: Menu...

User Manual
Page 24
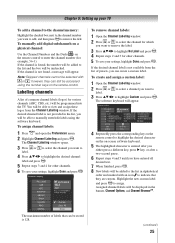
... you have to view the programmed channels. The TV will appear, as shown above). 5無 To cancel channel programming, press on the remote control (or highlight Cancel in its memory. While the TV is configured for Antenna. Setting channel skip To prevent certain channels from being viewed... Terrestrial menu, highlight Channel Program to bring up your TV Programming channels into the TV's channel memory When you press or on the remote control or TV control panel, your TV will appear in the channel memory. The list of Installation menu icons will automatically cycle through...
... you have to view the programmed channels. The TV will appear, as shown above). 5無 To cancel channel programming, press on the remote control (or highlight Cancel in its memory. While the TV is configured for Antenna. Setting channel skip To prevent certain channels from being viewed... Terrestrial menu, highlight Channel Program to bring up your TV Programming channels into the TV's channel memory When you press or on the remote control or TV control panel, your TV will appear in the channel memory. The list of Installation menu icons will automatically cycle through...
User Manual
Page 25
... text. 7無 When finished, press . 8無 New labels will be added to highlight the desired character on the on the remote control. If the desired channel label is not provided in the banner, Channel Options, and Channel BrowserTM. If the desired channel label is...be accessed using the software keyboard. To manually add digital subchannels on a physical channel: Use the Channel Numbers and the Dash ( ) on the remote control to highlight the desired channel label and press . 5無 Repeat steps 3 and 4 for other channels. 6無 To save your settings...
... text. 7無 When finished, press . 8無 New labels will be added to highlight the desired character on the on the remote control. If the desired channel label is not provided in the banner, Channel Options, and Channel BrowserTM. If the desired channel label is...be accessed using the software keyboard. To manually add digital subchannels on a physical channel: Use the Channel Numbers and the Dash ( ) on the remote control to highlight the desired channel label and press . 5無 Repeat steps 3 and 4 for other channels. 6無 To save your settings...

User Manual
Page 28
... want to label. 32 40" Game Console 4無 Press or to change the input; or c) Repeatedly press on the remote control and then press to view: 1無 Press panel. To label the video input sources: 1無 Press and open the Preferences menu. 2無...; Highlight Input Labeling and press . 3無 Press or to highlight the video source you press on the remote control. 5無 To save the new input labels, highlight Done and press . Chapter 6: Using the TV's features Selecting the video input source ...
... want to label. 32 40" Game Console 4無 Press or to change the input; or c) Repeatedly press on the remote control and then press to view: 1無 Press panel. To label the video input sources: 1無 Press and open the Preferences menu. 2無...; Highlight Input Labeling and press . 3無 Press or to highlight the video source you press on the remote control. 5無 To save the new input labels, highlight Done and press . Chapter 6: Using the TV's features Selecting the video input source ...
User Manual
Page 30
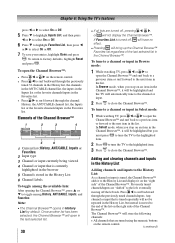
...Channel labels To toggle among History, ANT/CABLE, Inputs, and Favorites. Previously tuned channels/inputs are tuned using the numeric buttons on the remote control. • Press to surf backward through the channel History, the ANT/CABLE channel list, the Inputs list or the...channels: • All channels that is tuned repeatedly will open the Channel Browser™: • Press or on the remote control. (continued) Once another list has been selected, the Channel Browser™ will not be highlighted but instead is turned off the left...
...Channel labels To toggle among History, ANT/CABLE, Inputs, and Favorites. Previously tuned channels/inputs are tuned using the numeric buttons on the remote control. • Press to surf backward through the channel History, the ANT/CABLE channel list, the Inputs list or the...channels: • All channels that is tuned repeatedly will open the Channel Browser™: • Press or on the remote control. (continued) Once another list has been selected, the Channel Browser™ will not be highlighted but instead is turned off the left...

User Manual
Page 31
... press 1, 2, 5, then . For example, to a specific channel (programmed or unprogrammed) Tuning analog channels: Press the Channel Number (0-9) on the remote control. either through the automatic channel scan ( page 24) or the Channel add function ( page 25)-you will be handled for analog ... button and then the sub-channel number. To set to tune the RF channel using the Channel Number and dash ( ) on the remote control, analog channels can be tuned normally Auto (default) Digital channels will have priority when manually entering a channel number using the Channel Number...
... press 1, 2, 5, then . For example, to a specific channel (programmed or unprogrammed) Tuning analog channels: Press the Channel Number (0-9) on the remote control. either through the automatic channel scan ( page 24) or the Channel add function ( page 25)-you will be handled for analog ... button and then the sub-channel number. To set to tune the RF channel using the Channel Number and dash ( ) on the remote control, analog channels can be tuned normally Auto (default) Digital channels will have priority when manually entering a channel number using the Channel Number...
User Manual
Page 32
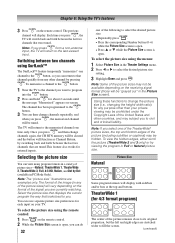
... for about 2 seconds until the message "Memorized" appears on the receiving signal format (those will display. Chapter 6: Using the TV's features 3無 Press on the remote control. 2無 While the Picture Size screen is open , you can do 32 one of picture sizes-Natural, TheaterWide 1, TheaterWide 2, TheaterWide 3, Full, 4:3 HD, Native, and... function as Channel Return, by pressing . Selecting the picture size You can return to that are examples only. To select the picture size using the remote control: 1無 Press on the...
... for about 2 seconds until the message "Memorized" appears on the receiving signal format (those will display. Chapter 6: Using the TV's features 3無 Press on the remote control. 2無 While the Picture Size screen is open , you can do 32 one of picture sizes-Natural, TheaterWide 1, TheaterWide 2, TheaterWide 3, Full, 4:3 HD, Native, and... function as Channel Return, by pressing . Selecting the picture size You can return to that are examples only. To select the picture size using the remote control: 1無 Press on the...

User Manual
Page 37
... audio Muting the sound Press on closed caption services (if available). See "Using the closed caption mode" ( page 37) for more information on the remote control to select the desired service. 4無 Press . (continued) 37 To select closed caption feature, use the CC Selector to the current Base CC Mode...
... audio Muting the sound Press on closed caption services (if available). See "Using the closed caption mode" ( page 37) for more information on the remote control to select the desired service. 4無 Press . (continued) 37 To select closed caption feature, use the CC Selector to the current Base CC Mode...

User Manual
Page 41
....) D) Some suggestive dialog L) Infrequent coarse language S) Some sexual situations V) Moderate violence General Audience (Most parents TV-G would find this category are watching, press on the remote control.
....) D) Some suggestive dialog L) Infrequent coarse language S) Some sexual situations V) Moderate violence General Audience (Most parents TV-G would find this category are watching, press on the remote control.
User Manual
Page 44
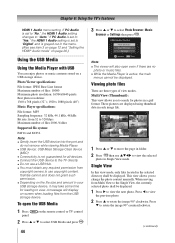
... Browser or Settings then press . USB Media Control Photo Browser Music Browser Settings Navigate ENTER Enter Note: ••The viewer will display on the remote control or TV control 2無 Press or to select USB Media and press 44 3無 Press or to view. Press ...displayed. 1無 Press to the Single View, the currently selected photo shall be displayed. Chapter 6: Using the TV's features HDMI 1 Audio menu setting. Toshiba cannot and does not grant such permission. ••Depending on a USB storage device.
... Browser or Settings then press . USB Media Control Photo Browser Music Browser Settings Navigate ENTER Enter Note: ••The viewer will display on the remote control or TV control 2無 Press or to select USB Media and press 44 3無 Press or to view. Press ...displayed. 1無 Press to the Single View, the currently selected photo shall be displayed. Chapter 6: Using the TV's features HDMI 1 Audio menu setting. Toshiba cannot and does not grant such permission. ••Depending on a USB storage device.


