Brochure
Page 1
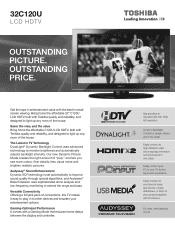
... affordable C120U LCD HDTV, built with Toshiba quality and reliability, and designed to monitor brightness and automatically adjusts backlight intensity. Audyssey® Sound Enhancement Dynamic EQ® technology is set automatically to improve sound quality through special... with 720p HD resolution Dynamic Backlight Control for the big screen experience. Say goodbye to standard-def with Toshiba quality and reliability, and designed to your TV for deeper blacks and more colors, finer details, less...with the best in to extend the range and bass. 32C120U LCD HDTV Outstanding picture.
... affordable C120U LCD HDTV, built with Toshiba quality and reliability, and designed to monitor brightness and automatically adjusts backlight intensity. Audyssey® Sound Enhancement Dynamic EQ® technology is set automatically to improve sound quality through special... with 720p HD resolution Dynamic Backlight Control for the big screen experience. Say goodbye to standard-def with Toshiba quality and reliability, and designed to your TV for deeper blacks and more colors, finer details, less...with the best in to extend the range and bass. 32C120U LCD HDTV Outstanding picture.
User Guide
Page 10
... Main menu layout 40 Menu setup/installation/layout 42 Navigating the menu system 42 Chapter 5: Setting up your TV 44 Initial Setup 44 Storing channels in memory (optional 46 Auto Tuning 46 Setting channel skip 48 Setting AV Input mode 50 Setting the HDMI® audio mode 50 Viewing the digital signal meter 51...
... Main menu layout 40 Menu setup/installation/layout 42 Navigating the menu system 42 Chapter 5: Setting up your TV 44 Initial Setup 44 Storing channels in memory (optional 46 Auto Tuning 46 Setting channel skip 48 Setting AV Input mode 50 Setting the HDMI® audio mode 50 Viewing the digital signal meter 51...
User Guide
Page 11
... Using the FREEZE feature 70 Adjusting the picture 71 Selecting the picture mode 71 Adjusting the picture quality 72 Using closed captions 73 Digital CC settings 74 CC Selector 75
... Using the FREEZE feature 70 Adjusting the picture 71 Selecting the picture mode 71 Adjusting the picture quality 72 Using closed captions 73 Digital CC settings 74 CC Selector 75

User Guide
Page 12
... temporarily 86 Using the input lock feature 87 Locking channels 87 Using the GameTimer 88 Using the panel lock feature 89 Using the PC settings feature 90 Setting the PC Audio 91 Using the Media Player 92 Auto Start function 93 To open the Media Player 93 Viewing photo files 95 Playing... music files 96 Viewing photo files and playing music files at the same time 98 Sorting photo or music files 98 Setting the sleep timer 99 Auto Brightness Sensor 99
... temporarily 86 Using the input lock feature 87 Locking channels 87 Using the GameTimer 88 Using the panel lock feature 89 Using the PC settings feature 90 Setting the PC Audio 91 Using the Media Player 92 Auto Start function 93 To open the Media Player 93 Viewing photo files 95 Playing... music files 96 Viewing photo files and playing music files at the same time 98 Sorting photo or music files 98 Setting the sleep timer 99 Auto Brightness Sensor 99
User Guide
Page 13
...100 Using REGZA-LINK 101 REGZA-LINK® playback device (DVD player, etc.) control 101 Other REGZA-LINK® functions 103 Setting up REGZA-LINK 104 Displaying TV status information 104 Understanding the last mode memory feature ......106 Chapter 7: Using the TV's Advanced ...Features 107 Using the advanced picture settings 107 Dynamic Contrast 107 Static Gamma 108 Color temperature 108 CableClear® digital Noise Reduction 109 MPEG Noise Reduction 110 Game Mode 110...
...100 Using REGZA-LINK 101 REGZA-LINK® playback device (DVD player, etc.) control 101 Other REGZA-LINK® functions 103 Setting up REGZA-LINK 104 Displaying TV status information 104 Understanding the last mode memory feature ......106 Chapter 7: Using the TV's Advanced ...Features 107 Using the advanced picture settings 107 Dynamic Contrast 107 Static Gamma 108 Color temperature 108 CableClear® digital Noise Reduction 109 MPEG Noise Reduction 110 Game Mode 110...
User Guide
Page 16
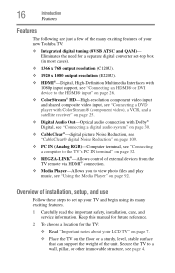
Secure the TV to view photo files and play music, see page 4. Overview of installation, setup, and use Follow these steps to set -top box (in most cases). ❖ 1366 x 768 output resolution (C120U). ❖ 1920 x 1080 output resolution (E220U). ❖ HDMI®-Digital... 7. ❖ Place the TV on page 92. Keep this manual for future reference. 2 To choose a location for a separate digital converter set up your new Toshiba TV: ❖ Integrated digital tuning (8VSB ATSC and QAM)- 16 Introduction Features Features The following are just a few of the many exciting features...
Secure the TV to view photo files and play music, see page 4. Overview of installation, setup, and use Follow these steps to set -top box (in most cases). ❖ 1366 x 768 output resolution (C120U). ❖ 1920 x 1080 output resolution (E220U). ❖ HDMI®-Digital... 7. ❖ Place the TV on page 92. Keep this manual for future reference. 2 To choose a location for a separate digital converter set up your new Toshiba TV: ❖ Integrated digital tuning (8VSB ATSC and QAM)- 16 Introduction Features Features The following are just a few of the many exciting features...
User Guide
Page 19
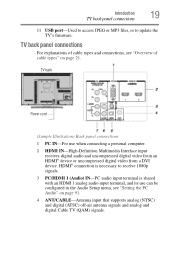
... (Sample Illustration) Back panel connections 1 PC IN-For use can be configured in the Audio Setup menu, see "Overview of cable types and connections, see "Setting the PC Audio" on page 21.
... (Sample Illustration) Back panel connections 1 PC IN-For use can be configured in the Audio Setup menu, see "Overview of cable types and connections, see "Setting the PC Audio" on page 21.
User Guide
Page 22
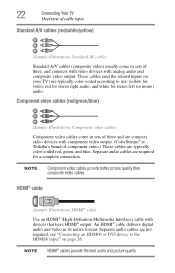
...white/yellow) (Sample Illustration) Standard AV cables Standard A/V cables (composite video) usually come in sets of three and are connects video devices with component video output. (ColorStream® is Toshiba's brand of three, and connects with video devices with devices that have HDMI® output. An... HDMI® cable delivers digital audio and video in sets of component video.) These cables are required for stereo ...
...white/yellow) (Sample Illustration) Standard AV cables Standard A/V cables (composite video) usually come in sets of three and are connects video devices with component video output. (ColorStream® is Toshiba's brand of three, and connects with video devices with devices that have HDMI® output. An... HDMI® cable delivers digital audio and video in sets of component video.) These cables are required for stereo ...
User Guide
Page 24
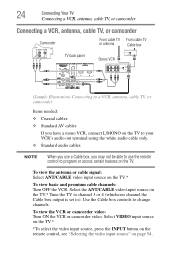
... camcorder video. Select the ANT/CABLE video input source on the TV.* Tune the TV to channel 3 or 4 (whichever channel the Cable box output is set to program or access certain features on the TV. 24 Connecting Your TV Connecting a VCR, antenna, cable TV, or camcorder Connecting a VCR, antenna, cable TV...
... camcorder video. Select the ANT/CABLE video input source on the TV.* Tune the TV to channel 3 or 4 (whichever channel the Cable box output is set to program or access certain features on the TV. 24 Connecting Your TV Connecting a VCR, antenna, cable TV, or camcorder Connecting a VCR, antenna, cable TV...
User Guide
Page 26
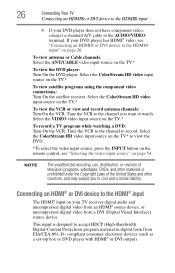
... from a DVI (Digital Visual Interface) source device. Tune the VCR to the channel you to civil and criminal liability. compliant consumer electronic devices (such as a set-top box or DVD player with HDMI® or DVI output). 26 Connecting Your TV Connecting an HDMI® or DVI device to the HDMI...
... from a DVI (Digital Visual Interface) source device. Tune the VCR to the channel you to civil and criminal liability. compliant consumer electronic devices (such as a set-top box or DVD player with HDMI® or DVI output). 26 Connecting Your TV Connecting an HDMI® or DVI device to the HDMI...
User Guide
Page 27
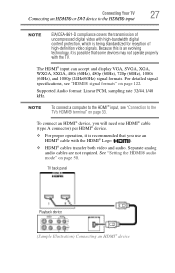
... PCM, sampling rate 32/44.1/48 kHz. NOTE To connect a computer to the HDMI® input, see "HDMI® signal formats" on page 33. See "Setting the HDMI® audio mode" on page 50. Because this is an evolving technology, it is being standardized for reception of high-definition video signals...
... PCM, sampling rate 32/44.1/48 kHz. NOTE To connect a computer to the HDMI® input, see "HDMI® signal formats" on page 33. See "Setting the HDMI® audio mode" on page 50. Because this is an evolving technology, it is being standardized for reception of high-definition video signals...
User Guide
Page 28
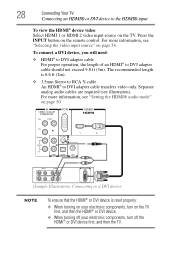
28 Connecting Your TV Connecting an HDMI® or DVI device to DVI adapter cable transfers video only. For more information, see "Setting the HDMI® audio mode" on page 50 VIDEO AUDIO L R IN IN DVI / HDCP OUT OUT L R (Sample Illustration) Connecting to DVI adapter cable should not ...
28 Connecting Your TV Connecting an HDMI® or DVI device to DVI adapter cable transfers video only. For more information, see "Setting the HDMI® audio mode" on page 50 VIDEO AUDIO L R IN IN DVI / HDCP OUT OUT L R (Sample Illustration) Connecting to DVI adapter cable should not ...
User Guide
Page 29
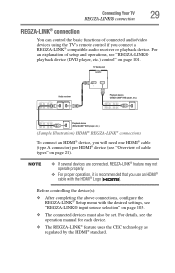
...can control the basic functions of connected audio/video devices using the TV's remote control if you use an HDMI® cable with the desired settings, see "REGZA-LINK® playback device (DVD player, etc.) control" on page 101. TV back panel Audio receiver Playback device (REGZA-... For an explanation of setup and operations, see "REGZA-LINK® input source selection" on page 103. ❖ The connected devices must also be set. NOTE ❖ If several devices are connected, REGZA-LINK® feature may not operate properly. ❖ For proper operation, it is recommended that...
...can control the basic functions of connected audio/video devices using the TV's remote control if you use an HDMI® cable with the desired settings, see "REGZA-LINK® playback device (DVD player, etc.) control" on page 101. TV back panel Audio receiver Playback device (REGZA-... For an explanation of setup and operations, see "REGZA-LINK® input source selection" on page 103. ❖ The connected devices must also be set. NOTE ❖ If several devices are connected, REGZA-LINK® feature may not operate properly. ❖ For proper operation, it is recommended that...

User Guide
Page 31
... PCM, depending on your device, see "Selecting the optical audio output format" on page 79. (Sample Image) Digital Output Format screen 6 To save the new settings, highlight Done, and then press the ENTER button. THIS DAMAGE IS NOT COVERED BY YOUR WARRANTY. ❖ The DIGITAL AUDIO OUT terminal may damage speakers...
... PCM, depending on your device, see "Selecting the optical audio output format" on page 79. (Sample Image) Digital Output Format screen 6 To save the new settings, highlight Done, and then press the ENTER button. THIS DAMAGE IS NOT COVERED BY YOUR WARRANTY. ❖ The DIGITAL AUDIO OUT terminal may damage speakers...
User Guide
Page 32
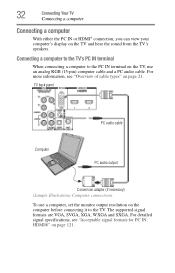
.... For detailed signal specifications, see "Overview of cable types" on the computer before connecting it to the PC IN terminal on the TV, use a computer, set the monitor output resolution on page 21. Connecting a computer to the TV's PC IN terminal When connecting a computer to the TV. For more information, see...
.... For detailed signal specifications, see "Overview of cable types" on the computer before connecting it to the PC IN terminal on the TV, use a computer, set the monitor output resolution on page 21. Connecting a computer to the TV's PC IN terminal When connecting a computer to the TV. For more information, see...

User Guide
Page 33
... To display the optimum picture, use an HDMI® cable (type A connector). When connecting a computer to an HDMI® terminal, use the computer setting feature, see "Connecting an HDMI® or DVI device to the HDMI® input" on page 91. ❖ Some computer models cannot be connected ...to -DVI adapter cable and analog audio cables. For configuration information, see "Setting the PC Audio" on page 26. NOTE ❖ The PC audio input terminals on page 90. Signal names for mini D-sub 15-pin connector:...
... To display the optimum picture, use an HDMI® cable (type A connector). When connecting a computer to an HDMI® terminal, use the computer setting feature, see "Connecting an HDMI® or DVI device to the HDMI® input" on page 91. ❖ Some computer models cannot be connected ...to -DVI adapter cable and analog audio cables. For configuration information, see "Setting the PC Audio" on page 26. NOTE ❖ The PC audio input terminals on page 90. Signal names for mini D-sub 15-pin connector:...

User Guide
Page 38
Press again to the last viewed channel or source, see "Setting the sleep timer" on page 99. 6 The FREEZE button freezes the picture. CAPTION accesses closed captions, see "Using closed captions" on page 73. 12 The ...
Press again to the last viewed channel or source, see "Setting the sleep timer" on page 99. 6 The FREEZE button freezes the picture. CAPTION accesses closed captions, see "Using closed captions" on page 73. 12 The ...
User Guide
Page 40
Icon Picture Sound Item Mode Picture Settings Noise Reduction Game Mode Theater Settings Digital Audio Selector Audio Settings Audio Setup Option Dynamic/Standard/Movie/PC/Preference Opens the Picture Settings menu Opens the Noise Reduction menu Off/On Opens the Theater Settings menu Launches the temporary Audio Selector Opens the Audio Settings menu Opens the Audio Setup...
Icon Picture Sound Item Mode Picture Settings Noise Reduction Game Mode Theater Settings Digital Audio Selector Audio Settings Audio Setup Option Dynamic/Standard/Movie/PC/Preference Opens the Picture Settings menu Opens the Noise Reduction menu Off/On Opens the Theater Settings menu Launches the temporary Audio Selector Opens the Audio Settings menu Opens the Audio Setup...
User Guide
Page 41
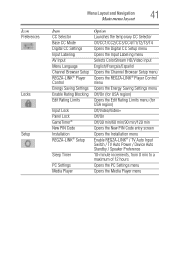
... Rating Blocking Edit Rating Limits Input Lock Panel Lock GameTimer® New PIN Code Installation REGZA-LINK® Setup Sleep Timer PC Settings Media Player Option Launches the temporary CC Selector Off/CC1/CC2/CC3/CC4/T1/T2/T3/T4 Opens the Digital CC Setup menu Opens the ... English/Français/Español Opens the Channel Browser Setup menu Opens the REGZA-LINK® Player Control menu Opens the Energy Saving Settings menu Off/On (for USA region) Opens the Edit Rating Limits menu (for USA region) Off/Video/Video+ Off/On Off/30 min/60 min...
... Rating Blocking Edit Rating Limits Input Lock Panel Lock GameTimer® New PIN Code Installation REGZA-LINK® Setup Sleep Timer PC Settings Media Player Option Launches the temporary CC Selector Off/CC1/CC2/CC3/CC4/T1/T2/T3/T4 Opens the Digital CC Setup menu Opens the ... English/Français/Español Opens the Channel Browser Setup menu Opens the REGZA-LINK® Player Control menu Opens the Energy Saving Settings menu Off/On (for USA region) Opens the Edit Rating Limits menu (for USA region) Off/Video/Video+ Off/On Off/30 min/60 min...

User Guide
Page 43
A highlighted menu item appears in a different color in the menu. 4 All menus close automatically if you do not make a selection within approximately 60 seconds, except the signal meter menu, which closes automatically after a few minutes. 5 To close a menu instantly, press the EXIT button. Menu Layout and Navigation 43 Navigating the menu system 3 Press the ENTER button to save your menu settings or select a highlighted item. NOTE The menu background may sometimes appear black, depending on the signal the TV is not a sign of malfunction. This is receiving.
A highlighted menu item appears in a different color in the menu. 4 All menus close automatically if you do not make a selection within approximately 60 seconds, except the signal meter menu, which closes automatically after a few minutes. 5 To close a menu instantly, press the EXIT button. Menu Layout and Navigation 43 Navigating the menu system 3 Press the ENTER button to save your menu settings or select a highlighted item. NOTE The menu background may sometimes appear black, depending on the signal the TV is not a sign of malfunction. This is receiving.


