User Manual
Page 8
... REGZA-LINK® connection 17 Connecting a digital audio system 18 Connecting a personal computer (PC 18 Chapter 3: Using the remote control 20 Installing the remote control batteries 20 Remote control effective range 20 Learning about the remote control 21 Chapter 4: Menu layout and navigation 22 Main menu layout 22 Setup/Installation menu layout 23 Navigating... 55 Specifications 55 Acceptable signal formats for PC IN and HDMI terminals 56 Limited United States Warranty for LCD Televisions 57 Limited Canadian Warranty for Toshiba Brand Flat Panel Televisions 58
... REGZA-LINK® connection 17 Connecting a digital audio system 18 Connecting a personal computer (PC 18 Chapter 3: Using the remote control 20 Installing the remote control batteries 20 Remote control effective range 20 Learning about the remote control 21 Chapter 4: Menu layout and navigation 22 Main menu layout 22 Setup/Installation menu layout 23 Navigating... 55 Specifications 55 Acceptable signal formats for PC IN and HDMI terminals 56 Limited United States Warranty for LCD Televisions 57 Limited Canadian Warranty for Toshiba Brand Flat Panel Televisions 58
User Manual
Page 9
Chapter 1: Introduction Features of your new TV The following are just a few of the many exciting features of your new Toshiba widescreen, integrated HD, LCD TV: • Integrated digital tuning (8VSB ATSC and QAM) eliminates the need for a separate digital converter set-top box (... 51). • PC IN (Analog RGB) computer terminal ( pages 18-19). • REGZA-LINK® allows control of external devices from the TV remote via HDMI connection( page 47). • ClearFrame™ ClearFrame 120 Hz anti-blur feature(Only for G310U) ( page 51). • Media Player allows...
Chapter 1: Introduction Features of your new TV The following are just a few of the many exciting features of your new Toshiba widescreen, integrated HD, LCD TV: • Integrated digital tuning (8VSB ATSC and QAM) eliminates the need for a separate digital converter set-top box (... 51). • PC IN (Analog RGB) computer terminal ( pages 18-19). • REGZA-LINK® allows control of external devices from the TV remote via HDMI connection( page 47). • ClearFrame™ ClearFrame 120 Hz anti-blur feature(Only for G310U) ( page 51). • Media Player allows...
User Manual
Page 10
... 13 For technical specifications and warranty information, see Chapter 9. 14 Enjoy your new TV! 10 THIS TYPE OF DAMAGE IS NOT COVERED UNDER THE TOSHIBA WARRANTY. 3 Do not plug in any power cords until AFTER you cannot turn on the screen. • Place the TV far enough from ...reflect on the TV. Keep this manual for future reference. 2 Observe the following when choosing a location for the TV: • Read "Important notes about the remote control" ( page 21) for an overview of the TV's connections and controls ( pages 11-12). 5 Connect your LCD TV" ( page ...
... 13 For technical specifications and warranty information, see Chapter 9. 14 Enjoy your new TV! 10 THIS TYPE OF DAMAGE IS NOT COVERED UNDER THE TOSHIBA WARRANTY. 3 Do not plug in any power cords until AFTER you cannot turn on the screen. • Place the TV far enough from ...reflect on the TV. Keep this manual for future reference. 2 Observe the following when choosing a location for the TV: • Read "Important notes about the remote control" ( page 21) for an overview of the TV's connections and controls ( pages 11-12). 5 Connect your LCD TV" ( page ...
User Manual
Page 11
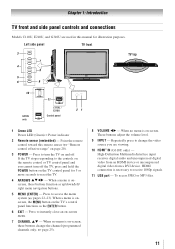
...for 5 or more seconds to turn off . If the TV stops responding to the controls on the remote control or TV control panel and you are used in this remote sensor ( "Remote control effective range" on page 20). 3無 POWER - Press to reset the TV. 4無 ...7 4 8 5 6 9 TV top 10 G310U only 11 C110U / E210U Control panel 21 1無 Green LED Power LED (Green) = Power indicator 2無 Remote sensor (embedded) - Chapter 1: Introduction TV front and side panel controls and connections Models C110U, E210U, and G310U are viewing. 10無 HDMI® IN (G310U...
...for 5 or more seconds to turn off . If the TV stops responding to the controls on the remote control or TV control panel and you are used in this remote sensor ( "Remote control effective range" on page 20). 3無 POWER - Press to reset the TV. 4無 ...7 4 8 5 6 9 TV top 10 G310U only 11 C110U / E210U Control panel 21 1無 Green LED Power LED (Green) = Power indicator 2無 Remote sensor (embedded) - Chapter 1: Introduction TV front and side panel controls and connections Models C110U, E210U, and G310U are viewing. 10無 HDMI® IN (G310U...
User Manual
Page 14
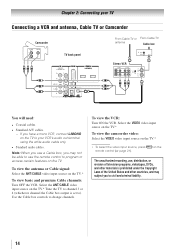
...To view the antenna or Cable signal: Select the ANT/CABLE video input source on the TV.* ** To select the video input source, press remote control ( page 21). Select the VIDEO video input source on the TV.* To view the camcorder video: Select the VIDEO video input ...unauthorized recording, use, distribution, or revision of television programs, videotapes, DVDs, and other materials is set to change channels. Note: When you use the remote control to your TV Connecting a VCR and antenna, Cable TV or Camcorder Camcorder AUDIO OUT L R VIDEO TV back panel 1 From Cable TV or...
...To view the antenna or Cable signal: Select the ANT/CABLE video input source on the TV.* ** To select the video input source, press remote control ( page 21). Select the VIDEO video input source on the TV.* To view the camcorder video: Select the VIDEO video input ...unauthorized recording, use, distribution, or revision of television programs, videotapes, DVDs, and other materials is set to change channels. Note: When you use the remote control to your TV Connecting a VCR and antenna, Cable TV or Camcorder Camcorder AUDIO OUT L R VIDEO TV back panel 1 From Cable TV or...
User Manual
Page 15
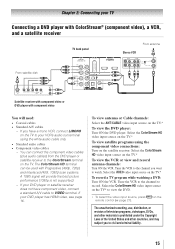
Tune the VCR to the channel to view the DVD. ** To select the video input source, press remote control ( page 21). If your DVD player has HDMI video, see page 16. Select the ColorStream HD video input source on the TV.* To ...
Tune the VCR to the channel to view the DVD. ** To select the video input source, press remote control ( page 21). If your DVD player has HDMI video, see page 16. Select the ColorStream HD video input source on the TV.* To ...
User Manual
Page 16
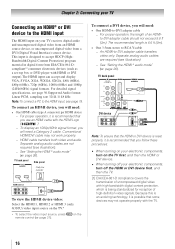
...-definition video signals. Conventional HDMI/DVI cable may not operate properly with the TV. 16 on the TV.* ** To select the video input source, press remote control ( page 21). TV back panel 1 DVI device VIDEO AUDIO L R IN IN OUT L R DVI / HDCP OUT Note: To ensure that the HDMI or DVI...
...-definition video signals. Conventional HDMI/DVI cable may not operate properly with the TV. 16 on the TV.* ** To select the video input source, press remote control ( page 21). TV back panel 1 DVI device VIDEO AUDIO L R IN IN OUT L R DVI / HDCP OUT Note: To ensure that the HDMI or DVI...
User Manual
Page 17
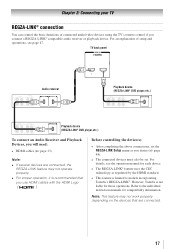
For details, see page 47. For an explanation of connected audio/video devices using the TV's remote control if you desire ( page 48). • The connected devices must also be set the REGZA-LINK Setup menu as regulated by the ... Devices, you use HDMI cables with the HDMI Logo ( ). Before controlling the device(s): • After completing the above connections, set . Refer to models incorporating Toshiba's REGZA-LINK®. Note: This feature may not operate properly. •• For proper operation, it is not liable for compatibility information. However...
For details, see page 47. For an explanation of connected audio/video devices using the TV's remote control if you desire ( page 48). • The connected devices must also be set the REGZA-LINK Setup menu as regulated by the ... Devices, you use HDMI cables with the HDMI Logo ( ). Before controlling the device(s): • After completing the above connections, set . Refer to models incorporating Toshiba's REGZA-LINK®. Note: This feature may not operate properly. •• For proper operation, it is not liable for compatibility information. However...
User Manual
Page 18
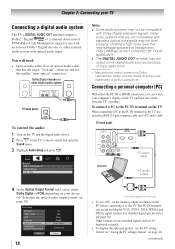
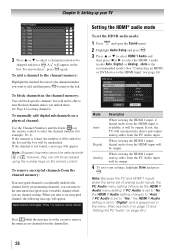
... digital audio system TV back panel To control the audio: 1無 Turn on the TV and the digital audio device. 2無 Press on the TV's remote control and open the Sound menu. 3無 Highlight Audio Setup and press . Dolby, and the double-D symbol are not compatible with standard optical out signals...
... digital audio system TV back panel To control the audio: 1無 Turn on the TV and the digital audio device. 2無 Press on the TV's remote control and open the Sound menu. 3無 Highlight Audio Setup and press . Dolby, and the double-D symbol are not compatible with standard optical out signals...

User Manual
Page 20
... reduced, replace batteries with new ones. Never mix battery types or new and used for an extended period of with the environment in the remote control, always replace both batteries with new ones. •• When necessary to match the + and - This will prevent battery acid...leaking into the battery compartment. 16.4 ft (5m) 20 Point remote control toward remote sensor on the battery compartment. Caution: Batteries must not be disposed of time. Remote control effective range For optimum performance, aim the remote control directly at the TV and make sure there is not to...
... reduced, replace batteries with new ones. Never mix battery types or new and used for an extended period of with the environment in the remote control, always replace both batteries with new ones. •• When necessary to match the + and - This will prevent battery acid...leaking into the battery compartment. 16.4 ft (5m) 20 Point remote control toward remote sensor on the battery compartment. Caution: Batteries must not be disposed of time. Remote control effective range For optimum performance, aim the remote control directly at the TV and make sure there is not to...
User Manual
Page 21
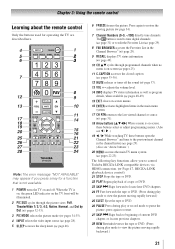
...on and off the sound ( page 37). 13無 VOL + - Note: The error message "NOT AVAILABLE" may appear if you to control Toshiba REGZA-LINK compatible devices via HDMI connection. ( Page 47, REGZA-LINK playback device control) 21無 STOP Stops the tape or DVD. 22無... 35-36). 12無 MUTE reduces or turns off . Press again to restore the moving rapidly backward.) 21 Chapter 3: Using the remote control Learning about the remote control Only the buttons used to tune digital channels ( page 31) or to the previous/next channel in the Channel Browser™...
...on and off the sound ( page 37). 13無 VOL + - Note: The error message "NOT AVAILABLE" may appear if you to control Toshiba REGZA-LINK compatible devices via HDMI connection. ( Page 47, REGZA-LINK playback device control) 21無 STOP Stops the tape or DVD. 22無... 35-36). 12無 MUTE reduces or turns off . Press again to restore the moving rapidly backward.) 21 Chapter 3: Using the remote control Learning about the remote control Only the buttons used to tune digital channels ( page 31) or to the previous/next channel in the Channel Browser™...
User Manual
Page 22
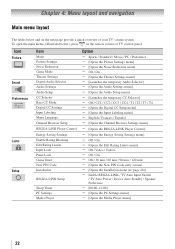
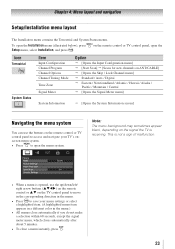
To open the main menus (illustrated below and on the remote control or TV control panel. Chapter 4: Menu layout and navigation Main menu layout The tables below ), press on the next page provide a quick overview of ...
To open the main menus (illustrated below and on the remote control or TV control panel. Chapter 4: Menu layout and navigation Main menu layout The tables below ), press on the next page provide a quick overview of ...
User Manual
Page 23
on the remote control or TV control panel, open the Icon Terrestrial System Status Item Input Configuration Channel Program Channel Options Channel Tuning Mode Time Zone Signal Meter ...] [Opens the System Information screen] Navigating the menu system You can use the up/down/left/ right arrow buttons (pqtu) on the remote control or pq on the remote control or TV control panel to access and navigate your menu settings or select a highlighted item. (A highlighted menu item appears in a different...
on the remote control or TV control panel, open the Icon Terrestrial System Status Item Input Configuration Channel Program Channel Options Channel Tuning Mode Time Zone Signal Meter ...] [Opens the System Information screen] Navigating the menu system You can use the up/down/left/ right arrow buttons (pqtu) on the remote control or pq on the remote control or TV control panel to access and navigate your menu settings or select a highlighted item. (A highlighted menu item appears in a different...
User Manual
Page 25
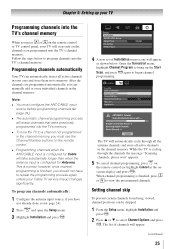
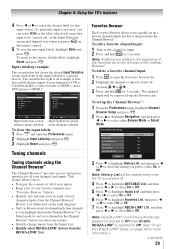
... When you can automatically detect all active channels in the channel memory. After the channels are programmed automatically, you press or on the remote control or TV control panel, your TV will take substantially longer than when the antenna input is cycling through all the antenna channels and... To tune the TV to program channels into the TV's channel memory. Note: •• You must use the Channel Number buttons on the remote control. •• Programming channels when the ANT/CABLE input is normal; Follow the steps below . Chapter 5: Setting up the Start Scan, ...
... When you can automatically detect all active channels in the channel memory. After the channels are programmed automatically, you press or on the remote control or TV control panel, your TV will take substantially longer than when the antenna input is cycling through all the antenna channels and... To tune the TV to program channels into the TV's channel memory. Note: •• You must use the Channel Number buttons on the remote control. •• Programming channels when the ANT/CABLE input is normal; Follow the steps below . Chapter 5: Setting up the Start Scan, ...
User Manual
Page 26
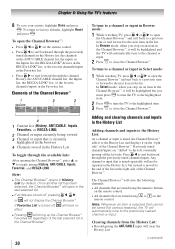
...output. Analog When viewing the HDMI 1 input, analog audio from the channel list. Note: Skipped channels cannot be output. Press 1 on the remote control. To add a channel to the channel memory: Highlight the checked box next to the channel number you tune to the channel list by programming...subchannels on a physical channel: Use the Channel Numbers and the Dash ( ) on the remote control to "Yes," the HDMI 1 Audio setting is available, it will be accessed using the number keys on remote to remove channel Press while the message is accidentally added to an encrypted channel, the ...
...output. Analog When viewing the HDMI 1 input, analog audio from the channel list. Note: Skipped channels cannot be output. Press 1 on the remote control. To add a channel to the channel memory: Highlight the checked box next to the channel number you tune to the channel list by programming...subchannels on a physical channel: Use the Channel Numbers and the Dash ( ) on the remote control to "Yes," the HDMI 1 Audio setting is available, it will be accessed using the number keys on remote to remove channel Press while the message is accidentally added to an encrypted channel, the ...
User Manual
Page 28
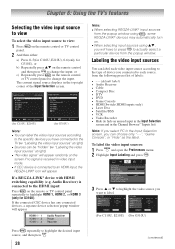
... the input. If the connected CEC device has any connected devices, a separate device selection popup window will appear randomly on the remote control and then press to change the input; Video Audio Receiver Cable Compact Disc DTV Video Audio Receiver Cable Compact Disc DTV (..."Labeling the video input sources" at right). ••Sources can choose only "- -", "Game Console", or "Hide" as the label. on the remote control or TV control 2無 And then either: a) Press 0-5(for C110U, E210U), 0-6(only for G310U). Labeling the video input sources You can label ...
... the input. If the connected CEC device has any connected devices, a separate device selection popup window will appear randomly on the remote control and then press to change the input; Video Audio Receiver Cable Compact Disc DTV Video Audio Receiver Cable Compact Disc DTV (..."Labeling the video input sources" at right). ••Sources can choose only "- -", "Game Console", or "Hide" as the label. on the remote control or TV control 2無 And then either: a) Press 0-5(for C110U, E210U), 0-6(only for G310U). Labeling the video input sources You can label ...
User Manual
Page 29
... 4無 Press or to the channel or input. 2無 Press and hold for 3 seconds. To set the REGZA-LINK® Setup" on the remote control. 5無 To save the new input labels, highlight Done and press .
... 4無 Press or to the channel or input. 2無 Press and hold for 3 seconds. To set the REGZA-LINK® Setup" on the remote control. 5無 To save the new input labels, highlight Done and press .
User Manual
Page 30
..., Inputs, Favorites, or REGZA-LINK) 2無 Channel or input currently being viewed 3無 Channel or input that are tuned using or on the remote control. • Press to surf backward through the channel History, the ANT/CABLE channel list, the Inputs list, the REGZA-LINK®.... Once another list has been selected, the Channel Browser™ will open the Channel Browser™: • Press or on the remote control. To tune to a channel or input in Select mode: 1無 While watching TV, press or to open the Channel Browser...
..., Inputs, Favorites, or REGZA-LINK) 2無 Channel or input currently being viewed 3無 Channel or input that are tuned using or on the remote control. • Press to surf backward through the channel History, the ANT/CABLE channel list, the Inputs list, the REGZA-LINK®.... Once another list has been selected, the Channel Browser™ will open the Channel Browser™: • Press or on the remote control. To tune to a channel or input in Select mode: 1無 While watching TV, press or to open the Channel Browser...
User Manual
Page 31
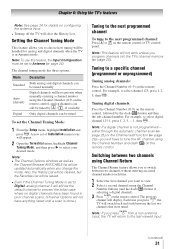
... must be set of Installation menu icons will return to view. 2無 Select a second channel using the Channel Number and dash ( ) on the remote control. Note: If a digital channel is not programmed- A new set to select channel 125, press 1, 2, 5, then . Note: If you change... ( page 24). For example, to a specific channel (programmed or unprogrammed) Tuning analog channels: Press the Channel Number (0-9) on the remote control. Setting the Channel Tuning Mode This feature allows you want to the last-viewed input. (continued) 31 The previous channel will clear the...
... must be set of Installation menu icons will return to view. 2無 Select a second channel using the Channel Number and dash ( ) on the remote control. Note: If a digital channel is not programmed- A new set to select channel 125, press 1, 2, 5, then . Note: If you change... ( page 24). For example, to a specific channel (programmed or unprogrammed) Tuning analog channels: Press the Channel Number (0-9) on the remote control. Setting the Channel Tuning Mode This feature allows you want to the last-viewed input. (continued) 31 The previous channel will clear the...
User Manual
Page 32
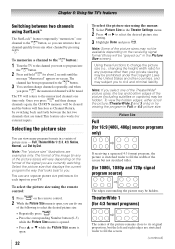
... depending on the format of the signal you can save separate picture size preferences for about 2 seconds until the message "Memorized" appears on the remote control. 2無 While the Picture Size menu is stretched wider to fill the width of the image (in any other countries, and may be.... You can do one of the TheaterWide® picture sizes, the top and bottom edges of picture sizes - To select the picture size using the remote control: 1無 Press on -screen. Note: Some of the picture sizes may be "grayed out" in a variety of the picture (including subtitles or ...
... depending on the format of the signal you can save separate picture size preferences for about 2 seconds until the message "Memorized" appears on the remote control. 2無 While the Picture Size menu is stretched wider to fill the width of the image (in any other countries, and may be.... You can do one of the TheaterWide® picture sizes, the top and bottom edges of picture sizes - To select the picture size using the remote control: 1無 Press on -screen. Note: Some of the picture sizes may be "grayed out" in a variety of the picture (including subtitles or ...


