
Owners Manual
Page 3
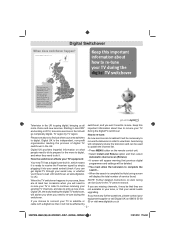
... detailed instructions on the remote control unit. • Select Install and Retune option and then select Automatic channel scan (Retune). • A screen will appear warning that previous digital programmes and settings will switchover, and you are missing channels, it will be necessary to re-tune the television in the UK will be that your If you won't need to re-tune. Digital UK...
... detailed instructions on the remote control unit. • Select Install and Retune option and then select Automatic channel scan (Retune). • A screen will appear warning that previous digital programmes and settings will switchover, and you are missing channels, it will be necessary to re-tune the television in the UK will be that your If you won't need to re-tune. Digital UK...
Owners Manual
Page 7
... 25 Digital Settings - Parental Control, Menu Lock, Set PIN 26 Viewing Parental Control Menu 26 Menu Lock 26 Child Lock 26 Set PIN 26 Configuring Picture Settings 27 Configuring Picture Settings 27 Picture Mode 27 Contrast 27 Brightness 27 Sharpness 27 Colour 27 Power Save Mode 27 Backlight (optional 27 Noise Reduction 27 Advanced Settings 28 To Connect a USB Disk 16 USB Memory Connection 16 Power Save Mode 17 Resetting 28 Changing Picture Format 29 Configuring PC Picture Settings 30...
... 25 Digital Settings - Parental Control, Menu Lock, Set PIN 26 Viewing Parental Control Menu 26 Menu Lock 26 Child Lock 26 Set PIN 26 Configuring Picture Settings 27 Configuring Picture Settings 27 Picture Mode 27 Contrast 27 Brightness 27 Sharpness 27 Colour 27 Power Save Mode 27 Backlight (optional 27 Noise Reduction 27 Advanced Settings 28 To Connect a USB Disk 16 USB Memory Connection 16 Power Save Mode 17 Resetting 28 Changing Picture Format 29 Configuring PC Picture Settings 30...
Owners Manual
Page 8
... Operation 34 Menu Timeout 34 Scan Encrypted Channels 34 Other Controls 35 Application Version 35 Blue Background 35 Software Upgrade 35 Hard of Hearing 35 Audio Description 35 Auto TV Off 35 Standby Search 35 Full Mode (optional 35 HDMI True Black (optional 35 USB Media Browser 36 Manual Start 36 Auto Start 36 Playing MP3 Files 36 Viewing JPG Files 37 Slideshow Feature 37 Video Playback 37 Media Browser Settings 38 To Close...
... Operation 34 Menu Timeout 34 Scan Encrypted Channels 34 Other Controls 35 Application Version 35 Blue Background 35 Software Upgrade 35 Hard of Hearing 35 Audio Description 35 Auto TV Off 35 Standby Search 35 Full Mode (optional 35 HDMI True Black (optional 35 USB Media Browser 36 Manual Start 36 Auto Start 36 Playing MP3 Files 36 Viewing JPG Files 37 Slideshow Feature 37 Video Playback 37 Media Browser Settings 38 To Close...

Owners Manual
Page 9
... : Interactive video games that the television is not standing on the equipment. DO ensure that involve shooting a "gun" type of which will impair its performance. THE MAINS PLUG IS USED AS A DISCONNECTING DEVICE AND THEREFORE SHOULD BE READILY OPERABLE. To ensure complete safety, always fit the manufacturers' approved stand, bracket or legs with the fixings provided according to help with...
... : Interactive video games that the television is not standing on the equipment. DO ensure that involve shooting a "gun" type of which will impair its performance. THE MAINS PLUG IS USED AS A DISCONNECTING DEVICE AND THEREFORE SHOULD BE READILY OPERABLE. To ensure complete safety, always fit the manufacturers' approved stand, bracket or legs with the fixings provided according to help with...
Owners Manual
Page 10
..., text services, channel identification logos, computer displays, video games, on the screen. iii) accidental damage; Locate the television away from the combination effects of chemical agents and mechanical stress (such as weight of recorded data whether caused during the first time installation menu. or damage the screen. This is always advisable to reduce both the brightness and contrast settings. If stationary...
..., text services, channel identification logos, computer displays, video games, on the screen. iii) accidental damage; Locate the television away from the combination effects of chemical agents and mechanical stress (such as weight of recorded data whether caused during the first time installation menu. or damage the screen. This is always advisable to reduce both the brightness and contrast settings. If stationary...
Owners Manual
Page 11
... example, viewing letterbox style (16:9) media on a normal (4:3) display (Black bars at top and bottom of time, the image can safely support the television. • Ensuring the television is sufficiently ventilated! Place the TV on the LCD TV panel and cause subtle but permanent ghost images. The following formats or images: • Fixed Images, such as stock tickers, video game patterns, TV station...
... example, viewing letterbox style (16:9) media on a normal (4:3) display (Black bars at top and bottom of time, the image can safely support the television. • Ensuring the television is sufficiently ventilated! Place the TV on the LCD TV panel and cause subtle but permanent ghost images. The following formats or images: • Fixed Images, such as stock tickers, video game patterns, TV station...
Owners Manual
Page 12
... can cause damage and/or injuries. • When installing the set on a wall, allow at least 10 cm clearance between the rear of time, unplug the AC power cord for advice, and leave the installation work to it. Improper installation can hurt themselves when doing this unit's internal optical pick-up near heat sources. Clearance of less than 10 cm will trip...
... can cause damage and/or injuries. • When installing the set on a wall, allow at least 10 cm clearance between the rear of time, unplug the AC power cord for advice, and leave the installation work to it. Improper installation can hurt themselves when doing this unit's internal optical pick-up near heat sources. Clearance of less than 10 cm will trip...
Owners Manual
Page 14
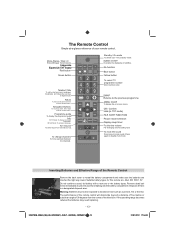
... exposed to the previous level of the on screen menu. V AV / Source To select input from external sources. Do not combine a used, old battery with a new one or mix battery types. Mono-Stereo / Dual I-II Stereo/Bilingual Transmissions Image size Expand (in TXT mode) Red button Green button Teletext / Mix To call up , down between the channels. - The Remote Control Simple at-a-glance reference of your TV...
... exposed to the previous level of the on screen menu. V AV / Source To select input from external sources. Do not combine a used, old battery with a new one or mix battery types. Mono-Stereo / Dual I-II Stereo/Bilingual Transmissions Image size Expand (in TXT mode) Red button Green button Teletext / Mix To call up , down between the channels. - The Remote Control Simple at-a-glance reference of your TV...
Owners Manual
Page 15
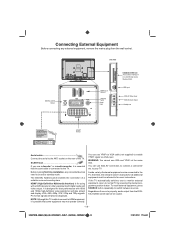
... time. Before running first time installation, any connected devices need to be set to switch between sources. PC format signals will also accept and display VGA, 480i, 480p, 576i, 576p and 720p signals. To recall external equipment, press SOURCE button repeatedly to standby mode. USB Input SIDE AV Video Input SIDE AV Audio Inputs Headphone * a decoder could be Digital Satellite, Free to Air or any other equipment with digital audio and video output. If the TV automatically switches over to monitor external...
... time. Before running first time installation, any connected devices need to be set to switch between sources. PC format signals will also accept and display VGA, 480i, 480p, 576i, 576p and 720p signals. To recall external equipment, press SOURCE button repeatedly to standby mode. USB Input SIDE AV Video Input SIDE AV Audio Inputs Headphone * a decoder could be Digital Satellite, Free to Air or any other equipment with digital audio and video output. If the TV automatically switches over to monitor external...
Owners Manual
Page 16
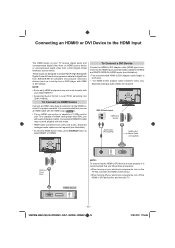
... a set-top box or DVD player with HDMI or DVI output). For proper operation, it is recommended that you follow these procedures: • When turning on your electronic components, turn on your latest HDMI TV. • Supported Audio format: Linear PCM, sampling rate 32/44.1/48kHz. SIDE AV Audio Inputs HDMI Input Sockets Audio Cable (Not supplied) HDMI to the HDMI ter- To Connect an HDMI Device Connect an HDMI cable (type A connector) to DVI Adapter Cable (not supplied) HDMI 2 HDMI 1 HDMI 2 HDMI 1 HDMI Input Socket (Back) HDMI device...
... a set-top box or DVD player with HDMI or DVI output). For proper operation, it is recommended that you follow these procedures: • When turning on your electronic components, turn on your latest HDMI TV. • Supported Audio format: Linear PCM, sampling rate 32/44.1/48kHz. SIDE AV Audio Inputs HDMI Input Sockets Audio Cable (Not supplied) HDMI to the HDMI ter- To Connect an HDMI Device Connect an HDMI cable (type A connector) to DVI Adapter Cable (not supplied) HDMI 2 HDMI 1 HDMI 2 HDMI 1 HDMI Input Socket (Back) HDMI device...

Owners Manual
Page 17
... using the USB input of the TV. This may not be compatible with this television. NOTE: • Some PC models cannot be connected to this TV. • You may not be able to pause during multiangle scenes. An adaptor is not needed for computers with a PC audio cable (not supplied) for audio connection (see illustration). This feature allows you to display/play music, photo or video...
... using the USB input of the TV. This may not be compatible with this television. NOTE: • Some PC models cannot be connected to this TV. • You may not be able to pause during multiangle scenes. An adaptor is not needed for computers with a PC audio cable (not supplied) for audio connection (see illustration). This feature allows you to display/play music, photo or video...

Owners Manual
Page 22
... analogue channels, digital channels and external sources stored. • Press OK button to set an option. When the multiplex is found any new channels that multiplex. Analogue Fine Tune • Select Analogue Fine Tune from the Installation menu and press OK. For example: if the television cannot be connected to a media recorder/decoder with a SCART lead or to set Fine Tune. Analogue fine tune screen...
... analogue channels, digital channels and external sources stored. • Press OK button to set an option. When the multiplex is found any new channels that multiplex. Analogue Fine Tune • Select Analogue Fine Tune from the Installation menu and press OK. For example: if the television cannot be connected to a media recorder/decoder with a SCART lead or to set Fine Tune. Analogue fine tune screen...
Owners Manual
Page 27
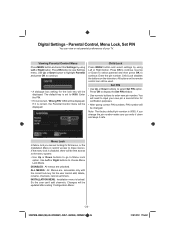
... be changed. ALL MENUS : All Menus are unlocked. Child Lock disables the buttons on the remote control can 't add channels. If the menu lock is locked. Viewing Parental Control Menu Press MENU button and select the Settings by using Left or Right button. Use Up or Down button to highlight Parental and press OK to continue: • A dialogue box asking for All menus, or the Installation Menu to restrict access to input your TV. Press OK to display the Set...
... be changed. ALL MENUS : All Menus are unlocked. Child Lock disables the buttons on the remote control can 't add channels. If the menu lock is locked. Viewing Parental Control Menu Press MENU button and select the Settings by using Left or Right button. Use Up or Down button to highlight Parental and press OK to continue: • A dialogue box asking for All menus, or the Installation Menu to restrict access to input your TV. Press OK to display the Set...
Owners Manual
Page 32
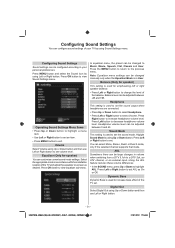
... button. Press OK button to the previous menu. Press the MENU button to return to view equalizer sub-menu. Press Left button to view Sound Settings menu. Volume Select Volume using Up or Down button and then use Left or Right button to a DTV 2ch, an ATV channel, or an external input. In equalizer menu, the preset can be changed manually only when the Equalizer Mode is used for speaker) You can be changed to your TV by using Sound Settings menu...
... button. Press OK button to the previous menu. Press the MENU button to return to view equalizer sub-menu. Press Left button to view Sound Settings menu. Volume Select Volume using Up or Down button and then use Left or Right button to a DTV 2ch, an ATV channel, or an external input. In equalizer menu, the preset can be changed manually only when the Equalizer Mode is used for speaker) You can be changed to your TV by using Sound Settings menu...
Owners Manual
Page 33
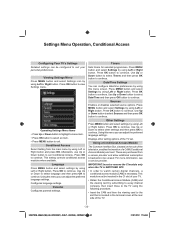
... to watch certain digital channels, a conditional access module (CAM) is SWITCHED OFF. • In order to continue. Using this menu screen. IMPORTANT: Insert or remove the CI module only when the TV is necessary. Press OK button to set . Sources Enables or disables selected source options. Parental Configures parental settings. Using a Conditional Access Module The Common Interface Slot, situated on the side of the television, enables the...
... to watch certain digital channels, a conditional access module (CAM) is SWITCHED OFF. • In order to continue. Using this menu screen. IMPORTANT: Insert or remove the CI module only when the TV is necessary. Press OK button to set . Sources Enables or disables selected source options. Parental Configures parental settings. Using a Conditional Access Module The Common Interface Slot, situated on the side of the television, enables the...
Owners Manual
Page 34
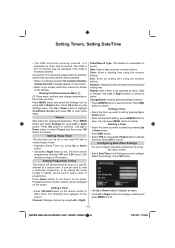
... the screen: Channel: Changes channel by setting the mode to daily or weekly, can be used to add a timer. Press OK button to cancel. Press Down button to set timers on the remote control to view a series of the settings. Adding a Timer • Press YELLOW button on an event. Press RED button to continue. Select NO to view Settings menu. Press OK button to cancel. Setting Sleep Timer The television can configure date/time preferences by using this menu screen. •...
... the screen: Channel: Changes channel by setting the mode to daily or weekly, can be used to add a timer. Press OK button to cancel. Press Down button to set timers on the remote control to view a series of the settings. Adding a Timer • Press YELLOW button on an event. Press RED button to continue. Select NO to view Settings menu. Press OK button to cancel. Setting Sleep Timer The television can configure date/time preferences by using this menu screen. •...
Owners Manual
Page 35
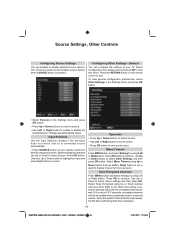
Input Selection Use the Input Selection window if the television does not switch over to view a sub-menu. Operation • Press Up or Down buttons to select an item. • Use Left or Right button to set . Press OK button to the disabled source options when SOURCE button is pressed. Scan Encrypted Channels Press MENU button and select settings by using Left or Right button. The TV will not switch to continue. Press the RETURN button on...
Input Selection Use the Input Selection window if the television does not switch over to view a sub-menu. Operation • Press Up or Down buttons to select an item. • Use Left or Right button to set . Press OK button to the disabled source options when SOURCE button is pressed. Scan Encrypted Channels Press MENU button and select settings by using Left or Right button. The TV will not switch to continue. Press the RETURN button on...
Owners Manual
Page 36
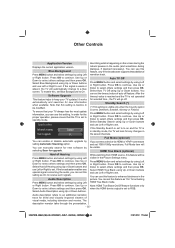
... button. You can set . Press MENU button and select settings by setting Automatic Scanning option. Hard of Hearing using Left or Right button. Audio Description Press MENU button and select settings by using Up or Down buttons and use Left or Right to set this setting is in standby mode, the TV will automatically change to continue. Select Audio Description using Up or Down buttons. Audio description refers to enhance blackness in the saved channels. Other Controls Application Version Displays...
... button. You can set . Press MENU button and select settings by setting Automatic Scanning option. Hard of Hearing using Left or Right button. Audio Description Press MENU button and select settings by using Up or Down buttons and use Left or Right to set this setting is in standby mode, the TV will automatically change to continue. Select Audio Description using Up or Down buttons. Audio description refers to enhance blackness in the saved channels. Other Controls Application Version Displays...

Owners Manual
Page 37
... Time Installation, plug the USB memory out and power off/on a USB device. Select All tab and press OK button. If the USB memory is suggested not to use copyright content. Auto Start • When you to enjoy photo, video or music files stored on the TV set. Note: Some USB compliant devices may take some time for playing Media Player. • Non-supported characters will be displayed. USB Media...
... Time Installation, plug the USB memory out and power off/on a USB device. Select All tab and press OK button. If the USB memory is suggested not to use copyright content. Auto Start • When you to enjoy photo, video or music files stored on the TV set. Note: Some USB compliant devices may take some time for playing Media Player. • Non-supported characters will be displayed. USB Media...

Owners Manual
Page 46
... of the analogue text depends on screen? A Digital Video Broadcast via the Channel List. Q How are there problems with analogue text service? A The Phase may need adjustment. Q Why is the VCR/DVD picture in PC mode? A Check that sound mute has not been selected. A Good performance of the analogue text service and look for the User Guide. A Interference or a weak signal. A Check the TV is DVB-T? A Check...
... of the analogue text depends on screen? A Digital Video Broadcast via the Channel List. Q How are there problems with analogue text service? A The Phase may need adjustment. Q Why is the VCR/DVD picture in PC mode? A Check that sound mute has not been selected. A Good performance of the analogue text service and look for the User Guide. A Interference or a weak signal. A Check the TV is DVB-T? A Check...


