
Printable Spec Sheet
Page 2
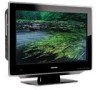
...up and disc design. Government. The DVD player in this TV may be recorded using CD-DA method for MP3 files is a registered trademark of Toshiba America Consumer Products, L.L.C. See owner's manual for more information....Toshiba America Consumer Products, L.L.C. 82 Totowa Road, Wayne, NJ 07470 (2009). and are used under license. 26LV610U Specifications TV Screen Size ATSC/NTSC/QAM Digital Tuning Pixel Resolution Aspect Ratio Brightness Contrast Ratio Comb Filter Viewing Angles H/V Response Time Cinema Mode 3 Mode Picture Size Adjustment 26.0" diagonal widescreen TFT LCD...
...up and disc design. Government. The DVD player in this TV may be recorded using CD-DA method for MP3 files is a registered trademark of Toshiba America Consumer Products, L.L.C. See owner's manual for more information....Toshiba America Consumer Products, L.L.C. 82 Totowa Road, Wayne, NJ 07470 (2009). and are used under license. 26LV610U Specifications TV Screen Size ATSC/NTSC/QAM Digital Tuning Pixel Resolution Aspect Ratio Brightness Contrast Ratio Comb Filter Viewing Angles H/V Response Time Cinema Mode 3 Mode Picture Size Adjustment 26.0" diagonal widescreen TFT LCD...
Owner's Manual - English
Page 6
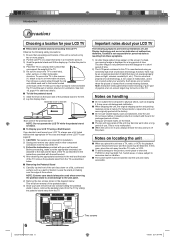
...NOTE: Extreme care should always be distorted. hot, humid areas; Confirm the pivot is displayed for a long period of time. therefore, Toshiba is not responsible for perceived defects resulting from these symptoms. 1) An after image (ghost) may not work on locating the unit ■ When... near a TV, radio, or VCR, the playback picture may cause unit damage and malfunction. ■ When shipping the unit, the original shipping carton and packing materials come in contact with the unit for prolonged periods of time. In this TV is folded. ■ To Display your LCD TV using an ...
...NOTE: Extreme care should always be distorted. hot, humid areas; Confirm the pivot is displayed for a long period of time. therefore, Toshiba is not responsible for perceived defects resulting from these symptoms. 1) An after image (ghost) may not work on locating the unit ■ When... near a TV, radio, or VCR, the playback picture may cause unit damage and malfunction. ■ When shipping the unit, the original shipping carton and packing materials come in contact with the unit for prolonged periods of time. In this TV is folded. ■ To Display your LCD TV using an ...
Owner's Manual - English
Page 7
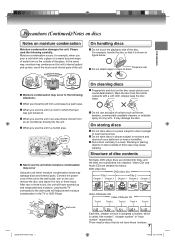
...Exacmopnldeeonfsmatoioisnt!ure Optical pick-up and evaporated any type of the disc. Wait! Store discs vertically in the TV or DVD Player. There may occur in an area where cold air from an air conditioner directly hits ...discs Fingerprints and dust on moisture condensation Moisture condensation damages the unit. When you use any moisture. Leaving the TV connected to the wall outlet, turn on discs outside of their case may damage discs and internal parts. For .... Introduction Precautions (Continued)/Notes on discs Notes on the disc cause picture and sound deterioration.
...Exacmopnldeeonfsmatoioisnt!ure Optical pick-up and evaporated any type of the disc. Wait! Store discs vertically in the TV or DVD Player. There may occur in an area where cold air from an air conditioner directly hits ...discs Fingerprints and dust on moisture condensation Moisture condensation damages the unit. When you use any moisture. Leaving the TV connected to the wall outlet, turn on discs outside of their case may damage discs and internal parts. For .... Introduction Precautions (Continued)/Notes on discs Notes on the disc cause picture and sound deterioration.
Owner's Manual - English
Page 8
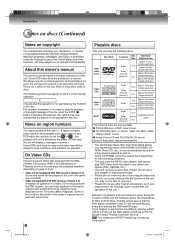
...(double sided disc) Approx. 80 minutes (single sided disc) 8 cm Approx. 160 minutes (double sided disc) Video CDs DIGITAL VIDEO Audio + Video (moving pictures) 12 cm Approx. 74 minutes (single sided disc) 8 cm Approx. 20 minutes (single sided disc) Audio CDs Audio 12 cm Approx. 74 minutes (single ... the creation of DVD and CD Software and/or the manufacture of DVD and CD discs, Toshiba cannot assure that the DVD player contained in this unit in this TV, please contact Toshiba Customer Service. The following discs. Notes on region numbers The region number of this unit. ...
...(double sided disc) Approx. 80 minutes (single sided disc) 8 cm Approx. 160 minutes (double sided disc) Video CDs DIGITAL VIDEO Audio + Video (moving pictures) 12 cm Approx. 74 minutes (single sided disc) 8 cm Approx. 20 minutes (single sided disc) Audio CDs Audio 12 cm Approx. 74 minutes (single ... the creation of DVD and CD Software and/or the manufacture of DVD and CD discs, Toshiba cannot assure that the DVD player contained in this unit in this TV, please contact Toshiba Customer Service. The following discs. Notes on region numbers The region number of this unit. ...
Owner's Manual - English
Page 9
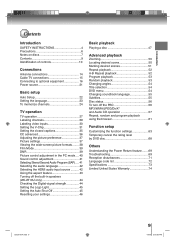
...channels 24 TV operation TV operation 27 Labeling channels 29 Labeling video inputs 30 Setting the V-Chip 31 Setting the closed captions 35 CC advanced 36 Adjusting the picture preference 37 Picture settings 37 Viewing the wide-screen picture formats........ 38 Film Mode 39 DNR 39 Picture control ...adjustment in the PC mode .... 40 Sound control adjustment 41 Selecting Stereo/Second Audio Program (SAP) .... 41 Selecting the audio language 42 Selecting the HDMI audio input source .......... 42 Using the aspect feature 43 Turning off the built-in speakers (26LV610U ...
...channels 24 TV operation TV operation 27 Labeling channels 29 Labeling video inputs 30 Setting the V-Chip 31 Setting the closed captions 35 CC advanced 36 Adjusting the picture preference 37 Picture settings 37 Viewing the wide-screen picture formats........ 38 Film Mode 39 DNR 39 Picture control ...adjustment in the PC mode .... 40 Sound control adjustment 41 Selecting Stereo/Second Audio Program (SAP) .... 41 Selecting the audio language 42 Selecting the HDMI audio input source .......... 42 Using the aspect feature 43 Turning off the built-in speakers (26LV610U ...

Owner's Manual - English
Page 17
... supplied) (white) Audio cable (not supplied) (red) To COLORSTREAM HD AUDIO (L/R) IN When using ColorStream® (component video). Connecting your TV/DVD to a component video compatible DVD player, such as shown below. In this unit are connected at the same time, the S-video cable takes... using the Component video cable, an Audio cable must also connect the audio cables to the AUDIO IN jacks as a Toshiba DVD player with ColorStream® can greatly enhance picture quality and performance. VCR with S-Video (playback) (white) Back side To S-VIDEO OUT To Audio (L/R) OUT (red...
... supplied) (white) Audio cable (not supplied) (red) To COLORSTREAM HD AUDIO (L/R) IN When using ColorStream® (component video). Connecting your TV/DVD to a component video compatible DVD player, such as shown below. In this unit are connected at the same time, the S-video cable takes... using the Component video cable, an Audio cable must also connect the audio cables to the AUDIO IN jacks as a Toshiba DVD player with ColorStream® can greatly enhance picture quality and performance. VCR with S-Video (playback) (white) Back side To S-VIDEO OUT To Audio (L/R) OUT (red...
Owner's Manual - English
Page 18
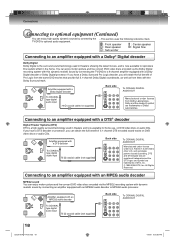
... 18 1/5/09 3:02:55 PM Connecting to an amplifier equipped with an MPEG audio decoder MPEG2 sound You can enjoy motion picture and live concert DVD video discs encoded via the Dolby Digital recording system with this dynamic realistic sound by connecting an amplifier ...64257;er equipped with a Dolby Digital decoder or Dolby Digital processor. You can enjoy motion picture and live concert DVD video discs encoded via the MPEG2 recording system with dynamic realistic sound by connecting the TV/DVD to an amplifier equipped with the Dolby Surround mark. Patent #: 5,451...
... 18 1/5/09 3:02:55 PM Connecting to an amplifier equipped with an MPEG audio decoder MPEG2 sound You can enjoy motion picture and live concert DVD video discs encoded via the Dolby Digital recording system with this dynamic realistic sound by connecting an amplifier ...64257;er equipped with a Dolby Digital decoder or Dolby Digital processor. You can enjoy motion picture and live concert DVD video discs encoded via the MPEG2 recording system with dynamic realistic sound by connecting the TV/DVD to an amplifier equipped with the Dolby Surround mark. Patent #: 5,451...
Owner's Manual - English
Page 22
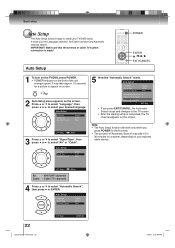
Note: • The Auto Setup function will work only when you press POWER for a picture to appear on screen. 2 Auto Setup menu appears on the screen. Cable TV channels 4 Press ▲ or ▼ to select "Air" or "Cable". It may take approx. 10 seconds for the first time. • ... ◀ or ▶ to select "Automatic Search", then press ▶ or ENTER. Auto Setup POWER ENTER / / / EXIT/CANCEL 1 To turn on the TV/DVD, press POWER. • POWER indicator on the front of "Automatic Search" may take 15 to 30 minutes to select your desired language. Press ▲...
Note: • The Auto Setup function will work only when you press POWER for a picture to appear on screen. 2 Auto Setup menu appears on the screen. Cable TV channels 4 Press ▲ or ▼ to select "Air" or "Cable". It may take approx. 10 seconds for the first time. • ... ◀ or ▶ to select "Automatic Search", then press ▶ or ENTER. Auto Setup POWER ENTER / / / EXIT/CANCEL 1 To turn on the TV/DVD, press POWER. • POWER indicator on the front of "Automatic Search" may take 15 to 30 minutes to select your desired language. Press ▲...

Owner's Manual - English
Page 23
... the unit changes green. The TV menu screen will return to the normal screen. Main Menu Picture Audio Channel Lock Setup : Select ENTER:Set 3 Press ▲ or ▼ to select "Setup", then press ▶ or ENTER. Note: • If no buttons are pressed for a picture to appear on screen. 4 ... MENU screen will appear. Press ▲ or ▼ to select "Language". Setup Closed Caption Language Video Label Auto Shut Off Aspect TOSHIBA Logo Light Reset >> English >> Off On On >> : Select : Adjust 5 Press EXIT/CANCEL to return to normal operation automatically. • The...
... the unit changes green. The TV menu screen will return to the normal screen. Main Menu Picture Audio Channel Lock Setup : Select ENTER:Set 3 Press ▲ or ▼ to select "Setup", then press ▶ or ENTER. Note: • If no buttons are pressed for a picture to appear on screen. 4 ... MENU screen will appear. Press ▲ or ▼ to select "Language". Setup Closed Caption Language Video Label Auto Shut Off Aspect TOSHIBA Logo Light Reset >> English >> Off On On >> : Select : Adjust 5 Press EXIT/CANCEL to return to normal operation automatically. • The...

Owner's Manual - English
Page 24
...or ENTER. Before selecting channels, they must be programmed into memory, skipping over unwanted channels. The TV menu screen will appear. The TV menu screen will appear. Main Menu Picture Audio Channel Lock Setup : Select ENTER:Set 1 Press MENU in your area. Auto Ch Memory ...memorizing all the channels available in the TV mode. VHF/UHF channels Cable - Auto Ch Memory Signal Type Automatic Search Cable Start 4 Press ◀ or ▶ to select "Auto Ch Memory", then press ▶ or ENTER. Main Menu Picture Audio Channel Lock Setup : Select ENTER:...
...or ENTER. Before selecting channels, they must be programmed into memory, skipping over unwanted channels. The TV menu screen will appear. The TV menu screen will appear. Main Menu Picture Audio Channel Lock Setup : Select ENTER:Set 1 Press MENU in your area. Auto Ch Memory ...memorizing all the channels available in the TV mode. VHF/UHF channels Cable - Auto Ch Memory Signal Type Automatic Search Cable Start 4 Press ◀ or ▶ to select "Auto Ch Memory", then press ▶ or ENTER. Main Menu Picture Audio Channel Lock Setup : Select ENTER:...
Owner's Manual - English
Page 25
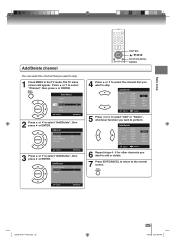
... Press ◀ or ▶ to select "Add" or "Delete", whichever function you want to select "Add/Delete", then press ▶ or ENTER. Main Menu Picture Audio Channel Lock Setup : Select ENTER:Set 2 Press ▲ or ▼ to perform. Add/Delete Adding Channel >> Add/Delete >> Clear All >> ENTER /... you want to skip. Basic setup Add/Delete channel You can select the channel that you want to skip. 1 Press MENU in the TV mode. The TV menu screen will appear. Channel Add/Delete >> DTV Signal >> Auto Ch Memory >> Ch Label >> : Select ENTER:Set 3 Press &#...
... Press ◀ or ▶ to select "Add" or "Delete", whichever function you want to select "Add/Delete", then press ▶ or ENTER. Main Menu Picture Audio Channel Lock Setup : Select ENTER:Set 2 Press ▲ or ▼ to perform. Add/Delete Adding Channel >> Add/Delete >> Clear All >> ENTER /... you want to skip. Basic setup Add/Delete channel You can select the channel that you want to skip. 1 Press MENU in the TV mode. The TV menu screen will appear. Channel Add/Delete >> DTV Signal >> Auto Ch Memory >> Ch Label >> : Select ENTER:Set 3 Press &#...

Owner's Manual - English
Page 26
...9660; to select "Add/Delete", then press ▶ or ENTER. Main Menu Picture Audio Channel Lock Setup : Select ENTER:Set 3 Press ▲ or ▼ to select "Add/Delete", then press ▶ or ENTER. The TV menu screen will be added into the channel memory. 1 Tune in the new ...channel. 2 Press MENU in the TV mode. Channel Add/Delete >> DTV Signal >> Auto Ch Memory >> Ch Label >> : Select ENTER:Set 3 Press ▲ or ▼ to the normal screen. 26 52G0101A P14-29.indd 26 1/5/09 3:03:05 PM Add/Delete Adding Channel >> Add/Delete...
...9660; to select "Add/Delete", then press ▶ or ENTER. Main Menu Picture Audio Channel Lock Setup : Select ENTER:Set 3 Press ▲ or ▼ to select "Add/Delete", then press ▶ or ENTER. The TV menu screen will be added into the channel memory. 1 Tune in the new ...channel. 2 Press MENU in the TV mode. Channel Add/Delete >> DTV Signal >> Auto Ch Memory >> Ch Label >> : Select ENTER:Set 3 Press ▲ or ▼ to the normal screen. 26 52G0101A P14-29.indd 26 1/5/09 3:03:05 PM Add/Delete Adding Channel >> Add/Delete...
Owner's Manual - English
Page 27
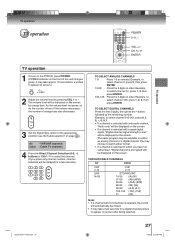
... the screen. • If a channel is selected with no broadcast is selected, the sound will be delayed for a picture to appear on page 24 ). VOL +/- CH / ENTER TV operation TV operation 1 To turn on the TV/DVD, press POWER. (POWER indicator on the screen by orange bars. As the volume level increases, so do...
... the screen. • If a channel is selected with no broadcast is selected, the sound will be delayed for a picture to appear on page 24 ). VOL +/- CH / ENTER TV operation TV operation 1 To turn on the TV/DVD, press POWER. (POWER indicator on the screen by orange bars. As the volume level increases, so do...
Owner's Manual - English
Page 28
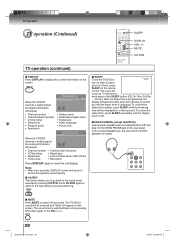
...English Mono Full 480i • Station name • Broadcast program name • Signal type • Audio language • Picture size 14 Analog Cable Sleep Timer Off When the TV/DVD receives a analog signal, the analog information Mono Full 480i will return to the last channel selected by pressing this button... 62-001 HDTV Moving Picture1 CH-1 Digital Air No Program Information is muted. ■ MUTE Press MUTE to Off. ■ HEAD PHONES (except 26LV610U) Insert a stereo headphones (not supplied) with a 1/8" mini plug into the HEAD PHONE jack on the rear panel.
...English Mono Full 480i • Station name • Broadcast program name • Signal type • Audio language • Picture size 14 Analog Cable Sleep Timer Off When the TV/DVD receives a analog signal, the analog information Mono Full 480i will return to the last channel selected by pressing this button... 62-001 HDTV Moving Picture1 CH-1 Digital Air No Program Information is muted. ■ MUTE Press MUTE to Off. ■ HEAD PHONES (except 26LV610U) Insert a stereo headphones (not supplied) with a 1/8" mini plug into the HEAD PHONE jack on the rear panel.
Owner's Manual - English
Page 29
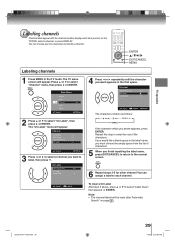
TV operation Labeling channels Channel label appear with the channel number display each channel. : Select : Adjust To clear a Ch Label After step 3 above, press ▲ or ▼ to select "Label Clear", then press ▶ or ENTER. Main Menu Picture Audio Channel Lock Setup : Select ENTER:Set 2 Press... ▲ or ▼ to select "Channel" menu, then press ▶ or ENTER. Repeat this step to enter the rest of characters. 5 When you want to label, then press ▼. The TV menu screen will ...
TV operation Labeling channels Channel label appear with the channel number display each channel. : Select : Adjust To clear a Ch Label After step 3 above, press ▲ or ▼ to select "Label Clear", then press ▶ or ENTER. Main Menu Picture Audio Channel Lock Setup : Select ENTER:Set 2 Press... ▲ or ▼ to select "Channel" menu, then press ▶ or ENTER. Repeat this step to enter the rest of characters. 5 When you want to label, then press ▼. The TV menu screen will ...
Owner's Manual - English
Page 30
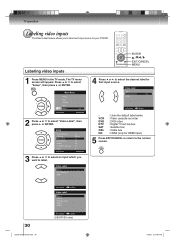
Main Menu Picture Audio Channel Lock Setup : Select ENTER:Set 2 Press ▲ or ▼ to select ...HDMI - : Select : Adjust - Video Label Video - HDMI 1 - Setup Closed Caption Language Video Label Auto Shut Off Aspect TOSHIBA Logo Light Reset : Select >> English >> Off On On >> ENTER:Set 3 Press ▲ or ▼ to select ... which you to label each input source for your TV/DVD. HDMI 2 - : Select : Adjust (26LV610U only) 1/5/09 3:04:00 PM Video 2 - The TV menu screen will appear. ColorStream HD - TV operation Labeling video inputs The Video Label feature allows ...
Main Menu Picture Audio Channel Lock Setup : Select ENTER:Set 2 Press ▲ or ▼ to select ...HDMI - : Select : Adjust - Video Label Video - HDMI 1 - Setup Closed Caption Language Video Label Auto Shut Off Aspect TOSHIBA Logo Light Reset : Select >> English >> Off On On >> ENTER:Set 3 Press ▲ or ▼ to select ... which you to label each input source for your TV/DVD. HDMI 2 - : Select : Adjust (26LV610U only) 1/5/09 3:04:00 PM Video 2 - The TV menu screen will appear. ColorStream HD - TV operation Labeling video inputs The Video Label feature allows ...
Owner's Manual - English
Page 31
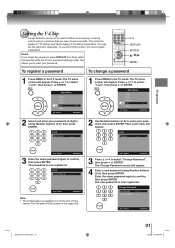
Notes: If you to restrict children from viewing or hearing violent scenes or pictures that you must register a password. Main Menu Picture Audio Channel Lock Setup : Select ENTER:Set 1 Press MENU in the TV mode. The Change Password screen will appear. You may choose to select "...1/5/09 3:04:03 PM The password is available only for the U.S. Main Menu Picture Audio Channel Lock Setup : Select ENTER:Set 2 Select and enter your password, then press ENTER. V-Chip system. The TV menu screen will appear. 4 Enter a new password using Number buttons (0-9), then...
Notes: If you to restrict children from viewing or hearing violent scenes or pictures that you must register a password. Main Menu Picture Audio Channel Lock Setup : Select ENTER:Set 1 Press MENU in the TV mode. The Change Password screen will appear. You may choose to select "...1/5/09 3:04:03 PM The password is available only for the U.S. Main Menu Picture Audio Channel Lock Setup : Select ENTER:Set 2 Select and enter your password, then press ENTER. V-Chip system. The TV menu screen will appear. 4 Enter a new password using Number buttons (0-9), then...
Owner's Manual - English
Page 32
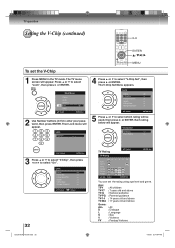
... >> V-Chip Clear >> Change Password >> : Select : Adjust 32 52G0101A P30-36.indd 32 TV Rating : Select TV Rating ALL D L S V FV TV-Y TV-Y7 TV-G TV-PG TV-14 TV-MA : Select ENTER:Set ENTER: Set You can set the V-Chip 1 Press MENU in the TV mode. Main Menu Picture Audio Channel Lock Setup : Select ENTER:Set 2 Use Number buttons (0-9) to select...
... >> V-Chip Clear >> Change Password >> : Select : Adjust 32 52G0101A P30-36.indd 32 TV Rating : Select TV Rating ALL D L S V FV TV-Y TV-Y7 TV-G TV-PG TV-14 TV-MA : Select ENTER:Set ENTER: Set You can set the V-Chip 1 Press MENU in the TV mode. Main Menu Picture Audio Channel Lock Setup : Select ENTER:Set 2 Use Number buttons (0-9) to select...
Owner's Manual - English
Page 33
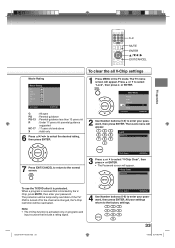
..."Lock", then press ▶ or ENTER. When a program is changed, the V-Chip restriction will be temporarily overridden. The TV menu screen will appear. Main Menu Picture Audio Channel Lock Setup : Select ENTER:Set 2 Use Number buttons (0-9) to select "V-Chip Clear", then press ▶ or ...ENTER. • The Password screen will be reactivated. V-Chip Clear Password ---- If the TV/ DVD is turned off or the ...
..."Lock", then press ▶ or ENTER. When a program is changed, the V-Chip restriction will be temporarily overridden. The TV menu screen will appear. Main Menu Picture Audio Channel Lock Setup : Select ENTER:Set 2 Use Number buttons (0-9) to select "V-Chip Clear", then press ▶ or ...ENTER. • The Password screen will be reactivated. V-Chip Clear Password ---- If the TV/ DVD is turned off or the ...
Owner's Manual - English
Page 34
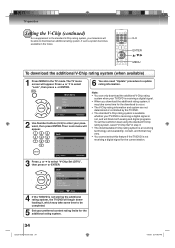
Main Menu Picture Audio Channel Lock Setup : Select ENTER:Set 2 Use Number buttons (0-9) to select "Lock", then press ▶ or ENTER. Press ▲ or ▼ to enter your password, then press ENTER. TV operation Setting the V-Chip (continued) As a supplement to the standard V-Chip rating system, your... "V-Chip Set (DTV)", then press ▶ or ENTER. Note: • You can only download the additional V-Chip rating system when your TV/DVD is receiving a digital signal. • When you download the additional rating system, it , which may vary. • You cannot select...
Main Menu Picture Audio Channel Lock Setup : Select ENTER:Set 2 Use Number buttons (0-9) to select "Lock", then press ▶ or ENTER. Press ▲ or ▼ to enter your password, then press ENTER. TV operation Setting the V-Chip (continued) As a supplement to the standard V-Chip rating system, your... "V-Chip Set (DTV)", then press ▶ or ENTER. Note: • You can only download the additional V-Chip rating system when your TV/DVD is receiving a digital signal. • When you download the additional rating system, it , which may vary. • You cannot select...


