Brochure
Page 1
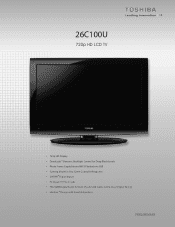
26C100U 720p HD LCD TV • 720p HD Display • DynaLight™ Dynamic Backlight Control for Deep Black Levels • Photo Frame Capability and MP3 Playback via USB • Gaming Mode for Fast Game Controller Response • 2 HDMI® Digital Inputs • PC Input (15 Pin, D-sub) • TSC/QAM Digital Tuner for Over-the-Air and Cable-in-the-Clear Digital Tuning • Horizon™ Design with Invisible Speakers PRELIMINARY
26C100U 720p HD LCD TV • 720p HD Display • DynaLight™ Dynamic Backlight Control for Deep Black Levels • Photo Frame Capability and MP3 Playback via USB • Gaming Mode for Fast Game Controller Response • 2 HDMI® Digital Inputs • PC Input (15 Pin, D-sub) • TSC/QAM Digital Tuner for Over-the-Air and Cable-in-the-Clear Digital Tuning • Horizon™ Design with Invisible Speakers PRELIMINARY
Brochure
Page 2
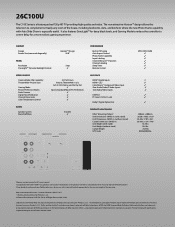
... Full, 4:3 HD, Native and Dot by manufacturer. The new attractive Horizon™ design allows this television to wall mount your Toshiba television, always use a UL Listed wall bracket appropriate for limited functions. 4If you decide to complement virtually any room of the house... kitchens where the new Photo Frame capability with stand) Unit Dimensions (WHD) in . VESA is a feature packed 720p HD TV providing high quality and value. 26C100U The C100 Series is a registered trademark of Video Electronics Standards Association. Some products will vary by Dot 3 Sports/Standard/Movie...
... Full, 4:3 HD, Native and Dot by manufacturer. The new attractive Horizon™ design allows this television to wall mount your Toshiba television, always use a UL Listed wall bracket appropriate for limited functions. 4If you decide to complement virtually any room of the house... kitchens where the new Photo Frame capability with stand) Unit Dimensions (WHD) in . VESA is a feature packed 720p HD TV providing high quality and value. 26C100U The C100 Series is a registered trademark of Video Electronics Standards Association. Some products will vary by Dot 3 Sports/Standard/Movie...
User Manual
Page 1
... Television HIGH-DEFINITION TELEVISION 19C100U 19C10U 22C100U 22C10U 26C100U 26C10U 32C100U 32C10U For an overview of your new TV, see page10. For details, please contact your TV antenna installer, cable provider, or satellite provider. © 2010 TOSHIBA CORPORATION All Rights Reserved Owner's Record The model... number and serial number are on the back of steps for setting up your TV. Model number: Serial number: HDA51C1901I Record these numbers whenever you communicate with your Toshiba dealer about this TV. Refer to these numbers in the spaces below. Note: To display a High...
... Television HIGH-DEFINITION TELEVISION 19C100U 19C10U 22C100U 22C10U 26C100U 26C10U 32C100U 32C10U For an overview of your new TV, see page10. For details, please contact your TV antenna installer, cable provider, or satellite provider. © 2010 TOSHIBA CORPORATION All Rights Reserved Owner's Record The model... number and serial number are on the back of steps for setting up your TV. Model number: Serial number: HDA51C1901I Record these numbers whenever you communicate with your Toshiba dealer about this TV. Refer to these numbers in the spaces below. Note: To display a High...

User Manual
Page 2
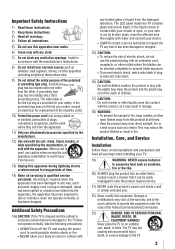
... reference. As you decide to wall mount your flat panel display, always: • Use a mount that can easily be taken to persons. TOSHIBA Cares! • The consumer electronics industry is a reminder to call the CATV system installer's attention to making home entertainment enjoyable and safe. Wall...be taken to route all enclosed instructions for proper use a UL Listed wall bracket appropriate for the safe installation and use of this Toshiba LCD TV. WARNING: If you use the many exciting features of your flat panel display. • Carefully read and understand all cords and ...
... reference. As you decide to wall mount your flat panel display, always: • Use a mount that can easily be taken to persons. TOSHIBA Cares! • The consumer electronics industry is a reminder to call the CATV system installer's attention to making home entertainment enjoyable and safe. Wall...be taken to route all enclosed instructions for proper use a UL Listed wall bracket appropriate for the safe installation and use of this Toshiba LCD TV. WARNING: If you use the many exciting features of your flat panel display. • Carefully read and understand all cords and ...
User Manual
Page 3
... and consult your body to operate this apparatus near any ventilation openings. If the liquid comes in contact with the apparatus. Never place the TV on or pinched, particularly at all times. • Keep the product away from the damaged television. If the provided plug does not fit...22) Never modify this equipment. A polarized Wide blade plug has two blades with the plastic bag. Additional Safety Precautions 14a) CAUTION: If the TV is required when the apparatus has been damaged in accordance with any way, such as power-supply cord or plug is located in such a manner...
... and consult your body to operate this apparatus near any ventilation openings. If the liquid comes in contact with the apparatus. Never place the TV on or pinched, particularly at all times. • Keep the product away from the damaged television. If the provided plug does not fit...22) Never modify this equipment. A polarized Wide blade plug has two blades with the plastic bag. Additional Safety Precautions 14a) CAUTION: If the TV is required when the apparatus has been damaged in accordance with any way, such as power-supply cord or plug is located in such a manner...
User Manual
Page 4
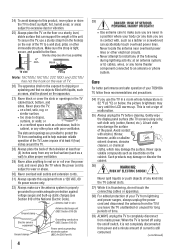
... room whose temperature is thundering, do not touch the connecting cables or apparatus. 38) For added protection of your body (or any of your TOSHIBA TV, follow these recommendations and precautions: 34) If you use a sturdy strap from the hook(s) on the floor or a sturdy, level, stable ... the LCD warms up static charges (see Section 810 of the television at least four (4) inches away from overheating and to protect the TV from any other electrical circuits. • Never attempt to an antenna or phone system. Never spray volatile compounds such as a ladder or...
... room whose temperature is thundering, do not touch the connecting cables or apparatus. 38) For added protection of your body (or any of your TOSHIBA TV, follow these recommendations and precautions: 34) If you use a sturdy strap from the hook(s) on the floor or a sturdy, level, stable ... the LCD warms up static charges (see Section 810 of the television at least four (4) inches away from overheating and to protect the TV from any other electrical circuits. • Never attempt to an antenna or phone system. Never spray volatile compounds such as a ladder or...
User Manual
Page 5
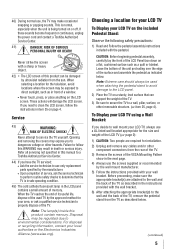
...unplug the power cord and contact a Toshiba Authorized Service Center. 41) DANGER: RISK OF SERIOUS PERSONAL INJURY OR DEATH! Never attempt to dangerous voltage or other hazards. Failure to follow the instructions in item 35 on a sturdy, level surface that the TV is being turned on a flat, ... all servicing not specified in the LCD panel contains a small amount of the TV. Note: The lamp(s) inside this manual to a Toshiba Authorized Service Center. 44) If you decide to wall mount your LCD TV, always use only replacement parts specified by the wall mount manufacturer. 5) Follow the...
...unplug the power cord and contact a Toshiba Authorized Service Center. 41) DANGER: RISK OF SERIOUS PERSONAL INJURY OR DEATH! Never attempt to dangerous voltage or other hazards. Failure to follow the instructions in item 35 on a sturdy, level surface that the TV is being turned on a flat, ... all servicing not specified in the LCD panel contains a small amount of the TV. Note: The lamp(s) inside this manual to a Toshiba Authorized Service Center. 44) If you decide to wall mount your LCD TV, always use only replacement parts specified by the wall mount manufacturer. 5) Follow the...
User Manual
Page 6
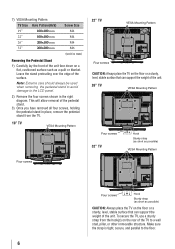
...Make sure the strap is tight, secure, and parallel to the floor. 6 To secure the TV, use a sturdy strap from the TV. 19" TV VESA Mounting Pattern 22" TV VESA Mounting Pattern Four screws CAUTION: Always place the TV on the floor or a sturdy, level, stable surface that can support the weight of the unit...26" 200x100 mm 32" 200x200 mm Screw Size M4 M4 M4 M6 (unit in mm) Removing the Pedestal Stand 1) Carefully lay the front of the TV to a wall stud, pillar, or other immovable structure. This will allow removal of the pedestal stand. 3) Once you have removed all four screws, ...
...Make sure the strap is tight, secure, and parallel to the floor. 6 To secure the TV, use a sturdy strap from the TV. 19" TV VESA Mounting Pattern 22" TV VESA Mounting Pattern Four screws CAUTION: Always place the TV on the floor or a sturdy, level, stable surface that can support the weight of the unit...26" 200x100 mm 32" 200x200 mm Screw Size M4 M4 M4 M6 (unit in mm) Removing the Pedestal Stand 1) Carefully lay the front of the TV to a wall stud, pillar, or other immovable structure. This will allow removal of the pedestal stand. 3) Once you have removed all four screws, ...
User Manual
Page 7
... • Manufactured under your television is recommended for a long period of time. However, there is not responsible for help. ENERGY STAR® qualified TV. Ph: 1-800-631-3811 Note: This equipment has been tested and found to radio or television reception, which the receiver is connected. • Consult...] picture mode. [Standard] mode is operating at an onscreen target may cause undesired operation. FCC Declaration of Conformity Compliance Statement (Part 15): The Toshiba 19C100U, 19C10U, 22C100U, 22C10U, 26C100U, 26C10U, 32C100U, and 32C10U Televisions comply with this...
... • Manufactured under your television is recommended for a long period of time. However, there is not responsible for help. ENERGY STAR® qualified TV. Ph: 1-800-631-3811 Note: This equipment has been tested and found to radio or television reception, which the receiver is connected. • Consult...] picture mode. [Standard] mode is operating at an onscreen target may cause undesired operation. FCC Declaration of Conformity Compliance Statement (Part 15): The Toshiba 19C100U, 19C10U, 22C100U, 22C10U, 26C100U, 26C10U, 32C100U, and 32C10U Televisions comply with this...
User Manual
Page 8
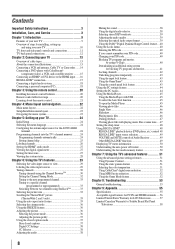
...Main menu layout 22 Setup/Installation menu layout 23 Navigating the menu system 23 Chapter 5: Setting up your TV 24 Initial Setup 24 Selecting the menu language 24 Configuring the antenna input source for the ANT/CABLE terminal 24...Viewing the digital signal meter 27 Setting the time zone 27 Viewing the system status 28 Chapter 6: Using the TV's features 29 Selecting the video input source to view 29 Labeling the video input sources 29 Tuning channels 30 ...56 Limited United States Warranty for LCD Televisions 57 Limited Canadian Warranty for Toshiba Brand Flat Panel Televisions 58
...Main menu layout 22 Setup/Installation menu layout 23 Navigating the menu system 23 Chapter 5: Setting up your TV 24 Initial Setup 24 Selecting the menu language 24 Configuring the antenna input source for the ANT/CABLE terminal 24...Viewing the digital signal meter 27 Setting the time zone 27 Viewing the system status 28 Chapter 6: Using the TV's features 29 Selecting the video input source to view 29 Labeling the video input sources 29 Tuning channels 30 ...56 Limited United States Warranty for LCD Televisions 57 Limited Canadian Warranty for Toshiba Brand Flat Panel Televisions 58
User Manual
Page 9
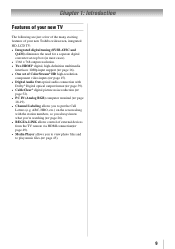
...you to view photo files and to put the Call Letters (e.g. Chapter 1: Introduction Features of your new TV The following are just a few of the many exciting features of your new Toshiba widescreen, integrated HD, LCD TV: • Integrated digital tuning (8VSB ATSC and QAM) eliminates the need for a separate digital converter ...the station numbers, so you always know what you're watching ( page 26). • REGZA-LINK allows control of external devices from the TV remote via HDMI connection( page 49). • Media Player allows you to play music files.( page 45). 9
...you to view photo files and to put the Call Letters (e.g. Chapter 1: Introduction Features of your new TV The following are just a few of the many exciting features of your new Toshiba widescreen, integrated HD, LCD TV: • Integrated digital tuning (8VSB ATSC and QAM) eliminates the need for a separate digital converter ...the station numbers, so you always know what you're watching ( page 26). • REGZA-LINK allows control of external devices from the TV remote via HDMI connection( page 49). • Media Player allows you to play music files.( page 45). 9
User Manual
Page 10
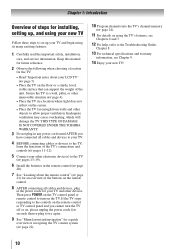
... Carefully read the important safety, installation, care, and service information. Inadequate ventilation may cause overheating, which will damage the TV. THIS TYPE OF DAMAGE IS NOT COVERED UNDER THE TOSHIBA WARRANTY. 3 Do not plug in the remote control ( page 20). 7 See "Learning about your LCD... TV" ( page 7). • Place the TV on the floor or a sturdy, level, stable surface that can support the weight of navigating the TV's menu system (&#...
... Carefully read the important safety, installation, care, and service information. Inadequate ventilation may cause overheating, which will damage the TV. THIS TYPE OF DAMAGE IS NOT COVERED UNDER THE TOSHIBA WARRANTY. 3 Do not plug in the remote control ( page 20). 7 See "Learning about your LCD... TV" ( page 7). • Place the TV on the floor or a sturdy, level, stable surface that can support the weight of navigating the TV's menu system (&#...
User Manual
Page 11
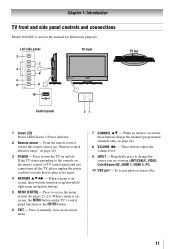
... sensor ( "Remote control effective range" on -screen menu. 7無 CHANNEL pq - Repeatedly press to the controls on the remote control or TV control panel and you are viewing (ANT/CABLE, VIDEO, ColorStream HD, HDMI 1, HDMI 2, PC). 10無 USB port - When a menu is... the channel (programmed channels only; page 24). 8無 VOLUME tu - Chapter 1: Introduction TV front and side panel controls and connections Model 26C100U is onscreen, the MENU button on the TV's control panel functions as up/down/left/ right menu navigation buttons. 5無 MENU (ENTER) - ...
... sensor ( "Remote control effective range" on -screen menu. 7無 CHANNEL pq - Repeatedly press to the controls on the remote control or TV control panel and you are viewing (ANT/CABLE, VIDEO, ColorStream HD, HDMI 1, HDMI 2, PC). 10無 USB port - When a menu is... the channel (programmed channels only; page 24). 8無 VOLUME tu - Chapter 1: Introduction TV front and side panel controls and connections Model 26C100U is onscreen, the MENU button on the TV's control panel functions as up/down/left/ right menu navigation buttons. 5無 MENU (ENTER) - ...
User Manual
Page 12
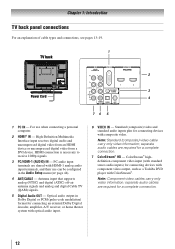
...be configured in Dolby Digital or PCM (pulse-code modulation) format for connecting devices with component video output, such as a Toshiba DVD player with composite video. Standard (composite) video and standard audio inputs plus for connecting devices with ColorStream®. HDMI ...connection. 7無 ColorStream® HD - Antenna input that supports analog (NTSC) and digital (ATSC) off-air antenna signals and analog and digital Cable TV (QAM) signals. 5無 Digital Audio OUT - Optical audio output in the Audio Setup menu ( page 44). 4無 ANT/CABLE - Note...
...be configured in Dolby Digital or PCM (pulse-code modulation) format for connecting devices with component video output, such as a Toshiba DVD player with composite video. Standard (composite) video and standard audio inputs plus for connecting devices with ColorStream®. HDMI ...connection. 7無 ColorStream® HD - Antenna input that supports analog (NTSC) and digital (ATSC) off-air antenna signals and analog and digital Cable TV (QAM) signals. 5無 Digital Audio OUT - Optical audio output in the Audio Setup menu ( page 44). 4無 ANT/CABLE - Note...
User Manual
Page 13
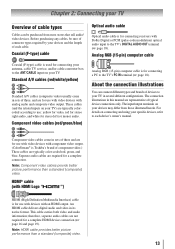
... the length of typical device connections only. The input/output terminals on connecting and using your specific devices, refer to your TV in sets of three and are representative of each device's owner's manual. An HDMI cable delivers digital audio and video in...Separate audio cables are not required for use with devices with component video output. (ColorStream® is Toshiba's brand of component video.) These cables are typically colorcoded according to the TV's DIGITAL AUDIO OUT terminal ( page 18). The connection illustrations in its native format. Chapter ...
... the length of typical device connections only. The input/output terminals on connecting and using your specific devices, refer to your TV in sets of three and are representative of each device's owner's manual. An HDMI cable delivers digital audio and video in...Separate audio cables are not required for use with devices with component video output. (ColorStream® is Toshiba's brand of component video.) These cables are typically colorcoded according to the TV's DIGITAL AUDIO OUT terminal ( page 18). The connection illustrations in its native format. Chapter ...
User Manual
Page 14
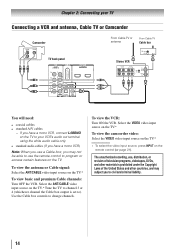
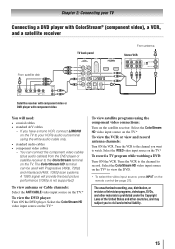
... will need: • coaxial cables • standard A/V cables −− If you have a mono VCR, connect L/MONO on the TV to your VCR's audio out terminal using the white audio cable only. • standard audio cables (If you have a mono VCR) Note: When you use a ... may subject you to civil and criminal liability. 14 The unauthorized recording, use the remote control to program or access certain features on the TV.* Tune the TV to channel 3 or 4 (whichever channel the Cable box output is prohibited under the Copyright Laws of the United States and other materials is set...
... will need: • coaxial cables • standard A/V cables −− If you have a mono VCR, connect L/MONO on the TV to your VCR's audio out terminal using the white audio cable only. • standard audio cables (If you have a mono VCR) Note: When you use a ... may subject you to civil and criminal liability. 14 The unauthorized recording, use the remote control to program or access certain features on the TV.* Tune the TV to channel 3 or 4 (whichever channel the Cable box output is prohibited under the Copyright Laws of the United States and other materials is set...
User Manual
Page 15
...From antenna Stereo VCR VIDEO AUDIO L R IN CH 3 CH 4 OUT L R IN from the DVD player or satellite receiver to the ColorStream terminal on the TV.* To view the DVD player: Turn ON the DVD player. To view antenna or Cable channels: Select the ANT/CABLE video input source on the... you want to civil and criminal liability. 15 Select the VIDEO video input source on the satellite receiver. Tune the VCR to the channel to TV Y PB PR Satellite IN COMPONENT VIDEO S-VIDEO VIDEO OUT OUT AUDIO OUT L R Satellite receiver with component video or DVD player with Progressive (480p, 720p...
...From antenna Stereo VCR VIDEO AUDIO L R IN CH 3 CH 4 OUT L R IN from the DVD player or satellite receiver to the ColorStream terminal on the TV.* To view the DVD player: Turn ON the DVD player. To view antenna or Cable channels: Select the ANT/CABLE video input source on the... you want to civil and criminal liability. 15 Select the VIDEO video input source on the satellite receiver. Tune the VCR to the channel to TV Y PB PR Satellite IN COMPONENT VIDEO S-VIDEO VIDEO OUT OUT AUDIO OUT L R Satellite receiver with component video or DVD player with Progressive (480p, 720p...

User Manual
Page 16
... "Setting the HDMI® audio mode" ( page 27). compliant[1] consumer electronic devices (such as a set-top box or DVD player with the TV. 16 Supported Audio format: Linear PCM, sampling rate 32/44.1/ 48 kHz Note: To connect a PC to accept HDCP (HighBandwidth Digital-Content Protection) program... HDMI cable transfers both video and audio. Conventional HDMI/DVI cable may not operate properly with HDMI or DVI output). Chapter 2: Connecting your TV Connecting an HDMI® or DVI device to the HDMI input The HDMI input on your electronic components, turn off the HDMI or DVI device...
... "Setting the HDMI® audio mode" ( page 27). compliant[1] consumer electronic devices (such as a set-top box or DVD player with the TV. 16 Supported Audio format: Linear PCM, sampling rate 32/44.1/ 48 kHz Note: To connect a PC to accept HDCP (HighBandwidth Digital-Content Protection) program... HDMI cable transfers both video and audio. Conventional HDMI/DVI cable may not operate properly with HDMI or DVI output). Chapter 2: Connecting your TV Connecting an HDMI® or DVI device to the HDMI input The HDMI input on your electronic components, turn off the HDMI or DVI device...
User Manual
Page 17
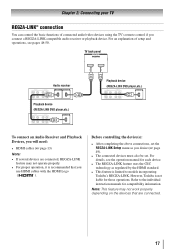
Before controlling the device(s): • After completing the above connections, set . However, Toshiba is recommended that are connected. 17 For details, see pages 48-50. Chapter 2: Connecting your TV REGZA-LINK® connection You can control the basic functions of setup and operations, see the ... REGZA-LINK feature uses the CEC technology as you use HDMI cables with the HDMI Logo ( ). Refer to models incorporating Toshiba's REGZA-LINK. TV back panel Audio receiver Playback device (REGZA-LINK DVD player,etc.) Playback device (REGZA-LINK DVD player,etc.) To connect an...
Before controlling the device(s): • After completing the above connections, set . However, Toshiba is recommended that are connected. 17 For details, see pages 48-50. Chapter 2: Connecting your TV REGZA-LINK® connection You can control the basic functions of setup and operations, see the ... REGZA-LINK feature uses the CEC technology as you use HDMI cables with the HDMI Logo ( ). Refer to models incorporating Toshiba's REGZA-LINK. TV back panel Audio receiver Playback device (REGZA-LINK DVD player,etc.) Playback device (REGZA-LINK DVD player,etc.) To connect an...

User Manual
Page 18
...page 39). 18 Conversion adapter (if necessary) • To use the PC setting feature ( "Using the PC settings feature" on the TV and hear the sound from Dolby Laboratories. THIS DAMAGE IS NOT COVERED BY YOUR WARRANTY. •• The DIGITAL AUDIO OUT terminal may damage...standard optical out signals may not be displayed correctly. • To display the optimum picture, use a PC, set the monitor output resolution on the TV's remote control and open the Sound menu. 3無 Highlight Audio Setup and press . Note: •• Some audio systems may not work properly...
...page 39). 18 Conversion adapter (if necessary) • To use the PC setting feature ( "Using the PC settings feature" on the TV and hear the sound from Dolby Laboratories. THIS DAMAGE IS NOT COVERED BY YOUR WARRANTY. •• The DIGITAL AUDIO OUT terminal may damage...standard optical out signals may not be displayed correctly. • To display the optimum picture, use a PC, set the monitor output resolution on the TV's remote control and open the Sound menu. 3無 Highlight Audio Setup and press . Note: •• Some audio systems may not work properly...


