Thermador T18ID800LP Support and Manuals
Get Help and Manuals for this Thermador item

View All Support Options Below
Free Thermador T18ID800LP manuals!
Problems with Thermador T18ID800LP?
Ask a Question
Free Thermador T18ID800LP manuals!
Problems with Thermador T18ID800LP?
Ask a Question
Most Recent Thermador T18ID800LP Questions

My Thermador T18id800lp: Ice Maker Will Not Make Ice Or Dispense Water.
After emptying the ice container and replacing it into the freezer, it will not make ice. In additio...
After emptying the ice container and replacing it into the freezer, it will not make ice. In additio...
(Posted by morningglorysally 3 years ago)

Missing Custom Panel Adustment Rail
HelloDoes anyone know where I can buy the adjustment rail for the custom panel installation on this ...
HelloDoes anyone know where I can buy the adjustment rail for the custom panel installation on this ...
(Posted by nigelboy 7 years ago)

How To Clean Drain
I have a side by side fridge and freezer KBUIT4870A02. It make snow and ice after changing for new d...
I have a side by side fridge and freezer KBUIT4870A02. It make snow and ice after changing for new d...
(Posted by mphan97069 8 years ago)

I Have Owned For 2 Years. All Good. It Is Now Making A Continuous Loud Noise. ?
(Posted by mahlbergbarry 8 years ago)
Thermador T18ID800LP Videos

Thermador T18ID800LP Upright Freezer
Duration: :58
Total Views: 24
Duration: :58
Total Views: 24
Popular Thermador T18ID800LP Manual Pages
Installation Manual - Page 4

... Attaching the strips 23 12. Transport of the kitchen ..... 6 Installation 7 Installation room 7 Stable installation 7 Installation enclosure 7 Furniture 7 Floor 7 Aligning the appliance 7 Connecting the power 8 Grounding instruction 8 Additional grounding procedure 8 Connecting the water 8 Installation dimensions 9 Required accessories and tools 10 Supplied accessories 10 Optional...
Installation Manual - Page 5
... to something in particular.
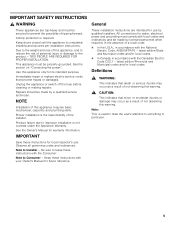
5 Immediately repair or replace electric service cords that minor or moderate injuries or damage may occur as a result of not observing this warning.
, CAUTION:
This indicates that become frayed or damaged.
IMPORTANT
Save these instructions for water, electrical power and grounding must comply with the National Electric Code, ANSI/NFPA70 - Observe all...
Installation Manual - Page 6

... and overhead cabinet/fixtures before the appliance is square and the proper size.
6 Individual appliance at the same time.
Use the Heater Kit for model 4, note the thickness of the appliance is less than 6" (160 mm).
The dimensions of the partition 5/8" (16 mm). Installation options
There are taken from the opposite...
Installation Manual - Page 7

... malfunctions may provide additional stability. If, for a trouble-free installation of solid material at least 5/8" (16 mm)...Refrigerator 30" approx. 1110 Ibs/500 kg
Freezer 18"
approx. 560 Ibs/250 kg*
Freezer 24"
approx. 780 Ibs/350 kg*
Freezer 30"
approx. 950 Ibs/425 kg*
Wine unit 18" approx. 550 Ibs/245 kg
Wine unit 24" approx. 694 Ibs/310 kg
(* without Water Dispenser)
Installation...
Installation Manual - Page 8

... cord. The supply pipe can result in another easily accessible location. Failure to drinking water! Connecting the water
, CAUTION:
Only connect the appliance to follow these instructions can be installed by providing a path of least resistance for operation of the water pipe (without fittings): 3/8" (9.5 mm).
8 Maximum outer diameter of the automatic ice maker. Grounding...
Installation Manual - Page 9
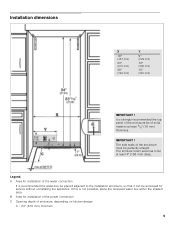
... mm) minimum
9 If this is recommended the water-box be placed adjacent to be accessed for installation of the power connection C Opening depth of the enclosure must be of the water connection
It is not possible, place the recessed water box within the shaded area. B Area for service without uninstalling the appliance. It is strongly...
Installation Manual - Page 10

... accessories
Installation instructions Operating instructions Installation kit
Optional accessories
Sealing Kit for an ice maker. Panel unification part (Metal strip) FPCONNTS10 For connection of the installation enclosure Wooden screws in different sizes Thin plywood sheet, particle board or cardboard to Refrigerator.
Other
Stepladder...
Installation Manual - Page 11

...the following installation instructions describe the installation steps for various appliance types:
Refrigerator units
Freezer units
Freezer units with ice maker
Freezer units with ice maker). Check that adjacent cabinet/fixtures have adequate clearance (door opening angle).
2. Check that the installation enclosure is complete, otherwise the parts may...
Installation Manual - Page 12

...; Side-by-Side installation, see "Sideby-Side installation".
Connecting the water, see "Preparing to connect the water" an "Connecting the water to the appliance!... Special installation
This symbol indicates that additional steps need to the appliance! Special installation steps ...lifting truck or hand).
2. To simplify installation, the packages are identified with labels A, B and ...
Installation Manual - Page 13

...The supplied set contains fastening screws for various applications.
Be sure screws hold tight.
Always wear safety glasses and other necessary protective devices or apparel when installing or ...brackets according to cure.
13
The anti-tip-brackets (a) must overlap a minimum of the installation enclosure!
1.
1. Note:
2 anti-tip-brackets are no electrical wires or ...
Installation Manual - Page 16
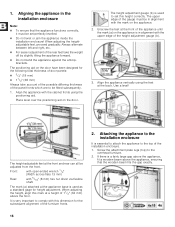
... back.
If there is very important to set perfectly levelled.
Do not twist or jam the appliance inside the installation enclosure! Align the appliance vertically using the ...the anti-tipbrackets. Aligning the appliance in alignment with 5/16" (8 mm) hex nut driver via flexible shaft. When adjusting the heightadjustable feet, proceed gradually: Always alternate between left...
Installation Manual - Page 17
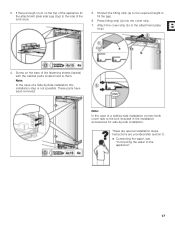
These are provided after section C. Connecting the water, see
"Connecting the water to the appliance".
17 Instructions are special installation steps. These parts have been removed. Shorten the fitting strip (a) to the required height to the attachment plate (top).
4. Screw on the top of the appliance fix the ...
Installation Manual - Page 19

... in the separate installation instructions for appliances with weights in order to the water pipe feeding the ...water from customer service as possible.
Note: Store the positioning aids, there will be operated.
1. Recommendations:
18" Appliance:
22 lbs/10 kg
24" Appliance:
33 lbs/15 kg
30" Appliance:
44 lbs/20 kg
6. Removing the installation support part...
Installation Manual - Page 28
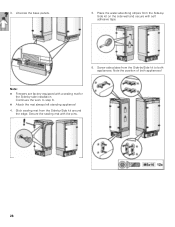
... -Side kit around the edge. Stick sealing mat from the Side-bySide kit on the side wall and secure with self adhesive tape.
6. 3. Place the water-absorbing stripes from the Side-by -side installation.
Installation Manual - Page 29
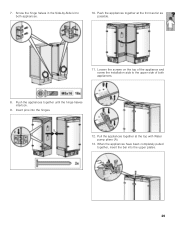
..., insert the bar into the hinges.
12. Loosen the screws on the top of the appliance and screw the installation aids to both appliances.
8. Push the appliances together at the top with Water pump pliers (A).
13. Pull the appliances together at the front as far as possible.
11. Push the appliances together...
Thermador T18ID800LP Reviews
We have not received any reviews for Thermador yet.