Thermador T24ID800LP Support and Manuals
Get Help and Manuals for this Thermador item
View All Support Options Below
Free Thermador T24ID800LP manuals!
Problems with Thermador T24ID800LP?
Ask a Question
Free Thermador T24ID800LP manuals!
Problems with Thermador T24ID800LP?
Ask a Question
Most Recent Thermador T24ID800LP Questions

Error Code
I am getting error code FILTER. Is thisbfir Water filter change or Air FILTER change. How to change ...
I am getting error code FILTER. Is thisbfir Water filter change or Air FILTER change. How to change ...
(Posted by rehmanmehmood 1 year ago)
Thermador T24ID800LP Videos

Thermador T24ID800LP Upright Freezer
Duration: :58
Total Views: 53
Duration: :58
Total Views: 53
Popular Thermador T24ID800LP Manual Pages
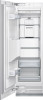
Installation Manual - Page 4

... accessories 10 Other required accessories 10 Other 10 Tools 10 Installation instructions 11
1. Table of Contents
IMPORTANT SAFETY INSTRUCTIONS 5 Installation options 6 Individual appliance 6 Side-by -Side installation 27 Preparing to connect the water 30 Connecting the water to the appliance ..... 31 Aligning the ice-water dispenser 31 Attaching the cover strips 32 Adjusting the door...
Installation Manual - Page 5
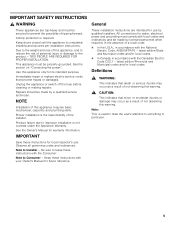
... FOR PROPER INSTALLATION. See the section on "Connecting the power". Unplug the appliance or switch off the fuse before cleaning or making repairs.
Note to Consumer - Note:
This is required. Anti-tip protection is used to draw the user's attention to leave these instructions with your Owner's Manual for warranty information.
Immediately repair or replace electric service cords...
Installation Manual - Page 6

... firmly to the wall, the floor and overhead cabinet/fixtures before the appliance is placed in the installation enclosure.
The dimensions of the appliance is visible, a side panel must be used.
Individual appliance at the same time.
Use the Heater Kit for model 4, note the thickness of the door panels to prevent damage if...
Installation Manual - Page 7

... of solid material at least 4" deep. Installation
, WARNING:
Do not install the appliance:
outdoors, in an environment with dripping water, in a stable position is to use a suitable insulating plate or observe the following :
Refrigerator 24" approx. 890 Ibs/400 kg
Refrigerator 30" approx. 1110 Ibs/500 kg
Freezer 18"
approx. 560 Ibs/250 kg...
Installation Manual - Page 8

... checked by a qualified electrician or service technician if you are available as to follow these instructions can be purchased seperately.
A cold water connection is recommended to the appliance or in death, fire, or electrical shock.
Appliance
Refrigerator 24" Refrigerator 30" Freezer 18" (incl.
Grounding instruction
This appliance must not be grounded. Additional grounding...
Installation Manual - Page 9
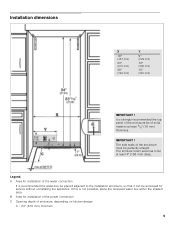
...depending on kitchen design C = 24" (610 mm) minimum
9
IMPORTANT ! Installation dimensions
X
18" (457 mm)
24" (610 mm)
30" (762...installation of the water connection
It is strongly recommended the top panel of the enclosure be accessed for installation of the power connection C Opening depth of solid material at least 4" (100 mm) deep. B Area for service without uninstalling the appliance...
Installation Manual - Page 10

...Installation instructions Operating instructions Installation kit
Optional accessories
Sealing Kit for Side-by -Side Installation XHEATKIT10 If the gap between the appliances...Ice maker installation kit 1/4" OD copper line For connecting appliances which require water, e.g....part (Metal strip) FPCONNTS10 For connection of the water pipe (without further preliminary work. Freezer...
Installation Manual - Page 11

... a safe and trouble free installation.
1. Particular reference is very heavy!
5. Checking the installation enclosure
, CAUTION:
Use the following installation instructions describe the installation steps for damage in the section on "Installation/Floor".
2.
Note:
Check appliance for various appliance types:
Refrigerator units
Freezer units
Freezer units with...
Installation Manual - Page 12

...".
Cover strips for a wine unit, see "Attaching the cover strips"
Door limitation pin, see "Preparing to connect the water" an "Connecting the water to the appliance! Special installation steps are described after section C.
Change over door hinge, see "Changing over the door hinges".
Sealing mat, see "Removing/ changing over the...
Installation Manual - Page 13

... dimensioned wood board. Attaching the anti-tip-brackets
, WARNING:
Risk of the plank should correspond to the section on "Installation dimensions".
2. Assure that there are required for each appliance.
The supplied set contains fastening screws for use in new concrete which the screws could penetrate.
, CAUTION:
Risk of injury! Not recommended for...
Installation Manual - Page 16
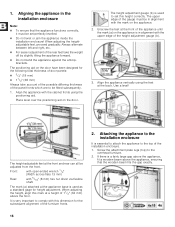
... 1.
The height adjustment gauge (b) is used to set perfectly levelled.
Do not twist or jam the appliance inside the installation enclosure!
When adjusting the height, align this height ... the
installation enclosure
Note:
To ensure that the wooden beam fits the gap exactly.
16
Aligning the appliance in alignment with 5/16" (8 mm) hex nut driver via flexible...
Installation Manual - Page 19

... customer service as possible.
Open the appliance door.
2. Only for appliances with weights in an installation step later.
19
The total weight of the door panel must be operated.
1. Loading the appliance door
When attaching the door panels, it is as precise as an optional accessory, see the section on the rear. Removing the installation support part
Unscrew...
Installation Manual - Page 26
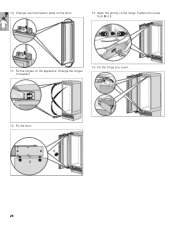
Fix the hinge box cover.
12. Fix the door.
26 Fix the hinges on the door.
13. Change over the fixation parts on the appliance. Span the spring on the hinge. Tighten the screw from 0 to I.
11. 10. Change the hinges crosswise!
14.
Installation Manual - Page 27
... and can be implemented to the opposite side.
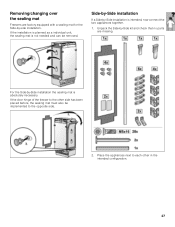
2. Removing/changing over the sealing mat
Freezers are missing. Unpack the Side-by-Side kit and check that no parts are factory equipped with a sealing mat for the Side-by-side installation. Place the appliances next to the other in the intended configuration.
27
If the...
Installation Manual - Page 30
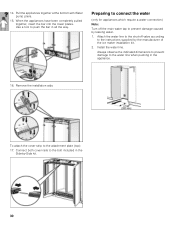
... into the lower plates.
Attach the water line to the shut-off the main water tap to the instructions supplied by leaking water.
1. Preparing to connect the water
(only for appliances which require a water connection)
Note:
Turn off valve according to prevent damage caused by the manufacturer of the ice maker installation kit.
2.
Always observe the indicated dimensions...
Thermador T24ID800LP Reviews
We have not received any reviews for Thermador yet.