Thermador T24ID800LP Support Question
Thermador T24ID800LP Support Question
Find answers below for this question about Thermador T24ID800LP.Need a Thermador T24ID800LP manual? We have 1 online manual for this item!
Question posted by rehmanmehmood on May 23rd, 2022
Error Code
I am getting error code FILTER. Is thisbfir Water filter change or Air FILTER change. How to change it? And how tonresetvit afterwards? need someone to please help me troubleshoot it.
Current Answers
Related Thermador T24ID800LP Manual Pages
Installation Manual - Page 4

... 24 Removing/changing over the sealing mat 27 Side-by -Side 6 Individual appliances with partition 6 Individual appliance at the end of the kitchen ..... 6 Installation 7 Installation room 7 Stable installation 7 Installation enclosure 7 Furniture 7 Floor 7 Aligning the appliance 7 Connecting the power 8 Grounding instruction 8 Additional grounding procedure 8 Connecting the water...
Installation Manual - Page 5
... technician.
See the section on "Connecting the power". Use this appliance only for water, electrical power and grounding must be properly grounded.
Product failure due to something in...warranty information. All connections for its intended purpose. latest edition/State and Municipal codes and/or local codes.
In Canada, in accordance with the Consumer. Definitions
, WARNING...
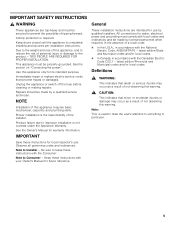
Installation Manual - Page 7

..."
approx. 255 Ibs/115 kg*
Freezer 24"
approx. 300 Ibs/135 kg*
Freezer 30"
approx. 335 Ibs/150 kg*
Wine unit 18
"approx. 300 Ibs/135 kg
Wine unit 24
"approx. 360 Ibs/160 kg
(* without Water Dispenser) To ensure that the installation enclosure is very heavy -
If in doubt, contact an architect...
Installation Manual - Page 8

...receptacle must be grounded. IceMaker) Freezer 30" (incl.
For the permitted installation areas and dimensions see "Installation dimensions". Follow all state and local codes or NEC. The appliance requires a... ground. Never ground the appliance to drinking water! Appliance
Refrigerator 24" Refrigerator 30" Freezer 18" (incl.
The installation must be between 25 and 120 psi...
Installation Manual - Page 9
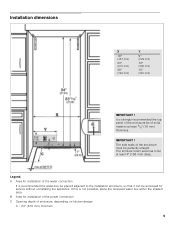
... enclosure be at least 5/8" (16 mm) thickness. It is strongly recommended the top panel of the water connection
It is not possible, place the recessed water box within the shaded area. If this is recommended the water-box be placed adjacent to be of enclosure, depending on kitchen design C = 24" (610 mm) minimum...
Installation Manual - Page 10

...(cross section min. 3" x 4") as an
alternative tip protection, length according to Refrigerator.
Freezer next to the width of two individual appliances, e.g.
Can be used for standard height door.../32" (10 mm). Panel unification part (Metal strip) FPCONNTS10 For connection of the water pipe (without further preliminary work surfaces. Tools
10
Cordless screwdriver
Torx bit T20 + magnetic...
Installation Manual - Page 11

...types:
Refrigerator units
Freezer units
Freezer units with ice maker
Freezer units with ice maker). Check attachment of... if it is being unpacked or if the doors are helping may be injured or the appliance may be damaged!
... lift appliance off the pallet - See section on "Connecting the water" and in the vicinity of appliance.
2. Note:
Do not...
Installation Manual - Page 12

... that additional steps need to be taken before...Change over door hinge, see "Changing over the door hinges".
Sealing mat, see "Removing/ changing over the sealing mat"
Side-by-Side installation, see "Sideby-Side installation".
Connecting the water...83 1/8" (2126 mm) tall. Special installation steps are helping may be injured or the appliance may be transported horizontally...
Installation Manual - Page 14
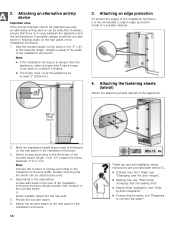
.... 3" x 4") to attach edge protection made of screws according to connect the water". Attaching the fastening sheets (lateral)
Attach the fastening sheets (lateral) to the...Change over door hinge, see "Changing over the door hinges".
Sealing mat, see "Removing/ changing over the sealing mat"
Side-by-Side installation, see "Sideby-Side installation".
Connecting the water...
Installation Manual - Page 15
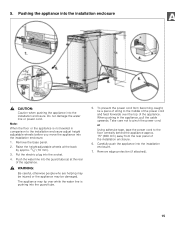
... appliance.
, WARNING:
Be careful, otherwise people who are helping may be injured or the appliance may be damaged. Remove edge protection (if attached).
15 Push the water line into the guard tube.
5.
Note:
When the floor... a piece of string to pinch the power cord. Do not damage the water line or power cord. Take care not to the middle of the power cord and feed forwards over while...
Installation Manual - Page 17
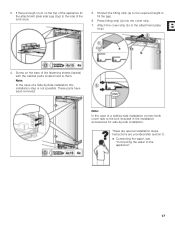
...-by -side installation. Shorten the fitting strip (a) to the required height to the appliance".
17 These are provided after section C. Connecting the water, see
"Connecting the water to fill the gap.
6. 3. Instructions are special installation steps. Attach the cover strip (b) to the bolt included in the installation accessories for side-by...
Installation Manual - Page 19

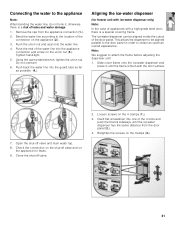
... off valve closed.
4. Switching the appliance ON
To guarantee the accuracy of the following working steps and thus the appearance of damage caused by leaking water from damage possibly caused to avoid the risk of the overall kitchen front later on the rear.
These door panels must not exceed the following...
Installation Manual - Page 23
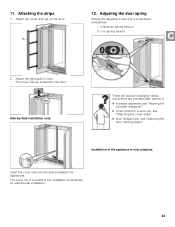
..."
Door limitation pin, see "Adjusting the door opening angle". Side-by -side installation.
23 Instructions are provided after section C.
Ice-water dispenser, see "Aligning the ice-water dispenser".
Cover strips for side-by -Side installation only:
These are special installation steps. Attach the cover strip (a) on the door.
12.
Installation Manual - Page 24
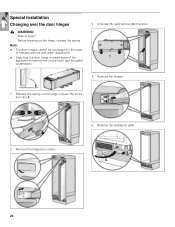
... working on the hinge, release the spring. Loosen the screw from I to 0.
2. Remove the hinge box covers.
5. Remove the hinges.
1. Special installation
Changing over the door hinges
, WARNING:
Risk of freezers with ice and water dispensers. Switching the door hinge is made easier if the
appliance is stored here on the hinge.
Installation Manual - Page 25
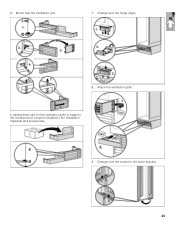
6. Attach the ventilation grille. Change over the hinge angle.
8. A replacement part for the lower bracket.
25 Change over the screw for the ventilation grille to adapt to the modified door hinge is included in the installation materials and accessories.
9. Mount new the ventilation grill.
7.
Installation Manual - Page 26
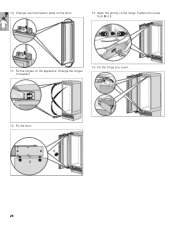
10. Change over the fixation parts on the hinge. Span the spring on the door.
13. Fix the hinge box cover.
12. Fix the door.
26 Tighten the screw from 0 to I.
11. Fix the hinges on the appliance. Change the hinges crosswise!
14.
Installation Manual - Page 27
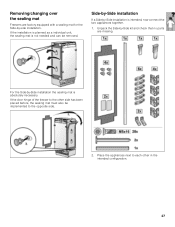
If the door hinge of the freezer to the other in the intended configuration.
27 For the Side-by -Side kit and check that...planned as a individual unit, the sealing mat is absolutely necessary.
Unpack the Side-by -Side installation the sealing mat is not needed and can be implemented to each other side has been placed before, the sealing mat must also be removed. Side-by-Side ...
Installation Manual - Page 28
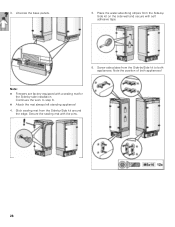
...Unscrew the base panels.
5. Note the position of both appliances.
Place the water-absorbing stripes from the Side-bySide kit on the side wall and secure ... self adhesive tape.
6. 3. Screw side plates from the Side-by -side installation. Note: Freezers are factory equipped with a sealing mat for
the Side-by -Side kit around the edge. Continues the work to both appliances!
Installation Manual - Page 29
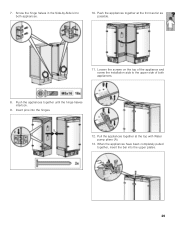
... to the upper side of both appliances.
10. Push the appliances together until the hinge halves interlock.
9. Push the appliances together at the top with Water pump pliers (A).
13. Pull the appliances together at the front as far as possible.
11. 7. Insert pins into the upper plates.
29 Loosen the screws...
Installation Manual - Page 31
... is a special covering frame. Tighten hand-tight.
5.
Check the connection on the shut-off valve and on the appliance (2.).
3. Push back the water line into one of the connection on the appliance for freezer unit with the door surface.
7. Remove the cap from the door panel (2.).
4. Slide cover frame onto the ice...
Similar Questions

My Thermador T18id800lp: Ice Maker Will Not Make Ice Or Dispense Water.
After emptying the ice container and replacing it into the freezer, it will not make ice. In additio...
After emptying the ice container and replacing it into the freezer, it will not make ice. In additio...
(Posted by morningglorysally 3 years ago)

Thermador T18id80nlp/17 Freezer Not Dispensing Ice
The ice maker makes ice but it does not dispense the cubes.
The ice maker makes ice but it does not dispense the cubes.
(Posted by akouroupos 7 years ago)

How To Clean Drain
I have a side by side fridge and freezer KBUIT4870A02. It make snow and ice after changing for new d...
I have a side by side fridge and freezer KBUIT4870A02. It make snow and ice after changing for new d...
(Posted by mphan97069 8 years ago)

