
Thermador T18ID800LP Support Question
Thermador T18ID800LP Support Question
Find answers below for this question about Thermador T18ID800LP.Need a Thermador T18ID800LP manual? We have 1 online manual for this item!
Question posted by morningglorysally on January 28th, 2021
My Thermador T18id800lp: Ice Maker Will Not Make Ice Or Dispense Water.
After emptying the ice container and replacing it into the freezer, it will not make ice. In addition, the water dispenser stopped working at the same time. Error 33 and Error 30 show up.
Current Answers
Answer #1: Posted by Odin on January 29th, 2021 7:39 AM
Odin

Member since:
April 10th, 2010 Points: 41,236,690

Member since:
April 10th, 2010 Points: 41,236,690
Open the freezer door and remove the pieces of ice jammed there (using a wooden stick if necessary). Then switch off the appliance for one minute or pull out the mains plug. The appliance can then be switched on again.
If the issue persists or if you require further advice--or if the instructions don't seem to apply--you may want to consult the company: use the contact information at https://www.contacthelp.com/thermador/customer-service.
Hope this is useful. Please don't forget to click the Accept This Answer button if you do accept it. My aim is to provide reliable helpful answers, not just a lot of them. See https://www.helpowl.com/profile/Odin.
Related Thermador T18ID800LP Manual Pages
Installation Manual - Page 4

... 30 Connecting the water to the appliance ..... 31 Aligning the ice-water dispenser 31 Attaching the cover strips 32 Adjusting the door opening angle 33
4 Transport of the kitchen ..... 6 Installation 7 Installation room 7 Stable installation 7 Installation enclosure 7 Furniture 7 Floor 7 Aligning the appliance 7 Connecting the power 8 Grounding instruction 8 Additional grounding...
Installation Manual - Page 5
... and plumbing skills. IMPORTANT
Save these instructions for water, electrical power and grounding must comply with local ... appliance or switch off the fuse before cleaning or making repairs.
Keep these instructions with your Owner's Manual....
In Canada, in particular.
5
Immediately repair or replace electric service cords that minor or moderate injuries or damage may occur...
Installation Manual - Page 6

... the kitchen.
The side panel must be connected firmly to prevent damage if the doors are many different installation options.
Individual appliance at the same time.
Use the Heater Kit for model 4, note the thickness of the appliance is placed in the installation enclosure.
The dimensions of the side panel...
Installation Manual - Page 7

...cabinet is created, make sure that the appliance...Freezer 30"
approx. 950 Ibs/425 kg*
Wine unit 18" approx. 550 Ibs/245 kg
Wine unit 24" approx. 694 Ibs/310 kg
(* without Water Dispenser)
Installation room
The appliance should not drop below 55 °F (13 °C) or rise above 110 °F (43 °C), otherwise malfunctions may provide additional...water may flow out of the ice maker, ice ...
Installation Manual - Page 8

... 24"
Maximal load at the side on the right (a), at one time 2.0 Ampere 2.0 Ampere 3.5 Ampere
4.0 Ampere
4.5 Ampere
2.0 Ampere 2.0 Ampere
For the installation position of the automatic ice maker. Additional grounding procedure
Some local regulations may result in death, fire, or electrical shock. A cold water connection is recommended to whether the appliance has been properly grounded...
Installation Manual - Page 9
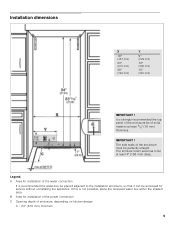
... can be of solid material at least 4" (100 mm) deep. Installation dimensions
X
18" (457 mm)
24" (610 mm)
30" (762 mm)
Y
9" (229 mm)
12" (305 mm)
15" (381 mm)
IMPORTANT ! The side walls of the ...Legend: A Area for installation of the power connection C Opening depth of the water connection
It is not possible, place the recessed water box within the shaded area. If this is recommended the...
Installation Manual - Page 10

...Freezer next to protect the floor from damage Suitable material for covering and protecting furniture (e.g.
protective sheets) Adhesive tape
Note: Before using, check whether the removed adhesive tape leaves adhesive residue on high-quality work surfaces! Other required accessories
Ice maker installation kit 1/4" OD copper line For connecting appliances which require water...
Installation Manual - Page 11

...ice-water dispenser
Wine storage units
Therefore the diagrams may tip over - If in the section on "Installation dimensions". 5. Checking the installation enclosure
, CAUTION:
Use the following installation instructions describe the installation steps for various appliance types:
Refrigerator units
Freezer units
Freezer units with ice maker
Freezer...
Installation Manual - Page 12

...via the side panels. The appliance is very heavy.
Special installation
This symbol indicates that additional steps need to be transported horizontally. The appliance is 83 1/8" (2126 mm) tall... in from the rear side of damage to the appliance".
Ice-water dispenser, see "Aligning the ice-water dispenser".
Cover strips for a wine unit, see "Attaching the cover strips"...
Installation Manual - Page 14
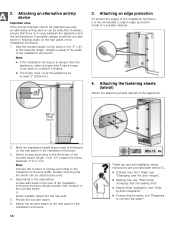
... anti-tip brackets cannot be attached securely, an alternative anti-tip-device can be attached.
If possible, always screw the wooden beam to connect the water". Attaching an edge protection
To protect the edges of the
installation enclosure.
14
These are provided after section C.
Change over door hinge, see "Changing...
Installation Manual - Page 15
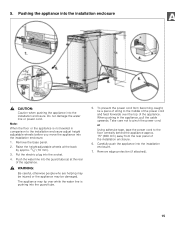
...appliance may tip over the top of the power cord and feed forwards over while the water line is not leveled in the appliance, pull the cable upwards. Take care not ...cord.
The appliance may be damaged. Remove edge protection (if attached).
15 5.
Do not damage the water line or power cord. Pushing the appliance into the installation enclosure
, CAUTION:
Caution when pushing the ...
Installation Manual - Page 17
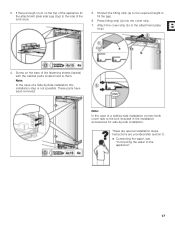
...: In the case of the appliance fix the attachment plate side lugs (top) to them. These are provided after section C. Connecting the water, see
"Connecting the water to the bolt included in the installation accessories for side-by -Side installation this installation step is not possible. Press fitting strip (a) into the...
Installation Manual - Page 19

...on , the appliance should now be used in the appliance with a water connection:
In order to avoid the risk of 30" and 36" wide appliances 2 adjacent door panels can be purchased from ...10 kg
24" Appliance:
33 lbs/15 kg
30" Appliance:
44 lbs/20 kg
6.
Note:
The instructions for carrying out this accessory.
5.
Only for this work on the rear. The total weight...
Installation Manual - Page 23
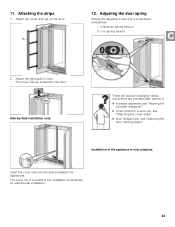
... installation accessories for a wine unit, see "Attaching the cover strips"
Door limitation pin, see "Aligning the ice-water dispenser".
Cover strips for side-by -Side installation only:
These are provided after section C.
Ice-water dispenser, see "Adjusting the door opening angle". Insert the cover strip into the space between the appliances. 11.
Attach...
Installation Manual - Page 24
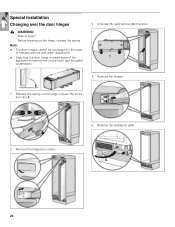
..., release the spring. Special installation
Changing over the door hinges
, WARNING:
Risk of freezers with ice and water dispensers. Switching the door hinge is made easier if the
appliance is stored here on the back (put the pallet underneath).
3. Before working on the hinge. Note: The door hinges cannot be exchanged in the...
Installation Manual - Page 28
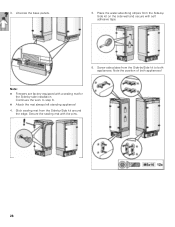
...Freezers are factory equipped with the pins.
28 Secure the sealing mat with a sealing mat for
the Side-by-side installation. Screw side plates from the Side-by -Side kit around the edge. Place the water...-absorbing stripes from the Side-by -Side kit to step 6. Attach the mat always left standing appliance! 4. Continues the work to both appliances! ...
Installation Manual - Page 29
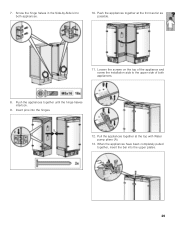
Push the appliances together until the hinge halves interlock.
9. Insert pins into the upper plates.
29 Push the appliances together at the top with Water pump pliers (A).
13. Pull the appliances together at the front as far as possible.
11. Loosen the screws on the top of both appliances.
10. 7. ...
Installation Manual - Page 30
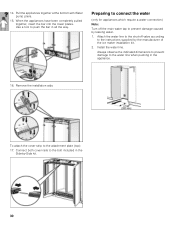
...the instructions supplied by the manufacturer of the ice maker installation kit.
2. Install the water line.
When the appliances have been completely pulled...water line when pushing in the Side-by leaking water.
1. Connect both cover rails to prevent damage caused by -Side kit.
30 Remove the installation aids. Preparing to connect the water
(only for appliances which require a water...
Installation Manual - Page 31
....
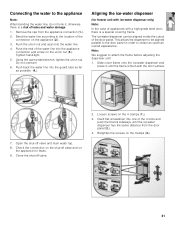
8. Loosen screws on the clamps (3.).
31 This allows the dispenser to be aligned inside the cutout of leaks and water damage.
1. Retighten the screws on the 4 clamps (1.).
3. The ice-water dispenser can be aligned parallel to the door panel in until the ice-water dispenser has the same distance from the appliance connection (1.).
2. Open the shut-off valve...
Installation Manual - Page 32
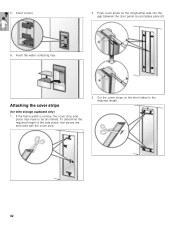
Cut the cover strips on the longitudinal side into the gap between the door panel (a) and glass pane (b).
6. Insert the water collecting tray. Attaching the cover strips
(for wine storage cupboard only)
1. 5. Push cover strips on the short sides to be shortened. To determine the required ...
Similar Questions

Ice Maker On The Blink
My refrigerator was reinstalled after a kitchen renovation and the ice maker stopped working. The pl...
My refrigerator was reinstalled after a kitchen renovation and the ice maker stopped working. The pl...
(Posted by Caidouwes 3 years ago)

Missing Custom Panel Adustment Rail
HelloDoes anyone know where I can buy the adjustment rail for the custom panel installation on this ...
HelloDoes anyone know where I can buy the adjustment rail for the custom panel installation on this ...
(Posted by nigelboy 7 years ago)

Thermador T18id80nlp/17 Freezer Not Dispensing Ice
The ice maker makes ice but it does not dispense the cubes.
The ice maker makes ice but it does not dispense the cubes.
(Posted by akouroupos 7 years ago)

How To Clean Drain
I have a side by side fridge and freezer KBUIT4870A02. It make snow and ice after changing for new d...
I have a side by side fridge and freezer KBUIT4870A02. It make snow and ice after changing for new d...
(Posted by mphan97069 8 years ago)

I Have Owned For 2 Years. All Good. It Is Now Making A Continuous Loud Noise. ?
(Posted by mahlbergbarry 8 years ago)