Thermador T18IF800SP Support and Manuals
Get Help and Manuals for this Thermador item
View All Support Options Below
Free Thermador T18IF800SP manuals!
Problems with Thermador T18IF800SP?
Ask a Question
Free Thermador T18IF800SP manuals!
Problems with Thermador T18IF800SP?
Ask a Question
Most Recent Thermador T18IF800SP Questions

Ice Maker On The Blink
My refrigerator was reinstalled after a kitchen renovation and the ice maker stopped working. The pl...
My refrigerator was reinstalled after a kitchen renovation and the ice maker stopped working. The pl...
(Posted by Caidouwes 3 years ago)
Thermador T18IF800SP Videos

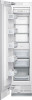
Thermador T18IF800SP Upright Freezer
Duration: :58
Total Views: 25
Duration: :58
Total Views: 25
Popular Thermador T18IF800SP Manual Pages
Installation Manual - Page 4

...Tools 10 Installation instructions 11
1. Attaching the appliance to the door panel 20 8. Attaching the toe kick panel 18 2. Preparing the door panels 19 5. Attaching the adjusting rail
to the installation enclosure 16
1. Checking the installation enclosure 11
2. Removing the packaging 11 3. Special installation 12
1. Removing the installation
support part 19 7. Attaching...
Installation Manual - Page 5
... purpose. All connections for local inspector's use by qualified installers.
This appliance must comply with your Owner's Manual for warranty information. Product failure due to something in particular.
5 Keep these instructions with local codes and ordinances and be properly grounded.
Immediately repair or replace electric service cords that minor or moderate injuries or damage may...
Installation Manual - Page 6

... of the kitchen.
The side panel must be connected firmly to prevent damage if the doors are many different installation options. See also "Kitchen Design Quick Reference".
See the section on "Required accessories and tools/Optional accessories".... the same time.
Use the Heater Kit for model 4, note the thickness of the partition 5/8" (16 mm). These are taken from the opposite...
Installation Manual - Page 7

... a firm connection between the installation enclosure and back wall! Squareness can be attached securely to use a suitable insulating plate or observe the following :
Refrigerator 24" approx. 890 Ibs/400 kg
Refrigerator 30" approx. 1110 Ibs/500 kg
Freezer 18"
approx. 560 Ibs/250 kg*
Freezer 24"
approx. 780 Ibs/350 kg*
Freezer 30"
approx. 950 Ibs...
Installation Manual - Page 8

...installed by a qualified electrician or service technician if you are available as to follow these instructions can be between 25 and 120 psi. (1.72-8.25 bar). Appliance
Refrigerator 24" Refrigerator 30" Freezer...only.
For the permitted installation areas and dimensions see "Installation dimensions".
The shut-off valve for the pipe. Follow all state and local codes or NEC. Additional ...
Installation Manual - Page 9
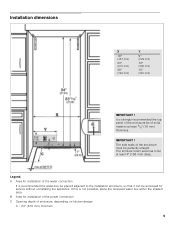
... depending on kitchen design C = 24" (610 mm) minimum
9 B Area for service without uninstalling the appliance. If this is recommended the water-box be placed adjacent to ... area has to the installation enclosure, so that it can be accessed for installation of the power connection C Opening depth of the enclosure must be at least 5/8" (16 mm) thickness.
Installation dimensions
X
18" ...
Installation Manual - Page 10

... whether the removed adhesive tape leaves adhesive residue on high-quality work surfaces. Freezer next to the width of two door panels. Freedom Heater Kit for an ice maker. Panel unification part (Metal strip) FPCONNTS10 For connection of the installation enclosure Wooden screws in different sizes Thin plywood sheet, particle board...
Installation Manual - Page 11

...installation instructions describe the installation steps for various appliance types:
Refrigerator units
Freezer units
Freezer units with ice maker
Freezer units with ice maker). See section on "Installation... the appliance. Installation instructions
The following check list for a safe and trouble free installation.
1. All cabinet parts in transit.
...
Installation Manual - Page 12

... need to be transported horizontally. Note:
Always use the appliance dolly from the front under the appliance. Secure the appliance during transportation to a suitable installation location with the manual sections.
5. 3. The appliance is very heavy. Risk of damage to the following table:
Raise up the appliance, observe the required minimum height at...
Installation Manual - Page 13

...tip-brackets (a) must overlap a minimum of the installation enclosure!
1. a sufficiently dimensioned wood board.
...installing or working with dowels and screws:
Not recommended for various applications. If this by fastening a spacer (b) behind the anti-tip angle, e.g. Attach the anti-tip-brackets completely. Assure that there are required for each appliance.
The supplied set...
Installation Manual - Page 16
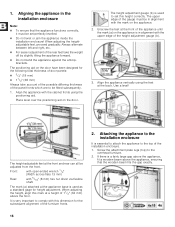
...Attaching the appliance to the installation enclosure
It is very important to set perfectly levelled.
Do not twist or jam the appliance inside the installation enclosure! Align the appliance with... subsequently.
1.
If there is used to comply with 5/16" (8 mm) hex nut driver via flexible shaft.
Align the appliance vertically using the positioning aid. 1. When adjusting the...
Installation Manual - Page 19

... similar.
Select a screw length which is recommended to the water pipe feeding the appliance, keep the shut-off .
Open the appliance door.
2.
Removing the installation support part
Unscrew the positioning aid from damage possibly caused to load the door storage compartments in the separate installation instructions for appliances with weights in an...
Installation Manual - Page 26
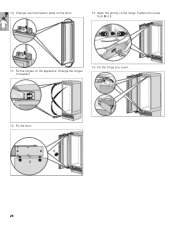
10. Fix the hinge box cover.
12. Fix the door.
26 Change over the fixation parts on the appliance. Change the hinges crosswise!
14. Tighten the screw from 0 to I.
11. Fix the hinges on the door.
13. Span the spring on the hinge.
Installation Manual - Page 27
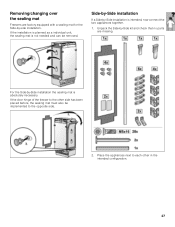
... the Side-by -Side installation is intended, now connect the two appliances together.
1.
Side-by-Side installation
If a Side-by -Side kit and check that no parts are factory equipped with a sealing mat for the Side-by -Side installation the sealing mat is absolutely necessary. Removing/changing over the sealing mat
Freezers are missing. For...
Installation Manual - Page 33

To adjust the door opening angle. Adjusting the door opening angle
Depending on the installation situation, it may be necessary to adjust the door opening angle to 90°.
2. A door opening angle of 115° has been set at the factory. 4. Insert the banking pin through the boreholes which are now vertically aligned...
Thermador T18IF800SP Reviews
We have not received any reviews for Thermador yet.