Thermador T24IF800SP Support and Manuals
Get Help and Manuals for this Thermador item

View All Support Options Below
Free Thermador T24IF800SP manuals!
Problems with Thermador T24IF800SP?
Ask a Question
Free Thermador T24IF800SP manuals!
Problems with Thermador T24IF800SP?
Ask a Question
Thermador T24IF800SP Videos

Thermador T24IF800SP Upright Freezer
Duration: :58
Total Views: 4
Duration: :58
Total Views: 4
Popular Thermador T24IF800SP Manual Pages
Installation Manual - Page 4

... Contents
IMPORTANT SAFETY INSTRUCTIONS 5 Installation options 6 Individual appliance 6 Side-by -Side installation 27 Preparing to connect the water 30 Connecting the water to the installation enclosure 16
1. Aligning the appliance in the installation enclosure 16
2. Transport of the appliance 12 4. Attaching the toe kick panel 18 2. Removing the installation
support part 19 7.
Installation Manual - Page 5
... REQUIRED FOR PROPER INSTALLATION. Immediately repair or replace electric service cords that minor or moderate injuries or damage may occur as a result of tipping forward. NOTE
Installation of not observing this appliance requires basic mechanical, carpentry and plumbing skills. See the Owner's Manual for water, electrical power and grounding must comply with local codes and ordinances and...
Installation Manual - Page 6

... at the end of the kitchen
If one side of the appliance is placed in the installation enclosure. Individual appliance
Individual appliances with partition
Side-by-Side
When dimensioning the partition for model 4, note the thickness of the side panel are many different installation options.
The dimensions of the door panels to the wall, the...
Installation Manual - Page 7

... upper and side walls of the appliance.
Floor
, WARNING:
A fully-loaded appliance is square.
Squareness can be installed in doubt, contact an architect or a building expert.
Appliance is very heavy:
Refrigerator 24" approx. 310 Ibs/140 kg
Refrigerator 30" approx. 350 Ibs/158 kg
Freezer 18"
approx. 255 Ibs/115 kg*
Freezer 24"
approx. 300 Ibs/135 kg...
Installation Manual - Page 8

... or fuse.
Follow all state and local codes or NEC. In such cases, the required ground wire, clamp and screw are in death, fire, or electrical shock.
Failure to follow these instructions can be installed by a qualified electrician or service technician if you are available as to the appliance or in electric shock. The receptacle...
Installation Manual - Page 10

... accessories
Installation instructions Operating instructions Installation kit
Optional accessories
Sealing Kit for covering and protecting furniture (e.g.
Otherwise do not use on the work surfaces. Freezer next to protect the floor from damage Suitable material for Side-by -Side Installation XHEATKIT10 If the gap between the appliances is less...
Installation Manual - Page 11

... enclosure walls (see "Installation dimensions".
3. Installation instructions
The following check list for a safe and trouble free installation.
1. Check the floor. Check that adjacent cabinet/fixtures have adequate clearance (door opening angle).
2. Note:
Check appliance for various appliance types:
Refrigerator units
Freezer units
Freezer units with ice maker...
Installation Manual - Page 12

... to the next chapter. 3. When raising up the appliance, observe the required minimum height at the installation location according to a suitable installation location with the manual sections.
5. Note:
Always use the appliance dolly from appliance side
Minimum height 86"/2185 mm
Do not raise up the appliance via appliance rear
Do not raise up from the rear side...
Installation Manual - Page 13

... anti-tip-brackets completely.
Assure that there are required for each appliance.
The supplied set contains fastening screws for fastening with dowels.
a sufficiently dimensioned wood board... the anti-tip-brackets
, WARNING:
Risk of the installation enclosure!
1. Select the fastening screws according to secure the appliance. The anti-tip-brackets (a) must overlap a minimum of...
Installation Manual - Page 14
... sealing mat"
Side-by at least 2" (50.8 mm).
3. Instructions are special installation steps. Depending to the subsurface: Locate wall studs in the rear of the installation enclosure, it is equal to the installation enclosure width, thereby ensuring that there is deeper than the appliance, select a beam which has a larger cross section or attach 2 beams...
Installation Manual - Page 15
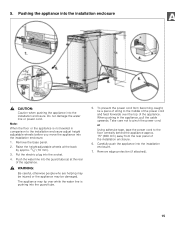
... be damaged. 5. To prevent the power cord from the rear panel of the appliance. Put the electric plug into the installation enclosure.
7. Carefully push the appliance into the socket.
4. Pushing the appliance into the installation enclosure
, CAUTION:
Caution when pushing the appliance into the guard tube (a) at the back by approx. 3/8" (10 mm).
3. Note:
When the...
Installation Manual - Page 16
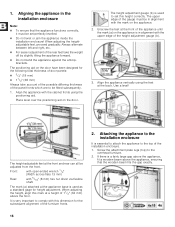
... lugs (top) to be adjusted from the front.
The positioning aid on the appliance is used to set perfectly levelled.
Do not twist or jam the appliance inside the installation enclosure! Align the appliance with the upper edge of the appliance until the mark (a) on the door have been designed for the following total thickness...
Installation Manual - Page 17
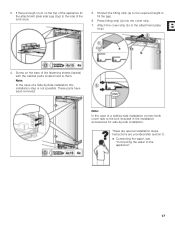
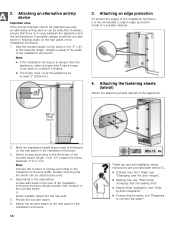
Attach the cover strip (b) to the appliance".
17 Instructions are special installation steps. These parts have been removed. If there enough room on the bars of the fastening sheets (lateral) with the cabinet parts located next to the side of a side-by-side installation connect both cover rails to fill the gap.
6. Press fitting strip (a) into the...
Installation Manual - Page 19

... lbs/10 kg
24" Appliance:
33 lbs/15 kg
30" Appliance:
44 lbs/20 kg
6.
Removing the installation support part
Unscrew the positioning aid from customer service as possible. Press the POWER button.
3. Preparing the door panels
Important note:
When performing any work step can be used in the separate installation instructions for this accessory.
5. Press...
Installation Manual - Page 27
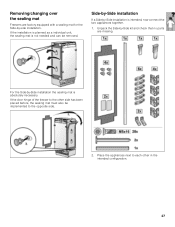
... intended, now connect the two appliances together.
1.
If the door hinge of the freezer to the other in the intended configuration.
27
If the installation is planned as a individual unit, the sealing mat is absolutely necessary. Side-by-Side installation
If a Side-by -Side kit and check that no parts are factory equipped with a sealing...
Thermador T24IF800SP Reviews
We have not received any reviews for Thermador yet.