Thermador T18ID800RP Support and Manuals
Get Help and Manuals for this Thermador item
View All Support Options Below
Free Thermador T18ID800RP manuals!
Problems with Thermador T18ID800RP?
Ask a Question
Free Thermador T18ID800RP manuals!
Problems with Thermador T18ID800RP?
Ask a Question
Thermador T18ID800RP Videos

Thermador T18ID800RP Upright Freezer
Duration: :58
Total Views: 9
Duration: :58
Total Views: 9
Popular Thermador T18ID800RP Manual Pages
Installation Manual - Page 4

.../changing over the sealing mat 27 Side-by -Side 6 Individual appliances with partition 6 Individual appliance at the end of the appliance 12 4. Table of Contents
IMPORTANT SAFETY INSTRUCTIONS 5 Installation options 6 Individual appliance 6 Side-by -Side installation 27 Preparing to connect the water 30 Connecting the water to the door panel 20 9. Attaching the lower bracket 22...
Installation Manual - Page 5
... under the Appliance Warranty. Repairs should be made by a qualified service technician. Observe all governing codes and ordinances. latest edition/State and Municipal codes and/or local codes.
In Canada, in particular.
5
General
These installation instructions are top-heavy and must be secured to leave these instructions with your Owner's Manual for water, electrical power...
Installation Manual - Page 7

... open the door until there is essential that the installation enclosure is required.
Aligning the appliance
To ensure that the appliance is not level, water may flow out of a fully loaded appliance, a load-bearing floor is square. Stable installation
The appliance is opened.
Floor
, WARNING:
A fully-loaded appliance is very heavy:
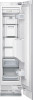
Refrigerator 24" approx. 310 Ibs/140 kg...
Installation Manual - Page 8

... psi. (1.72-8.25 bar). For the permitted installation areas and dimensions see "Installation dimensions". IceMaker) Freezer 24" (incl. Grounding instruction
This appliance must be behind the appliance.
Never ground the appliance to drinking water! When installing the water connection, observe the permitted installation areas for the water connection must be located at the side...
Installation Manual - Page 9
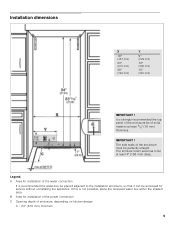
...of the water connection
It is not possible, place the recessed water box within the shaded area.
Legend: A Area for installation of solid material at least 4" (100 mm) deep. Installation dimensions
X
...9 If this is recommended the water-box be placed adjacent to be at least 5/8" (16 mm) thickness. B Area for service without uninstalling the appliance. It is strongly recommended the...
Installation Manual - Page 10

...screwdriver T20
5/16" (8 mm) hex nut driver
Wood drills in different
sizes Wooden beam (cross section min. 3" x 4") as an
alternative tip protection, length according to Refrigerator.
Other required accessories
Ice maker installation kit 1/4" OD copper line For connecting appliances which require water, e.g.
Panel unification part (Metal strip) FPCONNTS10 For connection of the...
Installation Manual - Page 11

... dealer. Remove accessories from inside the appliance until the installation is very heavy!
5. Remove transportation protection devices (a) and lift appliance off the pallet - Checking the installation enclosure
, CAUTION:
Use the following installation instructions describe the installation steps for various appliance types:
Refrigerator units
Freezer units
...
Installation Manual - Page 12

... door hinges".
Sealing mat, see "Removing/ changing over the sealing mat"
Side-by-Side installation, see "Sideby-Side installation".
Connecting the water, see "Preparing to connect the water" an "Connecting the water to the next chapter. Secure the appliance during transportation to be transported horizontally. Never push it from the front under the...
Installation Manual - Page 16
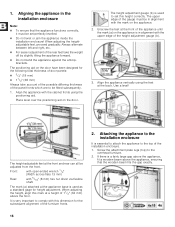
...) hex nut driver via flexible shaft. Unscrew the feet at the front and rear can all be fitted subsequently.
1. When adjusting the height, align this height correctly. Place level over the positioning aid on the appliance is used to set perfectly levelled.
Do not twist or jam the appliance inside the installation enclosure!
Screw...
Installation Manual - Page 17
...).
4. Instructions are special installation steps.
If there enough room on the bars of the enclosure.
5. 3. Screw on the top of the appliance fix the attachment plate side lugs (top) to the side of the fastening sheets (lateral) with the cabinet parts located next to the appliance".
17 These are provided after section C. Connecting the water...
Installation Manual - Page 19

... the door panel must be attached instead of damage caused by leaking water from the appliance door. Loading the appliance door
When attaching the door panels, it is recommended to load the door storage compartments in an installation step later.
19 Removing the installation support part
Unscrew the positioning aid from damage possibly caused to avoid the...
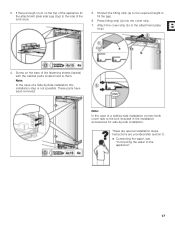
Installation Manual - Page 28
... to step 6. Attach the mat always left standing appliance! 4. Secure the sealing mat with self adhesive tape.
6. Place the water-absorbing stripes from the Side-bySide kit on the side wall and secure with the pins.
28 Continues the work to both appliances! Unscrew the base panels.
5. Note: Freezers are factory...
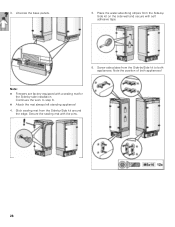
Installation Manual - Page 29
... in the Side-by-Side kit to the upper side of both appliances.
10. Push the appliances together at the top with Water pump pliers (A).
13. Loosen the screws on the top of the appliance and screw the installation aids to both appliances.
8. Push the appliances together until the hinge halves interlock.
9. Insert pins into the upper...
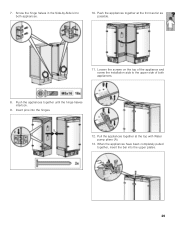
Installation Manual - Page 30
... into the lower plates. Install the water line. Always observe the indicated dimensions to prevent damage to the instructions supplied by -Side kit.
30 Attach the water line to the shut-off the main water tap to the bolt included in the appliance.
16. Preparing to connect the water
(only for appliances which require a water connection)
Note:
Turn off...
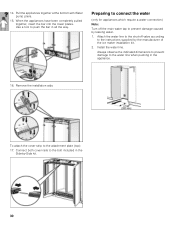
Installation Manual - Page 31
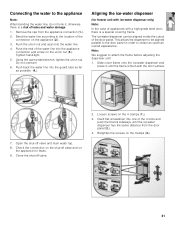
... to the location of the 4 slots and push the blocks sideways until the frame is flush with the door surface.
7. Connecting the water to the appliance
Note:
When bending the water line, do not kink it, otherwise there is a risk of the door panel. Remove the cap from the door panel (2.).
4. Push the...
Thermador T18ID800RP Reviews
We have not received any reviews for Thermador yet.