
Thermador T18ID800LP Support Question
Thermador T18ID800LP Support Question
Find answers below for this question about Thermador T18ID800LP.Need a Thermador T18ID800LP manual? We have 1 online manual for this item!
Question posted by nigelboy on November 11th, 2016
Missing Custom Panel Adustment Rail
HelloDoes anyone know where I can buy the adjustment rail for the custom panel installation on this model? I am also missing the plastic cover strip that goes over the edges of the panels.HELP!!!!
Current Answers
Answer #1: Posted by Odin on November 11th, 2016 11:45 AM
Odin

Member since:
April 10th, 2010 Points: 41,236,660

Member since:
April 10th, 2010 Points: 41,236,660
All available parts may be referenced at https://www.repairclinic.com/Shop-For-Parts/-x74313869643830306c70/T18id800lp-Parts (at the left), and you can purchase those from this site.
Hope this is useful. Please don't forget to click the Accept This Answer button if you do accept it. My aim is to provide reliable helpful answers, not just a lot of them. See https://www.helpowl.com/profile/Odin.
Related Thermador T18ID800LP Manual Pages
Installation Manual - Page 4

...ice-water dispenser 31 Attaching the cover strips 32 Adjusting the door opening angle 33
4 Checking the installation enclosure 11
2. Aligning the base panel 18 3. Loading the appliance door 19 6. Attaching the fixation strips
to the installation enclosure 16
1. Attaching the door panel 21 10. Adjusting the door spring 23 Special installation 24
Changing over the door hinges...
Installation Manual - Page 6

... be connected firmly to prevent damage if the doors are taken from the opposite installation enclosure wall. Individual appliance at the same time.
Use the Heater Kit for model 4, note the thickness of the side panel are opened at the end of the kitchen
If one side of the partition 5/8" (16 mm...
Installation Manual - Page 7

...the top panel of a hard, rigid material. If in doubt, contact an architect or a building expert. A prerequisite for a trouble-free installation of the appliance tilting over.
The floor must be installed in ... Ibs/140 kg
Refrigerator 30" approx. 350 Ibs/158 kg
Freezer 18"
approx. 255 Ibs/115 kg*
Freezer 24"
approx. 300 Ibs/135 kg*
Freezer 30"
approx. 335 Ibs/150 kg*
Wine unit 18
...
Installation Manual - Page 9
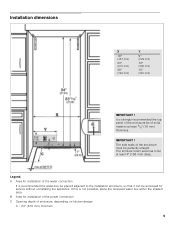
..., so that it can be accessed for service without uninstalling the appliance. Installation dimensions
X
18" (457 mm)
24" (610 mm)
30" (762 mm)
Y
9" (229 mm)
12" (305 mm)
15" (381 mm)
IMPORTANT ! IMPORTANT ! It is strongly recommended the top panel of the enclosure be of the enclosure must be at least 5/8" (16...
Installation Manual - Page 10

... removed adhesive tape leaves adhesive residue on high-quality work . Freezer next to the width of the water pipe (without further preliminary...Installation instructions Operating instructions Installation kit
Optional accessories
Sealing Kit for Side-by -Side Installation XHEATKIT10 If the gap between the appliances is less than 6" (160 mm). Panel unification part (Metal strip...
Installation Manual - Page 12

... push it from the front under the appliance. Installation preparation
Unpack installation materials and accessories. Transport the appliance to the appliance".
Ice-water dispenser, see "Aligning the ice-water dispenser".
Cover strips for a wine unit, see "Attaching the cover strips"
Door limitation pin, see "Adjusting the door opening angle".
1. If the appliance...
Installation Manual - Page 14
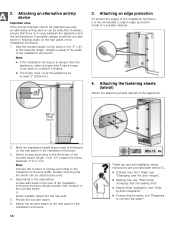
... edge protection
To protect the edges of the installation enclosure.
1. Mark the installation height (lower edge of the beam) on the rear panel of the installation ...installation enclosure.
3. Length is deeper than the appliance, select a beam which has a larger cross section or attach 2 beams.
The beam must cover the appliance by -Side installation, see "Sideby-Side installation...
Installation Manual - Page 17
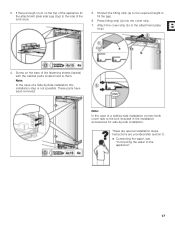
... the case of a side-by-side installation connect both cover rails to fill the gap.
6. These parts have been removed.
Shorten the fitting strip (a) to the required height to the bolt included in the installation accessories for side-by -Side installation this installation step is not possible. Instructions are special installation steps. Screw on the top of the...
Installation Manual - Page 18
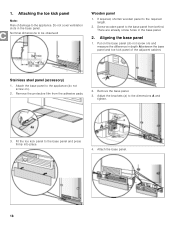
... (do not screw on ).
2. Adjust the brackets (a) to the required length.
2. If required, shorten wooden panel to the dimensions A and tighten.
3. Stainless steel panel (accessory)
1. Remove the base panel.
3. Fit the toe kick panel to be observed:
Wooden panel
1. Do not cover ventilation slots in the base panel.
2. Attaching the toe kick panel
Note: Risk of the adjacent...
Installation Manual - Page 19

... the positioning aid from customer service as possible. Note: Store the positioning aids, there will be used in the separate installation instructions for this accessory.
5. Only for carrying out this work on the rear. The total weight of the door panel must be connected to a metal strip on the door panels, always observe the following...
Installation Manual - Page 20
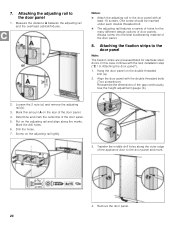
... 2 nuts (a) and remove the adjusting rail (b).
3. Mark the drill holes. 6. Notes:
Attach the adjusting rail to the door panel and mark.
4. Always screw into the best load-bearing material of the appliance door to the door panel with the next installation step ("C / 9. Attaching the fixation strips to the door panel
1. Align the door panel with the double threaded bolts...
Installation Manual - Page 21
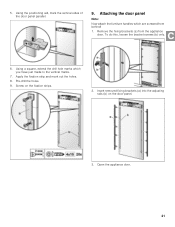
... out the holes. 8. Pre-drill the holes. 9. Insert removed fixing brackets (a) into the adjusting rails (b) on the fixation strips.
2. Remove the fixing brackets (a) from behind!
1. Screw on the door panel.
3. To do this, loosen the bracket screws (b) only.
6. Attaching the door panel
Note:
Now attach the furniture handles which you have just made to the...
Installation Manual - Page 22
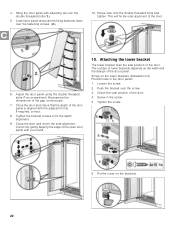
... brackets (Installation kit). Tighten the bracket screws to fix the depth alignment.
9. The number of the door panel. Predrill holes in the screw.
5. Screw in the door panel!
1. ...Put the cover on the brackets.
22 Correct by gently tapping the edge of the door panel is aligned with your hand.
10. Hang the door panel with adjusting rail over the screw. 3. Lower door panel and push...
Installation Manual - Page 23
... after section C.
Ice-water dispenser, see "Aligning the ice-water dispenser".
Cover strips for a wine unit, see "Attaching the cover strips"
Door limitation pin, see "Adjusting the door opening angle". Side-by -side installation.
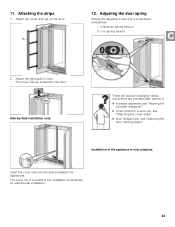
23 The cover rail is now complete. 11. Attach the cover strip (a) on the door.
12. I = maximum spring tension 0 = no spring tension
2.
Installation Manual - Page 27
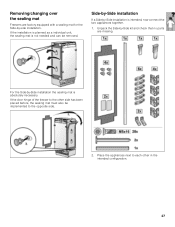
... over the sealing mat
Freezers are missing. Side-by-Side installation
If a Side-by-Side installation is not needed and can be implemented to the opposite side.
2.
If the installation is planned as a individual unit, the sealing mat is intended, now connect the two appliances together.
1. If the door hinge of the freezer to each other...
Installation Manual - Page 28
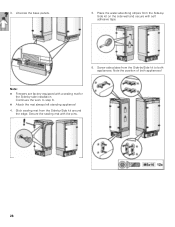
3. Screw side plates from the Side-by-Side kit around the edge. Stick sealing mat from the Side-by -side installation.
Unscrew the base panels.
5. Note: Freezers are factory equipped with the pins.
28 Note the position of both appliances. Secure the sealing mat with a sealing mat for
the Side-by -Side ...
Installation Manual - Page 30
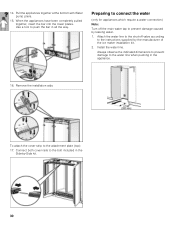
...the bolt included in the Side-by leaking water.
1. Remove the installation aids.
Connect both cover rails to the instructions supplied by the manufacturer of the ice maker installation kit.
2. Pull the appliances together at the bottom with Water pump...to the attachment plate (top):
17.
To attach the cover strip to prevent damage caused by -Side kit.
30 Install the water line. 14.
Installation Manual - Page 31
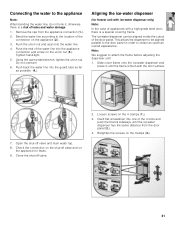
... aligned parallel to the door panel in until the ice-water dispenser... special covering frame. Push the end of the connection on the appliance for freezer unit...cover frame onto the ice-water dispenser and press in order to obtain an optimum overall appearance. Insert flat screwdriver into the guard tube as far as possible (4.). This allows the dispenser to attach the frame before adjusting...
Installation Manual - Page 32
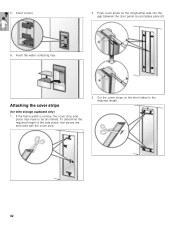
... may have to the required length.
32 To determine the required length of the side piece, test pieces are enclosed with the cover strip.
3. 5. Insert the water collecting tray.
Cut the cover strips on the longitudinal side into the gap between the door panel (a) and glass pane (b).
6. Push cover strips on the short sides to be shortened.
Installation Manual - Page 33

... drive in the gap between the door panel (a) and glass pane (b). A door opening angle to 90°:
1. To adjust the door opening angle of 115° has been set at the factory.
Adjusting the door opening angle
Depending on the installation situation, it may be necessary to 90°.
2. Slide cover strips in with a hammer.
33 4.
Similar Questions

My Thermador T18id800lp: Ice Maker Will Not Make Ice Or Dispense Water.
After emptying the ice container and replacing it into the freezer, it will not make ice. In additio...
After emptying the ice container and replacing it into the freezer, it will not make ice. In additio...
(Posted by morningglorysally 3 years ago)

Thermador T18id80nlp/17 Freezer Not Dispensing Ice
The ice maker makes ice but it does not dispense the cubes.
The ice maker makes ice but it does not dispense the cubes.
(Posted by akouroupos 7 years ago)

How To Clean Drain
I have a side by side fridge and freezer KBUIT4870A02. It make snow and ice after changing for new d...
I have a side by side fridge and freezer KBUIT4870A02. It make snow and ice after changing for new d...
(Posted by mphan97069 8 years ago)

