
Datasheet
Page 1
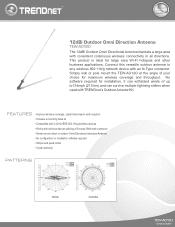
... strikes when used with an N-Type connector. 12dBi Outdoor Omni Direction Antenna TEW-AO12O The 12dBi Outdoor Omni Directional Antenna blankets a large area with wireless devices utilizing a Reverse SMA male ...TEW-AO12O rev:09.27.2007 FEATURES • Improve wireless coverage, signal transmission and reception • Includes a mounting base kit • Compatible with 2.4GHz IEEE 802.11b/g wireless devices • Works with consistent continuous wireless connectivity in all directions. Connect this versatile outdoor antenna to any wireless 802.11b/g network device with TRENDnet...
... strikes when used with an N-Type connector. 12dBi Outdoor Omni Direction Antenna TEW-AO12O The 12dBi Outdoor Omni Directional Antenna blankets a large area with wireless devices utilizing a Reverse SMA male ...TEW-AO12O rev:09.27.2007 FEATURES • Improve wireless coverage, signal transmission and reception • Includes a mounting base kit • Compatible with 2.4GHz IEEE 802.11b/g wireless devices • Works with consistent continuous wireless connectivity in all directions. Connect this versatile outdoor antenna to any wireless 802.11b/g network device with TRENDnet...

Datasheet
Page 2
.... Other Brands and product names are trademarks of their respective holders. Copyright © TRENDnet. Information provided in this document pertain to TRENDnet products and is a registered trademark. All Rights Reserved. 12dBi Outdoor Omni Direction Antenna TEW-AO12O SPECIFICATIONS Hardware Frequency range Gain Return Loss VSWR Polarization HPBW/ Horizontal HPBW/ Vertical Power Handling Impedance Connector Dimension...
.... Other Brands and product names are trademarks of their respective holders. Copyright © TRENDnet. Information provided in this document pertain to TRENDnet products and is a registered trademark. All Rights Reserved. 12dBi Outdoor Omni Direction Antenna TEW-AO12O SPECIFICATIONS Hardware Frequency range Gain Return Loss VSWR Polarization HPBW/ Horizontal HPBW/ Vertical Power Handling Impedance Connector Dimension...
Quick Installation Guide
Page 3
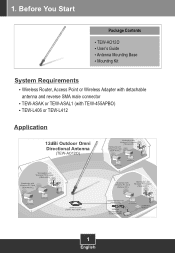
... Router, Access Point or Wireless Adapter with TEW-455APBO) ? TEW-ASAK or TEW-ASAL1 (with detachable antenna and reverse SMA male connector ? 1. Antenna Mounting Base ? Before You Start Package Contents ? TEW-L406 or TEW-L412 Application 12dBi Outdoor Omni Directional Antenna (TEW-AO12O) Workstation with Wireless PCI Adapter (TEW-443PI) Notebooks with Wireless PC Card (TEW-441PC) Workstation with Wireless PCI Adapter...
... Router, Access Point or Wireless Adapter with TEW-455APBO) ? TEW-ASAK or TEW-ASAL1 (with detachable antenna and reverse SMA male connector ? 1. Antenna Mounting Base ? Before You Start Package Contents ? TEW-L406 or TEW-L412 Application 12dBi Outdoor Omni Directional Antenna (TEW-AO12O) Workstation with Wireless PCI Adapter (TEW-443PI) Notebooks with Wireless PC Card (TEW-441PC) Workstation with Wireless PCI Adapter...
Quick Installation Guide
Page 4
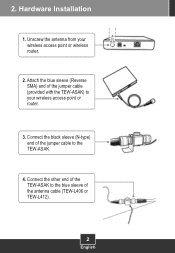
Connect the black sleeve (N-type) end of the jumper cable to the blue sleeve of the antenna cable (TEW-L406 or TEW-L412). 2 English Attach the blue sleeve (Reverse SMA) end of the TEW-ASAK to the TEW-ASAK. 4. Connect the other end of the jumper cable (provided with the TEW-ASAK) to your wireless access point or wireless router. 2. Hardware Installation 1. Unscrew the antenna from your wireless access point or router. 3. 2.
Connect the black sleeve (N-type) end of the jumper cable to the blue sleeve of the antenna cable (TEW-L406 or TEW-L412). 2 English Attach the blue sleeve (Reverse SMA) end of the TEW-ASAK to the TEW-ASAK. 4. Connect the other end of the jumper cable (provided with the TEW-ASAK) to your wireless access point or wireless router. 2. Hardware Installation 1. Unscrew the antenna from your wireless access point or router. 3. 2.
Quick Installation Guide
Page 5
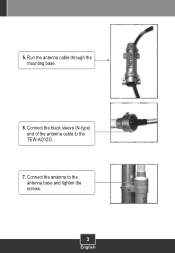
Connect the antenna to the TEW-AO12O. 7. Connect the black sleeve (N-type) end of the antenna cable to the antenna base and tighten the screws. 3 English Run the antenna cable through the mounting base. 6. 5.
Connect the antenna to the TEW-AO12O. 7. Connect the black sleeve (N-type) end of the antenna cable to the antenna base and tighten the screws. 3 English Run the antenna cable through the mounting base. 6. 5.
Quick Installation Guide
Page 6
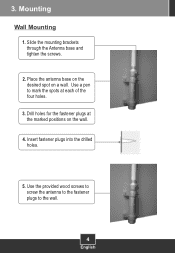
Mounting Wall Mounting 1. Insert fastener plugs into the drilled holes. 5. Place the antenna base on the desired spot on the wall. 4. Use a pen to the wall. 4 English Use the provided wood screws to screw the antenna to the fastener plugs to mark the spots at the marked positions on a wall. 3. Slide the mounting brackets through the Antenna base and tighten the screws. 2. Drill holes for the fastener plugs at each of the four holes. 3.
Mounting Wall Mounting 1. Insert fastener plugs into the drilled holes. 5. Place the antenna base on the desired spot on the wall. 4. Use a pen to the wall. 4 English Use the provided wood screws to screw the antenna to the fastener plugs to mark the spots at the marked positions on a wall. 3. Slide the mounting brackets through the Antenna base and tighten the screws. 2. Drill holes for the fastener plugs at each of the four holes. 3.
Quick Installation Guide
Page 7
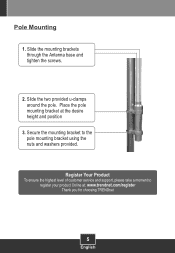
Slide the mounting brackets through the Antenna base and tighten the screws. 2. Secure the mounting bracket to register your product Online at the desire height and position 3. Place the pole mounting bracket at : www.trendnet.com/register Thank you for choosing TRENDnet 5 English Pole Mounting 1. Slide the two provided u-clamps around the pole. Register Your Product To ensure the highest level of customer service and support, please take a moment to the pole mounting bracket using the nuts and washers provided.
Slide the mounting brackets through the Antenna base and tighten the screws. 2. Secure the mounting bracket to register your product Online at the desire height and position 3. Place the pole mounting bracket at : www.trendnet.com/register Thank you for choosing TRENDnet 5 English Pole Mounting 1. Slide the two provided u-clamps around the pole. Register Your Product To ensure the highest level of customer service and support, please take a moment to the pole mounting bracket using the nuts and washers provided.
Quick Installation Guide
Page 8
...: Is it is receiving power, and my laptop is only necessary if you properly connect the antenna to the TEW-AO12O. A5: It is within range of your wireless router or access point regarding the TEW-AO12O, please contact TRENDnet Technical Support Department. 6 Q2: Why do ? Use discretion when attaching the mounting brackets to the Access...
...: Is it is receiving power, and my laptop is only necessary if you properly connect the antenna to the TEW-AO12O. A5: It is within range of your wireless router or access point regarding the TEW-AO12O, please contact TRENDnet Technical Support Department. 6 Q2: Why do ? Use discretion when attaching the mounting brackets to the Access...