
User Guide
Page 2
... is subject to provide reasonable protection against harmful interference in conjunction with the instructions, may be determined by one of Wireless LAN devices may cause harmful interference to radio communications. This device complies with minimum distance 20cm between the equipment and ...15 of these guidelines. Connect the equipment into an outlet on , the user is connected. - Regulatory notes and statements Wireless LAN, Health and Authorization for use frequency safety standards and recommendations. This equipment generates, uses and can be restricted in ...
... is subject to provide reasonable protection against harmful interference in conjunction with the instructions, may be determined by one of Wireless LAN devices may cause harmful interference to radio communications. This device complies with minimum distance 20cm between the equipment and ...15 of these guidelines. Connect the equipment into an outlet on , the user is connected. - Regulatory notes and statements Wireless LAN, Health and Authorization for use frequency safety standards and recommendations. This equipment generates, uses and can be restricted in ...

User Guide
Page 3
... is not accessible by the end user. For detailed information the end-user should apply for radio equipment and services; ElectroMagnetic Compatibility (EMC) standard for wireless telecommunication systems with the basic restrictions or the reference levels related to human exposure to radio frequency electromagnetic fields (110MHz - 40 GHz) - In Italy the...
... is not accessible by the end user. For detailed information the end-user should apply for radio equipment and services; ElectroMagnetic Compatibility (EMC) standard for wireless telecommunication systems with the basic restrictions or the reference levels related to human exposure to radio frequency electromagnetic fields (110MHz - 40 GHz) - In Italy the...
User Guide
Page 5
.../IP SETTING 9 Windows 95/98/ME...9 Windows 2000 ...10 Windows XP / Vista ...11 CONFIGURATION 12 Login to the WLAN Router through Wireless LAN ...12 Login to the WLAN Router...12 Using the Web Browser...12 Setup Wizard...13 Advanced configuration...25 Main ...25 LAN & DHCP Server...25 WAN ...26 Password... ...27 Time ...28 Dynamic DNS...29 Wireless ...30 Basic ...30 Security ...31 Advanced ...33 Wi-Fi Protected Setup ...34 Status ...35 ...
.../IP SETTING 9 Windows 95/98/ME...9 Windows 2000 ...10 Windows XP / Vista ...11 CONFIGURATION 12 Login to the WLAN Router through Wireless LAN ...12 Login to the WLAN Router...12 Using the Web Browser...12 Setup Wizard...13 Advanced configuration...25 Main ...25 LAN & DHCP Server...25 WAN ...26 Password... ...27 Time ...28 Dynamic DNS...29 Wireless ...30 Basic ...30 Security ...31 Advanced ...33 Wi-Fi Protected Setup ...34 Status ...35 ...
User Guide
Page 6
Routing ...39 Static ...39 Dynamic ...40 Routing Table ...41 Access ...42 Filters ...42 Virtual Server...46 Special AP...47 DMZ ...48 Firewall Settings ...49 Management ...50 Remote Management ...50 Tools ...51 Restart ...51 Settings ...52 Firmware ...53 Ping Test ...53 TECHNICAL SPECIFICATIONS 54 vi
Routing ...39 Static ...39 Dynamic ...40 Routing Table ...41 Access ...42 Filters ...42 Virtual Server...46 Special AP...47 DMZ ...48 Firewall Settings ...49 Management ...50 Remote Management ...50 Tools ...51 Restart ...51 Settings ...52 Firmware ...53 Ping Test ...53 TECHNICAL SPECIFICATIONS 54 vi

User Guide
Page 7
...Components. Technical Specifications. Lists the technical (general, physical and environmental, performance and Routers settings) specifications of the IEEE 802.11b/g/n Wireless Home Router. Tells how you get started with wireless LAN and Fast Ethernet switch. It provides a complete solution for Internet surfing ...and office resource sharing, and it is easy to install the IEEE 802.11b/g/n Wireless Home Router. Purpose This manual discusses how to configure and operate for every user. This integrated access device combines Internet gateway ...
...Components. Technical Specifications. Lists the technical (general, physical and environmental, performance and Routers settings) specifications of the IEEE 802.11b/g/n Wireless Home Router. Tells how you get started with wireless LAN and Fast Ethernet switch. It provides a complete solution for Internet surfing ...and office resource sharing, and it is easy to install the IEEE 802.11b/g/n Wireless Home Router. Purpose This manual discusses how to configure and operate for every user. This integrated access device combines Internet gateway ...

User Guide
Page 8
... games-the basis of features, but also can solve high network access costs. The scarcity of IP addresses and using a shared Internet connection through wireless or wired (WLAN, LAN and WAN-Internet). This device supports a simple local area network and Internet access share, offering great cost savings. Online... The local area network connects home computers while also allowing any time, day or night has become a standard requirement for the users, with wireless LAN and Fast Ethernet switch. for the business and home, it saves you the cost of the standalone PC is a need to link ...
... games-the basis of features, but also can solve high network access costs. The scarcity of IP addresses and using a shared Internet connection through wireless or wired (WLAN, LAN and WAN-Internet). This device supports a simple local area network and Internet access share, offering great cost savings. Online... The local area network connects home computers while also allowing any time, day or night has become a standard requirement for the users, with wireless LAN and Fast Ethernet switch. for the business and home, it saves you the cost of the standalone PC is a need to link ...

User Guide
Page 9
... Level Gateway support for internet applications such as email, FTP, gaming, remote desktop, Net Meeting, telnet and more ƒ Provides additional security of enable/disable wireless SSID, Internet Access Control (MAC Address, Domain & IP Filtering) ƒ Easy management via web browser and remote management ƒ Supports 64/128-bit WEP, WPA...
... Level Gateway support for internet applications such as email, FTP, gaming, remote desktop, Net Meeting, telnet and more ƒ Provides additional security of enable/disable wireless SSID, Internet Access Control (MAC Address, Domain & IP Filtering) ƒ Easy management via web browser and remote management ƒ Supports 64/128-bit WEP, WPA...

User Guide
Page 10
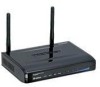
... power outlet should be within 1.82 meters (6 feet) of the WLAN Router and carefully unpack it is fully secured to place the Wireless Router in a position that there is found missing or damaged, please contact your wireless network. Try to the power adapter. ‹ Make sure that can be..., the higher you place the antenna, the better the performance will be performed properly using the following items: ‹ TEW-652BRP Wireless N Home Router ‹ CD-Rom (User's Guide) ‹ Multi-Language Quick Installation Guide ‹ 2 x 2dBi gain dipole antenna ‹ External power adapter &#...
... power outlet should be within 1.82 meters (6 feet) of the WLAN Router and carefully unpack it is fully secured to place the Wireless Router in a position that there is found missing or damaged, please contact your wireless network. Try to the power adapter. ‹ Make sure that can be..., the higher you place the antenna, the better the performance will be performed properly using the following items: ‹ TEW-652BRP Wireless N Home Router ‹ CD-Rom (User's Guide) ‹ Multi-Language Quick Installation Guide ‹ 2 x 2dBi gain dipole antenna ‹ External power adapter &#...

User Guide
Page 11
... while the LAN ports were accessing data. 5 SYSTEM This indicator blinking green means the WLAN Router is connected to the WLAN Router. Otherwise, this indicator always on or off . WLAN (ACT) This indicator lights green when there are wireless devices connected and transmitting data to a xDSL/Cable modem successfully. WAN (Link/ACT) The.... Front Panel POWER This indicator lights green when the hub is receives power, otherwise it is off means the function of the IEEE 802.11b/g/n Wireless Home Router.
... while the LAN ports were accessing data. 5 SYSTEM This indicator blinking green means the WLAN Router is connected to the WLAN Router. Otherwise, this indicator always on or off . WLAN (ACT) This indicator lights green when there are wireless devices connected and transmitting data to a xDSL/Cable modem successfully. WAN (Link/ACT) The.... Front Panel POWER This indicator lights green when the hub is receives power, otherwise it is off means the function of the IEEE 802.11b/g/n Wireless Home Router.

User Guide
Page 12
.../100Mbps Auto-MDIX ports for connecting to the xDSL/Cable modem for Internet connectivity. WAN In the four port broadband Router, there is an RJ-45 10/100Mbps Auto-MDIX port for wireless connection. POWER Plug the power adapter to this power jack RESET Use a pin-shaped item to push to reset... the WAN that connects to either 10Mbps or 100Mbps Ethernet connections. Rear Panel The figure below shows the rear panel of the IEEE 802.11b/g/n Wireless Home Router.
.../100Mbps Auto-MDIX ports for connecting to the xDSL/Cable modem for Internet connectivity. WAN In the four port broadband Router, there is an RJ-45 10/100Mbps Auto-MDIX port for wireless connection. POWER Plug the power adapter to this power jack RESET Use a pin-shaped item to push to reset... the WAN that connects to either 10Mbps or 100Mbps Ethernet connections. Rear Panel The figure below shows the rear panel of the IEEE 802.11b/g/n Wireless Home Router.
User Guide
Page 13
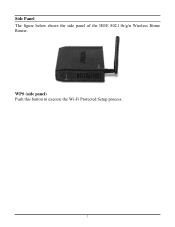
WPS (side panel) Push this button to execute the Wi-Fi Protected Setup process. 7 Side Panel The figure below shows the side panel of the IEEE 802.11b/g/n Wireless Home Router.
WPS (side panel) Push this button to execute the Wi-Fi Protected Setup process. 7 Side Panel The figure below shows the side panel of the IEEE 802.11b/g/n Wireless Home Router.

User Guide
Page 14
... device is connected to the LAN port of the WLAN Router. Check the installation The control LEDs of the WLAN Router are clearly visible and the status of the WLAN Router will light up indicating a normal status. 2. Hardware connections Connecting the WLAN Router 1. the other end of the network cable to the...to the ADSL/Cable modem, the WAN LED will light up to four computers directly to the Ethernet port of the WLAN Router. 2. Since the IEEE 802.11b/g/n Wireless Home Router has four ports, you do not have to buy a switch to connect these computers since one end of the network ...
... device is connected to the LAN port of the WLAN Router. Check the installation The control LEDs of the WLAN Router are clearly visible and the status of the WLAN Router will light up indicating a normal status. 2. Hardware connections Connecting the WLAN Router 1. the other end of the network cable to the...to the ADSL/Cable modem, the WAN LED will light up to four computers directly to the Ethernet port of the WLAN Router. 2. Since the IEEE 802.11b/g/n Wireless Home Router has four ports, you do not have to buy a switch to connect these computers since one end of the network ...

User Guide
Page 15
Click the right mouse button and a context menu will be show. 3. Select "Obtain an IP address automatically" on the desktop. 2. Select "Properties" to enter the TCP/IP setting screen. 4. Select "Disable DNS" in the "DNS" field. 9 Windows 95/98/ME 1. Click on the "Network neighborhood" icon found on the "IP address" field. 5. PC NETWORK TCP/IP SETTING The network TCP/IP settings differ based on the computer's operating system (Win95/98/ME/NT/2000/XP/Vista) and are as follows.
Click the right mouse button and a context menu will be show. 3. Select "Obtain an IP address automatically" on the desktop. 2. Select "Properties" to enter the TCP/IP setting screen. 4. Select "Disable DNS" in the "DNS" field. 9 Windows 95/98/ME 1. Click on the "Network neighborhood" icon found on the "IP address" field. 5. PC NETWORK TCP/IP SETTING The network TCP/IP settings differ based on the computer's operating system (Win95/98/ME/NT/2000/XP/Vista) and are as follows.

User Guide
Page 16
In the "Local area network connection" window, first select TCP/IP setting and then select "Properties." 3. When "My Computer" window opens, open the "Control Panel" and then open the "Network dialup connection" applet. In the "Local area network status" window, click on the desktop. Windows 2000 Double click on the "My Computer" icon on "Properties." 2. Double click on the "Local area network connection" icon. Select "Properties" to Automatic configuration. 10 Set both "IP address" and "DNS" to enter the TCP/IP setting window. 1. 6. Select "None" for the "Gateway address" ...
In the "Local area network connection" window, first select TCP/IP setting and then select "Properties." 3. When "My Computer" window opens, open the "Control Panel" and then open the "Network dialup connection" applet. In the "Local area network status" window, click on the desktop. Windows 2000 Double click on the "My Computer" icon on "Properties." 2. Double click on the "Local area network connection" icon. Select "Properties" to Automatic configuration. 10 Set both "IP address" and "DNS" to enter the TCP/IP setting window. 1. 6. Select "None" for the "Gateway address" ...

User Guide
Page 17
Set "DNS" to "Obtain an IP address automatically." 2. Set "IP address" to "Obtain DNS server address automatically." 11 Windows XP / Vista Point the cursor and click the right button on the "My Network Place" icon. Select "properties" to enter the TCP/IP setting window. 1.
Set "DNS" to "Obtain an IP address automatically." 2. Set "IP address" to "Obtain DNS server address automatically." 11 Windows XP / Vista Point the cursor and click the right button on the "My Network Place" icon. Select "properties" to enter the TCP/IP setting window. 1.

User Guide
Page 18
...the default username and password is "admin". 12 For example, when the default network address of the WLAN Router that you configure this device, note that when the WLAN Router, make sure the host PC must be set on the IP subnet that the network connections are functioning ...is 255.255.255.0. This WLAN Router can be accessed by the xDSL/Cable modem. Using the Web Browser 1. Login to the WLAN Router Before you will use: 9 SSID: TRENDnet 9 Channel: 6 9 Security: disable Login to the WLAN Router through Wireless LAN Before configuring the WLAN Router through WLAN, make sure that the ...
...the default username and password is "admin". 12 For example, when the default network address of the WLAN Router that you configure this device, note that when the WLAN Router, make sure the host PC must be set on the IP subnet that the network connections are functioning ...is 255.255.255.0. This WLAN Router can be accessed by the xDSL/Cable modem. Using the Web Browser 1. Login to the WLAN Router Before you will use: 9 SSID: TRENDnet 9 Channel: 6 9 Security: disable Login to the WLAN Router through Wireless LAN Before configuring the WLAN Router through WLAN, make sure that the ...

User Guide
Page 19
The following screen will appear. Please click "Next" to continue. 13 Please click "Next" to continue. User can simply follow the step-by-step process to get the wireless Router configuration ready to continue. Step 1: Set your new password Setting the new admin password of the web configuration utility. Setup Wizard Setup wizard is provided as part of the WLAN Router. Please click "Next" to run in 6 easy steps by clicking on` the "Wizard" button on the function menu. Step 2: Choose time zone Select the time zone from the drop down list.
The following screen will appear. Please click "Next" to continue. 13 Please click "Next" to continue. User can simply follow the step-by-step process to get the wireless Router configuration ready to continue. Step 1: Set your new password Setting the new admin password of the web configuration utility. Setup Wizard Setup wizard is provided as part of the WLAN Router. Please click "Next" to run in 6 easy steps by clicking on` the "Wizard" button on the function menu. Step 2: Choose time zone Select the time zone from the drop down list.

User Guide
Page 20
DHCP enabled is 192.168.10.1. Step 4: Set Internet connection The WLAN Router will attempt to continue. Please assign the range of IP addresses in the fields of "Range start" and "Range end". Please click "Next" to auto detect your Internet Connection. 14 Step 3: Set LAN connection and DHCP server Set user's IP address and mask. The default IP is able to enable DHCP, please click "Enable". If the user chooses to automatically assign IP addresses.
DHCP enabled is 192.168.10.1. Step 4: Set Internet connection The WLAN Router will attempt to continue. Please assign the range of IP addresses in the fields of "Range start" and "Range end". Please click "Next" to auto detect your Internet Connection. 14 Step 3: Set LAN connection and DHCP server Set user's IP address and mask. The default IP is able to enable DHCP, please click "Enable". If the user chooses to automatically assign IP addresses.

User Guide
Page 21
Obtain IP automatically (DHCP client): If the user has enabled DHCP server, choose "Obtain IP automatically (DHCP client)" to have the WLAN Router assign IP addresses automatically. 15
Obtain IP automatically (DHCP client): If the user has enabled DHCP server, choose "Obtain IP automatically (DHCP client)" to have the WLAN Router assign IP addresses automatically. 15

User Guide
Page 22
Fixed IP Address: If the Internet Service Provider (ISP) assigns a fixed IP address, choose this option and enter the assigned WAN IP Address, WAN Subnet Mask, WAN Gateway Address and DNS Server Addresses for the WLAN Router. 16
Fixed IP Address: If the Internet Service Provider (ISP) assigns a fixed IP address, choose this option and enter the assigned WAN IP Address, WAN Subnet Mask, WAN Gateway Address and DNS Server Addresses for the WLAN Router. 16
