
User Guide
Page 6
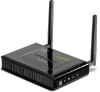
... for the 802.11e Quality of Service (QoS) standard • 2 removable antennas to support high speed performance and expanded coverage • Supports Wi-Fi Protected Setup (WPS) feature allowing you to your wireless network. Expand a wireless network without running additional cabling with 802.11b/g/n networks • Up to an existing wireless...
... for the 802.11e Quality of Service (QoS) standard • 2 removable antennas to support high speed performance and expanded coverage • Supports Wi-Fi Protected Setup (WPS) feature allowing you to your wireless network. Expand a wireless network without running additional cabling with 802.11b/g/n networks • Up to an existing wireless...

User Guide
Page 10
Click Setup Wizard button. 3. Read the License Agreement and click Next to continue the installation. Getting Started For a typical wireless setup at home or office, please do the following: 1. The Welcome screen appears on your CD-ROM drive. 2. Page 10 Insert Setup Wizard CD into your monitor.
Click Setup Wizard button. 3. Read the License Agreement and click Next to continue the installation. Getting Started For a typical wireless setup at home or office, please do the following: 1. The Welcome screen appears on your CD-ROM drive. 2. Page 10 Insert Setup Wizard CD into your monitor.
User Guide
Page 13
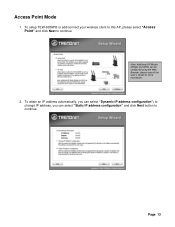
Access Point Mode 1. to change IP address, you can be configured using the Web Browser, please consult the User's Guide for more information. 2. To setup TEW-638APB or add/connect your wireless client to this AP, please select "Access Point" and click Next to continue. To attain an IP address automatically, you can select "Static IP address configuration" and click Next button to continue Note: Additional AP Modes (Bridge and WDS) can select "Dynamic IP address configuration"; Page 13
Access Point Mode 1. to change IP address, you can be configured using the Web Browser, please consult the User's Guide for more information. 2. To setup TEW-638APB or add/connect your wireless client to this AP, please select "Access Point" and click Next to continue. To attain an IP address automatically, you can select "Static IP address configuration" and click Next button to continue Note: Additional AP Modes (Bridge and WDS) can select "Dynamic IP address configuration"; Page 13
User Guide
Page 14
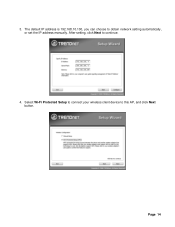
The default IP address is 192.168.10.100, you can choose to this AP, and click Next button. Select Wi-Fi Protected Setup to connect your wireless client device to obtain network setting automatically, or set the IP address manually. Page 14 After setting, click Next to continue. 4. 3.
The default IP address is 192.168.10.100, you can choose to this AP, and click Next button. Select Wi-Fi Protected Setup to connect your wireless client device to obtain network setting automatically, or set the IP address manually. Page 14 After setting, click Next to continue. 4. 3.

User Guide
Page 16
7. Enter SSID of TEW-638APB, click Next button. Page 16 To set TEW-638APB security, select Manual setup and click Next button 8.
7. Enter SSID of TEW-638APB, click Next button. Page 16 To set TEW-638APB security, select Manual setup and click Next button 8.
User Guide
Page 20
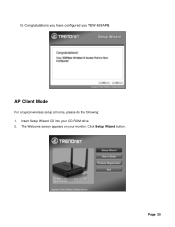
AP Client Mode For a typical wireless setup at home, please do the following: 1. 15. Click Setup Wizard button. Congratulations you have configured you TEW-638APB. Insert Setup Wizard CD into your monitor. The Welcome screen appears on your CD-ROM drive. 2. Page 20
AP Client Mode For a typical wireless setup at home, please do the following: 1. 15. Click Setup Wizard button. Congratulations you have configured you TEW-638APB. Insert Setup Wizard CD into your monitor. The Welcome screen appears on your CD-ROM drive. 2. Page 20

User Guide
Page 29
WPS FUNCTION: Select WPS to connect your wireless client device to make connection. 19. Use Push Button Method, click Connect button to this AP. Select one of the wireless client device to this AP 20. You also need to enable WPS function of the Wi-Fi Protected Setup methods to connect your wireless client device to continue. Page 29
WPS FUNCTION: Select WPS to connect your wireless client device to make connection. 19. Use Push Button Method, click Connect button to this AP. Select one of the wireless client device to this AP 20. You also need to enable WPS function of the Wi-Fi Protected Setup methods to connect your wireless client device to continue. Page 29

User Guide
Page 48
Page 48 Wireless WPS You can be selected - WPS mode Two WPS modes can setup security easily by choosing PIN or PBC method to get wireless connection with this AP. PIN & PBC. If PIN is selected, you should enter PIN code of your wireless client device to do Wi-Fi Protected Setup.
Page 48 Wireless WPS You can be selected - WPS mode Two WPS modes can setup security easily by choosing PIN or PBC method to get wireless connection with this AP. PIN & PBC. If PIN is selected, you should enter PIN code of your wireless client device to do Wi-Fi Protected Setup.

User Guide
Page 57
WPS You can be selected - PIN & PBC. Page 57 If PIN is selected, you should enter PIN code of your wireless client device to do Wi-Fi Protected Setup. Two WPS modes can setup security easily by choosing PIN or PBC method to get wireless connection with this AP.
WPS You can be selected - PIN & PBC. Page 57 If PIN is selected, you should enter PIN code of your wireless client device to do Wi-Fi Protected Setup. Two WPS modes can setup security easily by choosing PIN or PBC method to get wireless connection with this AP.

Quick Installation Guide
Page 4
For Windows Users 1. Insert Driver CD-ROM. 2. Click Setup Wizard. 4. 2. Hardware Installation Note: 1: Locate an optimum location for the Access Point is usually at the center of your wireless network. 2: Disable any anti-virus and firewall programs before starting hardware installation. The best place for the Access Point. Click I accept the terms in the License Agreement and then click Next. 2 English Click Run Setup.exe (Windows Vista only) 3.
For Windows Users 1. Insert Driver CD-ROM. 2. Click Setup Wizard. 4. 2. Hardware Installation Note: 1: Locate an optimum location for the Access Point is usually at the center of your wireless network. 2: Disable any anti-virus and firewall programs before starting hardware installation. The best place for the Access Point. Click I accept the terms in the License Agreement and then click Next. 2 English Click Run Setup.exe (Windows Vista only) 3.
Quick Installation Guide
Page 6
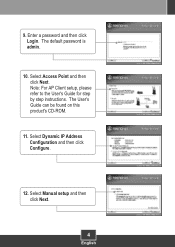
Note: For AP Client setup, please refer to the User's Guide for step by step instructions. The User's Guide can be found on this product's CD-ROM. 11. Select Access Point and then click Next. Select Manual setup and then click Next. 4 English 9. Enter a password and then click Login. The default password is admin. 10. Select Dynamic IP Address Configuration and then click Configure. 12.
Note: For AP Client setup, please refer to the User's Guide for step by step instructions. The User's Guide can be found on this product's CD-ROM. 11. Select Access Point and then click Next. Select Manual setup and then click Next. 4 English 9. Enter a password and then click Login. The default password is admin. 10. Select Dynamic IP Address Configuration and then click Configure. 12.
Quick Installation Guide
Page 10
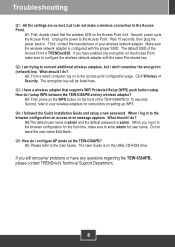
...-shared key. A4:The default user name is admin and the default password is TRENDnet638. Q5: How do I setup WPS between the TEW-638APB and my wireless adapter? If you still encounter problems or have a wireless adapter that the wireless LED on the ...log on the TEW-638APB? When you have enabled any questions regarding the TEW-638APB, please contact TRENDnet's Technical Support Department. 8 Click Wireless -> Security. The encryption key will be listed here. What should I do ? A1: First, double check that supports WiFi Protected Setup (WPS) push button setup. Make sure the...
...-shared key. A4:The default user name is admin and the default password is TRENDnet638. Q5: How do I setup WPS between the TEW-638APB and my wireless adapter? If you still encounter problems or have a wireless adapter that the wireless LED on the ...log on the TEW-638APB? When you have enabled any questions regarding the TEW-638APB, please contact TRENDnet's Technical Support Department. 8 Click Wireless -> Security. The encryption key will be listed here. What should I do ? A1: First, double check that supports WiFi Protected Setup (WPS) push button setup. Make sure the...

