
User Guide
Page 5
... 5 Front Panel ...5 Rear Panel ...6 Side Panel...6 Hardware connections ...7 Connecting the WLAN Router...7 Check the installation ...7 PC NETWORK TCP/IP SETTING 8 Windows 95/98/ME...8 Windows 2000 ...9 Windows XP ...10 CONFIGURATION 11 Login to the WLAN Router through Wireless LAN ...11 Login to the WLAN Router...11 Using the Web Browser...11 Setup Wizard...12 Advanced configuration...22...
... 5 Front Panel ...5 Rear Panel ...6 Side Panel...6 Hardware connections ...7 Connecting the WLAN Router...7 Check the installation ...7 PC NETWORK TCP/IP SETTING 8 Windows 95/98/ME...8 Windows 2000 ...9 Windows XP ...10 CONFIGURATION 11 Login to the WLAN Router through Wireless LAN ...11 Login to the WLAN Router...11 Using the Web Browser...11 Setup Wizard...12 Advanced configuration...22...

User Guide
Page 14
PC NETWORK TCP/IP SETTING The network TCP/IP settings differ based on the "IP address" field. 5. Select "Properties" to enter the TCP/IP setting screen. 4. Select "Obtain an IP address automatically" on the computer's operating system (Win95/98/ME/NT/2000/XP) and are as follows. Select "Disable DNS" in the "DNS" field. 8 Click the right mouse button and a context menu will be show. 3. Windows 95/98/ME 1. Click on the "Network neighborhood" icon found on the desktop. 2.
PC NETWORK TCP/IP SETTING The network TCP/IP settings differ based on the "IP address" field. 5. Select "Properties" to enter the TCP/IP setting screen. 4. Select "Obtain an IP address automatically" on the computer's operating system (Win95/98/ME/NT/2000/XP) and are as follows. Select "Disable DNS" in the "DNS" field. 8 Click the right mouse button and a context menu will be show. 3. Windows 95/98/ME 1. Click on the "Network neighborhood" icon found on the desktop. 2.

User Guide
Page 15
... Automatic configuration. In the "Local area network connection" window, first select TCP/IP setting and then select "Properties." 3. 6. Set both "IP address" and "DNS" to enter the TCP/IP setting window. 1. In the "Local area network status" window, click on the "Local area network connection" icon.... Select "None" for the "Gateway address" field. When "My Computer" window opens, open the "Control Panel" and then open the "...
... Automatic configuration. In the "Local area network connection" window, first select TCP/IP setting and then select "Properties." 3. 6. Set both "IP address" and "DNS" to enter the TCP/IP setting window. 1. In the "Local area network status" window, click on the "Local area network connection" icon.... Select "None" for the "Gateway address" field. When "My Computer" window opens, open the "Control Panel" and then open the "...

User Guide
Page 16
Select "properties" to "Obtain an IP address automatically." 2. Set "IP address" to enter the TCP/IP setting window. 1. Windows XP Point the cursor and click the right button on the "My Network Place" icon. Set "DNS" to "Obtain DNS server address automatically."
Select "properties" to "Obtain an IP address automatically." 2. Set "IP address" to enter the TCP/IP setting window. 1. Windows XP Point the cursor and click the right button on the "My Network Place" icon. Set "DNS" to "Obtain DNS server address automatically."
User Guide
Page 17
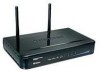
... IP address http://192.168.10.1 (the factory-default IP address setting) to the main configuration window, the default username and password is "admin". 11 This WLAN Router can be accessed by the xDSL/Cable modem. The default setting of the xDSL/Cable modem Ethernet interface...password to login to the URL web address location. 3. Login to the WLAN Router Before you will use: 9 SSID: TRENDnet 9 Channel: 6 9 Security: disable Login to the WLAN Router through Wireless LAN Before configuring the WLAN Router through WLAN, make sure that the SSID, Channel and the WEP is set properly...
... IP address http://192.168.10.1 (the factory-default IP address setting) to the main configuration window, the default username and password is "admin". 11 This WLAN Router can be accessed by the xDSL/Cable modem. The default setting of the xDSL/Cable modem Ethernet interface...password to login to the URL web address location. 3. Login to the WLAN Router Before you will use: 9 SSID: TRENDnet 9 Channel: 6 9 Security: disable Login to the WLAN Router through Wireless LAN Before configuring the WLAN Router through WLAN, make sure that the SSID, Channel and the WEP is set properly...

Quick Installation Guide
Page 8
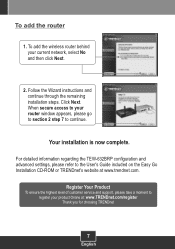
... Next to continue. If you have a DSL/Cable modem router. If you are adding the wireless router behind an existing router Note: When this window appears, it means you are replacing the current router with the wireless TEW-632BRP, please select Yes and click Next to continue. To replace current router 1. Follow the Wizard instructions and continue through the remaining...
... Next to continue. If you have a DSL/Cable modem router. If you are adding the wireless router behind an existing router Note: When this window appears, it means you are replacing the current router with the wireless TEW-632BRP, please select Yes and click Next to continue. To replace current router 1. Follow the Wizard instructions and continue through the remaining...
Quick Installation Guide
Page 9
To add the router 1. To add the wireless router behind your router window appears, please go to section 2 step 7 to the User's Guide included on the Easy Go Installation CD-ROM or TRENDnet's website at : www.TRENDnet.com/register Thank you for choosing TRENDnet 7 English Click Next. For detailed information regarding the TEW-632BRP configuration and advanced settings, please refer to... and support, please take a moment to your current network, select No and then click Next. 2. When secure access to register your product Online at www.trendnet.com.
To add the router 1. To add the wireless router behind your router window appears, please go to section 2 step 7 to the User's Guide included on the Easy Go Installation CD-ROM or TRENDnet's website at : www.TRENDnet.com/register Thank you for choosing TRENDnet 7 English Click Next. For detailed information regarding the TEW-632BRP configuration and advanced settings, please refer to... and support, please take a moment to your current network, select No and then click Next. 2. When secure access to register your product Online at www.trendnet.com.


