User Guide
Page 8
... a single Internet connection to share one high-speed broadband connection through an Internet sharing device can be easily setup. The scarcity of IP addresses and using a shared Internet connection through wireless or wired (WLAN, LAN and WAN-Internet). The local area network connects home computers while also allowing any time, day or night...
... a single Internet connection to share one high-speed broadband connection through an Internet sharing device can be easily setup. The scarcity of IP addresses and using a shared Internet connection through wireless or wired (WLAN, LAN and WAN-Internet). The local area network connects home computers while also allowing any time, day or night...

User Guide
Page 9
Supported Features: ¾ High speed data transfer rate ¾ NAT for sharing 1 IP address to all LAN/WLAN users. ¾ PPPoE and PPTP protocol for Dial-Up ADSL. ¾ 64/128 bit WEP Encryption ¾ WPA-PSK, WPA2-PSK, ... ¾ DHCP Server / Client. ¾ UPnP (Universal Plug and Play). ¾ WPS (Wi-Fi Protected Setup) ¾ Virtual Server mapping. ¾ MAC filtering. ¾ Protocol/IP filtering ¾ Domain/URL filtering ¾ DDNS ¾ Upgradeable firmware for future function. ¾ Simple installation using Setup Wizard. ¾ Easy configuration via Web Browser.
Supported Features: ¾ High speed data transfer rate ¾ NAT for sharing 1 IP address to all LAN/WLAN users. ¾ PPPoE and PPTP protocol for Dial-Up ADSL. ¾ 64/128 bit WEP Encryption ¾ WPA-PSK, WPA2-PSK, ... ¾ DHCP Server / Client. ¾ UPnP (Universal Plug and Play). ¾ WPS (Wi-Fi Protected Setup) ¾ Virtual Server mapping. ¾ MAC filtering. ¾ Protocol/IP filtering ¾ Domain/URL filtering ¾ DDNS ¾ Upgradeable firmware for future function. ¾ Simple installation using Setup Wizard. ¾ Easy configuration via Web Browser.

User Guide
Page 14
Click the right mouse button and a context menu will be show. 3. Select "Disable DNS" in the "DNS" field. 8 Select "Properties" to enter the TCP/IP setting screen. 4. Select "Obtain an IP address automatically" on the desktop. 2. Click on the "Network neighborhood" icon found on the "IP address" field. 5. Windows 95/98/ME 1. PC NETWORK TCP/IP SETTING The network TCP/IP settings differ based on the computer's operating system (Win95/98/ME/NT/2000/XP) and are as follows.
Click the right mouse button and a context menu will be show. 3. Select "Disable DNS" in the "DNS" field. 8 Select "Properties" to enter the TCP/IP setting screen. 4. Select "Obtain an IP address automatically" on the desktop. 2. Click on the "Network neighborhood" icon found on the "IP address" field. 5. Windows 95/98/ME 1. PC NETWORK TCP/IP SETTING The network TCP/IP settings differ based on the computer's operating system (Win95/98/ME/NT/2000/XP) and are as follows.

User Guide
Page 15
... Double click on "Properties." 2. Select "None" for the "Gateway address" field. In the "Local area network status" window, click on the "Local area network connection" icon. Set both "IP address" and "DNS" to enter the TCP/IP setting window. 1. Windows 2000 Double click on the "My Computer" ...icon on the desktop. In the "Local area network connection" window, first select TCP/IP setting and then select "Properties." 3. Select "...
... Double click on "Properties." 2. Select "None" for the "Gateway address" field. In the "Local area network status" window, click on the "Local area network connection" icon. Set both "IP address" and "DNS" to enter the TCP/IP setting window. 1. Windows 2000 Double click on the "My Computer" ...icon on the desktop. In the "Local area network connection" window, first select TCP/IP setting and then select "Properties." 3. Select "...

User Guide
Page 16
Set "DNS" to enter the TCP/IP setting window. 1. Windows XP Point the cursor and click the right button on the "My Network Place" icon. Select "properties" to "Obtain DNS server address automatically." Set "IP address" to "Obtain an IP address automatically." 2.
Set "DNS" to enter the TCP/IP setting window. 1. Windows XP Point the cursor and click the right button on the "My Network Place" icon. Select "properties" to "Obtain DNS server address automatically." Set "IP address" to "Obtain an IP address automatically." 2.
User Guide
Page 17
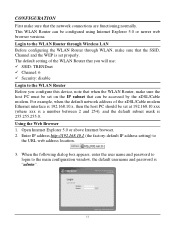
... For example, when the default network address of the WLAN Router that you will use: 9 SSID: TRENDnet 9 Channel: 6 9 Security: disable Login to the WLAN Router through Wireless LAN Before configuring the WLAN Router through WLAN, make sure that the network... connections are functioning normally. Login to the WLAN Router Before you configure this device, note that when the WLAN Router, make sure the host PC must be set on the IP...
... For example, when the default network address of the WLAN Router that you will use: 9 SSID: TRENDnet 9 Channel: 6 9 Security: disable Login to the WLAN Router through Wireless LAN Before configuring the WLAN Router through WLAN, make sure that the network... connections are functioning normally. Login to the WLAN Router Before you configure this device, note that when the WLAN Router, make sure the host PC must be set on the IP...

User Guide
Page 19
DHCP enabled is 192.168.10.1. Please click "Next" to auto detect your Internet Connection. Step 4: Set Internet connection The WLAN Router will attempt to continue. The default IP is able to enable DHCP, please click "Enable". If the user chooses to automatically assign IP addresses. Step 3: Set LAN connection and DHCP server Set user's IP address and mask. Please assign the range of IP addresses in the fields of "Range start" and "Range end".
DHCP enabled is 192.168.10.1. Please click "Next" to auto detect your Internet Connection. Step 4: Set Internet connection The WLAN Router will attempt to continue. The default IP is able to enable DHCP, please click "Enable". If the user chooses to automatically assign IP addresses. Step 3: Set LAN connection and DHCP server Set user's IP address and mask. Please assign the range of IP addresses in the fields of "Range start" and "Range end".

User Guide
Page 20
Obtain IP automatically (DHCP client): If the user has enabled DHCP server, choose "Obtain IP automatically (DHCP client)" to have the WLAN Router assign IP addresses automatically.
Obtain IP automatically (DHCP client): If the user has enabled DHCP server, choose "Obtain IP automatically (DHCP client)" to have the WLAN Router assign IP addresses automatically.

User Guide
Page 21
Fixed IP Address: If the Internet Service Provider (ISP) assigns a fixed IP address, choose this option and enter the assigned WAN IP Address, WAN Subnet Mask, WAN Gateway Address and DNS Server Addresses for the WLAN Router.
Fixed IP Address: If the Internet Service Provider (ISP) assigns a fixed IP address, choose this option and enter the assigned WAN IP Address, WAN Subnet Mask, WAN Gateway Address and DNS Server Addresses for the WLAN Router.

User Guide
Page 23
PPPoE with a fixed IP address: If connected to the Internet using a PPPoE (Dial-up xDSL) connection, and the ISP provides a User Name, Password and a Fixed IP Address, choose this option and enter the required information.
PPPoE with a fixed IP address: If connected to the Internet using a PPPoE (Dial-up xDSL) connection, and the ISP provides a User Name, Password and a Fixed IP Address, choose this option and enter the required information.
User Guide
Page 28
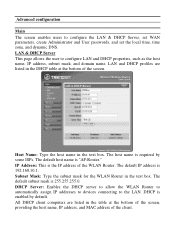
... table at the bottom of the screen, providing the host name, IP address, and MAC address of the screen. IP Address: This is 192.168.10.1. DHCP is required by default. DHCP Server: Enables the DHCP server to allow the WLAN Router to automatically assign IP addresses to devices connecting to configure the LAN & DHCP Server, set WAN...
... table at the bottom of the screen, providing the host name, IP address, and MAC address of the screen. IP Address: This is 192.168.10.1. DHCP is required by default. DHCP Server: Enables the DHCP server to allow the WLAN Router to automatically assign IP addresses to devices connecting to configure the LAN & DHCP Server, set WAN...

User Guide
Page 29
...local domain name of the IP range that DHCP will use to assign IP addresses to all LAN devices connected to set up the WLAN Router WAN connection, specify the IP address for the WAN, add DNS numbers, and enter the MAC address. End IP: Type an IP address to the WLAN Router. Lease Time: The lease... time specifies the amount of the IP range that DHCP will use to assign IP addresses to all LAN devices...
...local domain name of the IP range that DHCP will use to assign IP addresses to all LAN devices connected to set up the WLAN Router WAN connection, specify the IP address for the WAN, add DNS numbers, and enter the MAC address. End IP: Type an IP address to the WLAN Router. Lease Time: The lease... time specifies the amount of the IP range that DHCP will use to assign IP addresses to all LAN devices...
User Guide
Page 30
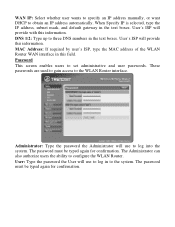
DNS 1/2: Type up to log in the text boxes. MAC Address: If required by user's ISP, type the MAC address of the WLAN Router WAN interface in the text boxes. The password must be typed again for confirmation. Administrator: Type the password the Administrator will ...into the system. The password must be typed again for confirmation. Password This screen enables users to obtain an IP address automatically. WAN IP: Select whether user wants to specify an IP address manually, or want DHCP to set administrative and user passwords. User's ISP will use to the system. These...
DNS 1/2: Type up to log in the text boxes. MAC Address: If required by user's ISP, type the MAC address of the WLAN Router WAN interface in the text boxes. The password must be typed again for confirmation. Administrator: Type the password the Administrator will ...into the system. The password must be typed again for confirmation. Password This screen enables users to obtain an IP address automatically. WAN IP: Select whether user wants to specify an IP address manually, or want DHCP to set administrative and user passwords. User's ISP will use to the system. These...

User Guide
Page 31
... the local time and date. Default NTP server: The Simple Network Time Protocol (SNTP) server allows the WLAN Router to synchronize the system clock to update the system time. Specify the NTP domain name or IP address in the text box. When enabled, select the start and end date for the WLAN... Router's real-time clock, select properly time zone, and enable or disable daylight saving. Time This screen enables users to...
... the local time and date. Default NTP server: The Simple Network Time Protocol (SNTP) server allows the WLAN Router to synchronize the system clock to update the system time. Specify the NTP domain name or IP address in the text box. When enabled, select the start and end date for the WLAN... Router's real-time clock, select properly time zone, and enable or disable daylight saving. Time This screen enables users to...

User Guide
Page 32
First, you need to register your preferred DNS with your current Public IP address when you are online. Then, please select the DDNS address in the Server Address and fill the related information in the below fields: Host Name, User Name and Password. Dynamic DNS This synchronizes the DDNS server with the DDNS provider.
First, you need to register your preferred DNS with your current Public IP address when you are online. Then, please select the DDNS address in the Server Address and fill the related information in the below fields: Host Name, User Name and Password. Dynamic DNS This synchronizes the DDNS server with the DDNS provider.

User Guide
Page 35
...the above screen is shown. Cipher Type: Select the cipher type for TKIP or AES encryption, Selected Auto for the RADIUS server. Enter the IP address, Port used and Shared Secret by the Secondary Radius Server. (optional) Manually enter a set the length of the encryption key and the parameters ...auto detects the cipher type. Please set of encryption from the drop-down list. The WLAN Router supports, 64 and 128-bit encryption. Select a key to use by the Primary Radius Server. 2. Enter the IP address, Port used and Shared Secret by clicking the radio button next to 4 different WEP keys...
...the above screen is shown. Cipher Type: Select the cipher type for TKIP or AES encryption, Selected Auto for the RADIUS server. Enter the IP address, Port used and Shared Secret by the Secondary Radius Server. (optional) Manually enter a set the length of the encryption key and the parameters ...auto detects the cipher type. Please set of encryption from the drop-down list. The WLAN Router supports, 64 and 128-bit encryption. Select a key to use by the Primary Radius Server. 2. Enter the IP address, Port used and Shared Secret by clicking the radio button next to 4 different WEP keys...

User Guide
Page 38
... stations connected to the WAN. After updating the firmware in Tools - Firmware, check this to view the WLAN Router's LAN, Wireless and WAN configurations. LAN: This section displays the LAN interface configuration including the MAC address, IP Address, Subnet Mask, and DHCP Server Status. Firmware Version: Displays the latest build of client stations currently connected...
... stations connected to the WAN. After updating the firmware in Tools - Firmware, check this to view the WLAN Router's LAN, Wireless and WAN configurations. LAN: This section displays the LAN interface configuration including the MAC address, IP Address, Subnet Mask, and DHCP Server Status. Firmware Version: Displays the latest build of client stations currently connected...

User Guide
Page 40
Syslog Server: Type the IP address of packet transmission via the WLAN Router's LAN, Wireless and WAN ports (in bytes per second). SMTP Account: If the SMTP Authentication enabled, fill in the password of the SMTP account here. Statistic ... errors and system malfunctions. Dropped Packets: Displays information about any malicious activity on the network. SMTP Server: Type your SMTP server address here. Send to: Type an email address for authentication, fill in account name and password in SMTP Account field and SMTP Password field. Debug Information: Displays information related to...
Syslog Server: Type the IP address of packet transmission via the WLAN Router's LAN, Wireless and WAN ports (in bytes per second). SMTP Account: If the SMTP Authentication enabled, fill in the password of the SMTP account here. Statistic ... errors and system malfunctions. Dropped Packets: Displays information about any malicious activity on the network. SMTP Server: Type your SMTP server address here. Send to: Type an email address for authentication, fill in account name and password in SMTP Account field and SMTP Password field. Debug Information: Displays information related to...

User Guide
Page 43
..., click "Update" to confirm the changes. Update: Select one of the entries in the static IP address table at the bottom of the network. Metric: Select which the WLAN Router forwards data to remove the entry. If this configuration. Contact the ISP or network administrator for this... information. Routing This selection enables users to access the Internet. Network Address: Type the static IP address the network uses to set parameters by the WLAN Router that the user wants to apply to this field is left blank, the network mask defaults ...
..., click "Update" to confirm the changes. Update: Select one of the entries in the static IP address table at the bottom of the network. Metric: Select which the WLAN Router forwards data to remove the entry. If this configuration. Contact the ISP or network administrator for this... information. Routing This selection enables users to access the Internet. Network Address: Type the static IP address the network uses to set parameters by the WLAN Router that the user wants to apply to this field is left blank, the network mask defaults ...

User Guide
Page 45
... the connected node. Metric: Displays the metric of the WLAN Router. Gateway Address: Displays the gateway address of the connected node. Interface: Displays whether the node is a database created by the WLAN Router that displays the network interconnection topology. Network Address: Displays the network IP address of the connected node. The routing table is connected via a WAN...
... the connected node. Metric: Displays the metric of the WLAN Router. Gateway Address: Displays the gateway address of the connected node. Interface: Displays whether the node is a database created by the WLAN Router that displays the network interconnection topology. Network Address: Displays the network IP address of the connected node. The routing table is connected via a WAN...

