
User Guide
Page 3
The IP cameras can be used with Microsoft web browsers and Intelligent IP Installer in Windows operating systems. This document focuses on introducing you want to know how to use IP cameras with Microsoft web browsers, please check the camera user manuals. 1 If you to monitor the image from the camera using Intelligent IP Installer. How to Use Intelligent IP Installer This chapter introduces how to Intelligent IP Installer.
The IP cameras can be used with Microsoft web browsers and Intelligent IP Installer in Windows operating systems. This document focuses on introducing you want to know how to use IP cameras with Microsoft web browsers, please check the camera user manuals. 1 If you to monitor the image from the camera using Intelligent IP Installer. How to Use Intelligent IP Installer This chapter introduces how to Intelligent IP Installer.

User Guide
Page 5
... setting information of Main Menu Main Menu Main Menu Camera Click this button to get and set basic values. Configuration of all Network Cameras in network. You can connect the specific Network Cameras to get live video and to get the information of all Network Cameras in local network. This section includes Info, User, Date Time, TCP/IP, PPPoE and DDNS. ) Note: Only the administrator has access...
... setting information of Main Menu Main Menu Main Menu Camera Click this button to get and set basic values. Configuration of all Network Cameras in network. You can connect the specific Network Cameras to get live video and to get the information of all Network Cameras in local network. This section includes Info, User, Date Time, TCP/IP, PPPoE and DDNS. ) Note: Only the administrator has access...

User Guide
Page 2
... Screen Menu...14 2.4.1. Show Camera: ...15 2.4.4. Manual Record 15 2.4.6. Unusual Event 22 3.11.2. Toggle Full Screen 15 3.1 Information Window 18 3.2 Audio Volume Control 18 3.3 Screen Division:...18 3.4 Browse Mode: ...18 3.5 Open Record: ...18 3.6 Enhancement ...19 3.6.1. General Setting 19 3.6.2. Enable Talk:...14 2.4.2. Filter Setting...19 3.7 Save Video ...19 3.8 Save Image ...20 3.9 Print ...20 3.10 Backup ...20 3.11 Log Viewer...22 3.11.1. Zoom:...13 2.3.3. System Log:...23 4.1 Day Mode ...24 Snapshot:...15 2.4.5. Focus: ...13 2.3.4. Connect/ Disconnect...
... Screen Menu...14 2.4.1. Show Camera: ...15 2.4.4. Manual Record 15 2.4.6. Unusual Event 22 3.11.2. Toggle Full Screen 15 3.1 Information Window 18 3.2 Audio Volume Control 18 3.3 Screen Division:...18 3.4 Browse Mode: ...18 3.5 Open Record: ...18 3.6 Enhancement ...19 3.6.1. General Setting 19 3.6.2. Enable Talk:...14 2.4.2. Filter Setting...19 3.7 Save Video ...19 3.8 Save Image ...20 3.9 Print ...20 3.10 Backup ...20 3.11 Log Viewer...22 3.11.1. Zoom:...13 2.3.3. System Log:...23 4.1 Day Mode ...24 Snapshot:...15 2.4.5. Focus: ...13 2.3.4. Connect/ Disconnect...

User Guide
Page 3
... 39 6.2.3. Monitor Display 42 6.7 Save/ Load Configuration 43 6.8 Log Viewer...44 6.8.1. Record on Motion 28 4.7.3. Action - Status Display...37 6.2 Setting - IP Camera / Video Server Setting Panel 40 6.3 Setting - Log Viewer - Log Viewer - OSD Setting:...39 6.2.4. Pre-record/ Post-record Time 28 5.1 Event ...29 5.1.1. PTZ Config 41 6.5 Setting - Default: ...27 4.5.2. Holiday:...27 4.5.3. Camera ...37 6.2.1. Event - Add Camera...37 6.2.2. User Account 42 6.6 Setting - System Log 45 Action Type 33 6.1 Setting - I/O Device 40 6.4 Setting - Unusual Event...
... 39 6.2.3. Monitor Display 42 6.7 Save/ Load Configuration 43 6.8 Log Viewer...44 6.8.1. Record on Motion 28 4.7.3. Action - Status Display...37 6.2 Setting - IP Camera / Video Server Setting Panel 40 6.3 Setting - Log Viewer - Log Viewer - OSD Setting:...39 6.2.4. Pre-record/ Post-record Time 28 5.1 Event ...29 5.1.1. PTZ Config 41 6.5 Setting - Default: ...27 4.5.2. Holiday:...27 4.5.3. Camera ...37 6.2.1. Event - Add Camera...37 6.2.2. User Account 42 6.6 Setting - System Log 45 Action Type 33 6.1 Setting - I/O Device 40 6.4 Setting - Unusual Event...
User Guide
Page 7
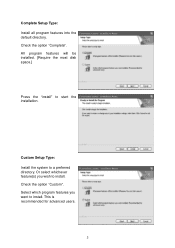
Complete Setup Type: Install all program features into the default directory. Check the option "Custom". Or select whichever feature(s) you want to install. This is recommended for advanced users. 3 Select which program features you wish to install. Custom Setup Type: Install the system to start the installation. Check the option "Complete". All program features will be installed. [Require the most disk space.] Press the "install" to a preferred directory.
Complete Setup Type: Install all program features into the default directory. Check the option "Custom". Or select whichever feature(s) you want to install. This is recommended for advanced users. 3 Select which program features you wish to install. Custom Setup Type: Install the system to start the installation. Check the option "Complete". All program features will be installed. [Require the most disk space.] Press the "install" to a preferred directory.

User Guide
Page 16
... drop down menu to events. Information Window PTZ Camera Control 12 SCHEDULE: Organize recording time schedule and setup recorder configuration. See Schedule on page 30 for detail. You can watch recorded video, search recorded video, adjust image of events that you want to get Playback Console. See Playback on page 20 for detail. setup reaction(s) responding to modify general setting, save video/ pictures, print images, check log information and event records, and set up recording function configuration...
... drop down menu to events. Information Window PTZ Camera Control 12 SCHEDULE: Organize recording time schedule and setup recorder configuration. See Schedule on page 30 for detail. You can watch recorded video, search recorded video, adjust image of events that you want to get Playback Console. See Playback on page 20 for detail. setup reaction(s) responding to modify general setting, save video/ pictures, print images, check log information and event records, and set up recording function configuration...
User Guide
Page 22
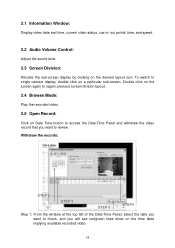
... the time table implying available recorded video. 18 Double click on the screen again to regain previous screen division layout. 3.4 Browse Mode: Play the recorded video. 3.5 Open Record: Click on the desired layout icon. 3.1 Information Window: Display video date and time, current video status, cue in/ out points' time, and speed. 3.2 Audio Volume Control: Adjust the sound level 3.3 Screen Division: Allocate the sub-screen display by clicking on Date Time button to access the Date-Time Panel and withdraw the video record that you want to review.
... the time table implying available recorded video. 18 Double click on the screen again to regain previous screen division layout. 3.4 Browse Mode: Play the recorded video. 3.5 Open Record: Click on the desired layout icon. 3.1 Information Window: Display video date and time, current video status, cue in/ out points' time, and speed. 3.2 Audio Volume Control: Adjust the sound level 3.3 Screen Division: Allocate the sub-screen display by clicking on Date Time button to access the Date-Time Panel and withdraw the video record that you want to review.
User Guide
Page 26
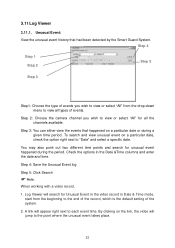
... Unusual Event in the video record in the Date &Time columns and enter the date and time. 3.11Log Viewer 3.11.1. Step 4: Save the Unusual Event log Step 5: Click Search Note: When working with a video record, 1. To search and view unusual event on a particular date, check the option right next to the end of the record, which is the default setting of events you wish...
... Unusual Event in the video record in the Date &Time columns and enter the date and time. 3.11Log Viewer 3.11.1. Step 4: Save the Unusual Event log Step 5: Click Search Note: When working with a video record, 1. To search and view unusual event on a particular date, check the option right next to the end of the record, which is the default setting of events you wish...
User Guide
Page 32
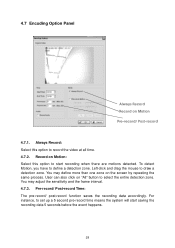
... motions detected. Pre-record/ Post-record Time: The pre-record/ post-record function saves the recording data accordingly. Left-click and drag the mouse to define a detection zone. Always Record: Select this option to start saving the recording data 5 seconds before the event happens. 28 You may adjust the sensitivity and the frame interval. 4.7.3. Record on the screen by repeating the same process. For instance, to record the video...
... motions detected. Pre-record/ Post-record Time: The pre-record/ post-record function saves the recording data accordingly. Left-click and drag the mouse to define a detection zone. Always Record: Select this option to start saving the recording data 5 seconds before the event happens. 28 You may adjust the sensitivity and the frame interval. 4.7.3. Record on the screen by repeating the same process. For instance, to record the video...
User Guide
Page 40
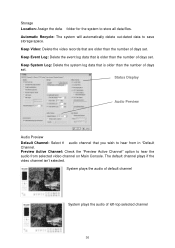
.... System plays the audio of default channel System plays the audio of days set . Automatic Recycle: The system will automatically delete out-dated data to hear the audio from in "Default Channel. Keep System Log: Delete the system log data that you wish to store all data files. Preview Active Channel: Check the "Preview Active Channel" option to save storage space. Status Display Audio Preview Audio Preview Default...
.... System plays the audio of default channel System plays the audio of days set . Automatic Recycle: The system will automatically delete out-dated data to hear the audio from in "Default Channel. Keep System Log: Delete the system log data that you wish to store all data files. Preview Active Channel: Check the "Preview Active Channel" option to save storage space. Status Display Audio Preview Audio Preview Default...
User Guide
Page 45
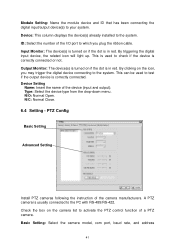
.... A PTZ camera is turned on the icon, you plug the ribbon cable. Input Monitor: The device(s) is in red. N/O: Normal Open. Module Setting: Name the module device and ID that has been connecting the digital input/output device(s) to the system. Device: This column displays the device(s) already installed to your system. Output Monitor: The device(s) is usually connected to the system. PTZ Config Basic Setting Advanced Setting Install PTZ cameras following the instruction of the device (input and output).
.... A PTZ camera is turned on the icon, you plug the ribbon cable. Input Monitor: The device(s) is in red. N/O: Normal Open. Module Setting: Name the module device and ID that has been connecting the digital input/output device(s) to the system. Device: This column displays the device(s) already installed to your system. Output Monitor: The device(s) is usually connected to the system. PTZ Config Basic Setting Advanced Setting Install PTZ cameras following the instruction of the device (input and output).
User Guide
Page 55
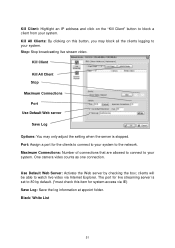
... video. Kill Client Kill All Client Stop Maximum Connections Port Use Default Web server Save Log Options: You may block all the clients logging to your system. Black/ White List 51 Stop: Stop broadcasting live video via IE) Save Log: Save the log information at appoint folder. Use Default Web Server: Activate the Web server by default. (*must check this button, you may only adjust the setting...
... video. Kill Client Kill All Client Stop Maximum Connections Port Use Default Web server Save Log Options: You may block all the clients logging to your system. Black/ White List 51 Stop: Stop broadcasting live video via IE) Save Log: Save the log information at appoint folder. Use Default Web Server: Activate the Web server by default. (*must check this button, you may only adjust the setting...

Quick Installation Guide
Page 1
... the operating instructions included with your router and can access the Internet. O Connect the power adapter cord to the LAN network (Router or Switch) via Ethernet cable. Note: Before proceeding, confirm that your router's DHCP feature is no network connection. The network port is linked, but there is enabled. (Most routers have DHCP turned on by default.) Refer to your router. Reset Button Step 1. TL-SC3430...
... the operating instructions included with your router and can access the Internet. O Connect the power adapter cord to the LAN network (Router or Switch) via Ethernet cable. Note: Before proceeding, confirm that your router's DHCP feature is no network connection. The network port is linked, but there is enabled. (Most routers have DHCP turned on by default.) Refer to your router. Reset Button Step 1. TL-SC3430...

Quick Installation Guide
Page 2
... setting guide).1 TP-LINK The Reliable choice Setup Wizard Software CD Menu IP Surveillance Software I Intelligent IP Installer I User Manual Language Pack O Select the optional program as to help , go to www.tp-link.com/support/faq.asp • To download the latest Firmware, Driver, Utility and User Guide, go to 6:00 PM. Click "Tools", then "Internet Options...". TP-LINK The Reliable chooe /ZISettin Live View I-L264+Megapixel Surveillance Camera ea. ' II C • For further specific...
... setting guide).1 TP-LINK The Reliable choice Setup Wizard Software CD Menu IP Surveillance Software I Intelligent IP Installer I User Manual Language Pack O Select the optional program as to help , go to www.tp-link.com/support/faq.asp • To download the latest Firmware, Driver, Utility and User Guide, go to 6:00 PM. Click "Tools", then "Internet Options...". TP-LINK The Reliable chooe /ZISettin Live View I-L264+Megapixel Surveillance Camera ea. ' II C • For further specific...
User Guide
Page 9
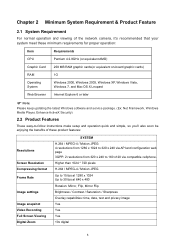
... ) Note: Please keep updating the latest Windows software and service package. (Ex: Net Framework, Windows Media Player, Enhance ActiveX Security) 2.2 Product Features These easy-to-follow instructions make setup and operation quick and simple, so you'll also soon be enjoying the benefits of these product features: Resolutions Screen Resolution Compressing format Frame Rate Image settings Image snapshot Video Recording Full Screen Viewing Digital Zoom SYSTEM H.264 / MPEG-4 / Motion JPEG: 4 resolutions from...
... ) Note: Please keep updating the latest Windows software and service package. (Ex: Net Framework, Windows Media Player, Enhance ActiveX Security) 2.2 Product Features These easy-to-follow instructions make setup and operation quick and simple, so you'll also soon be enjoying the benefits of these product features: Resolutions Screen Resolution Compressing format Frame Rate Image settings Image snapshot Video Recording Full Screen Viewing Digital Zoom SYSTEM H.264 / MPEG-4 / Motion JPEG: 4 resolutions from...

User Guide
Page 10
... working distance 5 M I / O 1 in microphone Audio compression: G.711 μ law, a law, and AMR Instant Messenger Support MSN Live View Mobile Phone Live View Through 2.5 WAP, 3GPP, 3G Streaming, and 3G Browser Alarm Sending FTP Client / SMTP / Network Storage Security Passward Protecton / HTTPS encryption / IP Filter Alarm Buffer Recording image and audio file pre-and-post disconnection up when the IP Camera is powered...
... working distance 5 M I / O 1 in microphone Audio compression: G.711 μ law, a law, and AMR Instant Messenger Support MSN Live View Mobile Phone Live View Through 2.5 WAP, 3GPP, 3G Streaming, and 3G Browser Alarm Sending FTP Client / SMTP / Network Storage Security Passward Protecton / HTTPS encryption / IP Filter Alarm Buffer Recording image and audio file pre-and-post disconnection up when the IP Camera is powered...

User Guide
Page 34
... adjusted according to the factory default setting. Don't turn off this IP Camera until the device reboots. ¾ Backup Setting: You can save the setting data file to the location you specified. ¾ Restore Setting: Download the saved setting data of computers. 7.1.3 Initialize ¾ Reboot: Click this button to the millisecond of computer clock times in a network of this IP Camera to the loaded data and then restarted. ¾ Firmware Update: Update the device software...
... adjusted according to the factory default setting. Don't turn off this IP Camera until the device reboots. ¾ Backup Setting: You can save the setting data file to the location you specified. ¾ Restore Setting: Download the saved setting data of computers. 7.1.3 Initialize ¾ Reboot: Click this button to the millisecond of computer clock times in a network of this IP Camera to the loaded data and then restarted. ¾ Firmware Update: Update the device software...
User Guide
Page 57
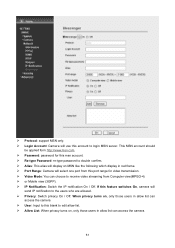
... to receive video streaming from Computer view(MPEG-4) ¾ or Mobile view (3GPP). ¾ IP Notification: Switch the IP notification On / Off. This MSN account should be applied form http://www.msn.com. ¾ Password: password for video transmission. ¾ Video Mode: You can access the camera. 51 ¾ Protocol: support MSN only. ¾ Login Account: Camera will use this account to the users who...
... to receive video streaming from Computer view(MPEG-4) ¾ or Mobile view (3GPP). ¾ IP Notification: Switch the IP notification On / Off. This MSN account should be applied form http://www.msn.com. ¾ Password: password for video transmission. ¾ Video Mode: You can access the camera. 51 ¾ Protocol: support MSN only. ¾ Login Account: Camera will use this account to the users who...
User Guide
Page 72
low-speed USB storage disk), there might be stored in motion detection function. z User Name: Type the name of workgroup. (If none, please leave it blank.) z Password: Type the password for workgroup. (If none, please leave it blank.) z Re-type password: Re-type password for workgroup. ) Note: If the recording video file is different in various operation systems. If you have any trouble in setting the network sharing, please ask the...
low-speed USB storage disk), there might be stored in motion detection function. z User Name: Type the name of workgroup. (If none, please leave it blank.) z Password: Type the password for workgroup. (If none, please leave it blank.) z Re-type password: Re-type password for workgroup. ) Note: If the recording video file is different in various operation systems. If you have any trouble in setting the network sharing, please ask the...

User Guide
Page 75
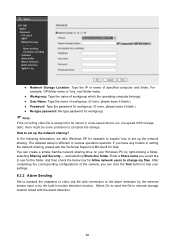
... Time and End Time of the other section. ) Note: You can check Chapter 9.4. 8.4 Schedule Click Schedule on the Advanced mode menu, the Schedule setting menu appears. z FTP -Alarm / FTP - ¾ Cyclic Size: The total amount of files transmitted to the network storage location has to be input. 8.5 Alarm Buffer When you click Alarm Buffer on the Advanced mode menu, the Alarm buffer setting menu...
... Time and End Time of the other section. ) Note: You can check Chapter 9.4. 8.4 Schedule Click Schedule on the Advanced mode menu, the Schedule setting menu appears. z FTP -Alarm / FTP - ¾ Cyclic Size: The total amount of files transmitted to the network storage location has to be input. 8.5 Alarm Buffer When you click Alarm Buffer on the Advanced mode menu, the Alarm buffer setting menu...


