
User Guide
Page 3
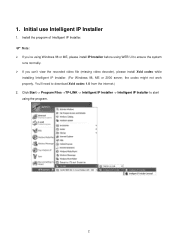
If you to Intelligent IP Installer. How to Use Intelligent IP Installer This chapter introduces how to use IP cameras with Microsoft web browsers and Intelligent IP Installer in Windows operating systems. This document focuses on introducing you want to know how to monitor the image from the camera using Intelligent IP Installer. The IP cameras can be used with Microsoft web browsers, please check the camera user manuals. 1
If you to Intelligent IP Installer. How to Use Intelligent IP Installer This chapter introduces how to use IP cameras with Microsoft web browsers and Intelligent IP Installer in Windows operating systems. This document focuses on introducing you want to know how to monitor the image from the camera using Intelligent IP Installer. The IP cameras can be used with Microsoft web browsers, please check the camera user manuals. 1
User Guide
Page 4
... IP Installer 1. 1. Install the program of Intelligent IP Installer. ) Note: ¾ If you can't view the recorded video file (missing video decoder), please install Xvid codec while installing Intelligent IP Installer. (For Windows 98, ME or 2000 server, the codec might not work properly. Click Start -> Program Files ->TP-LINK -> Intelligent IP Installer -> Intelligent IP Installer to start using WEB UI to download Xvid codec 1.0 from the internet.) 2. You'll need...
... IP Installer 1. 1. Install the program of Intelligent IP Installer. ) Note: ¾ If you can't view the recorded video file (missing video decoder), please install Xvid codec while installing Intelligent IP Installer. (For Windows 98, ME or 2000 server, the codec might not work properly. Click Start -> Program Files ->TP-LINK -> Intelligent IP Installer -> Intelligent IP Installer to start using WEB UI to download Xvid codec 1.0 from the internet.) 2. You'll need...

User Guide
Page 5
... into user basic setting information of Intelligent IP Installer. 3 This section includes Info, User, Date Time, TCP/IP, PPPoE and DDNS. ) Note: Only the administrator has access to get into common information of Main Menu Main Menu Main Menu Camera Click this button to get live video and to optimize video setting. 2. Configuration of all Network Cameras in local network. You can connect the specific Network Cameras to the Settings...
... into user basic setting information of Intelligent IP Installer. 3 This section includes Info, User, Date Time, TCP/IP, PPPoE and DDNS. ) Note: Only the administrator has access to get into common information of Main Menu Main Menu Main Menu Camera Click this button to get live video and to optimize video setting. 2. Configuration of all Network Cameras in local network. You can connect the specific Network Cameras to the Settings...

User Guide
Page 6
... in local network. ¾ The IP addresses shown in the network with product factory information, including product Name, IP Address, MAC Address, Mod. Some information is not available when the IP camera is free, the Network Video server will try to find a free IP address (this IP address, and its subnet mask would be from 192...
... in local network. ¾ The IP addresses shown in the network with product factory information, including product Name, IP Address, MAC Address, Mod. Some information is not available when the IP camera is free, the Network Video server will try to find a free IP address (this IP address, and its subnet mask would be from 192...

User Guide
Page 2
...:...18 3.4 Browse Mode: ...18 3.5 Open Record: ...18 3.6 Enhancement ...19 3.6.1. General Setting 19 3.6.2. System Log:...23 4.1 Day Mode ...24 Focus: ...13 2.3.4. Patrol:...13 2.4 On Screen Menu...14 2.4.1. Show Camera: ...15 2.4.4. Manual Record 15 2.4.6. Snapshot:...15 2.4.5. Connect/ Disconnect 14 2.4.3. Unusual Event 22 3.11.2. CONTENTS 1.1 System Requirement 1 1.2 Installation ...1 1.3 Quick Start...5 2.1 Start ...11 2.2 Information Window 13 2.3 PTZ Camera Control 13 2.3.1. Zoom:...13 2.3.3. Filter Setting...19 3.7 Save Video ...19 3.8 Save Image ...20...
...:...18 3.4 Browse Mode: ...18 3.5 Open Record: ...18 3.6 Enhancement ...19 3.6.1. General Setting 19 3.6.2. System Log:...23 4.1 Day Mode ...24 Focus: ...13 2.3.4. Patrol:...13 2.4 On Screen Menu...14 2.4.1. Show Camera: ...15 2.4.4. Manual Record 15 2.4.6. Snapshot:...15 2.4.5. Connect/ Disconnect 14 2.4.3. Unusual Event 22 3.11.2. CONTENTS 1.1 System Requirement 1 1.2 Installation ...1 1.3 Quick Start...5 2.1 Start ...11 2.2 Information Window 13 2.3 PTZ Camera Control 13 2.3.1. Zoom:...13 2.3.3. Filter Setting...19 3.7 Save Video ...19 3.8 Save Image ...20...

User Guide
Page 3
... 4.5.2. Record on Motion 28 4.7.3. Event - General ...35 6.1.1. IP Camera / Video Server Setting Panel 40 6.3 Setting - Monitor Display 42 6.7 Save/ Load Configuration 43 6.8 Log Viewer...44 6.8.1. Pre-record/ Post-record Time 28 5.1 Event ...29 5.1.1. Assign a Camera Event 30 5.1.2. Action - PTZ Config 41 6.5 Setting - Unusual Event 44 6.8.2. Log Viewer - 4.2 Load Preset Modes 24 4.3 Insert a New Schedule Manually 25 4.4 Copy Schedule ...26 4.5 Week Mode ...26 4.5.1. Custom: ...27 4.6 Adjust the Scheduled Setting 27...
... 4.5.2. Record on Motion 28 4.7.3. Event - General ...35 6.1.1. IP Camera / Video Server Setting Panel 40 6.3 Setting - Monitor Display 42 6.7 Save/ Load Configuration 43 6.8 Log Viewer...44 6.8.1. Pre-record/ Post-record Time 28 5.1 Event ...29 5.1.1. Assign a Camera Event 30 5.1.2. Action - PTZ Config 41 6.5 Setting - Unusual Event 44 6.8.2. Log Viewer - 4.2 Load Preset Modes 24 4.3 Insert a New Schedule Manually 25 4.4 Copy Schedule ...26 4.5 Week Mode ...26 4.5.1. Custom: ...27 4.6 Adjust the Scheduled Setting 27...

User Guide
Page 16
... recorded video, adjust image of events that you want to get Playback Console. GUARD: Add/edit type(s) of the stored data, save / load configuration settings, start counting application, access log viewer and backup files, or setup network services. See Config on page 42 for detail. SCHEDULE: Organize recording time schedule and setup recorder configuration. See Schedule on page 20 for detail. CONFIG: Select from the drop down menu...
... recorded video, adjust image of events that you want to get Playback Console. GUARD: Add/edit type(s) of the stored data, save / load configuration settings, start counting application, access log viewer and backup files, or setup network services. See Config on page 42 for detail. SCHEDULE: Organize recording time schedule and setup recorder configuration. See Schedule on page 20 for detail. CONFIG: Select from the drop down menu...
User Guide
Page 22
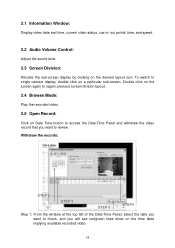
... review. 3.1 Information Window: Display video date and time, current video status, cue in/ out points' time, and speed. 3.2 Audio Volume Control: Adjust the sound level 3.3 Screen Division: Allocate the sub-screen display by clicking on the time table implying available recorded video. 18 To switch to check, and you want to single camera display, double click on a particular sub-screen. Double click on the screen again to regain previous screen division layout. 3.4 Browse Mode: Play the recorded video. 3.5 Open Record: Click on Date Time button to access the Date-Time...
... review. 3.1 Information Window: Display video date and time, current video status, cue in/ out points' time, and speed. 3.2 Audio Volume Control: Adjust the sound level 3.3 Screen Division: Allocate the sub-screen display by clicking on the time table implying available recorded video. 18 To switch to check, and you want to single camera display, double click on a particular sub-screen. Double click on the screen again to regain previous screen division layout. 3.4 Browse Mode: Play the recorded video. 3.5 Open Record: Click on Date Time button to access the Date-Time...
User Guide
Page 26
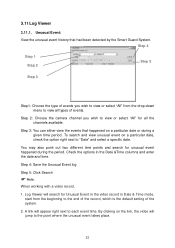
... the default setting of events. Step 3: You can either view the events that had been detected by the Smart Guard System. Check the options in Date & Time mode, start from the drop-down menu to view or select "All" for unusual event happened during a given time period. Log Viewer will search for Unusual Event in the video record in the Date &Time columns...
... the default setting of events. Step 3: You can either view the events that had been detected by the Smart Guard System. Check the options in Date & Time mode, start from the drop-down menu to view or select "All" for unusual event happened during a given time period. Log Viewer will search for Unusual Event in the video record in the Date &Time columns...
User Guide
Page 32
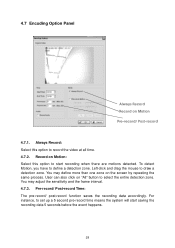
...-record/ Post-record Time: The pre-record/ post-record function saves the recording data accordingly. To detect Motion, you have to select the entire detection zone. User can also click on the screen by repeating the same process. You may adjust the sensitivity and the frame interval. 4.7.3. You may define more than one zone on "All" button to define a detection zone. Record on Motion Pre-record/ Post-record...
...-record/ Post-record Time: The pre-record/ post-record function saves the recording data accordingly. To detect Motion, you have to select the entire detection zone. User can also click on the screen by repeating the same process. You may adjust the sensitivity and the frame interval. 4.7.3. You may define more than one zone on "All" button to define a detection zone. Record on Motion Pre-record/ Post-record...
User Guide
Page 40
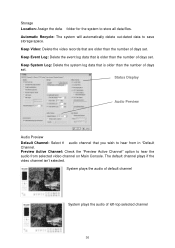
... hear from selected video channel on Main Console. Keep Video: Delete the video records that is older than the number of days set . System plays the audio of default channel System plays the audio of days set . Keep Event Log: Delete the event log data that are older than the number of days set. Storage Location: Assign the default folder for the system to save storage space.
... hear from selected video channel on Main Console. Keep Video: Delete the video records that is older than the number of days set . System plays the audio of default channel System plays the audio of days set . Keep Event Log: Delete the event log data that are older than the number of days set. Storage Location: Assign the default folder for the system to save storage space.
User Guide
Page 45
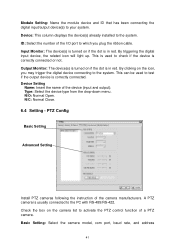
... device is correctly connected. Type: Select the device type from the drop-down menu. ID: Select the number of the device (input and output). N/C: Normal Close. 6.4 Setting - PTZ Config Basic Setting Advanced Setting Install PTZ cameras following the instruction of a PTZ camera. By triggering the digital input device, the related icon will light up. Module Setting: Name the module device and ID that has been connecting the digital input/output device(s) to the system. Device: This column displays the device(s) already installed...
... device is correctly connected. Type: Select the device type from the drop-down menu. ID: Select the number of the device (input and output). N/C: Normal Close. 6.4 Setting - PTZ Config Basic Setting Advanced Setting Install PTZ cameras following the instruction of a PTZ camera. By triggering the digital input device, the related icon will light up. Module Setting: Name the module device and ID that has been connecting the digital input/output device(s) to the system. Device: This column displays the device(s) already installed...
User Guide
Page 55
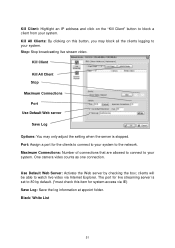
... folder. The port for live stream video. Stop: Stop broadcasting live streaming server is stopped. Use Default Web Server: Activate the Web server by default. (*must check this button, you may only adjust the setting when the server is set to block a client from your system. Black/ White List 51 Maximum Connections: Number of connections that are allowed to connect to the network. Kill All Clients...
... folder. The port for live stream video. Stop: Stop broadcasting live streaming server is stopped. Use Default Web Server: Activate the Web server by default. (*must check this button, you may only adjust the setting when the server is set to block a client from your system. Black/ White List 51 Maximum Connections: Number of connections that are allowed to connect to the network. Kill All Clients...
Quick Installation Guide
Page 1
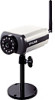
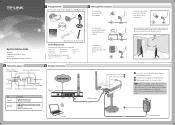
... Ethernet cable Laptop • Do not place the camera near devices that emit radio waves, such as mobile phones • We recommend to direct sunlight Quick Installation Guide TL-SC3171 Day/Night Surveillance Camera TL-SC3171G Wireless Day/Night Surveillance Camera 7106503246 Quick Installation Guide TL-SC3171 Day/Night Surveillance Camera TL-SC3171G Wireless Day/Night Surveillance Camera (The antenna is for TL-SC3171G only) System Requirement The following operating systems are supported: • Windows...
... Ethernet cable Laptop • Do not place the camera near devices that emit radio waves, such as mobile phones • We recommend to direct sunlight Quick Installation Guide TL-SC3171 Day/Night Surveillance Camera TL-SC3171G Wireless Day/Night Surveillance Camera 7106503246 Quick Installation Guide TL-SC3171 Day/Night Surveillance Camera TL-SC3171G Wireless Day/Night Surveillance Camera (The antenna is for TL-SC3171G only) System Requirement The following operating systems are supported: • Windows...
User Guide
Page 7
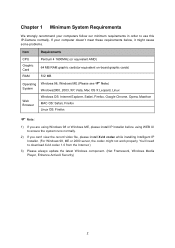
...'t view the record video file, please install Xvid codec while installing Intelligent IP Installer. (For Windows 98, ME or 2000 server, the codec might cause some problems. Item Requirements CPU Pentium 4 1600MHz (or equivalent AMD) Graphic Card 64 MB RAM graphic cards(or equivalent on-board graphic cards) RAM 512 MB Operating System ) Windows 98, Windows ME (Please see Note) Windows2000, 2003, XP, Vista, Mac OS...
...'t view the record video file, please install Xvid codec while installing Intelligent IP Installer. (For Windows 98, ME or 2000 server, the codec might cause some problems. Item Requirements CPU Pentium 4 1600MHz (or equivalent AMD) Graphic Card 64 MB RAM graphic cards(or equivalent on-board graphic cards) RAM 512 MB Operating System ) Windows 98, Windows ME (Please see Note) Windows2000, 2003, XP, Vista, Mac OS...
User Guide
Page 8
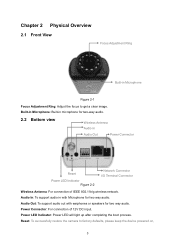
...: Adjust the focus to factory defaults, please keep the device powered on, 3 Power LED Indicator: Power LED will light up after completing the boot process. Power Connector: For connection of IEEE 802.11b/g wireless network. Audio Out: To support audio out with Microphone for two way audio. Built-in Microphone: Built-in with earphones or speakers for two way audio. Reset: To successfully restore the camera to get a clear image. Audio...
...: Adjust the focus to factory defaults, please keep the device powered on, 3 Power LED Indicator: Power LED will light up after completing the boot process. Power Connector: For connection of IEEE 802.11b/g wireless network. Audio Out: To support audio out with Microphone for two way audio. Built-in Microphone: Built-in with earphones or speakers for two way audio. Reset: To successfully restore the camera to get a clear image. Audio...
User Guide
Page 12
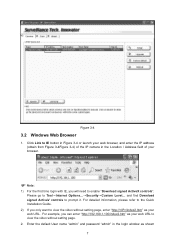
...Link to IE button in Figure 3-4 or launch your browser. ) Note: 1) For the first time login with IE, you will need to enable "Download signed ActiveX controls". and find Download signed ActiveV controls to Tool→Internet Options...→Security→Custom Level... Enter the default User name "admin" and password... the IP camera in the login window as shown 7 For example, you only want to view the video without setting page, enter "http:///index2.htm" as your web URL . Please go to prompt it. For detailed information, please refer to the Quick Installation Guide. 2) If...
...Link to IE button in Figure 3-4 or launch your browser. ) Note: 1) For the first time login with IE, you will need to enable "Download signed ActiveX controls". and find Download signed ActiveV controls to Tool→Internet Options...→Security→Custom Level... Enter the default User name "admin" and password... the IP camera in the login window as shown 7 For example, you only want to view the video without setting page, enter "http:///index2.htm" as your web URL . Please go to prompt it. For detailed information, please refer to the Quick Installation Guide. 2) If...
User Guide
Page 19
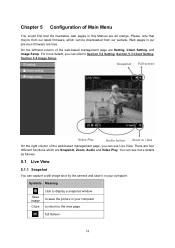
... web-based management page, you can capture a still image shot by the camera and save the picture in your computer. Please note that the illustrative web pages in your computer to return to Section 5.2 Setting, Section 5.3 Client Setting, Section 5.4 Image Setup. Snapshot Full screen Video Play Audio button Zoom in our previous firmware are blue. For more details as follows. 5.1 Live View 5.1.1 Snapshot You can refer to...
... web-based management page, you can capture a still image shot by the camera and save the picture in your computer. Please note that the illustrative web pages in your computer to return to Section 5.2 Setting, Section 5.3 Client Setting, Section 5.4 Image Setup. Snapshot Full screen Video Play Audio button Zoom in our previous firmware are blue. For more details as follows. 5.1 Live View 5.1.1 Snapshot You can refer to...
User Guide
Page 50
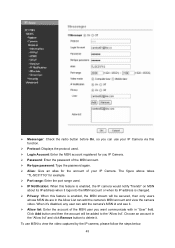
...". When it's disabled, any user can add the camera's MSN account and view the camera video. Choose an account in "User" field. ¾ Messenger: Check the radio button before On, so you want communicate with in the "Allow list" and click Remove button to delete it . ¾ Allow list: Enter the account of your IP Camera. The figure above takes "TL-SC3171G" for example. ¾...
...". When it's disabled, any user can add the camera's MSN account and view the camera video. Choose an account in "User" field. ¾ Messenger: Check the radio button before On, so you want communicate with in the "Allow list" and click Remove button to delete it . ¾ Allow list: Enter the account of your IP Camera. The figure above takes "TL-SC3171G" for example. ¾...
User Guide
Page 52
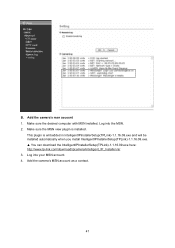
Make sure the MSN view plugin is embedded in IntelligentIPInstallerSetup(TPLink)-1.1.16.09.exe and will be installed automatically when you install IntelligentIPInstallerSetup(TPLink)-1.1.16.09.exe. ▲ You can download the IntelligentIPInstallerSetup(TPLink)-1.1.16.09.exe here: http://www.tp-link.com/download/ipcamera/Intelligent_IP_Installer.rar 3. Make sure the desired computer with MSN installed. Log into the MSN. 2. Log into your MSN account. 4. Add the camera's msn account 1. Add the camera's MSN account as a contact. 47 This plugin is installed. B.
Make sure the MSN view plugin is embedded in IntelligentIPInstallerSetup(TPLink)-1.1.16.09.exe and will be installed automatically when you install IntelligentIPInstallerSetup(TPLink)-1.1.16.09.exe. ▲ You can download the IntelligentIPInstallerSetup(TPLink)-1.1.16.09.exe here: http://www.tp-link.com/download/ipcamera/Intelligent_IP_Installer.rar 3. Make sure the desired computer with MSN installed. Log into the MSN. 2. Log into your MSN account. 4. Add the camera's msn account 1. Add the camera's MSN account as a contact. 47 This plugin is installed. B.


