
User Guide
Page 7
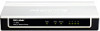
... Guide Package Contents The following items should be found in your package: ¾ One TD-8840 ADSL2+ Modem Router ¾ One AC power Adapter for TD-8840 ADSL2+ Modem Router ¾ One Resource CD for TD-8840 ADSL2+ Modem Router, including: • This Guide • Other Helpful Information • Quick installation Guide Program ¾ Quick installation Guide ¾ One...
... Guide Package Contents The following items should be found in your package: ¾ One TD-8840 ADSL2+ Modem Router ¾ One AC power Adapter for TD-8840 ADSL2+ Modem Router ¾ One Resource CD for TD-8840 ADSL2+ Modem Router, including: • This Guide • Other Helpful Information • Quick installation Guide Program ¾ Quick installation Guide ¾ One...

User Guide
Page 8
...it from our website (http://www.tp-link.com). 1.2 Conventions The Router or TD-8840, or device mentioned in this Guide. 1.3 Main Features ¾ High speed and asymmetry data transmit mode, built-in the pictures are sharing this User Guide. The TD-8840 uses not only html (web mode ...upgradeable ¾ Provides integrated access of TD-8840 and TD-8840B are just references for setting up the product, which face to use. For simplicity, we will take TD-8840 for example throughout this User guide stands for choosing the TD-8840 ADSL2+ Modem Router. 1.1 Product Overview With the excellent ...
...it from our website (http://www.tp-link.com). 1.2 Conventions The Router or TD-8840, or device mentioned in this Guide. 1.3 Main Features ¾ High speed and asymmetry data transmit mode, built-in the pictures are sharing this User Guide. The TD-8840 uses not only html (web mode ...upgradeable ¾ Provides integrated access of TD-8840 and TD-8840B are just references for setting up the product, which face to use. For simplicity, we will take TD-8840 for example throughout this User guide stands for choosing the TD-8840 ADSL2+ Modem Router. 1.1 Product Overview With the excellent ...

User Guide
Page 9
G.992.2 (G.lite) - ADSL dual latency (fast path and interleaved path) - Supports RFC1483 (EoA) (Bridged *and Router) - G.992.1 (G.dmt) - Annex A/B/C/M and Annex L (RE-DSL) compliant - Supports RFC2364 (PPPoA) - Annex A/B/C - G.992.3 (ADSL2) - Annex A/B/C - I.432 ATM physical layer ...VCs and TX VCs supported in software ¾ Full 24-bit Virtual Path Identifier (VPI) and Virtual Circuit Identifier (VCI) 3 TD-8840 ADSL2+ Modem Router User Guide ¾ Advanced DMT modulation and demodulation ¾ Real-time Configuration and device monitoring ¾ Quick response semi-conductive ...
G.992.2 (G.lite) - ADSL dual latency (fast path and interleaved path) - Supports RFC1483 (EoA) (Bridged *and Router) - G.992.1 (G.dmt) - Annex A/B/C/M and Annex L (RE-DSL) compliant - Supports RFC2364 (PPPoA) - Annex A/B/C - G.992.3 (ADSL2) - Annex A/B/C - I.432 ATM physical layer ...VCs and TX VCs supported in software ¾ Full 24-bit Virtual Path Identifier (VPI) and Virtual Circuit Identifier (VCI) 3 TD-8840 ADSL2+ Modem Router User Guide ¾ Advanced DMT modulation and demodulation ¾ Real-time Configuration and device monitoring ¾ Quick response semi-conductive ...
User Guide
Page 10
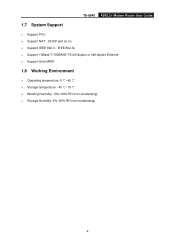
TD-8840 ADSL2+ Modem Router User Guide 1.7 System Support ¾ Support PVC ¾ Support NAT、DHCP and so on ¾ Support IEEE 802.3、IEEE 802.3u ¾ Support 10Base-T/100BASE-TX full-duplex or half duplex Ethernet ¾ Support Auto-MDIX 1.8 Working Environment ¾ Operating temperature: 0 ℃~40 ℃ ¾ Storage temperature: -40 ℃~70 ℃ ¾ Working Humidity: 10%~90% RH (non-condensing) ¾ Storage Humidity: 5%~90% RH (non-condensing) 4
TD-8840 ADSL2+ Modem Router User Guide 1.7 System Support ¾ Support PVC ¾ Support NAT、DHCP and so on ¾ Support IEEE 802.3、IEEE 802.3u ¾ Support 10Base-T/100BASE-TX full-duplex or half duplex Ethernet ¾ Support Auto-MDIX 1.8 Working Environment ¾ Operating temperature: 0 ℃~40 ℃ ¾ Storage temperature: -40 ℃~70 ℃ ¾ Working Humidity: 10%~90% RH (non-condensing) ¾ Storage Humidity: 5%~90% RH (non-condensing) 4
User Guide
Page 11
... on the corresponding 1~4 (LAN) port or the connection is in chart below. The LINE port is linked down. There is no activity. The ADSL negotiation is abnormal. TD-8840 ADSL2+ Modem Router User Guide Chapter 2. The Router should not be located where it can be easily accessible. 2.1 System Requirement Confirm your computer, with networking interface...
... on the corresponding 1~4 (LAN) port or the connection is in chart below. The LINE port is linked down. There is no activity. The ADSL negotiation is abnormal. TD-8840 ADSL2+ Modem Router User Guide Chapter 2. The Router should not be located where it can be easily accessible. 2.1 System Requirement Confirm your computer, with networking interface...

User Guide
Page 12
...And then release the button and wait the Router to reboot to its factory default settings. ¾ 1~4(LAN): Connect with the TD-8840 ADSL2+ Modem Router's LINE port by your Router away from direct sunlight, any unknown power adapter; otherwise your ADSL2+ Modem Router may be described in a lighting storm to...LINE (WAN): Connect to the MODEM Port of Splitter or connect to the Router's LAN port and your hands dry. 2.3 The Rear Panel TD-8840 ADSL2+ Modem Router User Guide ¾ ON/OFF: Turn on/off the ADSL2+ Modem Router's power. ¾ POWER: Please do not use any heater or heating ...
...And then release the button and wait the Router to reboot to its factory default settings. ¾ 1~4(LAN): Connect with the TD-8840 ADSL2+ Modem Router's LINE port by your Router away from direct sunlight, any unknown power adapter; otherwise your ADSL2+ Modem Router may be described in a lighting storm to...LINE (WAN): Connect to the MODEM Port of Splitter or connect to the Router's LAN port and your hands dry. 2.3 The Rear Panel TD-8840 ADSL2+ Modem Router User Guide ¾ ON/OFF: Turn on/off the ADSL2+ Modem Router's power. ¾ POWER: Please do not use any heater or heating ...

User Guide
Page 13
Last Step: Check the line connection to a standard electrical outlet. Power up finally. Figure 2-1 7 TD-8840 ADSL2+ Modem Router User Guide Third Step: Plug one end of the AC Power Adapter into the Power jack on the Router and the other end to see if everything is ready.
Last Step: Check the line connection to a standard electrical outlet. Power up finally. Figure 2-1 7 TD-8840 ADSL2+ Modem Router User Guide Third Step: Plug one end of the AC Power Adapter into the Power jack on the Router and the other end to see if everything is ready.

User Guide
Page 14
Figure 3-1 Step 2: Right click Local Area Connection (LAN), and then select Properties. 8 Now you need to configure the TCP/IP protocol below: ¾ Setting IP address automatically Step 1: Click the Start menu on your PC's IP address. TD-8840 ADSL2+ Modem Router User Guide Chapter 3. Quick Installation Guide 3.1 Configure PC After you directly connect your PC to the TD-8840 or connect your adapter to a Hub/Switch which has connected to the Router, you have two ways to configure your desktop, right click My Network Places, and then select Properties (shown in Figure 3-1).
Figure 3-1 Step 2: Right click Local Area Connection (LAN), and then select Properties. 8 Now you need to configure the TCP/IP protocol below: ¾ Setting IP address automatically Step 1: Click the Start menu on your PC's IP address. TD-8840 ADSL2+ Modem Router User Guide Chapter 3. Quick Installation Guide 3.1 Configure PC After you directly connect your PC to the TD-8840 or connect your adapter to a Hub/Switch which has connected to the Router, you have two ways to configure your desktop, right click My Network Places, and then select Properties (shown in Figure 3-1).

User Guide
Page 15
And then click OK. 9 Figure 3-3 Step 4: Select "Obtain an IP address automatically" and "Obtain DNS server address automatically" in the screen below. TD-8840 ADSL2+ Modem Router User Guide Figure 3-2 Step 3: Select General tab, highlight Internet Protocol (TCP/IP), and then click the Properties button.
And then click OK. 9 Figure 3-3 Step 4: Select "Obtain an IP address automatically" and "Obtain DNS server address automatically" in the screen below. TD-8840 ADSL2+ Modem Router User Guide Figure 3-2 Step 3: Select General tab, highlight Internet Protocol (TCP/IP), and then click the Properties button.
User Guide
Page 16
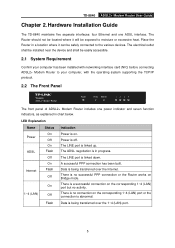
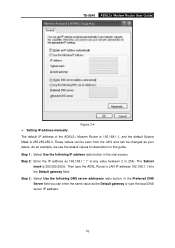
....168.1.* (* is any value between 2 to 254). Then type the ADSL Router's LAN IP address 192.168.1.1 into the Default gateway field. TD-8840 ADSL2+ Modem Router User Guide ¾ Setting IP address manually Figure 3-4 The default IP address of the ADSL2+ Modem Router is 192.168.1.1, and the default Subnet Mask is 255.255...
....168.1.* (* is any value between 2 to 254). Then type the ADSL Router's LAN IP address 192.168.1.1 into the Default gateway field. TD-8840 ADSL2+ Modem Router User Guide ¾ Setting IP address manually Figure 3-4 The default IP address of the ADSL2+ Modem Router is 192.168.1.1, and the default Subnet Mask is 255.255...

User Guide
Page 17
... Protocol (TCP/IP). 3) The words in fact may be different with this guide. Now, you can do the following , you have been successful. 11 TD-8840 ADSL2+ Modem Router User Guide Figure 3-5 ) Note: 1) Users of Windows 98 can open TCP/IP Properties according to the following: Right-click (Mouse) Network Neighbor Æ Choose...
... Protocol (TCP/IP). 3) The words in fact may be different with this guide. Now, you can do the following , you have been successful. 11 TD-8840 ADSL2+ Modem Router User Guide Figure 3-5 ) Note: 1) Users of Windows 98 can open TCP/IP Properties according to the following: Right-click (Mouse) Network Neighbor Æ Choose...

User Guide
Page 18
TD-8840 ADSL2+ Modem Router User Guide Figure 3-6 If the screen looks like the following login box will pop up. Enter default user name (admin) and password (admin) as shown in the address bar of the Router. Please try again. Figure 3-7 3.2 Login Open your web browser and enter http://192.168.1.1 in Figure 3-8. Click OK to enter the Web-based Utility of the browser. Figure 3-8 12 When ADSL connection is OK, the following , the connection has failed.
TD-8840 ADSL2+ Modem Router User Guide Figure 3-6 If the screen looks like the following login box will pop up. Enter default user name (admin) and password (admin) as shown in the address bar of the Router. Please try again. Figure 3-7 3.2 Login Open your web browser and enter http://192.168.1.1 in Figure 3-8. Click OK to enter the Web-based Utility of the browser. Figure 3-8 12 When ADSL connection is OK, the following , the connection has failed.
User Guide
Page 19
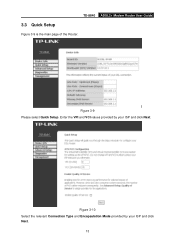
Enter the VPI and VCI values provided by your ISP and click Next. TD-8840 ADSL2+ Modem Router User Guide 3.3 Quick Setup Figure 3-9 is the main page of the Router. Figure 3-10 Select the relevant Connection Type and Encapsulation Mode provided by your ISP and click Next. 13 Figure 3-9 Please select Quick Setup.
Enter the VPI and VCI values provided by your ISP and click Next. TD-8840 ADSL2+ Modem Router User Guide 3.3 Quick Setup Figure 3-9 is the main page of the Router. Figure 3-10 Select the relevant Connection Type and Encapsulation Mode provided by your ISP and click Next. 13 Figure 3-9 Please select Quick Setup.

User Guide
Page 20
Figure 3-11 b) Enter the Username and Password provided by your ISP and click Next. Figure 3-12 14 TD-8840 ADSL2+ Modem Router User Guide 3.3.1 PPPoA a) Select PPP over ATM (PPPoA) Connection Type, and click Next.
Figure 3-11 b) Enter the Username and Password provided by your ISP and click Next. Figure 3-12 14 TD-8840 ADSL2+ Modem Router User Guide 3.3.1 PPPoA a) Select PPP over ATM (PPPoA) Connection Type, and click Next.

User Guide
Page 21
c) Click Save/Reboot. TD-8840 ADSL2+ Modem Router User Guide 3.3.2 PPPoE Figure 3-13 a) Select PPP over Ethernet (PPPoE) Connection Type, and click Next. Figure 3-14 b) Enter the Username and Password provided by your ISP and click Next. 15
c) Click Save/Reboot. TD-8840 ADSL2+ Modem Router User Guide 3.3.2 PPPoE Figure 3-13 a) Select PPP over Ethernet (PPPoE) Connection Type, and click Next. Figure 3-14 b) Enter the Username and Password provided by your ISP and click Next. 15

User Guide
Page 23
Figure 3-17 b) Enter the parameters provided by your ISP, and click Next. Figure 3-18 17 TD-8840 ADSL2+ Modem Router User Guide 3.3.3 MER a) Select MAC Encapsulation Routing (MER) Connection Type, and click Next.
Figure 3-17 b) Enter the parameters provided by your ISP, and click Next. Figure 3-18 17 TD-8840 ADSL2+ Modem Router User Guide 3.3.3 MER a) Select MAC Encapsulation Routing (MER) Connection Type, and click Next.

User Guide
Page 24
c) Click Save/Reboot. Figure 3-20 b) Enter the parameters provided by your ISP and click Next. 18 TD-8840 ADSL2+ Modem Router User Guide 3.3.4 IPoA Figure 3-19 a) Select IP over ATM (IPoA) Connection Type, and click Next.
c) Click Save/Reboot. Figure 3-20 b) Enter the parameters provided by your ISP and click Next. 18 TD-8840 ADSL2+ Modem Router User Guide 3.3.4 IPoA Figure 3-19 a) Select IP over ATM (IPoA) Connection Type, and click Next.
User Guide
Page 25
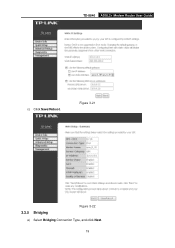
Figure 3-21 3.3.5 Bridging Figure 3-22 a) Select Bridging Connection Type, and click Next. 19 TD-8840 ADSL2+ Modem Router User Guide c) Click Save/Reboot.
Figure 3-21 3.3.5 Bridging Figure 3-22 a) Select Bridging Connection Type, and click Next. 19 TD-8840 ADSL2+ Modem Router User Guide c) Click Save/Reboot.

User Guide
Page 26
TD-8840 ADSL2+ Modem Router User Guide b) Click Save/Reboot. Figure 3-23 Figure 3-24 ) Note: After you complete any setup, the new setup must be saved and the Router must be restarted for the configuration to restart. 20 Please click the Save/Reboot button to take effect.
TD-8840 ADSL2+ Modem Router User Guide b) Click Save/Reboot. Figure 3-23 Figure 3-24 ) Note: After you complete any setup, the new setup must be saved and the Router must be restarted for the configuration to restart. 20 Please click the Save/Reboot button to take effect.

User Guide
Page 27
...-based Utility. All information is read-only. Figure 4-2 21 Figure 4-1 4.2 Quick Setup Please refer to know more about the ADSL 2+ Modem Router. For advanced users, if you want to 3.3 Quick Setup. 4.3 Advanced Setup Choose "Advanced Setup", and you can see the submenus as shown in Figure 4-2. TD-8840 ADSL2+ Modem Router User Guide Chapter 4.
...-based Utility. All information is read-only. Figure 4-2 21 Figure 4-1 4.2 Quick Setup Please refer to know more about the ADSL 2+ Modem Router. For advanced users, if you want to 3.3 Quick Setup. 4.3 Advanced Setup Choose "Advanced Setup", and you can see the submenus as shown in Figure 4-2. TD-8840 ADSL2+ Modem Router User Guide Chapter 4.

