
MA180 V2 User Guide
Page 2
... to change without permission from that to which can radiate radio frequency energy and, if not installed and used in any form or by any means or used to make any interference received, including interference that may cause undesired operation. No part of the specifications may be determined by turning the equipment off and on a circuit different from TP-LINK TECHNOLOGIES...
... to change without permission from that to which can radiate radio frequency energy and, if not installed and used in any form or by any means or used to make any interference received, including interference that may cause undesired operation. No part of the specifications may be determined by turning the equipment off and on a circuit different from TP-LINK TECHNOLOGIES...
MA180 V2 User Guide
Page 3
...is subject to the following two conditions: (1)This device may not cause harmful interference, and (2)This device must accept any radio or tv interference caused by unauthorized modifications to this product may cause radio interference, in which case the user may cause undesired operation. NOTE IMPORTANTE: Dé...a Class B product. IMPORTANT NOTE: Radiation Exposure Statement: This equipment complies with Canada radiation exposure limits set forth for any interference received, including interference that may be installed and operated with RSS-210 of the Industry Canada Rules.
...is subject to the following two conditions: (1)This device may not cause harmful interference, and (2)This device must accept any radio or tv interference caused by unauthorized modifications to this product may cause radio interference, in which case the user may cause undesired operation. NOTE IMPORTANTE: Dé...a Class B product. IMPORTANT NOTE: Radiation Exposure Statement: This equipment complies with Canada radiation exposure limits set forth for any interference received, including interference that may be installed and operated with RSS-210 of the Industry Canada Rules.

MA180 V2 User Guide
Page 5
...Science and Technology Park, Shennan Rd, Nanshan, Shenzhen, China TP-LINK TECHNOLOGIES CO., LTD DECLARATION OF CONFORMITY For the following equipment: Product Description: 3.75G HSUPA USB Adapter Model No.: MA180 Trademark: TP-LINK We declare under our own responsibility that the above products ...documents ETSI EN 301 908-1 & ETSI EN 301 908-2 ETSI EN 301 489-1 & ETSI EN 301 489-24 EN60950-1:2006+A11:2009+A1:2010 EN62311:2008 The product carries the CE Mark: Person is responsible for marking this declaration: Yang Hongliang Product Manager of International Business Date of issue: 2012 TP-LINK...
...Science and Technology Park, Shennan Rd, Nanshan, Shenzhen, China TP-LINK TECHNOLOGIES CO., LTD DECLARATION OF CONFORMITY For the following equipment: Product Description: 3.75G HSUPA USB Adapter Model No.: MA180 Trademark: TP-LINK We declare under our own responsibility that the above products ...documents ETSI EN 301 908-1 & ETSI EN 301 908-2 ETSI EN 301 489-1 & ETSI EN 301 489-24 EN60950-1:2006+A11:2009+A1:2010 EN62311:2008 The product carries the CE Mark: Person is responsible for marking this declaration: Yang Hongliang Product Manager of International Business Date of issue: 2012 TP-LINK...

MA180 V2 User Guide
Page 6
...2.1 Hardware Installation 4 2.2 Software Installation 5 Chapter 3. Management 11 4.1 Interface Introduction 11 4.1.1 Functional Button Icons 11 4.1.2 Status Information Icons 11 4.2 Message ...12 4.2.1 4.2.2 4.2.3 4.2.4 Create and Send a Message 13 Search a Message 15 View a Message...15 Message Settings...15 4.3 Phonebook 17 4.3.1 4.3.2 4.3.3 Create a Contact ...17 Search a Contact ...18 View a contact...18 4.4 Statistic ...19 4.4.1 View the Statistics 20 4.4.2 Reset the Statistics 20 4.5 Settings ...20 4.5.1 4.5.2 4.5.3 4.5.4 Connecting ...20 Security ...23 Network...
...2.1 Hardware Installation 4 2.2 Software Installation 5 Chapter 3. Management 11 4.1 Interface Introduction 11 4.1.1 Functional Button Icons 11 4.1.2 Status Information Icons 11 4.2 Message ...12 4.2.1 4.2.2 4.2.3 4.2.4 Create and Send a Message 13 Search a Message 15 View a Message...15 Message Settings...15 4.3 Phonebook 17 4.3.1 4.3.2 4.3.3 Create a Contact ...17 Search a Contact ...18 View a contact...18 4.4 Statistic ...19 4.4.1 View the Statistics 20 4.4.2 Reset the Statistics 20 4.5 Settings ...20 4.5.1 4.5.2 4.5.3 4.5.4 Connecting ...20 Security ...23 Network...

MA180 V2 User Guide
Page 9
... TP-LINK's 3.75G HSUPA USB Adapter, MA180 allows you to connect to the Internet in locations that are unable to receive conventional broadband. 1.2 Conventions The 'Adapter' mentioned in this User Guide stands for MA180 3.75G HSUPA USB Adapter without any explanations. 1.3 Main Features Download speed up to 7.2Mbps Upload speed up to acquire 3G mobile broadband access simply by inserting a standard 3G SIM/USIM card into the Adapter...
... TP-LINK's 3.75G HSUPA USB Adapter, MA180 allows you to connect to the Internet in locations that are unable to receive conventional broadband. 1.2 Conventions The 'Adapter' mentioned in this User Guide stands for MA180 3.75G HSUPA USB Adapter without any explanations. 1.3 Main Features Download speed up to 7.2Mbps Upload speed up to acquire 3G mobile broadband access simply by inserting a standard 3G SIM/USIM card into the Adapter...
MA180 V2 User Guide
Page 10
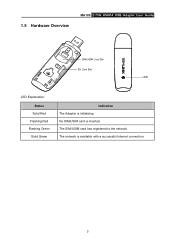
1.5 Hardware Overview MA180 3.75G HSUPA USB Adapter User Guide LED Explanation: Status Solid Red Flashing Red Flashing Green Solid Green Indication The Adapter is available with a successful Internet connection. 3 The network is initializing. No SIM/USIM card is inserted. The SIM/USIM card has registered to the network.
1.5 Hardware Overview MA180 3.75G HSUPA USB Adapter User Guide LED Explanation: Status Solid Red Flashing Red Flashing Green Solid Green Indication The Adapter is available with a successful Internet connection. 3 The network is initializing. No SIM/USIM card is inserted. The SIM/USIM card has registered to the network.

MA180 V2 User Guide
Page 12
MA180 3.75G HSUPA USB Adapter User Guide 2.2 Software Installation The MA180's Setup Wizard will appear as a virtual disk in My Computer. Click the Run AutoRun.exe. Note: Figure 2-1 The device will guide you through the installation procedures. If the above window doesn't appear, please go to My Computer and click the icon to continue. 5 Click Next to start the installation program. 2. The InstallShield Wizard window will appear on...
MA180 3.75G HSUPA USB Adapter User Guide 2.2 Software Installation The MA180's Setup Wizard will appear as a virtual disk in My Computer. Click the Run AutoRun.exe. Note: Figure 2-1 The device will guide you through the installation procedures. If the above window doesn't appear, please go to My Computer and click the icon to continue. 5 Click Next to start the installation program. 2. The InstallShield Wizard window will appear on...

MA180 V2 User Guide
Page 14
The installation process may take 1~2 minutes. MA180 3.75G HSUPA USB Adapter User Guide Figure 2-4 5. The screen as shown in Figure 2-6 will then appear. Please wait. Figure 2-5 6. Click Finish to complete the setup. 7
The installation process may take 1~2 minutes. MA180 3.75G HSUPA USB Adapter User Guide Figure 2-4 5. The screen as shown in Figure 2-6 will then appear. Please wait. Figure 2-5 6. Click Finish to complete the setup. 7
MA180 V2 User Guide
Page 16
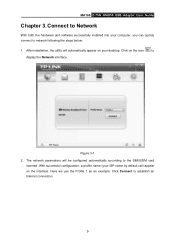
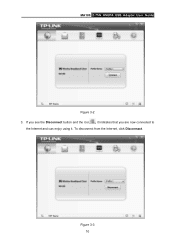
... the interface. Here we use the Profile 1 as an example. Click Connect to network following the steps below. 1. Click on your desktop. Connect to Network With both the hardware and software successfully installed into your ISP name by default) will be configured automatically according to display the Network interface. Figure 3-1 2. With successful configuration, a profile name (your computer, you can quickly connect to establish an Internet connection. 9 MA180 3.75G HSUPA USB Adapter User Guide...
... the interface. Here we use the Profile 1 as an example. Click Connect to network following the steps below. 1. Click on your desktop. Connect to Network With both the hardware and software successfully installed into your ISP name by default) will be configured automatically according to display the Network interface. Figure 3-1 2. With successful configuration, a profile name (your computer, you can quickly connect to establish an Internet connection. 9 MA180 3.75G HSUPA USB Adapter User Guide...
MA180 V2 User Guide
Page 17
To disconnect from the Internet, click Disconnect. Figure 3-3 10 MA180 3.75G HSUPA USB Adapter User Guide Figure 3-2 3. If you see the Disconnect button and the icon , it indicates that you are now connected to the Internet and can enjoy using it.
To disconnect from the Internet, click Disconnect. Figure 3-3 10 MA180 3.75G HSUPA USB Adapter User Guide Figure 3-2 3. If you see the Disconnect button and the icon , it indicates that you are now connected to the Internet and can enjoy using it.

MA180 V2 User Guide
Page 18
... are six functional button icons: Network, Message, Phonebook, Statistic, Settings and Help. To... Display the Message interface. Display the Help interface. 4.1.2 Status Information Icons These icons indicate the current system status. The MA180 uses utility as the management software. Display the Phonebook interface. MA180 3.75G HSUPA USB Adapter User Guide Chapter 4. Click... Management This section will see the corresponding interface. Display the Statistic interface Display the Settings interface. The following table lists the status information. 11 The...
... are six functional button icons: Network, Message, Phonebook, Statistic, Settings and Help. To... Display the Message interface. Display the Help interface. 4.1.2 Status Information Icons These icons indicate the current system status. The MA180 uses utility as the management software. Display the Phonebook interface. MA180 3.75G HSUPA USB Adapter User Guide Chapter 4. Click... Management This section will see the corresponding interface. Display the Statistic interface Display the Settings interface. The following table lists the status information. 11 The...

MA180 V2 User Guide
Page 19
... Figure 4-1. 12 Indicates that the SIM/USIM card has been inserted. Indicates that the current Internet status is connected. Indicates that the Adapter has been connected to your Internet service provider. Displays the name of your computer. Indicates that the PIN protection has been enabled. Indicates that the SIM/USIM card has not been inserted. Status MA180 3.75G HSUPA USB Adapter User Guide Information Indicates the network's signal strength.
... Figure 4-1. 12 Indicates that the SIM/USIM card has been inserted. Indicates that the current Internet status is connected. Indicates that the Adapter has been connected to your Internet service provider. Displays the name of your computer. Indicates that the PIN protection has been enabled. Indicates that the SIM/USIM card has not been inserted. Status MA180 3.75G HSUPA USB Adapter User Guide Information Indicates the network's signal strength.

MA180 V2 User Guide
Page 22
...list. You can forward only one message at the same time. 2. Click the selected message. Select a message to display the interface as save mode for the following the above the message list for the received messages. Then you choose to delete a message, it will appear beside it . Please make use...and then click the Message button to view. 2. The name and phone number of the message sender, message content and receiving time will be cautious while doing this. 3. Enter the name/phone number of the message sender. MA180 3.75G HSUPA USB Adapter User Guide Note: You can...
...list. You can forward only one message at the same time. 2. Click the selected message. Select a message to display the interface as save mode for the following the above the message list for the received messages. Then you choose to delete a message, it will appear beside it . Please make use...and then click the Message button to view. 2. The name and phone number of the message sender, message content and receiving time will be cautious while doing this. 3. Enter the name/phone number of the message sender. MA180 3.75G HSUPA USB Adapter User Guide Note: You can...

MA180 V2 User Guide
Page 27
... default will appear in Figure 4-9 will be reset. 4.5 Settings This section introduces how to configure the Adapter. Click OK. Note: Figure 4-9 The daily/monthly/yearly uploaded and downloaded date can be reset while the transfer time, upload/download speed and date can not be set automatically. Click on the icon interface. to display the Settings 4.5.1 Connecting There is embedded in the Adapter. MA180 3.75G HSUPA USB Adapter User Guide...
... default will appear in Figure 4-9 will be reset. 4.5 Settings This section introduces how to configure the Adapter. Click OK. Note: Figure 4-9 The daily/monthly/yearly uploaded and downloaded date can be reset while the transfer time, upload/download speed and date can not be set automatically. Click on the icon interface. to display the Settings 4.5.1 Connecting There is embedded in the Adapter. MA180 3.75G HSUPA USB Adapter User Guide...

MA180 V2 User Guide
Page 28
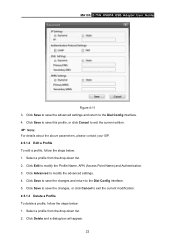
... profile according to set the Profile Name, APN (Access Point Name) and Authentication. 2. Otherwise, nothing will be displayed in the Profile Name field and you will see the Advanced interface as shown in Figure 4-10. Complete the parameters as shown in Figure 4-11. Click the Connecting button, and you will see the interface as required. 21 MA180 3.75G HSUPA USB Adapter User Guide functions.
... profile according to set the Profile Name, APN (Access Point Name) and Authentication. 2. Otherwise, nothing will be displayed in the Profile Name field and you will see the Advanced interface as shown in Figure 4-10. Complete the parameters as shown in Figure 4-11. Click the Connecting button, and you will see the interface as required. 21 MA180 3.75G HSUPA USB Adapter User Guide functions.
MA180 V2 User Guide
Page 29
... from the drop-down list. 2. Click Save to save the advanced settings and return to modify the advanced settings. 4. Click Advanced to the Dial Config interface. 4. Click Delete and a dialog box will appear. 22 MA180 3.75G HSUPA USB Adapter User Guide Figure 4-11 3. Click Save to save the changes, or click Cancel to modify the Profile Name, APN (Access Point Name) and Authentication. 3. Click Save to save...
... from the drop-down list. 2. Click Save to save the advanced settings and return to modify the advanced settings. 4. Click Advanced to the Dial Config interface. 4. Click Delete and a dialog box will appear. 22 MA180 3.75G HSUPA USB Adapter User Guide Figure 4-11 3. Click Save to save the changes, or click Cancel to modify the Profile Name, APN (Access Point Name) and Authentication. 3. Click Save to save...
MA180 V2 User Guide
Page 30
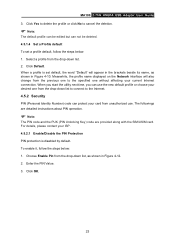
MA180 3.75G HSUPA USB Adapter User Guide 3. Select a profile from the drop-down list, as shown in Figure 4-12. 2. For details, please contact your current Internet connection. Click OK. 23 When a profile is disabled by default. Enter the PIN Value. 3. Meanwhile, the profile name displayed on the Network interface will appear in the brackets beside its name, as shown in Figure 4-10. Click Default. Click Yes...
MA180 3.75G HSUPA USB Adapter User Guide 3. Select a profile from the drop-down list, as shown in Figure 4-12. 2. For details, please contact your current Internet connection. Click OK. 23 When a profile is disabled by default. Enter the PIN Value. 3. Meanwhile, the profile name displayed on the Network interface will appear in the brackets beside its name, as shown in Figure 4-10. Click Default. Click Yes...
MA180 V2 Quick Install Guide 7106503935
Page 1
Quick Installation Guide 3.75G HSUPA USB Adapter MODEL NO. You need to the network. Click the Run AutoRun.exe. 3 Click Change to specify the destination you wish the application to be located or leave it in the direction indicated on your desktop. Please wait. 2 The InstallShield Wizard window will appear on your desktop. Flashing Green The SIM/USIM card has registered to buy one yourself...
Quick Installation Guide 3.75G HSUPA USB Adapter MODEL NO. You need to the network. Click the Run AutoRun.exe. 3 Click Change to specify the destination you wish the application to be located or leave it in the direction indicated on your desktop. Please wait. 2 The InstallShield Wizard window will appear on your desktop. Flashing Green The SIM/USIM card has registered to buy one yourself...

MA180 V2 Quick Install Guide 7106503935
Page 2
... the Connecting button to reinstall the driver. Why there is no signal indicated? 1) You may not be installed properly. Remove the TP-LINK 3G client driver and then plug the Adapter into your service provider for details as to how to activate it . Technical Support For more help , go to www.tp-link.com/en/support/fap To download the latest Firmware, Driver, Utility and User Guide, go to www.tp-link.com/en/support/download...
... the Connecting button to reinstall the driver. Why there is no signal indicated? 1) You may not be installed properly. Remove the TP-LINK 3G client driver and then plug the Adapter into your service provider for details as to how to activate it . Technical Support For more help , go to www.tp-link.com/en/support/fap To download the latest Firmware, Driver, Utility and User Guide, go to www.tp-link.com/en/support/download...
MA180 CE DOC
Page 1
TP-LINK DECLARATION OF CONFORMITY Product Description: 3.75E HSUPA USB Adapter Model No.: MA180 Trademark: TP-LINK We declare under our own responsibility that the above products satisfy all the technical regulations applicable to the product within the scope of Council Directives: Directives 1999/5/EC The above product is in conformity with the following standards or other normative documents ETSI...
TP-LINK DECLARATION OF CONFORMITY Product Description: 3.75E HSUPA USB Adapter Model No.: MA180 Trademark: TP-LINK We declare under our own responsibility that the above products satisfy all the technical regulations applicable to the product within the scope of Council Directives: Directives 1999/5/EC The above product is in conformity with the following standards or other normative documents ETSI...


