

EAP Controller Software V2 User Guide
Page 10
...an email address to continue. Step 3: Set an SSID name (wireless network name) and password. Click Next to receive the notification emails and reset your password. NOTE: Please remember well your password if necessary. Step 4: Configure an admin name and password for the first time. After... to the EAP Controller. You can change the username and password of each EAP device on the Controller Settings page so that you can reset the password if necessary. The configured admin name and password will simultaneously create two wireless networks, a 2.4GHz one and a ...
...an email address to continue. Step 3: Set an SSID name (wireless network name) and password. Click Next to receive the notification emails and reset your password. NOTE: Please remember well your password if necessary. Step 4: Configure an admin name and password for the first time. After... to the EAP Controller. You can change the username and password of each EAP device on the Controller Settings page so that you can reset the password if necessary. The configured admin name and password will simultaneously create two wireless networks, a 2.4GHz one and a ...
EAP Controller Software V2 User Guide
Page 13
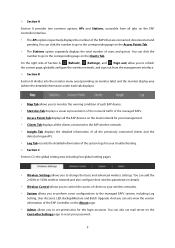
... details. Wireless Control allows you to control the access of clients to your wireless networks. System allows you to perform some configurations to reset your password. 9 Section A Section A provides two common options: APs and Stations, accessible from the management interface. Section B Section B divides into the monitor menu...
... details. Wireless Control allows you to control the access of clients to your wireless networks. System allows you to perform some configurations to reset your password. 9 Section A Section A provides two common options: APs and Stations, accessible from the management interface. Section B Section B divides into the monitor menu...

EAP Controller Software V2 User Guide
Page 21
... 24h (24 hours) and 30d (30 days). According to Disconnected. Pending displays that the EAP is in the LAN and list them . If you reset or forget a connected/disconnected EAP, it can detect all the EAP devices are connected and managed by date and time period. When EAPs are divided...
... 24h (24 hours) and 30d (30 days). According to Disconnected. Pending displays that the EAP is in the LAN and list them . If you reset or forget a connected/disconnected EAP, it can detect all the EAP devices are connected and managed by date and time period. When EAPs are divided...

EAP Controller Software V2 User Guide
Page 23
... divided into a pending one. Click to reconnect the client to upgrade the connected APs and the following window will pop up. When a disconnected EAP is reset to factory default settings or you forget it, it will appear as Upgrading until the process is unreachable by the EAP Controller software. The Status...
... divided into a pending one. Click to reconnect the client to upgrade the connected APs and the following window will pop up. When a disconnected EAP is reset to factory default settings or you forget it, it will appear as Upgrading until the process is unreachable by the EAP Controller software. The Status...
EAP Controller Software V2 User Guide
Page 54
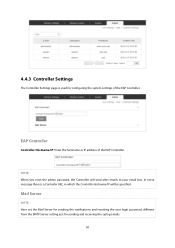
...IP: Enter the hostname or IP address of the EAP Controller. Mail Server NOTE: Here set the Mail Server for sending the notifications and resetting the user login password, different from the SMTP Server setting just for configuring the system settings of the EAP Controller. NOTE: When you... reset the admin password, the Controller will be specified. In every message there is used for sending and receiving the syslog emails. 50 4.4.3 Controller ...
...IP: Enter the hostname or IP address of the EAP Controller. Mail Server NOTE: Here set the Mail Server for sending the notifications and resetting the user login password, different from the SMTP Server setting just for configuring the system settings of the EAP Controller. NOTE: When you... reset the admin password, the Controller will be specified. In every message there is used for sending and receiving the syslog emails. 50 4.4.3 Controller ...
EAP Controller Software V2 User Guide
Page 55
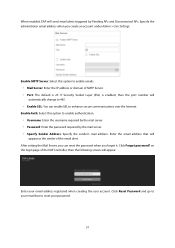
... triggered by the mail server. Specify Sender Address: Specify the sender's mail address. If Security Socket Layer (SSL) is 25. Click Reset Password and go to your email box to enable authentication. Username: Enter the username required by the mail server. Password: Enter... by Pending APs and Disconnected APs. Specify the administrator email address when you forget it. Enable SMTP Server: Select this option to reset your email address registered when creating the user account. Enter the email address that will appear as the sender of the EAP Controller,...
... triggered by the mail server. Specify Sender Address: Specify the sender's mail address. If Security Socket Layer (SSL) is 25. Click Reset Password and go to your email box to enable authentication. Username: Enter the username required by the mail server. Password: Enter... by Pending APs and Disconnected APs. Specify the administrator email address when you forget it. Enable SMTP Server: Select this option to reset your email address registered when creating the user account. Enter the email address that will appear as the sender of the EAP Controller,...
EAP110 V1 User Guide
Page 9
......52 7.4 LED ON/OFF ...53 7.5 SSH...53 7.6 SNMP ...54 Chapter 8 System ...57 8.1 User Account...57 8.2 Time Settings ...57 8.2.1 Time Settings ...58 8.2.2 Daylight Saving ...59 8.3 Reboot/Reset ...60 8.4 Backup & Restore ...61 8.5 Firmware Upgrade ...61 Appendix A: Specifications ...63 2
......52 7.4 LED ON/OFF ...53 7.5 SSH...53 7.6 SNMP ...54 Chapter 8 System ...57 8.1 User Account...57 8.2 Time Settings ...57 8.2.1 Time Settings ...58 8.2.2 Daylight Saving ...59 8.3 Reboot/Reset ...60 8.4 Backup & Restore ...61 8.5 Firmware Upgrade ...61 Appendix A: Specifications ...63 2
EAP110 V1 User Guide
Page 11
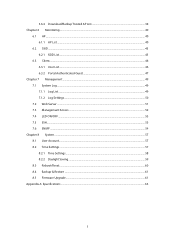
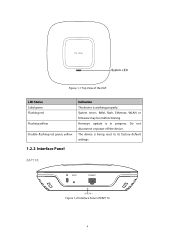
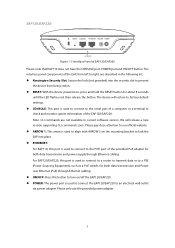
System errors. Figure 1-1 Top View of EAP110 4 Do not disconnect or power off the device. RAM, flash, Ethernet, WLAN or firmware may be malfunctioning. Firmware update is working properly. The device is being reset to its factory default settings. 1.2.2 Interface Panel EAP110: Figure 1-2 Interface Panel of the EAP LED Status Solid green Flashing red Flashing yellow Double-flashing red, green, yellow Indication The device is in progress.
System errors. Figure 1-1 Top View of EAP110 4 Do not disconnect or power off the device. RAM, flash, Ethernet, WLAN or firmware may be malfunctioning. Firmware update is working properly. The device is being reset to its factory default settings. 1.2.2 Interface Panel EAP110: Figure 1-2 Interface Panel of the EAP LED Status Solid green Flashing red Flashing yellow Double-flashing red, green, yellow Indication The device is in progress.
EAP110 V1 User Guide
Page 12
... software version. EAP120/EAP220: Figure 1-3 Interface Panel of a computer or a terminal to right, are not available in the following list. Kensington Security Slot: Secure the lock (not provided) into the security slot to prevent the device from being stolen. RESET: With the device powered... the button. We will restore to factory default settings. CONSOLE: This port is used to connect the EAP120/EAP220 to the POE port of the EAP120/EAP220. Please only use the provided power adapter. 5 Please pay close attention to our official website. ARROW 1: This...
... software version. EAP120/EAP220: Figure 1-3 Interface Panel of a computer or a terminal to right, are not available in the following list. Kensington Security Slot: Secure the lock (not provided) into the security slot to prevent the device from being stolen. RESET: With the device powered... the button. We will restore to factory default settings. CONSOLE: This port is used to connect the EAP120/EAP220 to the POE port of the EAP120/EAP220. Please only use the provided power adapter. 5 Please pay close attention to our official website. ARROW 1: This...
EAP110 V1 User Guide
Page 64
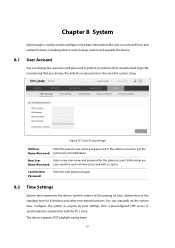
... time settings from unauthorized login. System time is mainly used to configure some basic information like user account and time, and realize functions including reboot, reset, backup, restore and upgrade the device. 8.1 User Account You can manually set the system time, configure the system to protect your device from a preconfigured NTP...
... time settings from unauthorized login. System time is mainly used to configure some basic information like user account and time, and realize functions including reboot, reset, backup, restore and upgrade the device. 8.1 User Account You can manually set the system time, configure the system to protect your device from a preconfigured NTP...
EAP110 V1 User Guide
Page 67
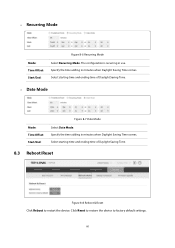
.... Select starting time and ending time of Daylight Saving Time. Date Mode Mode: Time Offset: Start/End: Figure 8-7 Date Mode Select Date Mode. Click Reset to restore the device to restart the device. Specify the time adding in minutes when Daylight Saving Time comes. The configuration is recurring in use...
.... Select starting time and ending time of Daylight Saving Time. Date Mode Mode: Time Offset: Start/End: Figure 8-7 Date Mode Select Date Mode. Click Reset to restore the device to restart the device. Specify the time adding in minutes when Daylight Saving Time comes. The configuration is recurring in use...

EAP110 V1 User Guide
Page 70
Appendix A: Specifications HARDWARE FEATURES Model EAP110 EAP120 EAP220 Interface Kensington lock slot RESET button ETHERNET: ETHERNET: 10/100/1000Mbps Ethernet port (RJ- 10/100Mbps 45) Ethernet port (RJ- CONSOLE port (RJ-45) 45) Power connector (DC-2) Power Supply ...
Appendix A: Specifications HARDWARE FEATURES Model EAP110 EAP120 EAP220 Interface Kensington lock slot RESET button ETHERNET: ETHERNET: 10/100/1000Mbps Ethernet port (RJ- 10/100Mbps 45) Ethernet port (RJ- CONSOLE port (RJ-45) 45) Power connector (DC-2) Power Supply ...

EAP220 V1 Quick Install Guide
Page 5
Hardware Overview 1. LED EAP110, EAP120 and EAP220 have the same LED status and corresponding indications. System LED LED Status Solid green Flashing red Flashing yellow Double-flashing red, green, yellow Indication The device is being reset to its factory default settings. 02 System errors. The device is working properly. Do not disconnect or power off the device. RAM, Flash, Ethernet, WLAN or firmware may be malfunctioning. Firmware update is in progress.
Hardware Overview 1. LED EAP110, EAP120 and EAP220 have the same LED status and corresponding indications. System LED LED Status Solid green Flashing red Flashing yellow Double-flashing red, green, yellow Indication The device is being reset to its factory default settings. 02 System errors. The device is working properly. Do not disconnect or power off the device. RAM, Flash, Ethernet, WLAN or firmware may be malfunctioning. Firmware update is in progress.

EAP220 V1 Quick Install Guide
Page 6
...check and monitor system information of a computer or a terminal to our official website. 03 Interface Panel ■■ EAP110 RESET ETHERNET ■■ EAP120/EAP220 ARROW 1 RESET CONSOLE ETHERNET ON/OFF POWER ARROW 1 Please note that EAP110 does not have the CONSOLE port, POWER port or ON/OFF...from left to factory default settings. CONSOLE This port is used to connect to the serial port of EAP120/EAP220. 2. RESET With the device powered on, press and hold the RESET button for about 8 seconds until the LED flashes red, then release the button. The device will release...
...check and monitor system information of a computer or a terminal to our official website. 03 Interface Panel ■■ EAP110 RESET ETHERNET ■■ EAP120/EAP220 ARROW 1 RESET CONSOLE ETHERNET ON/OFF POWER ARROW 1 Please note that EAP110 does not have the CONSOLE port, POWER port or ON/OFF...from left to factory default settings. CONSOLE This port is used to connect to the serial port of EAP120/EAP220. 2. RESET With the device powered on, press and hold the RESET button for about 8 seconds until the LED flashes red, then release the button. The device will release...

EAP220 V1 Quick Install Guide
Page 11
5. ARROW 2 ARROW 1 RESET ETHERNET 6. Turn the EAP clockwise until it locks into place. 08 Attach the EAP to the mounting bracket by aligning ARROW 1 with ARROW 2, as shown below.
5. ARROW 2 ARROW 1 RESET ETHERNET 6. Turn the EAP clockwise until it locks into place. 08 Attach the EAP to the mounting bracket by aligning ARROW 1 with ARROW 2, as shown below.

EAP220 V1 Quick Install Guide
Page 13
ARROW 1 ARROW 2 5. RESET ETHERNET 4. Hang the EAP on the EAP. 10 Turn the EAP clockwise until it locks into place. 6. Make sure the EAP is firmly seated against the wall. 7. Connect the Ethernet cable to the mounting bracket by aligning ARROW 1 with ARROW 2. Attach the EAP to the ETHERNET port on the screws.
ARROW 1 ARROW 2 5. RESET ETHERNET 4. Hang the EAP on the EAP. 10 Turn the EAP clockwise until it locks into place. 6. Make sure the EAP is firmly seated against the wall. 7. Connect the Ethernet cable to the mounting bracket by aligning ARROW 1 with ARROW 2. Attach the EAP to the ETHERNET port on the screws.
EAP220 V1 Quick Install Guide
Page 18
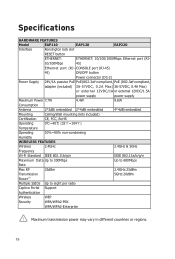
Specifications HARDWARE FEATURES Model EAP110 EAP120 EAP220 Interface Kensington lock slot RESET button ETHERNET: ETHERNET: 10/100/1000Mbps Ethernet port (RJ- 10/100Mbps 45) Ethernet port (RJ- CONSOLE port (RJ-45) 45) ON/OFF button Power connector (...
Specifications HARDWARE FEATURES Model EAP110 EAP120 EAP220 Interface Kensington lock slot RESET button ETHERNET: ETHERNET: 10/100/1000Mbps Ethernet port (RJ- 10/100Mbps 45) Ethernet port (RJ- CONSOLE port (RJ-45) 45) ON/OFF button Power connector (...


