
CPE510 V1 UG
Page 2
... ...1 Introduction...1 System Requirements ...1 Getting Started ...1 Navigation ...3 Chapter 2 Operation Modes ...4 Access Point ...4 Client...6 Repeater (Range Extender) ...7 Bridge ...8 AP Router ...8 AP Client Router (WISP Client) ...9 Chapter 3 Quick Setup Guide ...10 Access Point ...10 Client...12 Repeater (Range Extender) ...14 Bridge ...17 AP Router ...20 AP Client Router (WISP Client) ...22 Chapter 4 Status Tab...
... ...1 Introduction...1 System Requirements ...1 Getting Started ...1 Navigation ...3 Chapter 2 Operation Modes ...4 Access Point ...4 Client...6 Repeater (Range Extender) ...7 Bridge ...8 AP Router ...8 AP Client Router (WISP Client) ...9 Chapter 3 Quick Setup Guide ...10 Access Point ...10 Client...12 Repeater (Range Extender) ...14 Bridge ...17 AP Router ...20 AP Client Router (WISP Client) ...22 Chapter 4 Status Tab...
CPE510 V1 UG
Page 6
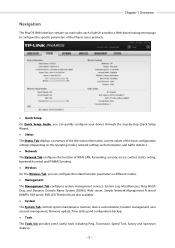
... to configure the specific parameters of the Pharos series products. Quick Setup On Quick Setup Guide, you can quickly configure your device through the step-by-step Quick Setup Wizard. Status The Status Tab displays a summary of the link status information, current values of the basic configuration settings (depending on the operating...
... to configure the specific parameters of the Pharos series products. Quick Setup On Quick Setup Guide, you can quickly configure your device through the step-by-step Quick Setup Wizard. Status The Status Tab displays a summary of the link status information, current values of the basic configuration settings (depending on the operating...

CPE510 V1 UG
Page 7
... tablets. Chapter 2 Operation Modes Chapter 2 Operation Modes The Pharos series products support six modes to the Installation Guide for hardware connection instruction and Chapter 3 Quick Setup Guide for wireless users. Meanwhile, Multi-SSID function can choose the desired scenario according to your needs, and refer to satisfy user's diversified network requirements...
... tablets. Chapter 2 Operation Modes Chapter 2 Operation Modes The Pharos series products support six modes to the Installation Guide for hardware connection instruction and Chapter 3 Quick Setup Guide for wireless users. Meanwhile, Multi-SSID function can choose the desired scenario according to your needs, and refer to satisfy user's diversified network requirements...

CPE510 V1 UG
Page 13
... an IP conflict with other devices. Access Point If Access Point is selected, click Next and take the following steps: 1. Chapter 3 Quick Setup Guide Chapter 3 Quick Setup Guide Quick Setup wizard allows you keep it by step. Choose the suitable operation mode according to quickly configure your network environment and follow the step...
... an IP conflict with other devices. Access Point If Access Point is selected, click Next and take the following steps: 1. Chapter 3 Quick Setup Guide Chapter 3 Quick Setup Guide Quick Setup wizard allows you keep it by step. Choose the suitable operation mode according to quickly configure your network environment and follow the step...

CPE510 V1 UG
Page 14
.... The Wireless AP Settings page will appear and display what you want to modify any parameter, click Back to complete the configuration. - 11 - Chapter 3 Quick Setup Guide 2. If you 've configured previously.
.... The Wireless AP Settings page will appear and display what you want to modify any parameter, click Back to complete the configuration. - 11 - Chapter 3 Quick Setup Guide 2. If you 've configured previously.

CPE510 V1 UG
Page 15
Chapter 3 Quick Setup Guide Client If Client is an IP conflict with other devices. Click Next. 2. The Wireless Client Settings page will appear as shown below . We recommend you keep it by default. The LAN Settings page will appear as shown below . Click Survey to search for wireless networks. - 12 - You can change the IP Address and Subnet Mask on this page when there is selected, click Next and take the following steps: 1. The default IP Address is 192.168.0.254 and the default Subnet Mask is 255.255.255.0.
Chapter 3 Quick Setup Guide Client If Client is an IP conflict with other devices. Click Next. 2. The Wireless Client Settings page will appear as shown below . We recommend you keep it by default. The LAN Settings page will appear as shown below . Click Survey to search for wireless networks. - 12 - You can change the IP Address and Subnet Mask on this page when there is selected, click Next and take the following steps: 1. The default IP Address is 192.168.0.254 and the default Subnet Mask is 255.255.255.0.

CPE510 V1 UG
Page 16
Chapter 3 Quick Setup Guide 3. Then click Next. - 13 - Lock to AP can make the device connect to be connected, you had connected before the next time. 4. Enter the ...
Chapter 3 Quick Setup Guide 3. Then click Next. - 13 - Lock to AP can make the device connect to be connected, you had connected before the next time. 4. Enter the ...

CPE510 V1 UG
Page 17
... Subnet Mask on this page when there is an IP conflict with other devices. We recommend you 've configured previously. Click Next. - 14 - Chapter 3 Quick Setup Guide 5. The Finish page will appear as shown below.
... Subnet Mask on this page when there is an IP conflict with other devices. We recommend you 've configured previously. Click Next. - 14 - Chapter 3 Quick Setup Guide 5. The Finish page will appear as shown below.

CPE510 V1 UG
Page 18
Lock to AP can make the device connect to search for wireless networks. 3. The Wireless Client Settings page will appear as shown below . Click Survey to the specified AP you had connected before the next time. - 15 - It's possible that two or more networks use the same SSID in the AP list. Chapter 3 Quick Setup Guide 2. The AP list will appear as shown below . Select the desired wireless network and click Connect.
Lock to AP can make the device connect to search for wireless networks. 3. The Wireless Client Settings page will appear as shown below . Click Survey to the specified AP you had connected before the next time. - 15 - It's possible that two or more networks use the same SSID in the AP list. Chapter 3 Quick Setup Guide 2. The AP list will appear as shown below . Select the desired wireless network and click Connect.

CPE510 V1 UG
Page 19
Then click Next. 5. The Finish page will appear and display what you should select the same Mode, Channel Width and Security type and enter the same PSK Password as entered on the root AP/router. If all are confirmed, click Finish to reconfigure it. Enter the distance between this device and the root AP/router in Distance setting. If you want to modify any parameter, click Back to complete the configuration. - 16 - If the root AP needs password to be connected, you 've configured previously. Chapter 3 Quick Setup Guide 4.
Then click Next. 5. The Finish page will appear and display what you should select the same Mode, Channel Width and Security type and enter the same PSK Password as entered on the root AP/router. If all are confirmed, click Finish to reconfigure it. Enter the distance between this device and the root AP/router in Distance setting. If you want to modify any parameter, click Back to complete the configuration. - 16 - If the root AP needs password to be connected, you 've configured previously. Chapter 3 Quick Setup Guide 4.

CPE510 V1 UG
Page 20
The LAN Settings page will appear as shown below . Click Next. 2. Chapter 3 Quick Setup Guide Bridge If Bridge is an IP conflict with other devices. The Wireless Client Settings page will appear as shown below . You can change the IP Address and Subnet Mask on this page when there is selected, click Next and take the following steps: 1. We recommend you keep it by default. The default IP Address is 192.168.0.254 and the default Subnet Mask is 255.255.255.0. Click Survey to search for wireless networks. - 17 -
The LAN Settings page will appear as shown below . Click Next. 2. Chapter 3 Quick Setup Guide Bridge If Bridge is an IP conflict with other devices. The Wireless Client Settings page will appear as shown below . You can change the IP Address and Subnet Mask on this page when there is selected, click Next and take the following steps: 1. We recommend you keep it by default. The default IP Address is 192.168.0.254 and the default Subnet Mask is 255.255.255.0. Click Survey to search for wireless networks. - 17 -

CPE510 V1 UG
Page 21
... time. 4. Select the desired wireless network and click Connect. It's possible that two or more networks use the same SSID in Distance setting. Chapter 3 Quick Setup Guide 3.
... time. 4. Select the desired wireless network and click Connect. It's possible that two or more networks use the same SSID in Distance setting. Chapter 3 Quick Setup Guide 3.

CPE510 V1 UG
Page 22
If you 've configured previously. The Finish page will be set the same as your root AP by default. If all are confirmed, click Finish to reconfigure it. Create a new SSID and PSK password for the local network will appear and display what you want to modify any parameter, click Back to complete the configuration. - 19 - Click Next. 6. The wireless AP settings for the local wireless network. Chapter 3 Quick Setup Guide 5.
If you 've configured previously. The Finish page will be set the same as your root AP by default. If all are confirmed, click Finish to reconfigure it. Create a new SSID and PSK password for the local network will appear and display what you want to modify any parameter, click Back to complete the configuration. - 19 - Click Next. 6. The wireless AP settings for the local wireless network. Chapter 3 Quick Setup Guide 5.

CPE510 V1 UG
Page 23
... choose this type. If your ISP provides, please refer to proceed. You don't need to configure any parameters, Click Next to the Internet. Chapter 3 Quick Setup Guide AP Router If AP Router is selected, click Next and take the following steps: 1.
... choose this type. If your ISP provides, please refer to proceed. You don't need to configure any parameters, Click Next to the Internet. Chapter 3 Quick Setup Guide AP Router If AP Router is selected, click Next and take the following steps: 1.

CPE510 V1 UG
Page 24
.... Enter the distance between this type, you should fill in the Security box and enter the PSK Password below . Then click Next. - 21 - Chapter 3 Quick Setup Guide Static IP -
.... Enter the distance between this type, you should fill in the Security box and enter the PSK Password below . Then click Next. - 21 - Chapter 3 Quick Setup Guide Static IP -

CPE510 V1 UG
Page 25
... configured previously. The WAN Connection Type page will appear and display what you want to modify any parameter, click Back to the Internet. Chapter 3 Quick Setup Guide 4.
... configured previously. The WAN Connection Type page will appear and display what you want to modify any parameter, click Back to the Internet. Chapter 3 Quick Setup Guide 4.
CPE510 V1 UG
Page 26
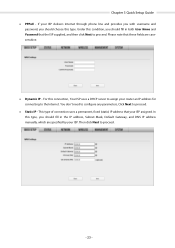
.... Under this condition, you should fill in both User Name and Password that the ISP supplied, and then click Next to the Internet. Chapter 3 Quick Setup Guide PPPoE -
.... Under this condition, you should fill in both User Name and Password that the ISP supplied, and then click Next to the Internet. Chapter 3 Quick Setup Guide PPPoE -

CPE510 V1 UG
Page 27
The AP list will appear as shown below . It's possible that two or more networks use the same SSID in the AP list. Chapter 3 Quick Setup Guide 3. Click Survey to the specified AP you had connected before the next time. - 24 - After configuring WAN connection type, The Wireless Client Settings page will appear as shown below . Lock to AP can make the device connect to search for wireless networks. 4. Select the desired wireless network and click Connect.
The AP list will appear as shown below . It's possible that two or more networks use the same SSID in the AP list. Chapter 3 Quick Setup Guide 3. Click Survey to the specified AP you had connected before the next time. - 24 - After configuring WAN connection type, The Wireless Client Settings page will appear as shown below . Lock to AP can make the device connect to search for wireless networks. 4. Select the desired wireless network and click Connect.

CPE510 V1 UG
Page 28
If the root AP needs password to be set the same as entered on the root AP/router. Click Next. - 25 - The wireless AP settings for the local wireless network. Then click Next. 6. Create a new SSID and PSK password for the local network will be connected, you should select the same Mode, Channel Width and Security type and enter the same PSK Password as your root AP by default. Enter the distance between this device and the root AP/router in Distance setting. Chapter 3 Quick Setup Guide 5.
If the root AP needs password to be set the same as entered on the root AP/router. Click Next. - 25 - The wireless AP settings for the local wireless network. Then click Next. 6. Create a new SSID and PSK password for the local network will be connected, you should select the same Mode, Channel Width and Security type and enter the same PSK Password as your root AP by default. Enter the distance between this device and the root AP/router in Distance setting. Chapter 3 Quick Setup Guide 5.

CPE510 V1 UG
Page 29
If all are confirmed, click Finish to reconfigure it. The Finish page will appear and display what you want to modify any parameter, click Back to complete the configuration. - 26 - Chapter 3 Quick Setup Guide 7. If you 've configured previously.
If all are confirmed, click Finish to reconfigure it. The Finish page will appear and display what you want to modify any parameter, click Back to complete the configuration. - 26 - Chapter 3 Quick Setup Guide 7. If you 've configured previously.


