Archer AX55US V1 User Guide
Page 2
... Hardware 7 2. 1. Connect Your Router 8 Chapter 3. Register a TP-Link ID 23 5. 2. Manage the User TP-Link IDs 24 5. 3. 1.Add TP-Link ID to Manage the Router 25 5. 3. 2.Remove TP-Link ID(s) from Managing the Router 25 5. 4. Set Up Internet Connection 13 4. 1. Appearance 4 1. 2. 1.Top Panel 4 1. 2. 2.Back Panel 5 Chapter 2. Use Quick Setup Wizard 14 4. 2. Manually Set Up Your Internet Connection 15 4. 4. Set...
... Hardware 7 2. 1. Connect Your Router 8 Chapter 3. Register a TP-Link ID 23 5. 2. Manage the User TP-Link IDs 24 5. 3. 1.Add TP-Link ID to Manage the Router 25 5. 3. 2.Remove TP-Link ID(s) from Managing the Router 25 5. 4. Set Up Internet Connection 13 4. 1. Appearance 4 1. 2. 1.Top Panel 4 1. 2. 2.Back Panel 5 Chapter 2. Use Quick Setup Wizard 14 4. 2. Manually Set Up Your Internet Connection 15 4. 4. Set...
Archer AX55US V1 User Guide
Page 17
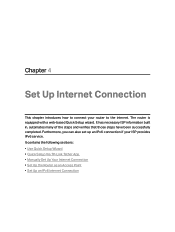
... up an IPv6 connection if your router to the internet. It contains the following sections: • Use Quick Setup Wizard • Quick Setup Via TP-Link Tether App • Manually Set Up Your Internet Connection • Set Up the Router as an Access Point • Set Up an IPv6 Internet Connection Chapter 4 Set...
... up an IPv6 connection if your router to the internet. It contains the following sections: • Use Quick Setup Wizard • Quick Setup Via TP-Link Tether App • Manually Set Up Your Internet Connection • Set Up the Router as an Access Point • Set Up an IPv6 Internet Connection Chapter 4 Set...
Archer AX55US V1 User Guide
Page 19
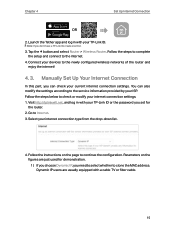
... internet connection settings. Dynamic IP users are just used for the router. 2. Manually Set Up Your Internet Connection In this part, you set for demonstration. 1 ) If you choose Dynamic IP, you don't have a TP-Link ID, create one first. 3. Visit http://tplinkwifi.net, and log in with... your TP-Link ID or the password you can also modify the settings according to the service information provided by your...
... internet connection settings. Dynamic IP users are just used for the router. 2. Manually Set Up Your Internet Connection In this part, you set for demonstration. 1 ) If you choose Dynamic IP, you don't have a TP-Link ID, create one first. 3. Visit http://tplinkwifi.net, and log in with... your TP-Link ID or the password you can also modify the settings according to the service information provided by your...

Archer AX55US V1 User Guide
Page 24
Click Save and then click Connect. 5 ) Pass-Through (Bridge): Click Save and skip to input further information if your ISP provides two separate accounts for the IPv4 and IPv6 connections, manually enter the username and password for the IPv6 connection. 4 ) 6to4 Tunnel: An IPv4 internet connection type is a prerequisite for this connection type (Manually Set Up Your Internet Connection). Click Advanced to Step 6. 20 Chapter 4 Set Up Internet Connection Note: If your ISP requires.
Click Save and then click Connect. 5 ) Pass-Through (Bridge): Click Save and skip to input further information if your ISP provides two separate accounts for the IPv4 and IPv6 connections, manually enter the username and password for the IPv6 connection. 4 ) 6to4 Tunnel: An IPv4 internet connection type is a prerequisite for this connection type (Manually Set Up Your Internet Connection). Click Advanced to Step 6. 20 Chapter 4 Set Up Internet Connection Note: If your ISP requires.
Archer AX55US V1 User Guide
Page 33
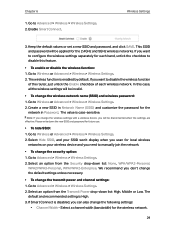
If you need to manually join the network. • To change the transmit power and channel settings: 1. Go to Advanced > Wireless > Wireless Settings. 2. Create a new SSID in Password. The value ...
If you need to manually join the network. • To change the transmit power and channel settings: 1. Go to Advanced > Wireless > Wireless Settings. 2. Create a new SSID in Password. The value ...

Archer AX55US V1 User Guide
Page 39
...section. Locate the Guest Network section. 3. Don't select Hide SSID unless you want your guests to your guests. Now your guests can access your TP-Link ID or the password you set for Guests 1. Create a Network for the router. 2. Click Save. You can turn on the top page.... 4. Tips: To view guest network information, go to access your own password. You can also click Sharing Network to share the SSID and password to manually input the SSID for the 2.4GHz or 5GHz wireless network. 2 ) Customize the SSID. Chapter 7 Guest Network 7. 1. Visit http://tplinkwifi.net, and...
...section. Locate the Guest Network section. 3. Don't select Hide SSID unless you want your guests to your guests. Now your guests can access your TP-Link ID or the password you set for Guests 1. Create a Network for the router. 2. Click Save. You can turn on the top page.... 4. Tips: To view guest network information, go to access your own password. You can also click Sharing Network to share the SSID and password to manually input the SSID for the 2.4GHz or 5GHz wireless network. 2 ) Customize the SSID. Chapter 7 Guest Network 7. 1. Visit http://tplinkwifi.net, and...

Archer AX55US V1 User Guide
Page 56
... the router's OneMesh page. Note: To check full list of TP-Link OneMesh devices, visit https://www.tp-link.com/onemesh/compatibility. 4. Now your router and extender successfully form a OneMesh network! 52 If you need to find it to add it in the extender's manual. Done! Chapter 10 OneMesh with Seamless Roaming 3. Otherwise, you have...
... the router's OneMesh page. Note: To check full list of TP-Link OneMesh devices, visit https://www.tp-link.com/onemesh/compatibility. 4. Now your router and extender successfully form a OneMesh network! 52 If you need to find it to add it in the extender's manual. Done! Chapter 10 OneMesh with Seamless Roaming 3. Otherwise, you have...

Archer AX55US V1 User Guide
Page 62
.... 58 This will appear on the screen, which means the selected devices have been successfully added to the whitelist. • Add unconnected devices 1 ) Click Add Manually. 2 ) Enter the Device Name and MAC Address of the device you can block or allow specific client devices to access your network (via wired or...
.... 58 This will appear on the screen, which means the selected devices have been successfully added to the whitelist. • Add unconnected devices 1 ) Click Add Manually. 2 ) Enter the Device Name and MAC Address of the device you can block or allow specific client devices to access your network (via wired or...

Archer AX55US V1 User Guide
Page 68
... 12 NAT Forwarding 5. The External Port, Internal Port and Protocol will be automatically filled in. Or enter the PC's IP address 192.168.0.100 manually in a router. Tips: • It is recommended to keep the default settings of Internal Port and Protocol if you are not clear about which... port and protocol to use is not in . 6. Users on the internet can enter the corresponding parameters manually. You should not be automatically filled in the common services list, you want to visit your home PC. Done! Click VIEW COMMON SERVICES and ...
... 12 NAT Forwarding 5. The External Port, Internal Port and Protocol will be automatically filled in. Or enter the PC's IP address 192.168.0.100 manually in a router. Tips: • It is recommended to keep the default settings of Internal Port and Protocol if you are not clear about which... port and protocol to use is not in . 6. Users on the internet can enter the corresponding parameters manually. You should not be automatically filled in the common services list, you want to visit your home PC. Done! Click VIEW COMMON SERVICES and ...
Archer AX55US V1 User Guide
Page 70
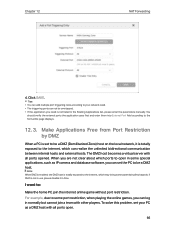
...; If the application you need is set your network need. • The triggering ports can log in the Existing Applications list, please enter the parameters manually. I want to open . 66 The DMZ host becomes a virtual server with all ports open in time. Chapter 12 NAT Forwarding 4. Make Applications Free from Port...
...; If the application you need is set your network need. • The triggering ports can log in the Existing Applications list, please enter the parameters manually. I want to open . 66 The DMZ host becomes a virtual server with all ports open in time. Chapter 12 NAT Forwarding 4. Make Applications Free from Port...

Archer AX55US V1 User Guide
Page 71
... each other players. 12. 4. Go to Advanced > NAT Forwarding > DMZ and tick to open the 67 Or enter the PC's IP address 192.168.0.100 manually in . You've set for example 192.168.0.100. 2. You may need to your PC. Some of the network. The configuration is enabled by UPnP... realizing the seamless connection of operating system need to enable the UPnP if you set your PC to a DMZ host and now you connect your TP-Link ID or the password you want to use this feature. • UPnP feature needs the support of operating system (e.g. Click VIEW CONNECTED DEVICES and select...
... each other players. 12. 4. Go to Advanced > NAT Forwarding > DMZ and tick to open the 67 Or enter the PC's IP address 192.168.0.100 manually in . You've set for example 192.168.0.100. 2. You may need to your PC. Some of the network. The configuration is enabled by UPnP... realizing the seamless connection of operating system need to enable the UPnP if you set your PC to a DMZ host and now you connect your TP-Link ID or the password you want to use this feature. • UPnP feature needs the support of operating system (e.g. Click VIEW CONNECTED DEVICES and select...

Archer AX55US V1 User Guide
Page 85
Or enter the MAC address of the client device manually. 3. Visit http://tplinkwifi.net, and log in with your router remotely.... 4. Chapter 14 Customize Your Network Settings 2. Click VIEW CONNECTED DEVICES and select the you device you can enjoy TP-Link's superior DDNS service. Then the MAC Address will be automatically filled in . 4. Click Register in with one,... Account Most ISPs assign a dynamic IP address to the router and you want to allow you have selected TP-Link, and enter the Domain Name as 192.168.1.x) to access your friends to the router. 1. Otherwise, ...
Or enter the MAC address of the client device manually. 3. Visit http://tplinkwifi.net, and log in with your router remotely.... 4. Chapter 14 Customize Your Network Settings 2. Click VIEW CONNECTED DEVICES and select the you device you can enjoy TP-Link's superior DDNS service. Then the MAC Address will be automatically filled in . 4. Click Register in with one,... Account Most ISPs assign a dynamic IP address to the router and you want to allow you have selected TP-Link, and enter the Domain Name as 192.168.1.x) to access your friends to the router. 1. Otherwise, ...

Archer AX55US V1 User Guide
Page 86
Chapter 14 Customize Your Network Settings If you want to the specific destination. 82 Tips: If you have selected NO-IP or DynDNS, enter the username, password and domain name of routing that is a form of your account. 5. Create Static Routes Static routing is configured manually by a network administrator or a user by adding entries into a routing table. The manually-configured routing information guides the router in forwarding data packets to use a new DDNS account, please click Logout first, and then log in with a new account. 14. 5. Click LOGIN AND SAVE.
Chapter 14 Customize Your Network Settings If you want to the specific destination. 82 Tips: If you have selected NO-IP or DynDNS, enter the username, password and domain name of routing that is a form of your account. 5. Create Static Routes Static routing is configured manually by a network administrator or a user by adding entries into a routing table. The manually-configured routing information guides the router in forwarding data packets to use a new DDNS account, please click Logout first, and then log in with a new account. 14. 5. Click LOGIN AND SAVE.

Archer AX55US V1 User Guide
Page 96
... devices to manage the router remotely: Do not tick the Enable checkbox of the device manually. 4. Click SAVE. 15. 6. Specify a Description for the router. 2. Go to Advanced > System > Administration and complete the settings in with your TP-Link ID or the password you to control remote devices' authority to manage the router from...
... devices to manage the router remotely: Do not tick the Enable checkbox of the device manually. 4. Click SAVE. 15. 6. Specify a Description for the router. 2. Go to Advanced > System > Administration and complete the settings in with your TP-Link ID or the password you to control remote devices' authority to manage the router from...

Archer AX55US V1 User Guide
Page 103
In the Set Time field, select Manually. 2. Set the current Time (In HH/MM/SS format). 4. Tick the Enable box of the second NTP Server. 6. Chapter 15 Manage the Router 4. The time ...; To set the date and time: 1. In the Set Time field, select Get from your computer will then be displayed and click SAVE. • To manually set Daylight Saving Time: 1. Click SAVE. • To get time from Managing Device. 2. Set the current Date (In MM/DD/YYYY format). 3. In the NTP...
In the Set Time field, select Manually. 2. Set the current Time (In HH/MM/SS format). 4. Tick the Enable box of the second NTP Server. 6. Chapter 15 Manage the Router 4. The time ...; To set the date and time: 1. In the Set Time field, select Get from your computer will then be displayed and click SAVE. • To manually set Daylight Saving Time: 1. Click SAVE. • To get time from Managing Device. 2. Set the current Date (In MM/DD/YYYY format). 3. In the NTP...

Archer AX55US V1 User Guide
Page 109
... login still fails, please contact the technical support. Go to Advanced> Network > Status to Advanced > Network > DHCP Server. 2 ) Enter 8.8.8.8 as Primary DNS, click SAVE. Please manually configure the DNS server. 1 ) Go to check internet status: If IP Address is a valid one, please try the methods below and try again. Note: You... and try again: • Your computer might not recognize any DNS server addresses. • Use another web browser or computer to log in with your TP-Link ID or the password you set for the router. 2. Q4.
... login still fails, please contact the technical support. Go to Advanced> Network > Status to Advanced > Network > DHCP Server. 2 ) Enter 8.8.8.8 as Primary DNS, click SAVE. Please manually configure the DNS server. 1 ) Go to check internet status: If IP Address is a valid one, please try the methods below and try again. Note: You... and try again: • Your computer might not recognize any DNS server addresses. • Use another web browser or computer to log in with your TP-Link ID or the password you set for the router. 2. Q4.

Archer AX55US V1 User Guide
Page 122
Symbol Explanation Class II equipment Polarity of output terminals Energy efficiency Marking Indoor use only Caution Operator's manual RECYCLING This product bears the selective sorting symbol for Waste electrical and electronic equipment (WEEE). This means that this product must be handled pursuant to European directive 2012/19/EU in order to be recycled or dismantled to the retailer when he buys a new electrical or electronic equipment. 118 User has the choice to give his product to a competent recycling organization or to minimize its impact on the environment.
Symbol Explanation Class II equipment Polarity of output terminals Energy efficiency Marking Indoor use only Caution Operator's manual RECYCLING This product bears the selective sorting symbol for Waste electrical and electronic equipment (WEEE). This means that this product must be handled pursuant to European directive 2012/19/EU in order to be recycled or dismantled to the retailer when he buys a new electrical or electronic equipment. 118 User has the choice to give his product to a competent recycling organization or to minimize its impact on the environment.
