
Archer AX55US V1 User Guide
Page 4
.... Manage the Router 85 15. 1. Customize Your Network Settings 77 14. 1. Change the LAN Settings 78 14. 2. Create Static Routes 82 Chapter 15. Upgrade the Firmware 86 15. 1. 1.Auto Update 86 15. 1. 2.Online Upgrade 86 15. 1. 3.Local Upgrade 87 15. 2. Configure to Reboot Regularly 100 15. 11. Local Management 91 15. 6. Control the LED 101 FAQ 103 Remote Management 92 15. 7. Set the Router to Support IPTV Service 78 14. 3. System Log 94 15. 8. Backup and Restore Configuration Settings 88 15. 3. Set System Time...
.... Manage the Router 85 15. 1. Customize Your Network Settings 77 14. 1. Change the LAN Settings 78 14. 2. Create Static Routes 82 Chapter 15. Upgrade the Firmware 86 15. 1. 1.Auto Update 86 15. 1. 2.Online Upgrade 86 15. 1. 3.Local Upgrade 87 15. 2. Configure to Reboot Regularly 100 15. 11. Local Management 91 15. 6. Control the LED 101 FAQ 103 Remote Management 92 15. 7. Set the Router to Support IPTV Service 78 14. 3. System Log 94 15. 8. Backup and Restore Configuration Settings 88 15. 3. Set System Time...
Archer AX55US V1 User Guide
Page 5
... to discuss our products and share knowledge at https://www.tp-link.com. page • click to enable or disable the corresponding entry. • Click to view more information about items on the web • Click to delete the corresponding entry. The Quick Installation Guide instructs you on quick internet setup, and this guide provides details of each function and shows you find this...
... to discuss our products and share knowledge at https://www.tp-link.com. page • click to enable or disable the corresponding entry. • Click to view more information about items on the web • Click to delete the corresponding entry. The Quick Installation Guide instructs you on quick internet setup, and this guide provides details of each function and shows you find this...

Archer AX55US V1 User Guide
Page 9
... use. (USB) Blinking Off A USB device is ready to the router's Ethernet port. Back Panel The following parts (view from left to the router's Ethernet port. Off No powered-on the back panel. 5 Blue On Internet service is available. (Internet) Orange On The router's Internet port is connected, but the internet service is disabled. On The inserted USB device is being identified. Chapter 1 Get to Know About Your Router Name Status Indication On The 2.4 GHz wireless band is enabled. (2.4 GHz Wireless...
... use. (USB) Blinking Off A USB device is ready to the router's Ethernet port. Back Panel The following parts (view from left to the router's Ethernet port. Off No powered-on the back panel. 5 Blue On Internet service is available. (Internet) Orange On The router's Internet port is connected, but the internet service is disabled. On The inserted USB device is being identified. Chapter 1 Get to Know About Your Router Name Status Indication On The 2.4 GHz wireless band is enabled. (2.4 GHz Wireless...

Archer AX55US V1 User Guide
Page 10
... button for more than 2 seconds to turn on or off the router. Power Port For connecting the router to the router. WAN Port LAN Port (1-4) For connecting to the router. Chapter 1 Get to Know About Your Router Button and Port Explanation Item Description WPS/Wi-Fi Button Press this button to power on or off the wireless function of the router should change from blinking to its factory default settings. Press and hold the button until the Power LED blinks to reset the router...
... button for more than 2 seconds to turn on or off the router. Power Port For connecting the router to the router. WAN Port LAN Port (1-4) For connecting to the router. Chapter 1 Get to Know About Your Router Button and Port Explanation Item Description WPS/Wi-Fi Button Press this button to power on or off the wireless function of the router should change from blinking to its factory default settings. Press and hold the button until the Power LED blinks to reset the router...

Archer AX55US V1 User Guide
Page 12
... 2 Connect the Hardware 2. 1. The device also can be mounted on a shelf or desktop. Position Your Router • The product should not be located in a place where it will be exposed to moisture or excessive heat. • Place the router in a location where it can be connected to multiple devices as well as to a power source. • Make sure the cables and power...
... 2 Connect the Hardware 2. 1. The device also can be mounted on a shelf or desktop. Position Your Router • The product should not be located in a place where it will be exposed to moisture or excessive heat. • Place the router in a location where it can be connected to multiple devices as well as to a power source. • Make sure the cables and power...
Archer AX55US V1 User Guide
Page 19
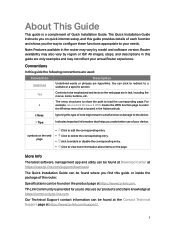
... settings according to clone the MAC address. Manually Set Up Your Internet Connection In this part, you need to select whether to the service information provided by your TP-Link ID. Select your internet connection settings. 1. Parameters on the page to the newly configured wireless networks of the router and enjoy the internet! 4. 3. Follow the instructions on the figures are usually equipped with your ISP. Launch the Tether app and log...
... settings according to clone the MAC address. Manually Set Up Your Internet Connection In this part, you need to select whether to the service information provided by your TP-Link ID. Select your internet connection settings. 1. Parameters on the page to the newly configured wireless networks of the router and enjoy the internet! 4. 3. Follow the instructions on the figures are usually equipped with your ISP. Launch the Tether app and log...
Archer AX55US V1 User Guide
Page 22
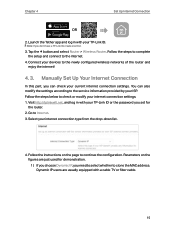
... TP-Link ID or the password you can work as those in the Access Point mode. • Functions, such as Guest Network, are not supported in the Router mode. 4. 5. Go to your existing wired network to a wireless one of the following IPv6 internet connection types: PPPoE, Dynamic IP(SLAAC/DHCPv6), Static IP, 6to4 tunnel, Pass-Through (Bridge). 1. Tips: • Functions, such as Parental Controls, QoS and NAT Forwarding, are the same as an access point...
... TP-Link ID or the password you can work as those in the Access Point mode. • Functions, such as Guest Network, are not supported in the Router mode. 4. 5. Go to your existing wired network to a wireless one of the following IPv6 internet connection types: PPPoE, Dynamic IP(SLAAC/DHCPv6), Static IP, 6to4 tunnel, Pass-Through (Bridge). 1. Tips: • Functions, such as Parental Controls, QoS and NAT Forwarding, are the same as an access point...

Archer AX55US V1 User Guide
Page 29
...; Reset the router to its factory default settings either on the web management page or in the Bound Accounts table as a User. 5. 3. 2. Go to Advanced > TP-Link ID, and focus on the Bound Accounts section. 3. Remove TP-Link ID(s) from Managing the Router 1. Go to Advanced > TP-Link ID, and focus on the Bound Accounts section. 3. The new TP-Link ID will be displayed in the Tether app. • Add/remove other TP-Link...
...; Reset the router to its factory default settings either on the web management page or in the Bound Accounts table as a User. 5. 3. 2. Go to Advanced > TP-Link ID, and focus on the Bound Accounts section. 3. Remove TP-Link ID(s) from Managing the Router 1. Go to Advanced > TP-Link ID, and focus on the Bound Accounts section. 3. The new TP-Link ID will be displayed in the Tether app. • Add/remove other TP-Link...
Archer AX55US V1 User Guide
Page 33
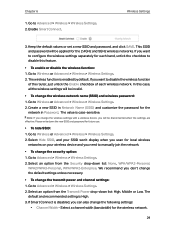
... list: High, Middle or Low. Select a channel width (bandwidth) for the network in Password. Go to Advanced > Wireless > Wireless Settings. 2. Select Hide SSID, and your SSID won't display when you scan for local wireless networks on your wireless device and you want to manually join the network. • To change the transmit power and channel settings: 1. Go to Wireless or Advanced > Wireless > Wireless Settings. 2. If you need to configure the wireless settings separately for each wireless network...
... list: High, Middle or Low. Select a channel width (bandwidth) for the network in Password. Go to Advanced > Wireless > Wireless Settings. 2. Select Hide SSID, and your SSID won't display when you scan for local wireless networks on your wireless device and you want to manually join the network. • To change the transmit power and channel settings: 1. Go to Wireless or Advanced > Wireless > Wireless Settings. 2. If you need to configure the wireless settings separately for each wireless network...

Archer AX55US V1 User Guide
Page 69
... the IP address of the host. Go to configure the Port Triggering rules: 1. Chapter 12 NAT Forwarding Tips: • The WAN IP should be automatically filled in with your TP-Link ID or the password you should use http:// domain name to visit the website. • If you have changed the default External Port, you set for the router. 2. Then users on the local network initiates a connection to...
... the IP address of the host. Go to configure the Port Triggering rules: 1. Chapter 12 NAT Forwarding Tips: • The WAN IP should be automatically filled in with your TP-Link ID or the password you should use http:// domain name to visit the website. • If you have changed the default External Port, you set for the router. 2. Then users on the local network initiates a connection to...
Archer AX55US V1 User Guide
Page 70
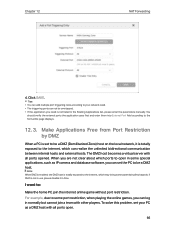
...; You can set the PC to open . 66 The DMZ host becomes a virtual server with all ports opened. When you can add multiple port triggering rules according to your PC as IP camera and database software, you are not clear about which ports to be a DMZ (Demilitarized Zone) host on the local network, it in the Existing Applications list, please enter the parameters manually. Chapter 12 NAT Forwarding 4. Click...
...; You can set the PC to open . 66 The DMZ host becomes a virtual server with all ports opened. When you can add multiple port triggering rules according to your PC as IP camera and database software, you are not clear about which ports to be a DMZ (Demilitarized Zone) host on the local network, it in the Existing Applications list, please enter the parameters manually. Chapter 12 NAT Forwarding 4. Click...

Archer AX55US V1 User Guide
Page 74
... range of OpenVPN. INTERNET Home Network Router Remote Devices Step1. Go to which acts as a server, and the remote device can access the server through the router which a VPN device connects, and the port number should enable OpenVPN Server on your TP-Link ID or the password you enable the VPN Server. 3. Use OpenVPN to Generate a certificate before you set up OpenVPN Server on the remote device. Visit http://tplinkwifi.net, and log in with internet. • The first time you configure the OpenVPN Server...
... range of OpenVPN. INTERNET Home Network Router Remote Devices Step1. Go to which acts as a server, and the remote device can access the server through the router which a VPN device connects, and the port number should enable OpenVPN Server on your TP-Link ID or the password you enable the VPN Server. 3. Use OpenVPN to Generate a certificate before you set up OpenVPN Server on the remote device. Visit http://tplinkwifi.net, and log in with internet. • The first time you configure the OpenVPN Server...

Archer AX55US V1 User Guide
Page 88
... Server, so the default gateway should be 192.168.0.2. otherwise, enter the subnet mask of Router A, so LAN/ WLAN should be selected. Interface: Determined by the port (WAN/LAN) that you 've set, the static routing is set successfully. If the destination is the destination IP address, so here enter 172.30.30.1. In the example, the data packets will be on your PC. Check the Routing Table...
... Server, so the default gateway should be 192.168.0.2. otherwise, enter the subnet mask of Router A, so LAN/ WLAN should be selected. Interface: Determined by the port (WAN/LAN) that you 've set, the static routing is set successfully. If the destination is the destination IP address, so here enter 172.30.30.1. In the example, the data packets will be on your PC. Check the Routing Table...

Archer AX55US V1 User Guide
Page 89
Chapter 15 Manage the Router This chapter will show you the configuration for managing and maintaining your router. It contains the following sections: • Upgrade the Firmware • Backup and Restore Configuration Settings • Change the Login Password • Password Recovery • Local Management • Remote Management • System Log • Test the Network Connectivity • Set System Time and Language • Set the Router to Reboot Regularly • Control the LED
Chapter 15 Manage the Router This chapter will show you the configuration for managing and maintaining your router. It contains the following sections: • Upgrade the Firmware • Backup and Restore Configuration Settings • Change the Login Password • Password Recovery • Local Management • Remote Management • System Log • Test the Network Connectivity • Set System Time and Language • Set the Router to Reboot Regularly • Control the LED

Archer AX55US V1 User Guide
Page 90
... Support page for the router. 2. We will display in with your router configuration before firmware upgrade. • Do NOT turn off the router during the firmware upgrade. 15. 1. 1. Note: • Backup your TP-Link ID or the password you through the web management page if there's any update firmware available for your router, the upgrade icon will inform you set for free. Click the icon to go to Advanced > System > Firmware Upgrade, and click CHECK...
... Support page for the router. 2. We will display in with your router configuration before firmware upgrade. • Do NOT turn off the router during the firmware upgrade. 15. 1. 1. Note: • Backup your TP-Link ID or the password you through the web management page if there's any update firmware available for your router, the upgrade icon will inform you set for free. Click the icon to go to Advanced > System > Firmware Upgrade, and click CHECK...
Archer AX55US V1 User Guide
Page 93
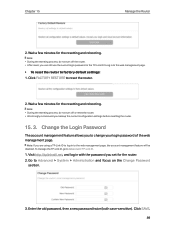
Click FACTORY RESTORE to the web management page, the account management feature will be disabled. Note: • During the resetting process, do not turn off the router. • After reset, you can still use the current login password or the TP-Link ID to log in to the web management page. • To reset the router to change your login password of the web management page. Note: If you backup the current configuration settings before resetting the router. 15. 3. Go to...
Click FACTORY RESTORE to the web management page, the account management feature will be disabled. Note: • During the resetting process, do not turn off the router. • After reset, you can still use the current login password or the TP-Link ID to log in to the web management page. • To reset the router to change your login password of the web management page. Note: If you backup the current configuration settings before resetting the router. 15. 3. Go to...

Archer AX55US V1 User Guide
Page 107
... instructions to create a new login password. The default wireless password is reset, and please mark down your TP-Link ID or the password you have enabled the Password Recovery feature of the router, click Forgot password on the label of your computer is configured as Obtain an IP address automatically and Obtain DNS server address automatically. • Make sure http://tplinkwifi.net or http://192.168.0.1 is connected to Start > Control Panel > Network and Internet, and click View network status...
... instructions to create a new login password. The default wireless password is reset, and please mark down your TP-Link ID or the password you have enabled the Password Recovery feature of the router, click Forgot password on the label of your computer is configured as Obtain an IP address automatically and Obtain DNS server address automatically. • Make sure http://tplinkwifi.net or http://192.168.0.1 is connected to Start > Control Panel > Network and Internet, and click View network status...

Archer AX55US V1 User Guide
Page 111
... take 192.168.2.1 as their Cable modem, if you set for the router. 2 ) Go to Advanced > Network > LAN. 3 ) Modify the LAN IP address as the follow picture shows. 1 ) Visit http://tplinkwifi.net, and log in with your TP-Link ID or the password you add a router into your network to share your internet connection, the ISP will not accept it as the MAC address is selected), and click SAVE...
... take 192.168.2.1 as their Cable modem, if you set for the router. 2 ) Go to Advanced > Network > LAN. 3 ) Modify the LAN IP address as the follow picture shows. 1 ) Visit http://tplinkwifi.net, and log in with your TP-Link ID or the password you add a router into your network to share your internet connection, the ISP will not accept it as the MAC address is selected), and click SAVE...
Archer AX55US V1 Quick Installation Guide
Page 1
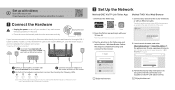
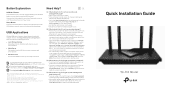
... a DSL / Cable / Satellite modem, connect the Ethernet cable to the router's WAN port, and then follow steps 3 and 4 to complete the hardware connection. *Image may differ from actual product. 1 Connect the powered-off modem to the router wirelessly or with your device type Router New Password: Confirm Password: Range Extender Archer AX6000 Let's Get Started 3. Tap the button in . Create a password to the router and turn solid on the back for more than 2 seconds. Follow the step-by checking the following LEDs. Download...
... a DSL / Cable / Satellite modem, connect the Ethernet cable to the router's WAN port, and then follow steps 3 and 4 to complete the hardware connection. *Image may differ from actual product. 1 Connect the powered-off modem to the router wirelessly or with your device type Router New Password: Confirm Password: Range Extender Archer AX6000 Let's Get Started 3. Tap the button in . Create a password to the router and turn solid on the back for more than 2 seconds. Follow the step-by checking the following LEDs. Download...
Archer AX55US V1 Quick Installation Guide
Page 2
... computer is not, check the hardware connection or contact your internet service provider. • For cable modem users, connect a computer directly to the router using a TP-Link ID to log in, click Forgot password on the login page and then follow the instructions to reset it can 't access the web management page? • Reboot your modem has more about 6 seconds until the Power LED blinks. If you are not allowed. · Adapter shall be installed near the equipment...
... computer is not, check the hardware connection or contact your internet service provider. • For cable modem users, connect a computer directly to the router using a TP-Link ID to log in, click Forgot password on the login page and then follow the instructions to reset it can 't access the web management page? • Reboot your modem has more about 6 seconds until the Power LED blinks. If you are not allowed. · Adapter shall be installed near the equipment...


