SL-D920 Owner's Manual
Page 2
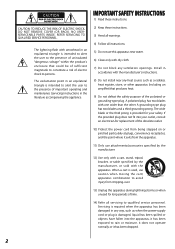
... any heat source such as when the power-supply cord or plug is provided for your outlet, consult an electrician for replacement of the obsolete outlet. 10) Protect the power cord from the apparatus. 11) Only use this apparatus during lightning storms or when unused for long periods of the polarized or grounding-type plug. IMPORTANT SAFETY INSTRUCTIONS 1) Read these instructions. 3) Heed...
... any heat source such as when the power-supply cord or plug is provided for your outlet, consult an electrician for replacement of the obsolete outlet. 10) Protect the power cord from the apparatus. 11) Only use this apparatus during lightning storms or when unused for long periods of the polarized or grounding-type plug. IMPORTANT SAFETY INSTRUCTIONS 1) Read these instructions. 3) Heed...
SL-D920 Owner's Manual
Page 3
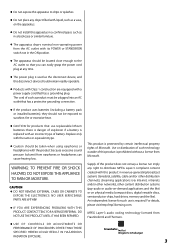
... headphones with the product because excessive sound pressure (volume) from the AC outlet with its POWER or STANDBY/ON switch not in a bookcase or similar furniture. < The apparatus draws nominal non-operating power from earphones or headphones can easily grasp the power cord plug at any time. < The power plug is used as a vase, on physical media (compact discs, digital versatile discs, semiconductor chips, hard drives, memory and...
... headphones with the product because excessive sound pressure (volume) from the AC outlet with its POWER or STANDBY/ON switch not in a bookcase or similar furniture. < The apparatus draws nominal non-operating power from earphones or headphones can easily grasp the power cord plug at any time. < The power plug is used as a vase, on physical media (compact discs, digital versatile discs, semiconductor chips, hard drives, memory and...
SL-D920 Owner's Manual
Page 4
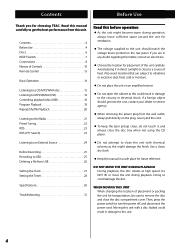
... or service agency. < When removing the power plug from this matter, consult an electrician. < Choose the location for choosing TEAC. Contents 4 Before Use 4 Discs 6 RESET Switch 7 Connections 8 Names of Controls 10 Remote Control 13 Basic Operation 14 Listening to a CD/MP3/WMA disc 15 Listening to MP3/WMAs (USB 16 Controlling playback (disc/USB 16 Program Playback 18 Repeat/Shuffle Playback 20 Listening to the Radio 21 Preset Tuning 22...
... or service agency. < When removing the power plug from this matter, consult an electrician. < Choose the location for choosing TEAC. Contents 4 Before Use 4 Discs 6 RESET Switch 7 Connections 8 Names of Controls 10 Remote Control 13 Basic Operation 14 Listening to a CD/MP3/WMA disc 15 Listening to MP3/WMAs (USB 16 Controlling playback (disc/USB 16 Program Playback 18 Repeat/Shuffle Playback 20 Listening to the Radio 21 Preset Tuning 22...
SL-D920 Owner's Manual
Page 5
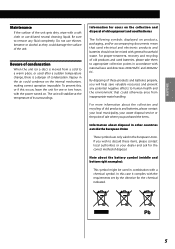
... waste disposal service or the point of sale where you wish to human health and the environment that used electrical and electronic products and batteries should not be used after a sudden temperature change, there is moved from inappropriate waste handling. ENGLISH Maintenance If the surface of the unit gets dirty, wipe with the power turned on. Do...
... waste disposal service or the point of sale where you wish to human health and the environment that used electrical and electronic products and batteries should not be used after a sudden temperature change, there is moved from inappropriate waste handling. ENGLISH Maintenance If the surface of the unit gets dirty, wipe with the power turned on. Do...
SL-D920 Owner's Manual
Page 7
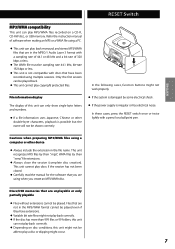
... cannot play discs if the session has not been closed. < Carefully read the manual for the software that are using a computer or other double-byte characters, playback is irregular or has electrical noise. In these cases, press the RESET switch once or twice lightly with discs that have been recorded using a PC. < This unit can play back monaural and stereo MP3...
... cannot play discs if the session has not been closed. < Carefully read the manual for the software that are using a computer or other double-byte characters, playback is irregular or has electrical noise. In these cases, press the RESET switch once or twice lightly with discs that have been recorded using a PC. < This unit can play back monaural and stereo MP3...
SL-D920 Owner's Manual
Page 8
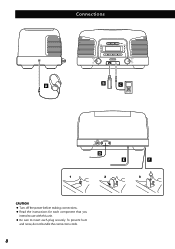
To prevent hum and noise, do not bundle the connection cords. 8 Connections A B C D E F 1 2 3 CAUTION < Turn off the power before making connections. < Read the instructions for each component that you intend to use with this unit. < Be sure to insert each plug securely.
To prevent hum and noise, do not bundle the connection cords. 8 Connections A B C D E F 1 2 3 CAUTION < Turn off the power before making connections. < Read the instructions for each component that you intend to use with this unit. < Be sure to insert each plug securely.
SL-D920 Owner's Manual
Page 9
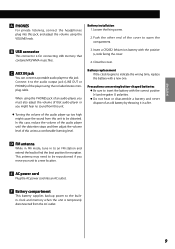
.... E AC power cord Plug the AC power cord into this unit. In this case, reduce the volume of the audio player until the distortion stops and then adjust the volume level of that contains MP3/WMA music files. 3. Close the cover. F Battery compartment This battery supplies backup power to a comfortable listening level. Battery installation 1. This antenna may need to be distorted. Loosen the fixing screw. 2. Connect it in...
.... E AC power cord Plug the AC power cord into this unit. In this case, reduce the volume of the audio player until the distortion stops and then adjust the volume level of that contains MP3/WMA music files. 3. Close the cover. F Battery compartment This battery supplies backup power to a comfortable listening level. Battery installation 1. This antenna may need to be distorted. Loosen the fixing screw. 2. Connect it in...
SL-D920 Owner's Manual
Page 11
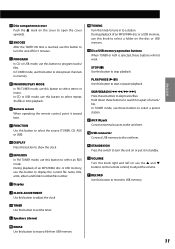
... ON time is selected, these buttons to tune in standby. In TUNER mode, use this button to turn the unit on the cover to select stereo or mono. STOP (H) Use this button to show the clock. H INFO/RDS In FM TUNER mode, use this button to stop playback. D FM MODE/PLAY MODE In FM TUNER mode, use this button to erase a file from USB memory. 11 L Speakers (stereo) M ERASE Use this button to open the cover upwards. I Display N TUNING Turn this switch to turn...
... ON time is selected, these buttons to tune in standby. In TUNER mode, use this button to turn the unit on the cover to select stereo or mono. STOP (H) Use this button to show the clock. H INFO/RDS In FM TUNER mode, use this button to stop playback. D FM MODE/PLAY MODE In FM TUNER mode, use this button to erase a file from USB memory. 11 L Speakers (stereo) M ERASE Use this button to open the cover upwards. I Display N TUNING Turn this switch to turn...
SL-D920 Owner's Manual
Page 12
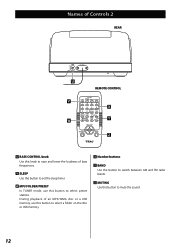
V SLEEP Use this button to mute the sound. 12 Z MUTING Use this button to set the sleep timer. W MP3 FOLDER/PRESET In TUNER mode, use this button to select a folder on the disc or USB memory. During playback of bass frequencies. Names of Controls 2 REAR U V W REMOTE CONTROL X Y Z U BASS CONTROL knob Use this knob to raise and lower the loudness of an MP3/WMA disc or a USB memory, use this button to select preset stations. X Number buttons Y BAND Use this button to switch between AM and FM radio bands.
V SLEEP Use this button to mute the sound. 12 Z MUTING Use this button to set the sleep timer. W MP3 FOLDER/PRESET In TUNER mode, use this button to select a folder on the disc or USB memory. During playback of bass frequencies. Names of Controls 2 REAR U V W REMOTE CONTROL X Y Z U BASS CONTROL knob Use this knob to raise and lower the loudness of an MP3/WMA disc or a USB memory, use this button to select preset stations. X Number buttons Y BAND Use this button to switch between AM and FM radio bands.

SL-D920 Owner's Manual
Page 14
... switches to Standby mode. 3 Play the source and adjust the volume using the VOLUME knob. Push the SNOOZE button to restore regular brightness. Push it again to darken the display. This function also works in the following illustration. Muting To mute the sound temporarily, press the MUTING button. Sleep Timer Each press of the SLEEP button changes the amount of the front panel display. 31 1 Press the STANDBY/ON switch to turn...
... switches to Standby mode. 3 Play the source and adjust the volume using the VOLUME knob. Push the SNOOZE button to restore regular brightness. Push it again to darken the display. This function also works in the following illustration. Muting To mute the sound temporarily, press the MUTING button. Sleep Timer Each press of the SLEEP button changes the amount of the front panel display. 31 1 Press the STANDBY/ON switch to turn...
SL-D920 Owner's Manual
Page 18
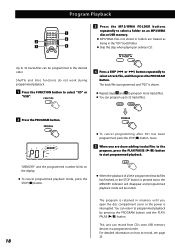
... until you open the disc compartment cover or the power is shown. < Repeat steps 3 and 4 to program more tracks/files. < You can be ended. Shuffle and Intro functions do not work during programmed playback. 1 Press the FUNCTION button to record, see page 25. 18 "MEMORY" and the programmed number blink on the display. < To cancel programmed playback mode, press the STOP (H) button. < When the playback...
... until you open the disc compartment cover or the power is shown. < Repeat steps 3 and 4 to program more tracks/files. < You can be ended. Shuffle and Intro functions do not work during programmed playback. 1 Press the FUNCTION button to record, see page 25. 18 "MEMORY" and the programmed number blink on the display. < To cancel programmed playback mode, press the STOP (H) button. < When the playback...
SL-D920 Owner's Manual
Page 19
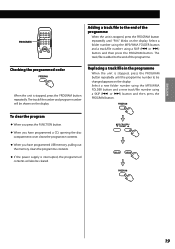
... have programmed a CD, opening the disc compartment cover clears the programme contents. < When you have programmed USB memory, pulling out the memory clears the programme contents. < If the power supply is stopped, press the PROGRAM button repeatedly. or /) button and then press the PROGRAM button. ENGLISH PROGRAM Adding a track/file to be changed appears on the display. The track/file number and program number will...
... have programmed a CD, opening the disc compartment cover clears the programme contents. < When you have programmed USB memory, pulling out the memory clears the programme contents. < If the power supply is stopped, press the PROGRAM button repeatedly. or /) button and then press the PROGRAM button. ENGLISH PROGRAM Adding a track/file to be changed appears on the display. The track/file number and program number will...
SL-D920 Owner's Manual
Page 21
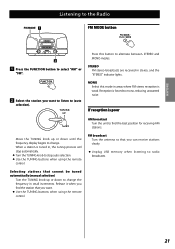
... small increments. FM broadcast Turn the antenna so that you want . < Use the TUNING buttons when using the remote control. When a station is poor Move the TUNING knob up or down until the frequency display begins to change . Selecting stations that cannot be tuned automatically (manual selection) Turn the TUNING knob up or down to change the frequency in , the tuning process will stop auto selection. < Use the TUNING buttons when using the remote control. Press this mode in stereo, and the "STEREO" indicator lights.
... small increments. FM broadcast Turn the antenna so that you want . < Use the TUNING buttons when using the remote control. When a station is poor Move the TUNING knob up or down until the frequency display begins to change . Selecting stations that cannot be tuned automatically (manual selection) Turn the TUNING knob up or down to change the frequency in , the tuning process will stop auto selection. < Use the TUNING buttons when using the remote control. Press this mode in stereo, and the "STEREO" indicator lights.
SL-D920 Owner's Manual
Page 22
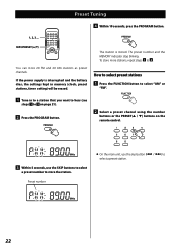
... the PROGRAM button. 2 Select a preset channel using the number buttons or the PRESET (5 / b) buttons on the remote control. 3 Within 5 seconds, use the skip button (. / /) to select "AM" or "FM". 1 Tune in memory (clock, preset stations, timer setting) will be erased. Preset Tuning 4 Within 10 seconds, press the PROGRAM button. 1, 2, 3.... The preset number and the MEMORY indicator stop blinking. How to select preset stations 1 Press the FUNCTION button to select a preset station. 22 MP3/PRESET ( / ) You can store 20 FM and 20 AM stations as preset channels. Preset number < On...
... the PROGRAM button. 2 Select a preset channel using the number buttons or the PRESET (5 / b) buttons on the remote control. 3 Within 5 seconds, use the skip button (. / /) to select "AM" or "FM". 1 Tune in memory (clock, preset stations, timer setting) will be erased. Preset Tuning 4 Within 10 seconds, press the PROGRAM button. 1, 2, 3.... The preset number and the MEMORY indicator stop blinking. How to select preset stations 1 Press the FUNCTION button to select a preset station. 22 MP3/PRESET ( / ) You can store 20 FM and 20 AM stations as preset channels. Preset number < On...
SL-D920 Owner's Manual
Page 23
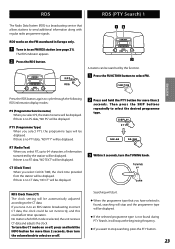
... CT data, "NO CT" will be displayed. No matter which RDS mode is a broadcasting service that you select PTY, the programme type will be displayed. The RDS indicator appears. 2 Press the RDS button. 3 A station can be displayed. RDS RDS (PTY Search) 1 The Radio Data System (RDS) is selected, the unit receives CT data and adjusts the clock. If there is no PS...
... CT data, "NO CT" will be displayed. No matter which RDS mode is a broadcasting service that you select PTY, the programme type will be displayed. The RDS indicator appears. 2 Press the RDS button. 3 A station can be displayed. RDS RDS (PTY Search) 1 The Radio Data System (RDS) is selected, the unit receives CT data and adjusts the clock. If there is no PS...
SL-D920 Owner's Manual
Page 24
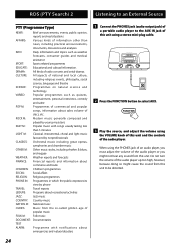
... emergencies and natural disasters 24 1 Connect the PHONES jack (audio output jack) of a portable audio player to the AUX IN jack of this unit using a stereo mini-plug cable. 2 Press the FUNCTION button to select AUX. 3 Play the source, and adjust the volume using the PHONES jack of an audio player, you must adjust the volume of the audio player or you might cause the sound from this unit to be distorted. When using the VOLUME knob of this unit. All kinds of radio concerts...
... emergencies and natural disasters 24 1 Connect the PHONES jack (audio output jack) of a portable audio player to the AUX IN jack of this unit using a stereo mini-plug cable. 2 Press the FUNCTION button to select AUX. 3 Play the source, and adjust the volume using the PHONES jack of an audio player, you must adjust the volume of the audio player or you might cause the sound from this unit to be distorted. When using the VOLUME knob of this unit. All kinds of radio concerts...
SL-D920 Owner's Manual
Page 25
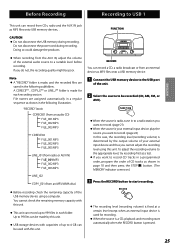
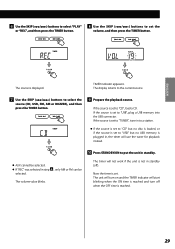
... quality might be recorded (CD, AM, FM, or AUX). < When the source is radio, tune in to a radio station you want to record. (page 21) < When the source is your external input device, play the source you cannot adjust the recording level using a computer. A CDRECE** , COPY_E** or LINE_I** folder is made for recording. < When the source is a CD, playback and recording start recording. < Before...
... quality might be recorded (CD, AM, FM, or AUX). < When the source is radio, tune in to a radio station you want to record. (page 21) < When the source is your external input device, play the source you cannot adjust the recording level using a computer. A CDRECE** , COPY_E** or LINE_I** folder is made for recording. < When the source is a CD, playback and recording start recording. < Before...
SL-D920 Owner's Manual
Page 29
.... If the source is set to "TUNER", tune in , the timer will not work if the unit is set to put the unit in standby. < AUX cannot be selected. The unit will turn on and the TIMER indicator will start blinking when the ON time is reached and turn off ). The volume value blinks. The source is displayed. The display returns to the current source. 7 Use the SKIP (.//) buttons to set to...
.... If the source is set to "TUNER", tune in , the timer will not work if the unit is set to put the unit in standby. < AUX cannot be selected. The unit will turn on and the TIMER indicator will start blinking when the ON time is reached and turn off ). The volume value blinks. The source is displayed. The display returns to the current source. 7 Use the SKIP (.//) buttons to set to...
SL-D920 Owner's Manual
Page 30
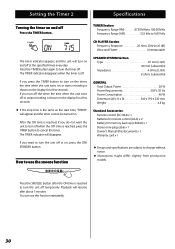
... (subwoofer) Impedance 4 ohms (L & R) 8 ohms (subwoofer) GENERAL Total Output Power 20 W Power Requirements 230 V, 50 Hz Power Consumption 40 W Dimension (W x H x D 340 x 190 x 230 mm Weight 4.8 kg Standard Accessories: Remote control (RC-1264) x 1 Batteries for remote control (AAA) x 2 Battery for memory back-up (CR2032) x 1 Stereo mini-plug cable x 1 Owner's Manual (this function repeatedly. 30 If you do not want to turn off at the specified times every day. Setting the Timer 2 Specifications Turning the timer on the display...
... (subwoofer) Impedance 4 ohms (L & R) 8 ohms (subwoofer) GENERAL Total Output Power 20 W Power Requirements 230 V, 50 Hz Power Consumption 40 W Dimension (W x H x D 340 x 190 x 230 mm Weight 4.8 kg Standard Accessories: Remote control (RC-1264) x 1 Batteries for remote control (AAA) x 2 Battery for memory back-up (CR2032) x 1 Stereo mini-plug cable x 1 Owner's Manual (this function repeatedly. 30 If you do not want to turn off at the specified times every day. Setting the Timer 2 Specifications Turning the timer on the display...
SL-D920 Owner's Manual
Page 31
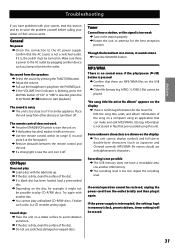
... similar appliance. Place the unit away from the PHONES jack. The remote control does not work e Press the STANDBY/ON switch to solve the problem yourself before calling your dealer or TEAC service centre. e Use the remote control within its range (5 m) and point it sounds mono e Press the FM MODE button. CD Player Does not play unfinalized CD-R/RW discs. Try again with the label side up. e You cannot...
... similar appliance. Place the unit away from the PHONES jack. The remote control does not work e Press the STANDBY/ON switch to solve the problem yourself before calling your dealer or TEAC service centre. e Use the remote control within its range (5 m) and point it sounds mono e Press the FM MODE button. CD Player Does not play unfinalized CD-R/RW discs. Try again with the label side up. e You cannot...


