Owners Manual
Page 2
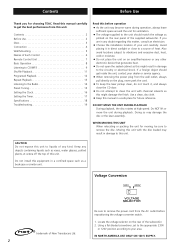
... converter switch. 1. Contents 2 Before Use 2 Discs 3 Connection 4 Wall Mounting 5 Names of the supplied subwoofer. Doing so may become warm during playback. Locate the voltage selector on the rear panel of Each Control 6 Remote Control Unit 7 Basic Operation 8 Listening to CD/MP3 9 Shuffle Playback 11 Programed Playback 12 Repeat Playback 13 Listening to the Radio 14 Preset Tuning 15 Setting the Clock 16 Setting the Timer 17 Specifications 18 Troubleshooting 19 Read this manual carefully...
... converter switch. 1. Contents 2 Before Use 2 Discs 3 Connection 4 Wall Mounting 5 Names of the supplied subwoofer. Doing so may become warm during playback. Locate the voltage selector on the rear panel of Each Control 6 Remote Control Unit 7 Basic Operation 8 Listening to CD/MP3 9 Shuffle Playback 11 Programed Playback 12 Repeat Playback 13 Listening to the Radio 14 Preset Tuning 15 Setting the Clock 16 Setting the Timer 17 Specifications 18 Troubleshooting 19 Read this manual carefully...

Owners Manual
Page 3
... will warp the disc. < CD-R discs are in this player. Never clean the disc using a circular motion. 3 Long exposure to hold the disc < If you . (Compact discs can damage the unit. It is away from its subsidiaries cannot be returned to the care and handling of a CD-R disc, read the precautions supplied with the disc, or contact the disc manufacturer directly. < Should the disc become dirty...
... will warp the disc. < CD-R discs are in this player. Never clean the disc using a circular motion. 3 Long exposure to hold the disc < If you . (Compact discs can damage the unit. It is away from its subsidiaries cannot be returned to the care and handling of a CD-R disc, read the precautions supplied with the disc, or contact the disc manufacturer directly. < Should the disc become dirty...

Owners Manual
Page 4
... live in an FM station and extend the lead to use one with the power cord. To prevent hum and noise, do not bundle the connection cords with 5 or more elements. A AM loop antenna Position the antenna for reception. Read instructions of all the equipment before making connections. Connection MAIN UNIT A B SPEAKER (R) C D SUBWOOFER E DVD, CDR, etc. if you intend to find the best position for the best sound.
... live in an FM station and extend the lead to use one with the power cord. To prevent hum and noise, do not bundle the connection cords with 5 or more elements. A AM loop antenna Position the antenna for reception. Read instructions of all the equipment before making connections. Connection MAIN UNIT A B SPEAKER (R) C D SUBWOOFER E DVD, CDR, etc. if you intend to find the best position for the best sound.
Owners Manual
Page 5
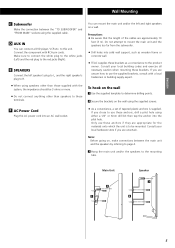
... wall 1 Use the supplied template to use these terminals. to the red jacks (Right). F AC Power Cord Plug this unit. Main Unit 3 2 Speaker 3 2 5 Make sure to connect the white plug to the white jacks (Left) and the red plug to this AC power cord into solid wall support, such as a convenience to the product owner. Do not attempt to mount the main unit and the speakers too far from the subwoofer. < Drill...
... wall 1 Use the supplied template to use these terminals. to the red jacks (Right). F AC Power Cord Plug this unit. Main Unit 3 2 Speaker 3 2 5 Make sure to connect the white plug to the white jacks (Left) and the red plug to this AC power cord into solid wall support, such as a convenience to the product owner. Do not attempt to mount the main unit and the speakers too far from the subwoofer. < Drill...
Owners Manual
Page 6
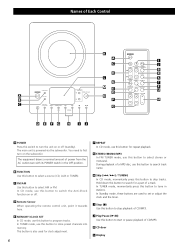
... clock adjustment. 6 F REPEAT In CD mode, use this button to switch the Anti-Shock function on or off (standby). During playback of a MP3 disc, use this button to program tracks. Hold down this button to skip tracks. In TUNER mode, use this button to select stereo or monaural. D Remote Sensor When operating the remote control unit, point it towards here. G STEREO/MONO/MP3 In FM TUNER mode, use this button to store preset channels into memory. In Standby mode, these buttons are used...
... clock adjustment. 6 F REPEAT In CD mode, use this button to switch the Anti-Shock function on or off (standby). During playback of a MP3 disc, use this button to program tracks. Hold down this button to skip tracks. In TUNER mode, use this button to select stereo or monaural. D Remote Sensor When operating the remote control unit, point it towards here. G STEREO/MONO/MP3 In FM TUNER mode, use this button to store preset channels into memory. In Standby mode, these buttons are used...
Owners Manual
Page 7
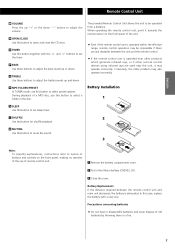
... Remote Control Unit M VOLUME Press the up "+" or the down "-" button to adjust the bass sound up and down . P BASS Use these buttons to adjust the treble sounds up or down R MP3 FOLDER/PRESET In TUNER mode, use this button to be impossible if there are any obstacles between the remote control unit and main unit decreases, the battery is exhausted. Battery Replacement If the distance required between the unit and the remote control...
... Remote Control Unit M VOLUME Press the up "+" or the down "-" button to adjust the bass sound up and down . P BASS Use these buttons to adjust the treble sounds up or down R MP3 FOLDER/PRESET In TUNER mode, use this button to be impossible if there are any obstacles between the remote control unit and main unit decreases, the battery is exhausted. Battery Replacement If the distance required between the unit and the remote control...
Owners Manual
Page 8
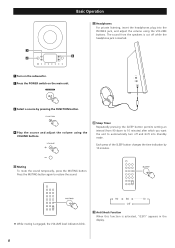
C Sleep Timer Repeatedly pressing the SLEEP button permits setting an interval (from the speakers is cut off and shift into the PHONES jack, and adjust the volume using the VOLUME buttons. Each press of the SLEEP button changes the time indication by pressing the FUNCTION button. 4 Play the source and adjust the volume using the VOLUME buttons. A Muting To mute the sound temporarily, press the MUTING button. The sound from 90 down to 10 minutes) after...
C Sleep Timer Repeatedly pressing the SLEEP button permits setting an interval (from the speakers is cut off and shift into the PHONES jack, and adjust the volume using the VOLUME buttons. Each press of the SLEEP button changes the time indication by pressing the FUNCTION button. 4 Play the source and adjust the volume using the VOLUME buttons. A Muting To mute the sound temporarily, press the MUTING button. The sound from 90 down to 10 minutes) after...

Owners Manual
Page 9
... disc. No buttons will work during loading. When a MP3 disc is loaded. ENGLISH Listening to CD/MP3 1 3 1 1 Press the FUNCTION button to select "CD". 24 5 4 Press the OPEN/CLOSE button to close the CD door. 2 Press the OPEN/CLOSE button. 3 Put a disc onto the center spindle of all the tracks has finished, the unit stops automatically. 9 total tracks total playing time When a MP3 disc is loaded, playback starts...
... disc. No buttons will work during loading. When a MP3 disc is loaded. ENGLISH Listening to CD/MP3 1 3 1 1 Press the FUNCTION button to select "CD". 24 5 4 Press the OPEN/CLOSE button to close the CD door. 2 Press the OPEN/CLOSE button. 3 Put a disc onto the center spindle of all the tracks has finished, the unit stops automatically. 9 total tracks total playing time When a MP3 disc is loaded, playback starts...

Owners Manual
Page 10
... the program is displayed as follows: FILE (folder name)wTITLE (*)wARTIST (*)wALBUM (*) *: track information Press the MP3 button for a part of the previous track, press the . Listening to CD/MP3 2 MP3 To suspend playback temporarily (pause mode) To skip to the next or a previous track Press the Play/Pause button (G/J) during playback, the track being played will be played from...
... the program is displayed as follows: FILE (folder name)wTITLE (*)wARTIST (*)wALBUM (*) *: track information Press the MP3 button for a part of the previous track, press the . Listening to CD/MP3 2 MP3 To suspend playback temporarily (pause mode) To skip to the next or a previous track Press the Play/Pause button (G/J) during playback, the track being played will be played from...

Owners Manual
Page 11
... of folder is displayed. An alphabet (initial letter of the track you press the / button during programed playback. < If one of the following buttons is included, and press Play/Pause button (G/J) to is pressed, shuffle mode will be cancelled: SHUFFLE, STOP, FUNCTION, POWER, OPEN/CLOSE Initial letter ... doesn't work during shuffle playback, next track will be randomly selected and played. "SHUFFLE" will then light up in the display. < If you want to listen to start playback. Then you can select the track by pressing the Skip button (.or/). 4. Playback starts from the...
... of folder is displayed. An alphabet (initial letter of the track you press the / button during programed playback. < If one of the following buttons is included, and press Play/Pause button (G/J) to is pressed, shuffle mode will be cancelled: SHUFFLE, STOP, FUNCTION, POWER, OPEN/CLOSE Initial letter ... doesn't work during shuffle playback, next track will be randomly selected and played. "SHUFFLE" will then light up in the display. < If you want to listen to start playback. Then you can select the track by pressing the Skip button (.or/). 4. Playback starts from the...
Owners Manual
Page 12
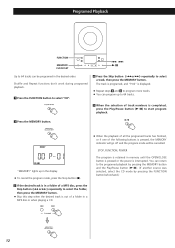
... the MEMORY button and the Play/Pause button (G/J). (If another source was selected, select the CD mode by pressing the FUNCTION button beforehand.) 12 The track is programed, and "P-02" is displayed. < Repeat steps 3 and 4 to program more tracks. < You can be cancelled: STOP, FUNCTION, POWER The program is interrupted. Programed Playback FUNCTION MEMORY/ CLOCK SET Up to start program playback. 2 Press the MEMORY button. "MEMORY" lights up to...
... the MEMORY button and the Play/Pause button (G/J). (If another source was selected, select the CD mode by pressing the FUNCTION button beforehand.) 12 The track is programed, and "P-02" is displayed. < Repeat steps 3 and 4 to program more tracks. < You can be cancelled: STOP, FUNCTION, POWER The program is interrupted. Programed Playback FUNCTION MEMORY/ CLOCK SET Up to start program playback. 2 Press the MEMORY button. "MEMORY" lights up to...
Owners Manual
Page 13
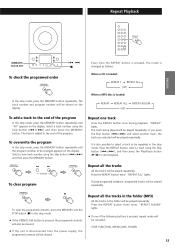
... button three times. The track number and program number will be repeated in the stop mode. It is disconnected from the power supply, the programed contents will be changed as follows: When a CD is loaded. Press the REPEAT button twice. Repeat Playback ENGLISH MEMORY/ CLOCK SET To check the programed order In the stop mode, press the MEMORY button repeatedly until "00" appears on the display. Select a track number using...
... button three times. The track number and program number will be repeated in the stop mode. It is disconnected from the power supply, the programed contents will be changed as follows: When a CD is loaded. Press the REPEAT button twice. Repeat Playback ENGLISH MEMORY/ CLOCK SET To check the programed order In the stop mode, press the MEMORY button repeatedly until "00" appears on the display. Select a track number using...
Owners Manual
Page 14
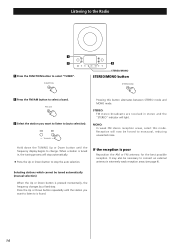
... change. Listening to the Radio 1 2 1 Press the FUNCTION button to select "TUNER". 3 STEREO/MONO STEREO/MONO button 2 Press the FM/AM button to select a band. 3 Select the station you want to listen to (auto selection). If the reception is tuned in stereo and the "STEREO" indicator will stop automatically. < Press the Up or Down button to is found. 14 Pressing this mode. STEREO: FM stereo broadcasts are received...
... change. Listening to the Radio 1 2 1 Press the FUNCTION button to select "TUNER". 3 STEREO/MONO STEREO/MONO button 2 Press the FM/AM button to select a band. 3 Select the station you want to listen to (auto selection). If the reception is tuned in stereo and the "STEREO" indicator will stop automatically. < Press the Up or Down button to is found. 14 Pressing this mode. STEREO: FM stereo broadcasts are received...
Owners Manual
Page 15
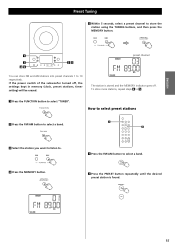
ENGLISH Preset Tuning 5 Within 5 seconds, select a preset channel to store the station using the TUNING buttons, and then press the MEMORY button. 1 2 35 45 You can store FM and AM stations into preset channels 1 to select "TUNER". If the power switch of the subwoofer turned off . preset channel The station is found. 15 To store more stations, repeat steps 2 to 5 . 1 Press the FUNCTION button to 10 respectively. How to select preset stations 2 Press the FM...
ENGLISH Preset Tuning 5 Within 5 seconds, select a preset channel to store the station using the TUNING buttons, and then press the MEMORY button. 1 2 35 45 You can store FM and AM stations into preset channels 1 to select "TUNER". If the power switch of the subwoofer turned off . preset channel The station is found. 15 To store more stations, repeat steps 2 to 5 . 1 Press the FUNCTION button to 10 respectively. How to select preset stations 2 Press the FM...
Owners Manual
Page 16
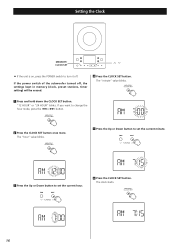
... or Down button to change the hour mode, press the .or/ button. 2 Press the CLOCK SET button once more. If the power switch of the subwoofer turned off . "12 HOUR" or "24 HOUR" blinks. The "minute" value blinks. 1 Press and hold down the CLOCK SET button. The "hour" value blinks. 5 Press the Up or Down button to set the current hour. 6 Press the CLOCK SET button. The clock starts. 16 Setting the Clock MEMORY/ CLOCK SET < If the...
... or Down button to change the hour mode, press the .or/ button. 2 Press the CLOCK SET button once more. If the power switch of the subwoofer turned off . "12 HOUR" or "24 HOUR" blinks. The "minute" value blinks. 1 Press and hold down the CLOCK SET button. The "hour" value blinks. 5 Press the Up or Down button to set the current hour. 6 Press the CLOCK SET button. The clock starts. 16 Setting the Clock MEMORY/ CLOCK SET < If the...
Owners Manual
Page 17
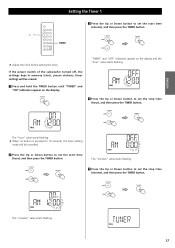
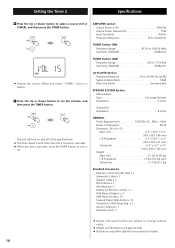
... TIMER button. ENGLISH Setting the Timer 1 3 Press the Up or Down button to set the start time (hour), and then press the TIMER button. TIMER < Adjust the clock before setting the timer. If the power switch of the subwoofer turned off, the settings kept in memory (clock, preset stations, timer setting) will be erased. 1 Press and hold the TIMER button until "TIMER" and "ON" indicators appear on the display and the "hour" value starts flashing. 4 Press the Up or Down button to set...
... TIMER button. ENGLISH Setting the Timer 1 3 Press the Up or Down button to set the start time (hour), and then press the TIMER button. TIMER < Adjust the clock before setting the timer. If the power switch of the subwoofer turned off, the settings kept in memory (clock, preset stations, timer setting) will be erased. 1 Press and hold the TIMER button until "TIMER" and "ON" indicators appear on the display and the "hour" value starts flashing. 4 Press the Up or Down button to set...
Owners Manual
Page 18
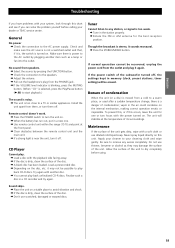
... Remote Control Unit (RC-962) x 1 Subwoofer Cable x 1 Speaker Cable x 2 FM Antenna x 1 AM Antenna x 1 Battery for Remote Control x 1 Wall Mount Adaptor x 3 Wall Mount Screw x 10 Tapered Plastic Wall Anchor x 10 Template for Wall Mounting x 1 Owner's Manual x 1 Warranty Card x 1 < Design and specifications are approximate. < Illustrations may differ slightly from production models. 18 Setting the Timer 2 Specifications 6 Press the Up or Down button to change without notice. < Weight and dimensions are subject to select a source (CD...
... Remote Control Unit (RC-962) x 1 Subwoofer Cable x 1 Speaker Cable x 2 FM Antenna x 1 AM Antenna x 1 Battery for Remote Control x 1 Wall Mount Adaptor x 3 Wall Mount Screw x 10 Tapered Plastic Wall Anchor x 10 Template for Wall Mounting x 1 Owner's Manual x 1 Warranty Card x 1 < Design and specifications are approximate. < Illustrations may differ slightly from production models. 18 Setting the Timer 2 Specifications 6 Press the Up or Down button to change without notice. < Weight and dimensions are subject to select a source (CD...
Owners Manual
Page 19
... dealer or TEAC service center. Maintenance If the surface of the unit to a warm place, or used after a sudden temperature change, there is dirty, clean the surface of condensation; Be sure to your cleaning cloth and wipe gently. e Tune in memory (clock, preset stations, timer setting) will stabilize at the front panel. General No power e Check the connection to play back CD-R discs. Remote control doesn't work. e If a strong light is...
... dealer or TEAC service center. Maintenance If the surface of the unit to a warm place, or used after a sudden temperature change, there is dirty, clean the surface of condensation; Be sure to your cleaning cloth and wipe gently. e Tune in memory (clock, preset stations, timer setting) will stabilize at the front panel. General No power e Check the connection to play back CD-R discs. Remote control doesn't work. e If a strong light is...

Owners Manual
Page 56
...ù 11, 20092 Cinisello Balsamo, Milano, Italy Phone: 02-66010500 280 William Street, Melbourne VIC 3000, Australia Phone: (03) 9672-2400 This appliance has a serial number located on the rear panel. Model number Serial number 0704.MA-0907A De C.V TEAC UK LIMITED TEAC EUROPE GmbH TEAC FRANCE S.A. Phone: 01923-819699 Bahnstrasse 12, 65205 Wiesbaden-Erbenheim, Germany Phone: 0611-71580 17, Rue Alexis-de-Tocqueville, CE...
...ù 11, 20092 Cinisello Balsamo, Milano, Italy Phone: 02-66010500 280 William Street, Melbourne VIC 3000, Australia Phone: (03) 9672-2400 This appliance has a serial number located on the rear panel. Model number Serial number 0704.MA-0907A De C.V TEAC UK LIMITED TEAC EUROPE GmbH TEAC FRANCE S.A. Phone: 01923-819699 Bahnstrasse 12, 65205 Wiesbaden-Erbenheim, Germany Phone: 0611-71580 17, Rue Alexis-de-Tocqueville, CE...


