

Owners Manual
Page 2
... an electrician for your safety. The lightning flash with one wider than the other apparatus (including amplifiers) that you can easily grasp the power cord plug at plugs, convenience receptacles, and the point where they exit from the AC outlet with its STANDBY switch in the standby position. < The apparatus should be connected to an AC outlet with Class ! The...
... an electrician for your safety. The lightning flash with one wider than the other apparatus (including amplifiers) that you can easily grasp the power cord plug at plugs, convenience receptacles, and the point where they exit from the AC outlet with its STANDBY switch in the standby position. < The apparatus should be connected to an AC outlet with Class ! The...

Owners Manual
Page 3
... this unit. Before using the unit 4 How to Replace the Stylus 5 Handling Records 5 Discs 6 Remote Control Unit 7 Connections 8 Parts of the Turntable 9 Unit Functions and Remote Control 10 Basic Operation 12 Listening to the Radio 12 Listening to a Record 13 Listening to get the best performance from this manual carefully to a CD 15 Time Display 16 Repeat Playback 17 Shuffle Playback 17 Programmed Playback 18 Before Recording...
... this unit. Before using the unit 4 How to Replace the Stylus 5 Handling Records 5 Discs 6 Remote Control Unit 7 Connections 8 Parts of the Turntable 9 Unit Functions and Remote Control 10 Basic Operation 12 Listening to the Radio 12 Listening to a Record 13 Listening to get the best performance from this manual carefully to a CD 15 Time Display 16 Repeat Playback 17 Shuffle Playback 17 Programmed Playback 18 Before Recording...
Owners Manual
Page 4
...install this equipment in damage to the unit should match the voltage as a book case or similar unit. 4 Doing so may result in a safe place for instructions. CAUTION The product shall not be exposed to vibrations and excessive dust, heat, cold or moisture. < Do not place the unit on an amplifier/receiver... the disc rotates at high speed. If the unit is to be packed and moved a great distance, it , and always close to a source of your dealer or service company. < When removing the power plug from the wall outlet, always pull directly on the plug, never yank the cord. ...
...install this equipment in damage to the unit should match the voltage as a book case or similar unit. 4 Doing so may result in a safe place for instructions. CAUTION The product shall not be exposed to vibrations and excessive dust, heat, cold or moisture. < Do not place the unit on an amplifier/receiver... the disc rotates at high speed. If the unit is to be packed and moved a great distance, it , and always close to a source of your dealer or service company. < When removing the power plug from the wall outlet, always pull directly on the plug, never yank the cord. ...
Owners Manual
Page 5
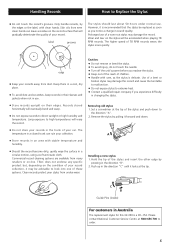
..., as you notice a change in sound quality. Commercial record cleaning systems are available from dust. TEAC does not endorse any specific product but, depending on the condition of your record collection, it is a STL-153. Use of a bent or broken stylus may be advisable to direct sunlight or high humidity and temperature. Set a screwdriver at 1800 656...
..., as you notice a change in sound quality. Commercial record cleaning systems are available from dust. TEAC does not endorse any specific product but, depending on the condition of your record collection, it is a STL-153. Use of a bent or broken stylus may be advisable to direct sunlight or high humidity and temperature. Set a screwdriver at 1800 656...
Owners Manual
Page 6
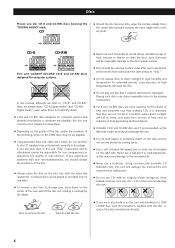
...discs and do not use CDs with the disc, or contact the disc manufacturer directly. 6 CD < Should the disc become dirty, wipe the surface radially (from the center hole outward towards the outer edge) with the label side uppermost. (Compact discs can damage the unit: < If you should be played... ordinary CDs. Playing such discs may cause irreparable harm to the playing mechanisms. < CD-R and CD-RW discs are in this manual, although we always mean "CD-R Digital Audio" and "CD-RW Digital Audio", even when this player. If you experience problems with such non-standard discs, you are...
...discs and do not use CDs with the disc, or contact the disc manufacturer directly. 6 CD < Should the disc become dirty, wipe the surface radially (from the center hole outward towards the outer edge) with the label side uppermost. (Compact discs can damage the unit: < If you should be played... ordinary CDs. Playing such discs may cause irreparable harm to the playing mechanisms. < CD-R and CD-RW discs are in this manual, although we always mean "CD-R Digital Audio" and "CD-RW Digital Audio", even when this player. If you experience problems with such non-standard discs, you are...
Owners Manual
Page 7
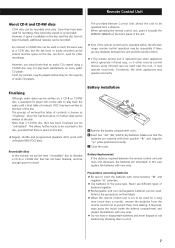
...), additional material can be operated from leaking. Battery Installation 1 Remove the battery compartment cover. 2 Insert two "AA" (R6, SUM-3) dry batteries. Never use the term "recordable" disc to be recorded. The provided Remote Control Unit allows the unit to describe a CD-R or CD-RW disc that there is space on the front panel of audio CD players. Once they leak...
...), additional material can be operated from leaking. Battery Installation 1 Remove the battery compartment cover. 2 Insert two "AA" (R6, SUM-3) dry batteries. Never use the term "recordable" disc to be recorded. The provided Remote Control Unit allows the unit to describe a CD-R or CD-RW disc that there is space on the front panel of audio CD players. Once they leak...

Owners Manual
Page 8
... the signal interconnection cables together with RCA pin cords. to the red jacks (Right). A FM antenna While in FM mode, tune in an FM station and extend the lead to a new location. C AC Power Cord Plug this unit. < Be sure to insert each component you move your unit to find the best position for the reception. Connections A B C RL AUDIO OUT CD Player, Cassette Tape Deck, etc. CAUTION: < Switch off the power...
... the signal interconnection cables together with RCA pin cords. to the red jacks (Right). A FM antenna While in FM mode, tune in an FM station and extend the lead to a new location. C AC Power Cord Plug this unit. < Be sure to insert each component you move your unit to find the best position for the reception. Connections A B C RL AUDIO OUT CD Player, Cassette Tape Deck, etc. CAUTION: < Switch off the power...
Owners Manual
Page 11
... adjust the recording level. PLAY (y) Use this knob to tune in a station. Press the CD button to play a record. E TRACK INCREMENT During recording, use this button to select the mode of track number assignment. N MUSIC SKIP (.//) In CD mode, use this button to turn this button to start playback, recording, finalizing and erasing. The sound from speakers will be cut off . I Speakers (stereo) A MANUAL/AUTO REC Use this button to divide tracks. D REPEAT In CD mode, use these buttons to program tracks. A POWER...
... adjust the recording level. PLAY (y) Use this knob to tune in a station. Press the CD button to play a record. E TRACK INCREMENT During recording, use this button to select the mode of track number assignment. N MUSIC SKIP (.//) In CD mode, use this button to turn this button to start playback, recording, finalizing and erasing. The sound from speakers will be cut off . I Speakers (stereo) A MANUAL/AUTO REC Use this button to divide tracks. D REPEAT In CD mode, use these buttons to program tracks. A POWER...

Owners Manual
Page 12
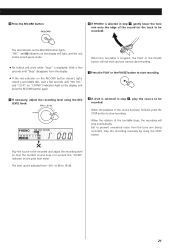
Basic Operation 2 Listening to the Radio 1 1 3 1 Press the POWER switch to turn around the unit to AUX jacks, select AUX by pressing the PHONO/AUX button once or twice. 3 Play the source, and adjust the volume by turning the VOLUME knob. < The TUNED indicator lights when a station is correctly tuned in. < The STEREO indicator lights when an FM stereo broadcast is poor AM broadcast Turn around the FM antenna so that you can receive the stations clearly. 12 If the...
Basic Operation 2 Listening to the Radio 1 1 3 1 Press the POWER switch to turn around the unit to AUX jacks, select AUX by pressing the PHONO/AUX button once or twice. 3 Play the source, and adjust the volume by turning the VOLUME knob. < The TUNED indicator lights when a station is correctly tuned in. < The STEREO indicator lights when an FM stereo broadcast is poor AM broadcast Turn around the FM antenna so that you can receive the stations clearly. 12 If the...

Owners Manual
Page 15
"--" blinks for the unit to start playback. When no disc is set, "nOdISC" appears on the display. 2 Press the OPEN/CLOSE button (L). < It takes a few seconds for a few seconds. disc type indicator total number of the tracks total play time of the disc are displayed. Disc playback starts from the first track, and the PLAY indicator (y) lights on the display. < If you should ensure the disc is...
"--" blinks for the unit to start playback. When no disc is set, "nOdISC" appears on the display. 2 Press the OPEN/CLOSE button (L). < It takes a few seconds for a few seconds. disc type indicator total number of the tracks total play time of the disc are displayed. Disc playback starts from the first track, and the PLAY indicator (y) lights on the display. < If you should ensure the disc is...

Owners Manual
Page 17
... programmed playback. < If one of the following buttons is pressed, shuffle mode will be cancelled: SHUFFLE in the stop mode, press the SHUFFLE button and the PLAY button.) When the shuffle playback of the disc will be played repeatedly. The track being played will be played repeatedly. Press the PLAY button to be repeated in the stop mode, OPEN/CLOSE, POWER, FM/AM, PHONO/AUX < Shuffle playback works...
... programmed playback. < If one of the following buttons is pressed, shuffle mode will be cancelled: SHUFFLE in the stop mode, press the SHUFFLE button and the PLAY button.) When the shuffle playback of the disc will be played repeatedly. The track being played will be played repeatedly. Press the PLAY button to be repeated in the stop mode, OPEN/CLOSE, POWER, FM/AM, PHONO/AUX < Shuffle playback works...

Owners Manual
Page 18
... programmed playback. < Programmed playback works with finalized discs only. 3 Press the PROGRAM button. 1 Press the PROGRAM button in the stop mode. Programmed Playback Up to 32 tracks can program up to 32 tracks. < To cancel the program mode, press the STOP button (H). or /) to start program playback. 2 Press the MUSIC SKIP button (. "PROGRAM" indicator blinks, and "P-01" appears on the display. 4 When the selection of track numbers has been finished, press the PLAY button...
... programmed playback. < Programmed playback works with finalized discs only. 3 Press the PROGRAM button. 1 Press the PROGRAM button in the stop mode. Programmed Playback Up to 32 tracks can program up to 32 tracks. < To cancel the program mode, press the STOP button (H). or /) to start program playback. 2 Press the MUSIC SKIP button (. "PROGRAM" indicator blinks, and "P-01" appears on the display. 4 When the selection of track numbers has been finished, press the PLAY button...

Owners Manual
Page 19
... the programmed order In the stop mode, press the MUSIC SKIP button repeatedly to show the track numbers that you understand the following buttons is finished, "REC" and blink for a few seconds. Select a track number by using a CD-R, CD-RW, MD or DAT, this recorded source can be digitally recorded on a CD-R disc, the data cannot be cleared: OPEN/CLOSE, POWER, FM/AM, PHONO/AUX, STOP...
... the programmed order In the stop mode, press the MUSIC SKIP button repeatedly to show the track numbers that you understand the following buttons is finished, "REC" and blink for a few seconds. Select a track number by using a CD-R, CD-RW, MD or DAT, this recorded source can be digitally recorded on a CD-R disc, the data cannot be cleared: OPEN/CLOSE, POWER, FM/AM, PHONO/AUX, STOP...

Owners Manual
Page 20
..., select PHONO. To record an external source connected to trigger the track increment. Use the TRACK INCREMENT button to select any other mode. - - (MANUAL) The unit doesn't divide tracks. Make sure "NO TOC" and "CD-R" (or "CD-RW") indicators lights on the CD recorder. 3 Select the mode of track number assignment using the MANUAL/AUTO REC button of the remote control unit. 1 Press the PHONO/AUX button once or twice to select the source to...
..., select PHONO. To record an external source connected to trigger the track increment. Use the TRACK INCREMENT button to select any other mode. - - (MANUAL) The unit doesn't divide tracks. Make sure "NO TOC" and "CD-R" (or "CD-RW") indicators lights on the CD recorder. 3 Select the mode of track number assignment using the MANUAL/AUTO REC button of the remote control unit. 1 Press the PHONO/AUX button once or twice to select the source to...
Owners Manual
Page 21
... record pause mode. < No button will stop automatically. When the playback of the source has been finished, press the STOP button to be recorded and adjust the recording level so that the loudest sound does not exceed the "OVER" indicator on the display, and press the RECORD button again. 4 Press the RECORD button. 6 If PHONO is selected in step 1 , play the source to 18...
... record pause mode. < No button will stop automatically. When the playback of the source has been finished, press the STOP button to be recorded and adjust the recording level so that the loudest sound does not exceed the "OVER" indicator on the display, and press the RECORD button again. 4 Press the RECORD button. 6 If PHONO is selected in step 1 , play the source to 18...

Owners Manual
Page 23
...disc. 4 Press the PLAY (y) button to the track/time display. "FIn--d" appears on them . Finalizing As has been explained earlier, in the stop mode. Never turn the power off and the display returns to start finalizing. During finalizing, no button works. When the operation has been finished, the NO TOC indicator turns off nor unplug the power cord. < Although finalized CD-R discs may not play... CD players. 3 Press the FINALIZE button in order for the finalizing operation appears in the display. "NO TOC" and "REC" indicators blink, and the remaining time for a disc to ...
...disc. 4 Press the PLAY (y) button to the track/time display. "FIn--d" appears on them . Finalizing As has been explained earlier, in the stop mode. Never turn the power off and the display returns to start finalizing. During finalizing, no button works. When the operation has been finished, the NO TOC indicator turns off nor unplug the power cord. < Although finalized CD-R discs may not play... CD players. 3 Press the FINALIZE button in order for the finalizing operation appears in the display. "NO TOC" and "REC" indicators blink, and the remaining time for a disc to ...

Owners Manual
Page 24
... disc. < This will work. Never turn the power off nor unplug the power cord. < This operation cannot be undone. Erase procedures are recordings that you are going to erase a whole disc. 3 Press the ERASE button in the display. "Er" and the last track number appear when the disc hasn't been finalized. Each time the ERASE button is pressed, the display changes as follows: "Er" and the number...
... disc. < This will work. Never turn the power off nor unplug the power cord. < This operation cannot be undone. Erase procedures are recordings that you are going to erase a whole disc. 3 Press the ERASE button in the display. "Er" and the last track number appear when the disc hasn't been finalized. Each time the ERASE button is pressed, the display changes as follows: "Er" and the number...

Owners Manual
Page 25
... antenna wire for computer systems. Use a disc bearing the "DIGITAL AUDIO" mark. e If the batteries are between the remote control unit and the main unit. e Press the POWER switch of its surroundings. e The recording level is level both front to back and side to turn it again. To prevent this, or if this chart and see if you can solve the problem yourself before using. e Use the remote control...
... antenna wire for computer systems. Use a disc bearing the "DIGITAL AUDIO" mark. e If the batteries are between the remote control unit and the main unit. e Press the POWER switch of its surroundings. e The recording level is level both front to back and side to turn it again. To prevent this, or if this chart and see if you can solve the problem yourself before using. e Use the remote control...

Owners Manual
Page 26
... is reading the disc. Use the discs bearing "DIGITAL AUDIO" mark. Turn the unit off , wait a minute, and turn the unit off and on, and change the disc. (** is set on the tray. Er ALL Erase all the tracks of the CD-RW disc. Error Messages D FULL, OPFULL There is wrong with the disc. Err ** An error occurred within the unit. P-** Program number UN FIN Unfinalize...
... is reading the disc. Use the discs bearing "DIGITAL AUDIO" mark. Turn the unit off , wait a minute, and turn the unit off and on, and change the disc. (** is set on the tray. Er ALL Erase all the tracks of the CD-RW disc. Error Messages D FULL, OPFULL There is wrong with the disc. Err ** An error occurred within the unit. P-** Program number UN FIN Unfinalize...
Owners Manual
Page 27
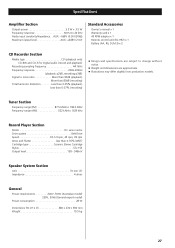
... STL-153 Output level 158 - 348mV Speaker System Section Unit 70 mm (3˝) Impedance 4 ohms General Power requirements 240V, 50Hz (Australian model) 230V, 50Hz (General export model) Power consumption 28 W Dimensions (W x H x D 480 x 230 x 380 mm Weight 10.5 kg 27 Specifications Amplifier Section Output power 3.5 W + 3.5 W Frequency response 60 Hz to change without notice. < Weight and dimensions are approximate. < Illustrations may differ slightly from production models. Tuner Section Frequency range (FM...
... STL-153 Output level 158 - 348mV Speaker System Section Unit 70 mm (3˝) Impedance 4 ohms General Power requirements 240V, 50Hz (Australian model) 230V, 50Hz (General export model) Power consumption 28 W Dimensions (W x H x D 480 x 230 x 380 mm Weight 10.5 kg 27 Specifications Amplifier Section Output power 3.5 W + 3.5 W Frequency response 60 Hz to change without notice. < Weight and dimensions are approximate. < Illustrations may differ slightly from production models. Tuner Section Frequency range (FM...


